.Net Core6.0 WebAPI项目框架搭建三:Swagger的使用
完整框架项目源码地址:https://download.csdn.net/download/yigu4011/87788956?spm=1001.2014.3001.5503
.net6创建项目的时候自带Swagger框架,但是缺少一些注释功能
接下来就是封装一些注册代码,注册代码要是都放在program.cs里面,会显得很乱,所以我给他做一个封装,然后program.cs里面只需要services.addxxx()就行了。
在API下面新建SetUp文件夹,新建静态类SwaggerSetUp.cs,再新建静态方法AddSwaggerSetup,用来注册Swagger服务
///
    /// swagger启动服务
    ///
    public static class SwaggerSetUp
    {
        public static void AddSwaggerSetup(this IServiceCollection services)
        {
            if (services == null)
                throw new ArgumentNullException(nameof(services));

            var ApiName = "Web.Core";

            services.AddSwaggerGen(c =>
            {
                c.SwaggerDoc("V1", new OpenApiInfo
                {
                    // {ApiName} 定义成全局变量,方便修改
                    Version = "V1",
                    Title = $"{ApiName} 接口文档——.NetCore 6.0",
                    Description = $"{ApiName} HTTP API V1",
                });
                c.OrderActionsBy(o => o.RelativePath);

            });

        }
    }
然后在program.cs里面直接一句话注册就ok了
//注册swagger
builder.Services.AddSwaggerSetup();
编辑启动swagger的方法
if (app.Environment.IsDevelopment())
{
    app.UseDeveloperExceptionPage();
}

app.UseSwagger();
app.UseSwaggerUI(c =>
{
    c.SwaggerEndpoint($"/swagger/V1/swagger.json", $"Web.Core.API V1");

    //路径配置,设置为空,表示直接在根域名(localhost:8001)访问该文件,注意localhost:8001/swagger是访问不到的,去launchSettings.json把launchUrl去掉,如果你想换一个路径,直接写名字即可,比如直接写c.RoutePrefix = "doc";
    c.RoutePrefix = "";
});
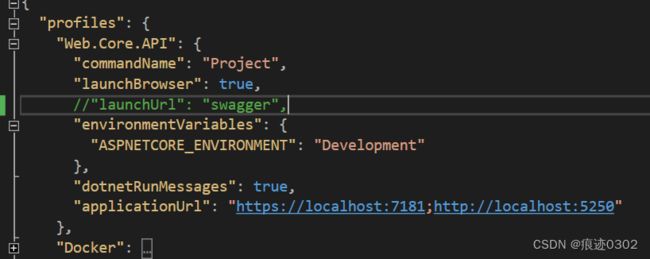
在 launchSettings.json 文件中的 launchUrl设置为空或删除
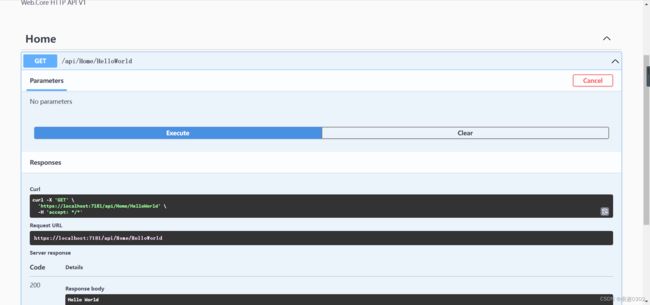
启动项目
添加接口注释
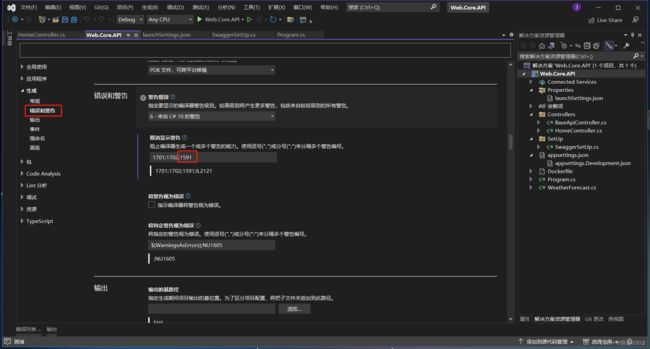
右键项目名称web.core.api,属性,生成,输出,勾选文档文件,自己填写相对路径
在SwaggerSetUp里面添加代码
services.AddSwaggerGen(c =>
            {
                c.SwaggerDoc("V1", new OpenApiInfo
                {
                    // {ApiName} 定义成全局变量,方便修改
                    Version = "V1",
                    Title = $"{ApiName} 接口文档——.NetCore 6.0",
                    Description = $"{ApiName} HTTP API V1",
                });
                c.OrderActionsBy(o => o.RelativePath);

                var xmlPath = Path.Combine(AppContext.BaseDirectory, "Web.Core.API.xml");//这个就是刚刚配置的xml文件名
                c.IncludeXmlComments(xmlPath, true);//默认的第二个参数是false,这个是controller的注释,记得修改
            });
这时候控制器会显示很多警告
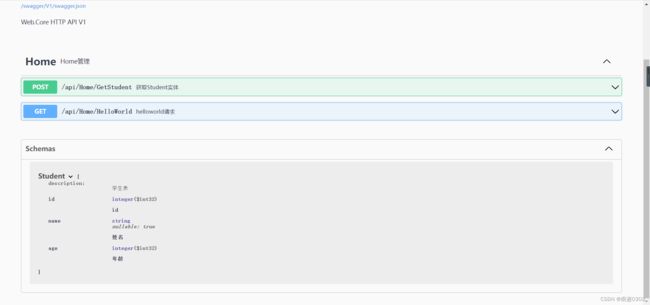
给控制器加上注释,运行项目
右键解决方案,添加文件夹Model,新建类库项目
新建实体类Student.cs
    ///
    /// 学生表
    ///
    public class Student
    {
        ///
        /// id
        ///
        public int Id { get; set; }
        ///
        /// 姓名
        ///
        public string Name { get; set; }
        ///
        /// 年龄
        ///
        public int Age { get; set; }
    }
添加model注释
右键项目名称web.core.model,属性,生成,输出,勾选文档文件,自己填写相对路径
SwaggerSetUp.cs中增加代码
var xmlModelPath = Path.Combine(AppContext.BaseDirectory, "Web.Core.Model.xml");//这个就是Model层的xml文件名
c.IncludeXmlComments(xmlModelPath);
在HomeController里面新建一个测试方法测试下实体类的注释
///
/// 获取Student实体
///
/// 运行项目之后发现实体类也有注释了


