Zygote启动流程及源码分析
1 Zygote是什么
在Android中,负责孵化新进程的这个进程叫做Zygote,安卓上其他的应用进程都是由zygote孵化的。众所周知,安卓是Linux内核,安卓系统上运行的一切程序都是放在Dalvik虚拟机上的,Zygote也不例外,事实上,zygote是安卓运行的第一个Dalvik虚拟机进程。既然Zygote负责孵化其他的安卓进程,那么它自己是由谁孵化的呢?既然Android是基于Linux内核,那么Zygote当然就是Linux内核启动的用户级进程Init创建的了。
2 Zygote的作用是什么?
- 创建SystemServer
- 孵化应用进程
2.1 注意区分:ZygoteInit
ZygoteInit的作用:
- 注册一个Socket:Zygote是孵化器,当有新进程需要运行时,系统会通过这个Socket(ANDROID_SOCKET_zygote)在第一时间通知“总管家”,并由他负责实际的进程孵化过程
- 预加载各类资源(preload())
3 AndroidRuntime和AppRuntime
在介绍zygote进程的启动流程之前,我们先来看看两个重要的类AppRuntime 和AndroidRuntime。
这两个类是Android runtime运行环境的接口类,在Android runtime中起着至关重要的作用。
下面是这两个类之间的关系:
class AppRuntime : public AndroidRuntime
从上面的类继承关系中可以看到,AppRuntime类继承自AndroidRuntime。从后续处理中,在Android 创建运行时环境的时候,主要是通过AppRuntime实例操作。
3.1 AndroidRuntime类
AndroidRuntime类是AppRuntime的父类,基本承载着Android runtime的绝大部分操作处理。
下面是AndroidRuntime类的声明,从其声明中,我们可以看到Android runtime的几个重要的接口:
3.1.1公共接口:
- registerNativeMethods函数。JNI编程时,应用程序向虚拟机注册本地方法时使用。JNI编程时非常重要的一个函数接口。
- getRuntime函数。提供给外部获取当前进程AndroidRuntime类实例的接口。
- getJavaVM函数。提供给外部获取当前进程android虚拟机的接口。
- getJNIEnv函数。提供给外部获取当前进程JNI环境的接口。
3.1.2私有接口
- startReg函数。系统级服务的JNI注册函数。
- startVm函数。创建并启动Android虚拟机。
- mJavaVM。指向虚拟机的指针,用以访问Android虚拟机。
3.2 AppRuntime类
AppRuntime类继承自AndroidRuntime类,重载了AndroidRuntime类的onVmCreated()、onStarted()、onZygoteInit()和onExit()函数,是zygote进程处理时实际runtime入口。
3.3 Android runtime类的功能
从上面AppRuntime类和AndroidRuntime类的实现声明中可知,AndroidRumtime主要实现如下功能:
- 创建并启动虚拟机
- 注册JNI服务
- 提供外部访问虚拟机的接口
- 提供外部访问JNI环境的接口,并提供JNI程序开发的功能支持。
4 zygote进程的功能处理
zygote进程的入口处理函数是app_main.cpp中的main()函数。Android run time环境的创建和启动,主要是通过AndroidRuntime来实现的。
不管是app_process、app_process32还是app_process64,对应的源文件都是app_main.cpp。
接下来我们就看看app_process对应的main函数,该函数定义于app_main.cpp中。
在app_main.cpp的main函数中,主要做的事情就是参数解析。这个函数有两种启动模式:
- zygote模式,也就是初始化zygote进程,传递的参数有–start-system-server --socket-name=zygote,前者表示启动SystemServer,后者指定socket的名称(Zygote64_32)。
- application模式,也就是启动普通应用程序,传递的参数有class名字以及class带的参数
zygote进程主要处理:
- app_main.cpp中的main()处理:解析传入参数,实例化AppRuntime,启动Android runtime运行时环境等
- Android虚拟机的创建
- 向Android虚拟机注册Android native处理函数
- java层Zygote初始化处理
下面我们按照程序执行流程来具体梳理一下整个zygote进程的启动处理过程。
4.1 app_main.cpp中的main()处理
4.1.1 实例化AndroidRuntime类
///通过执行system/bin/app_process命令,根据service zygote /system/bin/app_process -Xzygote /system/bin --zygote --start-system-server传入参数
//argc是传入参数的参数数目:argc=5
//argv是传入的参数值:
//                 argv[0]="/system/bin/app_process64"
//                 argv[1]="-Xzygote"
//                 argv[2]="/system/bin"
//                 argv[3]="--zygote"
//                 argv[4]="--start-system-server"
AppRuntime runtime(argv[0], computeArgBlockSize(argc, argv));
4.1.2 解析启动参数
- 忽略命令行参数:”/system/bin/app_process64”
// Process command line arguments
// ignore argv[0]
//执行此语句块后:
//argc=4
//"/system/bin/app_process64"被忽略,此时argv剩下的值为:
//                 argv[1]="-Xzygote"
//                 argv[2]="/system/bin"
//                 argv[3]="--zygote"
//                 argv[4]="--start-system-server"
 argc--;
 argv++;
- 把以“-”打头的参数传递给虚拟机,对于zygote,是把”-Xzygote”传入虚拟机
//执行此语句块后:
//argc=3
//"-Xzygote"被传递给虚拟机,被忽略,此时argv剩下的值为:
//                 argv[2]="/system/bin"
//                 argv[3]="--zygote"
//                 argv[4]="--start-system-server"
int i;
for (i = 0; i < argc; i++) {
//只有第一个参数"-Xzygote"满足,第二个参数是"/system/bin",不是以"-"打头的,所以退出for循环。
     if (argv[i][0] != '-') {
         break;
     }
     if (argv[i][1] == '-' && argv[i][2] == 0) {
         ++i; // Skip --.
         break;
     }
     runtime.addOption(strdup(argv[i]));
 }
- 解析剩余传入的参数,根据上一个语句块的处理,此时剩余参数值为:”/system/bin”、”–zygote”和”–start-system-server”
// Parse runtime arguments.  Stop at first unrecognized option.
    bool zygote = false;
    bool startSystemServer = false;
    bool application = false;
    String8 niceName;
    String8 className;
    ++i;  // Skip unused "parent dir" argument.
    while (i < argc) {
        const char* arg = argv[i++];
        //根据参数"--zygote",表示当前进程是zygote进程,zygote=true,并设置nicename为zygote64(64位)或zygote。
        if (strcmp(arg, "--zygote") == 0) {
            zygote = true;
            //static const char ZYGOTE_NICE_NAME[] = "zygote64";或
            //static const char ZYGOTE_NICE_NAME[] = "zygote";
            niceName = ZYGOTE_NICE_NAME;
        }
          //根据参数"--start-system-server",需要启动System Server。
          else if (strcmp(arg, "--start-system-server") == 0) {
            startSystemServer = true;
        } else if (strcmp(arg, "--application") == 0) {
            application = true;
        } else if (strncmp(arg, "--nice-name=", 12) == 0) {
            niceName.setTo(arg + 12);
        } else if (strncmp(arg, "--", 2) != 0) {
            className.setTo(arg);
            break;
        } else {
            --i;
            break;
        }
    }
4.1.3变更zygote进程名为zygote或zygote64
    //niceName在参数解析时被设置。此处变更了app_process启动的进程名为zygote。
    if (!niceName.isEmpty()) {
        runtime.setArgv0(niceName.string());
        set_process_name(niceName.string());
    }
4.1.4 调用AndroidRuntime.start()来创建和启动Android 运行时环境
//zygote在参数解析时被设置为true。
//"com.android.internal.os.ZygoteInit"是Android Java运行时环境的初始化类。
//zygote=true。
 if (zygote) {
        runtime.start("com.android.internal.os.ZygoteInit", args, zygote);
    } else if (className) {
        runtime.start("com.android.internal.os.RuntimeInit", args, zygote);
    } else {
        fprintf(stderr, "Error: no class name or --zygote supplied.\n");
        app_usage();
        LOG_ALWAYS_FATAL("app_process: no class name or --zygote supplied.");
        return 10;
    }
4.2 Android虚拟机的创建
Android虚拟机的创建是在AndroidRuntime.start()中处理的。
先初始化JniInvocation,然后通过startVm()->JNI_CreateJavaVM()来创建Android虚拟机。
    /* start the virtual machine */
    JniInvocation jni_invocation;
    jni_invocation.Init(NULL);
    JNIEnv* env;
    if (startVm(&mJavaVM, &env, zygote) != 0) {
        return;
    }
    onVmCreated(env);
4.2.1JniInvocation
JniInvocation,是一个外部和虚拟机之间的一个中间层,是外部访问虚拟机的API接口,允许外部动态的调用虚拟机内部的实现。其主要实现如下功能:
- 指定加载的虚拟机。现在Android系统中有两种虚拟机:dalvik和art。现在已基本使用art虚拟机了。
- 封装虚拟机的对象接口
代码路径:
\libnativehelper\JniInvocation.cpp
\libnativehelper\include\nativehelper\JniInvocation.h
4.2.1.1 JniInvocation的主要接口
//获取默认的虚拟机初始化参数
jint (*JNI_GetDefaultJavaVMInitArgs_)(void*);
//创建虚拟机
jint (*JNI_CreateJavaVM_)(JavaVM**, JNIEnv**, void*);
//获取已创建的虚拟机对象
jint (*JNI_GetCreatedJavaVMs_)(JavaVM**, jsize, jsize*);
4.2.1.2 虚拟机库的加载
在JniInvocation的Init()函数首先会加载虚拟机库文件。
虚拟机库文件有两种获取方式:
- 用户指定
- 系统默认
用户可以通过persist.sys.dalvik.vm.lib.2属性设定虚拟机的库文件,默认的库文件是libart.so。
4.2.1.3接口的初始化
在虚拟机库文件加载成功后,需要对JniInvocation的接口进行初始化,提供虚拟机接口功能供外部来访问虚拟机。
在init()函数里,有如下处理:
//初始化JNI_GetDefaultJavaVMInitArgs_,调用JNI_GetDefaultJavaVMInitArgs_实际上就是调用虚拟机库函数JNI_GetDefaultJavaVMInitArgs。
 if (!FindSymbol(reinterpret_cast<void**>(&JNI_GetDefaultJavaVMInitArgs_),
                  "JNI_GetDefaultJavaVMInitArgs")) {
    return false;
  }
  //初始化JNI_CreateJavaVM_,调用JNI_CreateJavaVM_实际上就是调用虚拟机库函数JNI_CreateJavaVM。
  if (!FindSymbol(reinterpret_cast<void**>(&JNI_CreateJavaVM_),
                  "JNI_CreateJavaVM")) {
    return false;
  }
  //初始化JNI_GetCreatedJavaVMs_,调用JNI_GetCreatedJavaVMs_实际上就是调用虚拟机库函数JNI_GetCreatedJavaVMs。
  if (!FindSymbol(reinterpret_cast<void**>(&JNI_GetCreatedJavaVMs_),
                  "JNI_GetCreatedJavaVMs")) {
    return false;
  }
函数JNI_CreateJavaVM()、JNI_GetCreatedJavaVMs()、JNI_GetDefaultJavaVMInitArgs()定义在art\runtime\java_vm_ext.cc下,是art虚拟机的内部处理函数。
4.2.2 startVm的处理
在JniInvocation初始化之后,虚拟机库文件被加载且接口函数也已被初始化。从JniInvocation的初始化中,我们知道,Android N的默认虚拟机已是ART虚拟机。
startVm()函数就是用来创建ART虚拟机的。整个的处理过程就是配置虚拟机的属性然后调用虚拟机库函数JNI_CreateJavaVM()来创建。
在虚拟机属性配置过程中,有如下几点值得我们注意:
- 虚拟机的heapstartsize和heapsize分别被设置为4M和16M。这表明在Java的进程空间中,内存堆栈只有16M的空间
parseRuntimeOption("dalvik.vm.heapstartsize", heapstartsizeOptsBuf, "-Xms", "4m");
parseRuntimeOption("dalvik.vm.heapsize", heapsizeOptsBuf, "-Xmx", "16m");
- 执行模式的配置。执行模式是在属性”dalvik.vm.execution-mode”里配置的
property_get("dalvik.vm.execution-mode", propBuf, "");
if (strcmp(propBuf, "int:portable") == 0) {
  executionMode = kEMIntPortable;
} else if (strcmp(propBuf, "int:fast") == 0) {
  executionMode = kEMIntFast;
} else if (strcmp(propBuf, "int:jit") == 0) {
  executionMode = kEMJitCompiler;
}
- NativeBridge的配置,在属性”ro.dalvik.vm.native.bridge”里设置。如果没有被设置,则NativeBridge被disabled
// Native bridge library. "0" means that native bridge is disabled.
property_get("ro.dalvik.vm.native.bridge", propBuf, "");
if (propBuf[0] == '\0') {
  ALOGW("ro.dalvik.vm.native.bridge is not expected to be empty");
} else if (strcmp(propBuf, "0") != 0) {
  snprintf(nativeBridgeLibrary, sizeof("-XX:NativeBridge=") + PROPERTY_VALUE_MAX,
     "-XX:NativeBridge=%s", propBuf);
  addOption(nativeBridgeLibrary);
}
还有其他一些属性配置,具体请参考int AndroidRuntime::startVm(JavaVM** pJavaVM, JNIEnv** pEnv, bool zygote)的实现。
4.3 向Android虚拟机注册Android native处理函数
在创建Android虚拟机成功后,Android 运行环境也已准备就绪并运行。在Android系统服务运行的过程中,需要Java层和C/C++层的相互访问。在Android系统中,虚拟机提供JNI机制来实现Java层和C/C++层代码的相互访问。
JNI机制的实现,主要依赖于虚拟机的native method注册机制,使Java类的方法和C/C++函数关联起来。在Java类中调用相应方法的时候能直接寻找到对应的native函数并调用之。
为了相关服务能正常运行,在zygote中就需要对相关服务的JNI功能进行初始化,以使在相关服务运行的时候能够使用底层提供的功能。
此阶段就是来处理系统级的JNI的native函数注册的。用户级别的native函数的注册是通过System.loadLibrary(libraryname)中处理,此部分将在JNI处理中介绍。
下面是AndroidRuntime::start()中的处理,直接调用AndroidRuntime::startReg(env)函数进行注册。
/*
* Register android functions.
*/
if (startReg(env) < 0) {
    ALOGE("Unable to register all android natives\n");
    return;
}
在AndroidRuntime::startReg(env)函数中,到底是如何注册JNI native functions的呢?注册了哪些JNI native functions呢?我们来看一下该函数的具体处理:
- 设置Android线程函数。Android所有的线程都是通过函数javaCreateThreadEtc()创建,并attach到虚拟机中
    /*
     * This hook causes all future threads created in this process to be
     * attached to the JavaVM.  (This needs to go away in favor of JNI
     * Attach calls.)
     */
    androidSetCreateThreadFunc((android_create_thread_fn) javaCreateThreadEtc);
- 注册native funcitons。每一个native functions都是通过虚拟机的RegisterNativeMethods()函数接口进行注册的
    /*
     * Every "register" function calls one or more things that return
     * a local reference (e.g. FindClass).  Because we haven't really
     * started the VM yet, they're all getting stored in the base frame
     * and never released.  Use Push/Pop to manage the storage.
     */
    env->PushLocalFrame(200);

    if (register_jni_procs(gRegJNI, NELEM(gRegJNI), env) < 0) {
        env->PopLocalFrame(NULL);
        return -1;
    }
    env->PopLocalFrame(NULL);
在zygote进程中注册的native functions。请大家参考AndroidRuntime.cpp中的 static const RegJNIRec gRegJNI[]定义,gRegJNI[]是系统级JNI native functions列表。注册native functions详细处理,请参照JNI篇介绍,这里暂时做一个大致介绍:
- 在虚拟机中查找当前java类是否已经加载,如果已加载,则直接把当前native function 与java类的方法关联。如果当前java类没有加载,则先加载该java类,然后再把native function 与java类的方法关联。
- 在此注册过程中,我们可以看到,注册中涉及的java类已全部加载到虚拟机中,并与其他进程共享,因为Android java层中,其他的进程都是fork zygote进程的。
4.4 java层Zygote初始化处理
在完成虚拟机的创建及JNI native functions的注册后,程序就会执行到Android Java层上。
/*
 * Start VM.  This thread becomes the main thread of the VM, and will
 * not return until the VM exits.
*/
//classname="com.android.internal.os.ZygoteInit"
char* slashClassName = toSlashClassName(className);
jclass startClass = env->FindClass(slashClassName);
if (startClass == NULL) {
  ALOGE("JavaVM unable to locate class '%s'\n", slashClassName);
  /* keep going */
} else {
  jmethodID startMeth = env->GetStaticMethodID(startClass, "main",
    "([Ljava/lang/String;)V");
  if (startMeth == NULL) {
    ALOGE("JavaVM unable to find main() in '%s'\n", className);
    /* keep going */
  } else {
    //调用com.android.internal.os.ZygoteInit的main()方法。
    env->CallStaticVoidMethod(startClass, startMeth, strArray);
  }
}
下面我们来具体梳理一下Zygote Java层的处理过程
4.4.1 com.android.internal.os.ZygoteInit类的main()方法
文件目录:\frameworks\base\core\java\com\android\internal\os\ZygoteInit.java。
在ZygoteInit类的main()方法里,主要实现如下功能:
- 保证在Zygote进程中没有创建线程
- 创建zygote socket并监听
- preload Android资源
- GC初始化并启动
- 启动System server进程
- 运行zygote进程的select loop
4.4.1.1 保证在Zygote进程中没有创建线程
这个处理保证在Zygote Init处理的时候没有线程被创建,也就是说,在Zygote进程中是没有线程存在的。
// Mark zygote start. This ensures that thread creation will throw
// an error.
ZygoteHooks.startZygoteNoThreadCreation();
同时,在Zygote init处理完成后,关闭保护功能。
ZygoteHooks.stopZygoteNoThreadCreation();
4.4.1.2 创建zygote socket并监听
zygote socket是应用程序通过Zygote进程来创建应用进程的一个通道,其主要被用在zygote select loop中来进行应用程序进程的创建处理。
//zygote socketName = "ANDROID_SOCKET_zygote"
String socketName = "zygote";
registerZygoteSocket(socketName);
4.4.1.3preload Android资源
在zygote init中,Android的相关资源被预加载到Zygote进程空间中。这些资源在后续所有的应用程序进程中都是共享的,因为Android Java层进程都是Zygote的子进程。
//Android资源预加载的入口
preload();
下面是preload()方法的具体实现。
- preloadClasses:加载class类到虚拟机中,需要加载的类是由/system/etc/preloaded-classes文件指定。它是由相关preloaded-classes文件生成,如:
\frameworks\base\preloaded-classes
\frameworks\base\compiled-classes-phone
虚拟机会通过classloader把preloaded-classes文件中指定的类都加载到虚拟机中,方便应用程序的调用处理。此处会涉及到手机内存空间和手机开机性能问题,手机性能优化方面可以进一步深入研究。 - preloadResources:加载系统资源
- preloadOpenGL: 加载显示资源
- preloadSharedLibraries: 加载共享库,包含android.so、compiler_rt.so和jnigraphics.so
- preloadTextResources:加载语言库
static void preload() {
   Log.d(TAG, "begin preload");
   Trace.traceBegin(Trace.TRACE_TAG_DALVIK, "BeginIcuCachePinning");
   beginIcuCachePinning();
   Trace.traceEnd(Trace.TRACE_TAG_DALVIK);
   Trace.traceBegin(Trace.TRACE_TAG_DALVIK, "PreloadClasses");
   preloadClasses();
   Trace.traceEnd(Trace.TRACE_TAG_DALVIK);
   Trace.traceBegin(Trace.TRACE_TAG_DALVIK, "PreloadResources");
   preloadResources();
   Trace.traceEnd(Trace.TRACE_TAG_DALVIK);
   Trace.traceBegin(Trace.TRACE_TAG_DALVIK, "PreloadOpenGL");
   preloadOpenGL();
   Trace.traceEnd(Trace.TRACE_TAG_DALVIK);
   preloadSharedLibraries();
   preloadTextResources();
   // Ask the WebViewFactory to do any initialization that must run in the zygote process,
   // for memory sharing purposes.
   WebViewFactory.prepareWebViewInZygote();
   endIcuCachePinning();
   warmUpJcaProviders();
   Log.d(TAG, "end preload");
}
4.4.1.4 GC初始化并启动
// Do an initial gc to clean up after startup
Trace.traceBegin(Trace.TRACE_TAG_DALVIK, "PostZygoteInitGC");
gcAndFinalize();
Trace.traceEnd(Trace.TRACE_TAG_DALVIK);
4.4.1.5启动System server进程
if (startSystemServer) {
    startSystemServer(abiList, socketName);
}
在startSystemServer()方法里,通过Zygote.forkSystemServer() native函数调用来创建system server 进程。从创建中可以看到,system server进程是zygote进程的子进程。
/* Hardcoded command line to start the system server */
String args[] = {
    "--setuid=1000",
    "--setgid=1000",
    "--setgroups=1001,1002,1003,1004,1005,1006,1007,1008,1009,1010,1018,1021,1032,3001,3002,3003,3006,3007,3009,3010",
    "--capabilities=" + capabilities + "," + capabilities,
    "--nice-name=system_server",
    "--runtime-args",
    "com.android.server.SystemServer",
};
ZygoteConnection.Arguments parsedArgs = null;

int pid;

try {
    parsedArgs = new ZygoteConnection.Arguments(args);
    ZygoteConnection.applyDebuggerSystemProperty(parsedArgs);
    ZygoteConnection.applyInvokeWithSystemProperty(parsedArgs);

    /* Request to fork the system server process */
    pid = Zygote.forkSystemServer(
            parsedArgs.uid, parsedArgs.gid,
            parsedArgs.gids,
            parsedArgs.debugFlags,
            null,
            parsedArgs.permittedCapabilities,
            parsedArgs.effectiveCapabilities);
} catch (IllegalArgumentException ex) {
    throw new RuntimeException(ex);
}
在system_server进程创建之后,如果运行的是子进程,即system_server进程,则通过命令执行到com.android.server.SystemServer类的main()方法。
//运行在子进程system_server进程
/* For child process */
if (pid == 0) {
     if (hasSecondZygote(abiList)) {
         waitForSecondaryZygote(socketName);
     }

     //跳转到com.android.server.SystemServer的main()方法继续处理。
     //具体实现请参考handleSystemServerProcess()方法的实现。
     handleSystemServerProcess(parsedArgs);
 }
4.4.1.6 运行zygote进程的select loop
zygote select loop是在zygote进程中运行,通过zygote socket接受相关命令来创建zygote进程的子进程。
下面是select loop 在main()方法的入口:
Log.i(TAG, "Accepting command socket connections");
runSelectLoop(abiList);
在runSelectLoop()方法中
- 监听socket,通过Os.poll函数来等待POLLIN事件的到来。
- 通过ZygoteConnection来读取socket传过来的command并创建进程。
- zygote进程在运行select loop后,zygote进程就进入无限循环,一直等待socket的command,并做处理。
  //zygote进程在此进入无限循环
  while (true) {
  StructPollfd[] pollFds = new StructPollfd[fds.size()];
    for (int i = 0; i < pollFds.length; ++i) {
        pollFds[i] = new StructPollfd();
        pollFds[i].fd = fds.get(i);
        pollFds[i].events = (short) POLLIN;
    }
    try {
        //zygote进程被阻塞,直至以下条件达到时退出:
        //a file descriptor becomes ready;
        //the call is interrupted by a signal handler; or
        //the timeout expires.
        Os.poll(pollFds, -1);
    } catch (ErrnoException ex) {
        throw new RuntimeException("poll failed", ex);
    }
    for (int i = pollFds.length - 1; i >= 0; --i) {
        if ((pollFds[i].revents & POLLIN) == 0) {
            continue;
        }
        if (i == 0) {
            ZygoteConnection newPeer = acceptCommandPeer(abiList);
            peers.add(newPeer);
            fds.add(newPeer.getFileDesciptor());
        } else {
            //调用ZygoteConnection的runOnce()方法来fork进程。
            boolean done = peers.get(i).runOnce();
            if (done) {
                peers.remove(i);
                fds.remove(i);
            }
        }
    }
}
至此,zygote进程启动处理完成,最后一直停留在select loop中运行。
4.5 另外一种分析方法
Zygote是Android第一个应用进程,它由init程序解析 import /init.${ro.zygote}.rc 所启动。
ro.zygote32.rc
service zygote /system/bin/app_process -Xzygote /system/bin --zygote --start-system-server
    class main
    socket zygote stream 660 root system
    onrestart write /sys/android_power/request_state wake
    onrestart write /sys/power/state on
    onrestart restart media
    onrestart restart netd
    writepid /dev/cpuset/foreground/tasks
看到它的启动由app_process 执行文件启动,接下来分析app_process源码:frameworks/base/cmds/app_process/app_main.cpp,直接看其的main函数
- 调用startVm函数来创建虚拟机,调用startReg函数为java虚拟机注册JNI方法
- 通过toSlashClassName找到ZygoteInit,通过GetStaticMethedID函数找到main方法然后调用,ZygoteInit的main方法是由Java语言编写的,当前的运行逻辑在Native中,这就需要JNI来调用Java,这样Zygote就从Native层进入了Java框架层。
- ZygoteInit的main方法的源码如下:
public static void main(String[] argv) {
        ZygoteServer zygoteServer = null;

        // Mark zygote start. This ensures that thread creation will throw
        // an error.
        // 这个处理保证在Zygote Init处理的时候没有线程被创建,也就是说,在Zygote进程中是没有线程存在的
        ZygoteHooks.startZygoteNoThreadCreation();

        // Zygote goes into its own process group.
        try {
            Os.setpgid(0, 0);
        } catch (ErrnoException ex) {
            throw new RuntimeException("Failed to setpgid(0,0)", ex);
        }

        Runnable caller;
        try {
            // Store now for StatsLogging later.
            final long startTime = SystemClock.elapsedRealtime();
            final boolean isRuntimeRestarted = "1".equals(
                    SystemProperties.get("sys.boot_completed"));

            String bootTimeTag = Process.is64Bit() ? "Zygote64Timing" : "Zygote32Timing";
            TimingsTraceLog bootTimingsTraceLog = new TimingsTraceLog(bootTimeTag,
                    Trace.TRACE_TAG_DALVIK);
            bootTimingsTraceLog.traceBegin("ZygoteInit");
            RuntimeInit.preForkInit();

            boolean startSystemServer = false;
            String zygoteSocketName = "zygote";
            String abiList = null;
            boolean enableLazyPreload = false;

            // 解析app_main.cpp传来的参数
            for (int i = 1; i < argv.length; i++) {
                if ("start-system-server".equals(argv[i])) {
                    startSystemServer = true;               // 需要启动System Server
                } else if ("--enable-lazy-preload".equals(argv[i])) {
                    enableLazyPreload = true;
                } else if (argv[i].startsWith(ABI_LIST_ARG)) {
                    abiList = argv[i].substring(ABI_LIST_ARG.length());
                } else if (argv[i].startsWith(SOCKET_NAME_ARG)) {
                    zygoteSocketName = argv[i].substring(SOCKET_NAME_ARG.length());
                } else {
                    throw new RuntimeException("Unknown command line argument: " + argv[i]);
                }
            }

            // 创建Zygote Socket并监听
            // zygote socket是应用程序通过Zygote进程来创建应用程序的一个通道,其主要被用在Zygote select loop中来进行应用程序进程的创建处理
            final boolean isPrimaryZygote = zygoteSocketName.equals(Zygote.PRIMARY_SOCKET_NAME);
            if (!isRuntimeRestarted) {
                if (isPrimaryZygote) {
                    FrameworkStatsLog.write(FrameworkStatsLog.BOOT_TIME_EVENT_ELAPSED_TIME_REPORTED,
                            BOOT_TIME_EVENT_ELAPSED_TIME__EVENT__ZYGOTE_INIT_START,
                            startTime);
                } else if (zygoteSocketName.equals(Zygote.SECONDARY_SOCKET_NAME)) {
                    FrameworkStatsLog.write(FrameworkStatsLog.BOOT_TIME_EVENT_ELAPSED_TIME_REPORTED,
                            BOOT_TIME_EVENT_ELAPSED_TIME__EVENT__SECONDARY_ZYGOTE_INIT_START,
                            startTime);
                }
            }

            if (abiList == null) {
                throw new RuntimeException("No ABI list supplied.");
            }

            // In some configurations, we avoid preloading resources and classes eagerly.
            // In such cases, we will preload things prior to our first fork.
            if (!enableLazyPreload) { // 加载进程的资源和类
                bootTimingsTraceLog.traceBegin("ZygotePreload");
                EventLog.writeEvent(LOG_BOOT_PROGRESS_PRELOAD_START,
                        SystemClock.uptimeMillis());
                preload(bootTimingsTraceLog);
                EventLog.writeEvent(LOG_BOOT_PROGRESS_PRELOAD_END,
                        SystemClock.uptimeMillis());
                bootTimingsTraceLog.traceEnd(); // ZygotePreload
            }

            // Do an initial gc to clean up after startup
            bootTimingsTraceLog.traceBegin("PostZygoteInitGC");
            gcAndFinalize();
            bootTimingsTraceLog.traceEnd(); // PostZygoteInitGC

            bootTimingsTraceLog.traceEnd(); // ZygoteInit

            Zygote.initNativeState(isPrimaryZygote);

            ZygoteHooks.stopZygoteNoThreadCreation(); // 在Zygote Init处理完成后,关闭保护功能

            zygoteServer = new ZygoteServer(isPrimaryZygote); // 创建zygoteserver

            // 如果需要创建SystemServer,根据zygoteSocketName和zygoteServer来fork一个SystemServer
            if (startSystemServer) { // 开启SystemServer进程,这是Zygote进程的第一次分裂
                Runnable r = forkSystemServer(abiList, zygoteSocketName, zygoteServer);

                // {@code r == null} in the parent (zygote) process, and {@code r != null} in the
                // child (system_server) process.
                if (r != null) {
                    r.run(); // 如果SystemServer已经创建,那么就开始run()
                    return;
                }
            }

            Log.i(TAG, "Accepting command socket connections");

            // The select loop returns early in the child process after a fork and
            // loops forever in the zygote.
            // select循环在fork之后的子进程中尽早返回,并在zygote中永远循环
            // 启动一个死循环监听来自Client端的消息
            caller = zygoteServer.runSelectLoop(abiList);
        } catch (Throwable ex) {
            Log.e(TAG, "System zygote died with fatal exception", ex);
            throw ex;
        } finally {
            if (zygoteServer != null) { // 关闭SystemServer的Socket
                zygoteServer.closeServerSocket();
            }
        }

        // We're in the child process and have exited the select loop. Proceed to execute the
        // command.
        // 我们已经在子进程中,并且已经退出了Select循环
        // 继续执行命令
        if (caller != null) {
            caller.run();
        }
    }
4.6 ZygoteInit.java的main函数流程总结:
-
解析app_main.cpp传来的参数,配置startSystemServer、enableLazyPreload、abiList和zygoteSocketName等参数
   final boolean isPrimaryZygote = zygoteSocketName.equals(Zygote.PRIMARY_SOCKET_NAME);
               if (!isRuntimeRestarted) {
                   if (isPrimaryZygote) {
                       FrameworkStatsLog.write(FrameworkStatsLog.BOOT_TIME_EVENT_ELAPSED_TIME_REPORTED,
                               BOOT_TIME_EVENT_ELAPSED_TIME__EVENT__ZYGOTE_INIT_START,
                               startTime);
                   } else if (zygoteSocketName.equals(Zygote.SECONDARY_SOCKET_NAME)) {
                       FrameworkStatsLog.write(FrameworkStatsLog.BOOT_TIME_EVENT_ELAPSED_TIME_REPORTED,
                               BOOT_TIME_EVENT_ELAPSED_TIME__EVENT__SECONDARY_ZYGOTE_INIT_START,
                               startTime);
                   }
               }
-
加载进程的资源和类(preload())
-
gc
-
创建Zygoteserver
-
如果需要创建SystemServer,根据zygoteSocketName和zygoteServer来fork一个SystemServer。开启SystemServer进程,这是Zygote进程的第一次分裂,如果SystemServer已经创建,那么就开始run()
-
启动一个死循环监听来自Client端的消息zygoteServer.runSelectLoop(abiList);
-
关闭SystemServer的Socket
-
我们已经在子进程中,并且已经退出了Select循环。继续执行命令
4.7 总结下来的流程:
-
通过registerServerSocket方法来创建一个Server端的socket,这个name为zygote的socket用于等待ActivityManagerService请求Zygote来创建新的应用程序进程
-
预加载,预加载项如下:
preloadClasses();
preloadResources();
preloadOpenGL();
preloadSharedLibraries();
preloadTextResources();
WebViewFactory.prepareWebViewInZygote();
...
-
启动SystemServer进程
-
执行runSelectLoop()方法等待消息去创建应用进程
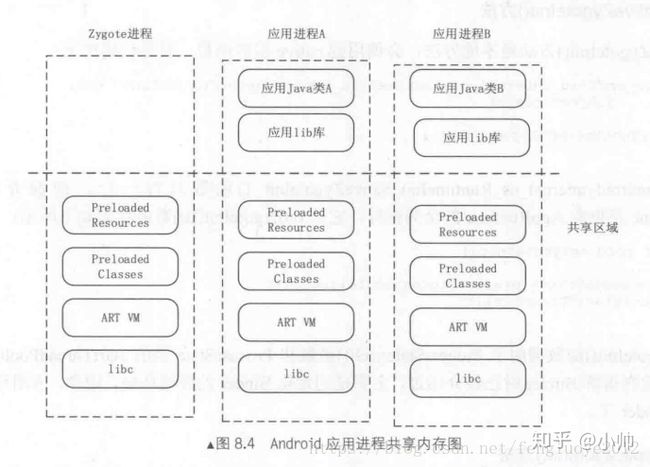
4.8 以下是Android应用进程共享内存图:
通过上图可以很容易理解在Zygote进程预加载系统资源后,然后通过它孵化出其他的虚拟机进程,进而共享虚拟机内存和框架层资源,这样大幅度提高应用程序的启动和运行速度。
4.9 Zygote注意的细节:
- Zygote进行fork的时候要是单线程,为了避免造成死锁或者状态不一致等问题
- Zygote的跨进程通信没有采用Binder机制,而是采用本地socket
5 关于Zygote的一些疑问
5.1 孵化应用进程这种事为什么不交给SystemServer来做,而专门设计一个Zygote?
我们知道,应用在启动的时候需要做很多准备工作,包括启动虚拟机,加载各类系统资源等等,这些都是非常耗时的,如果能在zygote里就给这些必要的初始化工作做好,子进程在fork的时候就能直接共享,那么这样的话效率就会非常高。这个就是zygote存在的价值,这一点呢SystemServer是替代不了的,主要是因为SystemServer里跑了一堆系统服务,这些是不能继承到应用进程的。而且我们应用进程在启动的时候,内存空间除了必要的资源外,最好是干干净净的,不要继承一堆乱七八糟的东西。所以呢,不如给SystemServer和应用进程里都要用到的资源抽出来单独放在一个进程里,也就是这的zygote进程,然后zygote进程再分别孵化出SystemServer进程和应用进程。孵化出来之后,SystemServer进程和应用进程就可以各干各的事了。
5.2 Zygote的IPC通信机制为什么不采用binder?如果采用binder的话会有什么问题么?
第一个原因,我们可以设想一下采用binder调用的话该怎么做,首先zygote要启用binder机制,需要打开binder驱动,获得一个描述符,再通过mmap进行内存映射,还要注册binder线程,这还不够,还要创建一个binder对象注册到serviceManager,另外AMS要向zygote发起创建应用进程请求的话,要先从serviceManager查询zygote的binder对象,然后再发起binder调用,这来来回回好几趟非常繁琐,相比之下,zygote和SystemServer进程本来就是父子关系,对于简单的消息通信,用管道或者socket非常方便省事。
第二个原因,如果zygote启用binder机制,再fork出SystemServer,那么SystemServer就会继承了zygote的描述符以及映射的内存,这两个进程在binder驱动层就会共用一套数据结构,这显然是不行的,所以还得先给原来的旧的描述符关掉,再重新启用一遍binder机制,这个就是自找麻烦了。
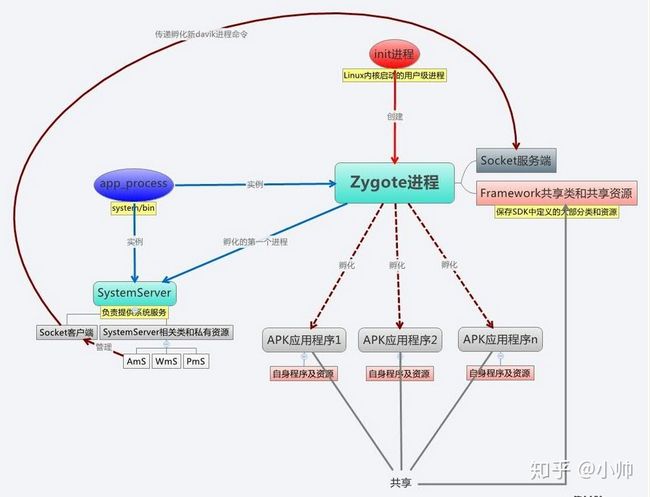
5.3 Zygote工作流程图:
6 总结及编程相关事项
其实我们想一下,就会发现zygote的整个启动流程实际上是非常符合实际情况的
- 在Android中,每个进程都运行在对应的虚拟机上,因此zygote首先就负责创建出虚拟机
- 然后,为了反射调用java代码,必须有对应的JNI函数,于是zygote进行了JNI函数的注册
- 当一切准备妥当后,zygote进程才进入到java世界
上面是Zygote进程的启动过程。从Zygote进程的启动过程中,我们可以获取以下知识点,能在我们的编程中给予一定的帮助。
- 每个虚拟机的内存堆栈只有16M,所以在Java处理中要特别注意内存的管理和使用。
- JNI的native function注册。如果想让自己的JNI处理在虚拟机中供其他进程调用,则可以把注册函数添加到gRegJNI[]数组里。但是这样会增加系统的开机时间及内存的开销。
- 虚拟机的属性配置大部分都是依据property属性的值,所以在系统级的优化方面可以根据自己的需求来修改配置虚拟机的属性,从而生成一个适合自己项目的虚拟机。
- 在Java层的ZygoteInit类中类及资源的加载,会占用大量的开机时间和内存开销,在开机时间优化及系统内存优化方面可以做进一步研究。
- Java进程都是Zygote进程的子进程,这个是Java进程的一个基本概念,有助于程序开发中性能及内存优化等方案的讨论。
- zygote进程的启动有许多好的编程技法和算法,如参数的解析、native function的注册、JniInvocation的接口定义和实现、socket的处理、通过命令来执行特定类的方法等,值得借鉴和参考。
7 最后,附上一个超级详细的Zygote启动流程源码解析
http://www.ty2y.com/study/android8.1ymqdpe.html#

