云原生Spring Boot应用配置Prometheus+Grafana监控(保姆级)
最近想要配置Spring Boot应用Prometheus+Grafana监控的demo,发现网上的很多中英文资料,内容过时或者配置不对。
因此写一个文章来说明整个体系是怎么工作的。
Demo的源码地址:
-
https://github.com/hengyunabc/spring-boot-prometheus-grafana-demo
spring boot应用metrics配置
首先,我们直接到官网创建一个spring boot demo应用:
-
https://start.spring.io/
创建好后,我们在pom.xml里加入下面的依赖:
    org.springframework.boot
    spring-boot-starter


    org.springframework.boot
    spring-boot-starter-web


    org.springframework.boot
    spring-boot-starter-actuator


    io.micrometer
    micrometer-registry-prometheus
-
spring-boot-starter-actuator 支持spring boot暴露http endpoint
-
micrometer-registry-prometheus 支持prometheus endpoint,这个暴露的是
OpenMetrics的格式,prometheus从这里采集数据。
再看下 application.properties文件:
spring.application.name=expose-prometheus-demo
server.port=8080

management.endpoints.web.exposure.include=*
management.server.port=8090
management.metrics.tags.application=${spring.application.name}
-
management.server.port配置endpoint为独立端口,和应用混用同一端口容易有安全问题 -
management.metrics.tags.application配置metric里application的tag
本地启动应用之后,访问 http://localhost:8090/actuator/prometheus ,可以看到metrics数据里带上了application的tag:
# TYPE jvm_classes_unloaded_classes_total counter
jvm_classes_unloaded_classes_total{application="expose-prometheus-demo",} 0.0
配置k8s环境
启动minikube k8s集群
minikube start --image-mirror-country='cn' --nodes 2 --kubernetes-version=v1.18.3
$ kubectl get nodes
NAME           STATUS     ROLES    AGE   VERSION
minikube       Ready      master   65s   v1.18.3
minikube-m02   NotReady      30s   v1.18.3
构建docker镜像
打包spring boot fat jar:
./mvnw clean package -DskipTests
docker build . -t hengyunabc/expose-prometheus-demo:0.0.1-SNAPSHOT
本地启动测试:
docker run -it -p8080:8080 -p8090:8090 hengyunabc/expose-prometheus-demo:0.0.1-SNAPSHOT
访问:http://localhost:8090/actuator/prometheus
安装prometheus
helm repo add prometheus-community https://prometheus-community.github.io/helm-charts
helm repo update
helm install prometheus prometheus-community/kube-prometheus-stack
开启Prometheus UI端口转发:
kubectl port-forward $(kubectl get pods --selector "app.kubernetes.io/name=prometheus" --output=name) 9090
开启grafana UI端口转发:
kubectl port-forward $(kubectl get pods --selector "app.kubernetes.io/name=grafana" --output=name) 3000
发布spring boot应用到k8s
kubectl apply -f ./servicemonitor-deployment.yaml
在servicemonitor-deployment.yaml里定义了三个东东。要注意的是Service和ServiceMonitor都要打上label: release: prometheus。
Deployment
---
apiVersion: apps/v1
kind: Deployment
metadata:
  name: expose-prometheus-demo
  labels:
    app: expose-prometheus-demo
spec:
  replicas: 1
  selector:
    matchLabels:
      app: expose-prometheus-demo
  template:
    metadata:
      labels:
        app: expose-prometheus-demo
    spec:
      containers:
      - name: expose-prometheus-demo
        image: hengyunabc/expose-prometheus-demo:0.0.1-SNAPSHOT
        imagePullPolicy: Always
        ports:
        - containerPort: 8080
        - containerPort: 8090
Service
---
apiVersion: v1
kind: Service
metadata:
  name: expose-prometheus-demo-service
  labels:
    app: expose-prometheus-demo
    release: prometheus
spec:
  selector:
    app: expose-prometheus-demo
  ports:
    - protocol: TCP
      name: http-traffic
      port: 8080
      targetPort: 8080
    - protocol: TCP
      name: metric-traffic
      port: 8090
      targetPort: 8090
ServiceMonitor
---
apiVersion: monitoring.coreos.com/v1
kind: ServiceMonitor
metadata:
  name: expose-prometheus-demo-service-monitor
  labels:
    app: expose-prometheus-demo
    release: prometheus
spec:
  selector:
    matchLabels:
      app: expose-prometheus-demo
  endpoints:
  - port: metric-traffic
    path: "/actuator/prometheus"
应用发布到k8s里之后,访问Prometheus UI,可以查看到是否发现了demo的Service Discovery
-
http://localhost:9090/service-discovery
工作原理
下面分两部分详细解析下整个流程是怎么工作的。
第一部分:
-
spring boot应用通过引入
prometheusendpoint,数据暴露在 http://localhost:8090/actuator/prometheus -
prometheus已在k8s里部署好,它是一个无情的抓取机器,现在要想办法让它去拉spring boot应用的数据
-
prometheus的运行里的实际配置,可以访问 http://localhost:9090/config 查看。这里也是校验
ServiceMonitor是否生效的一个地方。
第二部分:
-
部署kind
Service,label带有release: prometheus -
部署kind
ServiceMonitor,label带有release: prometheus -
Prometheus operator会发现新部署的
ServiceMonitor,然后生成新的prometheus配置,保存到k8s的Secrets里,实际保存文件是压缩过的:prometheus.yaml.gz -
prometheus-config-reloader会把这个
prometheus.yaml.gz解压到/etc/prometheus/config_out/prometheus.env.yaml -
prometheus启动时正是以--config.file参数指定了上面的prometheus.env.yaml
可以参考官方的图片:
配置grafana
-
http://localhost:3000/
grafana 默认的用户名密码是:
admin/prom-operator
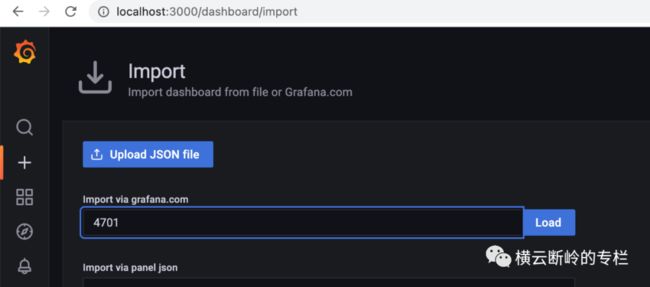
首先导入下面的开源JVM (Micrometer) dashboard:
-
https://grafana.com/grafana/dashboards/4701
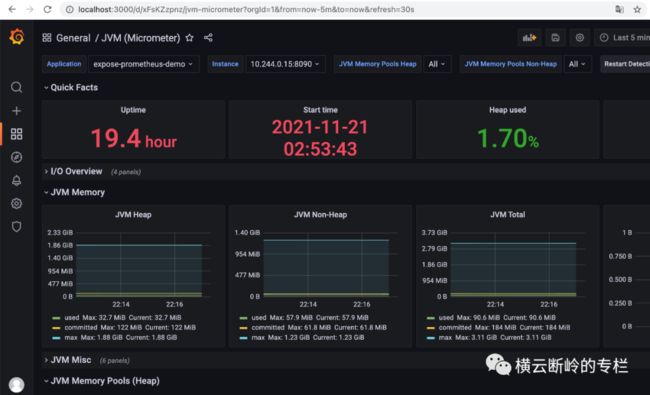
在Grafana UI里,在Dashboards,Manage,Import,填入4701。导入成功之后,就可以在Dashboards里找到JVM (Micrometer)。
打开之后可以看到 expose-prometheus-demo的监控信息。
排查问题方法
现在是重点了,为什么按网上的一些资料去配置却不能工作呢?因为Prometheus Operator本身也是在不断更新,所以一些配置过时了。
-
熟练查看k8s里的各种资源
比如查看k8s里Prometheus相关的pod信息:
kubectl get pod prometheus-prometheus-kube-prometheus-prometheus-0 -o yaml
从结果我们可以知道prometheus-config-reloader的配置是怎样的:
  - args:
    - --listen-address=:8080
    - --reload-url=http://127.0.0.1:9090/-/reload
    - --config-file=/etc/prometheus/config/prometheus.yaml.gz
    - --config-envsubst-file=/etc/prometheus/config_out/prometheus.env.yaml
    - --watched-dir=/etc/prometheus/rules/prometheus-prometheus-kube-prometheus-prometheus-rulefiles-0
    command:
    - /bin/prometheus-config-reloader
-
理解
ServiceMonitor是怎么工作的
在工作原理一节里,官方的原理图里有kind为Prometheus的资源。因此我们安装好prometheus operator之后,可以查看具体的yaml配置。
$ kubectl get Prometheus
NAME                                    VERSION   REPLICAS   AGE
prometheus-kube-prometheus-prometheus   v2.28.1   1          2d23h
$ kubectl get Prometheus prometheus-kube-prometheus-prometheus -o yaml
在结果的yaml里,我们可以找到serviceMonitorSelector的配置信息:
  serviceMonitorSelector:
    matchLabels:
      release: prometheus
所以我们要在Demo里的servicemonitor-deployment.yaml里配置上release: prometheus,这个是很多教程不工作的原因。
-
配置流程是异步触发的
从应用deploy,到operator变更,到prometheus reload,再真正抓取到配置,整个过程是异步的。变更之后可能要一两分钟才会生效。
总结
-
k8s的整套监控是很强大的,但也比较复杂,在原来的组件上套了一层Operator,从而实现自动发现,自动更新。
-
对于用户来说,Operator既是蜜糖也是砒霜,虽然简化了使用,但要理解更多的概念。


