引言
个人曾经在不同机器配置以及不同的Windows系统当中个人尝试多次安装Postgresql,发现每一次情况都不一样,强烈建议读者使用虚拟机的Linux系统安装Postgresql最为稳妥,减少不必要的踩坑烦恼。
安装方式
一共有两种安装方式:
- 第一种是使用官方提供的
yum安装。 - 第二种是使用源码编译二进制的方式安装。
第二种方式个人并不是很推荐,在依赖上可能要折腾不少时间,并且不同的Linux发行系统需要解决的依赖问题也不同。
个人环境说明
环境说明:
- 操作系统:Win11 2023 22H2
- CPU:13代 i5 13500HX
- 内存:32G
- 虚拟机:VM Tool 17
- CenterOs版本:7.9
- 镜像:
CentOS-7-x86_64-Minimal-2009_2.iso
实际上还要关注一下CPU的兼容性:
CPU architectures: x86, x86_64, IA64, PowerPC, PowerPC 64, S/390, S/390x, Sparc, Sparc 64, ARM, MIPS, MIPSEL, and PA-RISC. Code support exists for M68K, M32R, and VAX
这里提这一点是因为之前用M1的Mac尝试的时候,发现M1 需要 通过 Rosetta 转译,并且执行稍微复杂的SQL 的时候就会很卡,非常蛋疼,这一点只能看官方是否有兼容M1版本的意愿了。
RPM安装
RPM安装方式直接简单,适合个人快速搭建和使用Postgresql。
安装RPM存储库
存储库用于做数据存储以及Postgresql的自动更新操作。首先访问官方链接:https://www.postgresql.org/download/linux/redhat/填写自己的配置情况,利用官方的配置脚本操作即可。
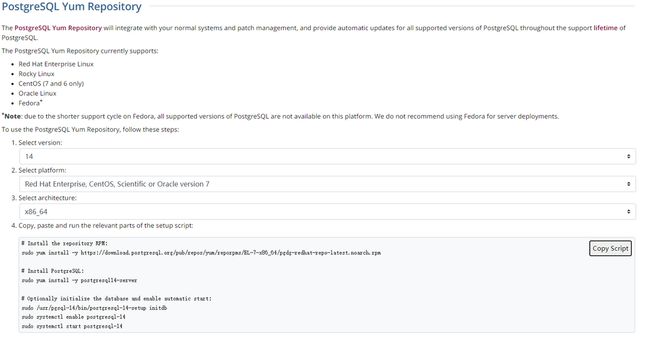
以Postgresql-14和个人的环境配置为例,截图部分对应的代码如下,注意个人使用的是虚拟机的CenterOs7.9 的版本。
rpm下载
sudo yum install -y https://download.postgresql.org/pub/repos/yum/reporpms/EL-7-x86_64/pgdg-redhat-repo-latest.noarch.rpm 安装postgresql
sudo yum install -y postgresql14-server 配置Postgresql开机启动
sudo /usr/pgsql-14/bin/postgresql-14-setup initdb sudo systemctl enable postgresql-14 sudo systemctl start postgresql-14个人的运行结果如下:
[zxd@localhost ~]$ sudo /usr/pgsql-14/bin/postgresql-14-setup initdb
Initializing database ... OK

[zxd@localhost ~]$ sudo systemctl enable postgresql-14
Created symlink from /etc/systemd/system/multi-user.target.wants/postgresql-14.service to /usr/lib/systemd/system/postgresql-14.service.

[zxd@localhost ~]$ sudo systemctl start postgresql-14
上面的命令执行完成之后,我们可以看一下postgresql的服务是否启动成功:
sudo systemctl status postgresql-14[xander@localhost ~]$ sudo systemctl status postgresql-14
● postgresql-14.service - PostgreSQL 14 database server
Loaded: loaded (/usr/lib/systemd/system/postgresql-14.service; enabled; vendor preset: disabled)
Active: active (running) since Fri 2023-04-07 05:06:33 EDT; 7min ago
Docs: https://www.postgresql.org/docs/14/static/
Process: 908 ExecStartPre=/usr/pgsql-14/bin/postgresql-14-check-db-dir ${PGDATA} (code=exited, status=0/SUCCESS)
Main PID: 919 (postmaster)
CGroup: /system.slice/postgresql-14.service
├─919 /usr/pgsql-14/bin/postmaster -D /var/lib/pgsql/14/data/
├─934 postgres: logger
├─937 postgres: checkpointer
├─938 postgres: background writer
├─939 postgres: walwriter
├─940 postgres: autovacuum launcher
├─941 postgres: stats collector
└─942 postgres: logical replication launcher
Apr 07 05:06:32 localhost.localdomain systemd[1]: Starting PostgreSQL 14 database server...
Apr 07 05:06:33 localhost.localdomain postmaster[919]: 2023-04-07 05:06:33.265 EDT [919] LOG: redirec...ess
Apr 07 05:06:33 localhost.localdomain postmaster[919]: 2023-04-07 05:06:33.265 EDT [919] HINT: Future...g".
Apr 07 05:06:33 localhost.localdomain systemd[1]: Started PostgreSQL 14 database server.
Hint: Some lines were ellipsized, use -l to show in full.
如果没有出现上面的结果,则尝试执行下面的命令。
systemctl postgresql initdbchkconfig postgresql on安装完毕后,系统会在Linux的系统创建数据库超级用户 postgres,密码为空。我们使用非postgres用户登陆测试一下,发现 Postgresql 会拒绝访问:
[root@localhost xander]# psql -U postgres
psql: error: connection to server on socket "/var/run/postgresql/.s.PGSQL.5432" failed: FATAL: Peer authentication failed for user "postgres"为什么失败了?查阅官方文档可以得知,Postgresql初始化之后配置文件只能允许本地连接,而且连接到服务器的认证方式是peer和ident。
但是我们在Linux中使用root切换到postgres 用户,可以直接使用 psql命令访问,关于这一点后文还会再次介绍。
[xander@localhost ~]$ su root
Password:

[root@localhost xander]# su postgres
bash-4.2$ psql
could not change directory to "/home/xander": Permission denied
psql (14.8)
Type "help" for help.
bash-4.2$ exit
exit

[root@localhost xander]#
如果要实现外部访问,我们需要修改pg_hba.conf的文件以及postgresql.conf文件,但是由于本部分使用RPM的安装方式,很多配置都是官方预设的,常常会找不到这两个文件......所以在介绍如何实现远程访问之前,这里补充 Postgresql 使用RPM安装的配置说明。
RPM安装配置补充说明
RPM的安装方式虽然无脑简单并且无需过多配置,但是会导致安装之后配置是官方默认预设的,很多时候想要了解Postgresql的配置文件位置比较麻烦。
这里花了一点时间通过find命令把RPM安装之后的关键路径都给盘出来了。
注意这些配置可能随着不同Linux操作系统和不同的Postgresql版本变化,这里仅供CenterOs操作系统参考。
initdb.log
如果不喜欢官方给的自动启动服务,可以用下面的命令进行自定义重启,注意/var/lib/pgsql/14/data/这个路径需要提前执行initdb初始化。
/usr/pgsql-14/bin/pg_ctl -D /var/lib/pgsql/14/data/ -l logfile startbin 命令目录位置
bin 目录在/usr/pgsql-14/bin/ 的路径之下,里面包含了postgresql 的命令。我们可以配置环境变量$PG_PATH 路径为/usr/pgsql-14/bin/。
[xander@localhost ~]$ ll /usr/pgsql-14/bin/
total 11420
-rwxr-xr-x 1 root root   71784 Feb  9 07:01 clusterdb
-rwxr-xr-x 1 root root   79992 Feb  9 07:01 createdb
-rwxr-xr-x 1 root root   76232 Feb  9 07:01 createuser
-rwxr-xr-x 1 root root   71568 Feb  9 07:01 dropdb
-rwxr-xr-x 1 root root   67408 Feb  9 07:01 dropuser
-rwxr-xr-x 1 root root  134840 Feb  9 07:01 initdb
-rwxr-xr-x 1 root root   41472 Feb  9 07:01 pg_archivecleanup
-rwxr-xr-x 1 root root  126928 Feb  9 07:01 pg_basebackup
-rwxr-xr-x 1 root root  181024 Feb  9 07:01 pgbench
-rwxr-xr-x 1 root root   62568 Feb  9 07:01 pg_checksums
-rwxr-xr-x 1 root root   41248 Feb  9 07:01 pg_config
-rwxr-xr-x 1 root root   58056 Feb  9 07:01 pg_controldata
-rwxr-xr-x 1 root root   71112 Feb  9 07:01 pg_ctl
-rwxr-xr-x 1 root root  413872 Feb  9 07:01 pg_dump
-rwxr-xr-x 1 root root  109984 Feb  9 07:01 pg_dumpall
pg_hba.conf 文件位置
pg_hba.conf 文件默认在/var/lib/psql/pg版本号/下。
postgresql.conf 文件位置
postgresql.conf文件默认在/var/lib/psql/pg版本号/下。
RPM 安装日志
安装日志的查询路径如下:
[xander@localhost ~]$ sudo cat /var/lib/pgsql/14/initdb.log不出意外这个启动日志会像下面这样:
The files belonging to this database system will be owned by user "postgres".
This user must also own the server process.

The database cluster will be initialized with locale "en_US.UTF-8".
The default database encoding has accordingly been set to "UTF8".
The default text search configuration will be set to "english".

Data page checksums are disabled.

fixing permissions on existing directory /var/lib/pgsql/14/data ... ok
creating subdirectories ... ok
selecting dynamic shared memory implementation ... posix
selecting default max_connections ... 100
selecting default shared_buffers ... 128MB
selecting default time zone ... America/New_York
creating configuration files ... ok
running bootstrap script ... ok
performing post-bootstrap initialization ... ok
syncing data to disk ... ok

Success. You can now start the database server using:

    /usr/pgsql-14/bin/pg_ctl -D /var/lib/pgsql/14/data/ -l logfile start
pg_ctl 重启 postgresql
如果想要利用pg_ctl重启,可以用下面的命令:
/usr/pgsql-14/bin/pg_ctl -D /var/lib/pgsql/14/data/ -l logfile restart注意以root用户重启会被postgresql拒绝,记得切回到官方创建的 postgres 用户再进行操作。
[root@localhost xander]# /usr/pgsql-14/bin/pg_ctl -D /var/lib/pgsql/14/data/ -l logfile restart
pg_ctl: cannot be run as root
Please log in (using, e.g., "su") as the (unprivileged) user that will
own the server process.
我们切换到postgres用户,执行上面一长串命令,却收到了提示没有权限。
bash-4.2$ /usr/pgsql-14/bin/pg_ctl -D /var/lib/pgsql/14/data/ -l logfile start
bash: ./pg_ctl: Permission denied
这里发现文件夹的所属人是root,自然是没有权限的。既然是权限问题,那么我们就用root重新给postgres用户分配权限即可,做法只需要把所属人交给postgres用户即可。
[root@localhost xander]# chown -R postgres /var/lib/pgsql[root@localhost xander]# ll /var/lib/pgsql/
total 0
drwx------ 4 postgres postgres 51 Apr 7 04:59 14pg_ctl 常用操作
关闭postgresql
bash-4.2$ /usr/pgsql-14/bin/pg_ctl -D /var/lib/pgsql/14/data/ -l logfile stop
waiting for server to shut down.... done
server stopped
启动postgresql
bash-4.2$ /usr/pgsql-14/bin/pg_ctl -D /var/lib/pgsql/14/data/ -l logfile start
waiting for server to start.... done
server started
重启postgresql
bash-4.2$ /usr/pgsql-14/bin/pg_ctl -D /var/lib/pgsql/14/data/ -l logfile restart
waiting for server to shut down.... done
server stopped
waiting for server to start.... done
server started
PostgreSQL: Documentation: 14: pg_ctl 官方文档有更多例子,篇幅有限,这里就不一一展示了。
pg_ctl init[db] [-D datadir] [-s] [-o initdb-options]

pg_ctl start [-D datadir] [-l filename] [-W] [-t seconds] [-s] [-o options] [-p path] [-c]

pg_ctl stop [-D datadir] [-m s[mart] | f[ast] | i[mmediate] ] [-W] [-t seconds] [-s]

pg_ctl restart [-D datadir] [-m s[mart] | f[ast] | i[mmediate] ] [-W] [-t seconds] [-s] [-o options] [-c]

pg_ctl reload [-D datadir] [-s]

pg_ctl status [-D datadir]

pg_ctl promote [-D datadir] [-W] [-t seconds] [-s]

pg_ctl logrotate [-D datadir] [-s]

pg_ctl kill signal_name process_id

On Microsoft Windows, also:

pg_ctl register [-D datadir] [-N servicename] [-U username] [-P password] [-S a[uto] | d[emand] ] [-e source] [-W] [-t seconds] [-s] [-o options]

pg_ctl unregister [-N servicename]
本地连接方式连接pgsql
如果你觉得这数据库我不想做任何配置,只想赶紧上手体验一下 postgresql,那么可以直接用本地连接的方式,官方默认给新建的postgres赋予了免密访问权限。
可以通过less /etc/passwd 的命令查看当前系统的所有用户:
xander:x:1000:1000:xander:/home/xander:/bin/bash

# pgsql 构建新用户
postgres:x:26:26:PostgreSQL Server:/var/lib/pgsql:/bin/bash
postgres 为RPM安装之后Postgresql默认创建的。因为想要不做任何配置以本地方式访问,需要先切换到postgres用户。
su postgres切换到postgres用户之后,直接执行psql即可。
bash-4.2$ psql
psql (14.7)
Type "help" for help.

postgres=#
实现Postgresql 远程访问
了解RPM安装模式的几个重要文件目录位置之后,下面介绍如何实现Postgresql 的远程访问。
修改pg_hba.conf文件
使用RPM安装方式,pg_hba.conf文件默认在/var/lib/psql/pg版本号/下。
[root@localhost pgsql-14]# ll /var/lib/pgsql/14/data/
total 68
drwx------ 5 postgres postgres    41 Apr  7 04:59 base
-rw------- 1 postgres postgres    30 Apr  7 05:06 current_logfiles
drwx------ 2 postgres postgres  4096 Apr  7 04:59 global
drwx------ 2 postgres postgres    32 Apr  7 04:59 log
drwx------ 2 postgres postgres     6 Apr  7 04:59 pg_commit_ts
drwx------ 2 postgres postgres     6 Apr  7 04:59 pg_dynshmem
-rw------- 1 postgres postgres  4577 Apr  7 04:59 pg_hba.conf
-rw------- 1 postgres postgres  1636 Apr  7 04:59 pg_ident.conf
drwx------ 4 postgres postgres    68 Apr  7 05:11 pg_logical
drwx------ 4 postgres postgres    36 Apr  7 04:59 pg_multixact
drwx------ 2 postgres postgres     6 Apr  7 04:59 pg_notify
drwx------ 2 postgres postgres     6 Apr  7 04:59 pg_replslot
drwx------ 2 postgres postgres     6 Apr  7 04:59 pg_serial
drwx------ 2 postgres postgres     6 Apr  7 04:59 pg_snapshots
drwx------ 2 postgres postgres     6 Apr  7 05:06 pg_stat
drwx------ 2 postgres postgres    25 Apr  7 05:31 pg_stat_tmp
drwx------ 2 postgres postgres    18 Apr  7 04:59 pg_subtrans
drwx------ 2 postgres postgres     6 Apr  7 04:59 pg_tblspc
drwx------ 2 postgres postgres     6 Apr  7 04:59 pg_twophase
-rw------- 1 postgres postgres     3 Apr  7 04:59 PG_VERSION
drwx------ 3 postgres postgres    60 Apr  7 04:59 pg_wal
drwx------ 2 postgres postgres    18 Apr  7 04:59 pg_xact
-rw------- 1 postgres postgres    88 Apr  7 04:59 postgresql.auto.conf
-rw------- 1 postgres postgres 28776 Apr  7 04:59 postgresql.conf
-rw------- 1 postgres postgres    58 Apr  7 05:06 postmaster.opts
-rw------- 1 postgres postgres   102 Apr  7 05:06 postmaster.pid
在文件中我们找到下面的内容:
# TYPE  DATABASE        USER            ADDRESS                 METHOD

# "local" is for Unix domain socket connections only
local   all             all                                     peer
# IPv4 local connections:
host    all             all             127.0.0.1/32            scram-sha-256
# IPv6 local connections:
host    all             all             ::1/128                 scram-sha-256
# Allow replication connections from localhost, by a user with the
# replication privilege.
local   replication     all                                     peer
host    replication     all             127.0.0.1/32            scram-sha-256
host    replication     all             ::1/128                 scram-sha-256
这里简单介绍一下参数作用:
- TYPE:连接类型一般有
local和host两种,local 指的是本地连接,host 则类似外部的ssh远程服务器的访问方式。 - DATABASE:表示要连接的数据库,all 表示所有。这里可以改为具体的数据库名称
- USER:这里填写Linux用户。比如默认分配的postgres可以免密访问。
- ADDRESS:
127.0.0.1/32表示只允许来自己本机的连接,0.0.0.0/0表示所有的Ip放行。192.168.1.0/24表示允许192.168.1.1-192.168.1.255这个地址段的ip地址连接。 METHOD:表示连接的认证方式,PostgreSQL的连接命令psql有两种连接方式:
- 不带
-h参数或host参数时,是local连接,用的是peer认证方式。 - 使用
-h localhost、-h 127.0.0.1、postgres@localhost或[email protected]这样的格式,则会使用host类型,使用TCP/IP的方式连接,使用的是ident的认证方式。
- 不带
为了实现外部远程访问,配置做如下修改:
[xander@localhost ~]$ sudo vim /var/lib/pgsql/14/data/pg_hba.conf# TYPE DATABASE USER ADDRESS METHOD
# "local" is for Unix domain socket connections only
local all all peer
# IPv4 local connections:
host all all 127.0.0.1/32 scram-sha-256
# IPv6 local connections:
host all all ::1/128 scram-sha-256
# Allow replication connections from localhost, by a user with the
# replication privilege.
local replication all peer
host replication all 127.0.0.1/32 scram-sha-256
host replication all ::1/128 scram-sha-256
# llow all access to
host all all 0.0.0.0/0 trust末尾添加一行:
host all all 0.0.0.0/0 trust配置完成之后xq保存并且退出。可以通过下面的方式重启服务:
[root@localhost bin]# systemctl restart postgresql-14重启postgresql之后我们继续执行psql,发现报错还是存在,root还是无法访问:
[root@localhost bin]# psql
psql: error: connection to server on socket "/var/run/postgresql/.s.PGSQL.5432" failed: FATAL:  role "root" does not exist
我们需要修改另一个文件postgresql.conf。
修改 postgresql.conf 文件
通过vim /var/lib/psql/pg版本号/postgresql.conf ,我们找到下面的内容,把listen_addresses的注释放开,并且把内容修改为*,然后wq保存退出即可。
#------------------------------------------------------------------------------
# CONNECTIONS AND AUTHENTICATION
#------------------------------------------------------------------------------

# - Connection Settings -

listen_addresses = '*'          # what IP address(es) to listen on;
navicat 连接测试
最后我们通过Windows的Navicat配置连接测试一下,密码这里可以选择留空,原因可以看上文。


当然建议用postgres构建一个权限较高的用户给外部访问。
常用命令
参考自:https://blog.csdn.net/u010856284/article/details/70142810
\di 查看索引
postgres=# \di
Did not find any relations.
创建数据库
create database [数据库名]; 删除数据库
drop database [数据库名]; 重命名一个表
alter table [表名A] rename to [表名B];删除一个表
drop table [表名]; 在已有的表里添加字段
alter table [表名] add column [字段名] [类型]; 删除表中的字段
alter table [表名] drop column [字段名]; 重命名一个字段
alter table [表名] rename column [字段名A] to [字段名B];给一个字段设置缺省值
alter table [表名] alter column [字段名] set default [新的默认值]; 去除缺省值
alter table [表名] alter column [字段名] drop default; 在表中插入数据
insert into 表名 ([字段名m],[字段名n],......) values ([列m的值],[列n的值],......); 修改表中的某行某列的数据:
update [表名] set [目标字段名]=[目标值] where [该行特征]; 删除表中某行数据:
delete from [表名] where [该行特征];

--删空整个表
delete from [表名];
创建表
create table ([字段名1] [类型1] ;,[字段名2] [类型2],......<,primary key (字段名m,字段名n,...)>;);\l 列举表
列举数据库,相当于mysql的show databases。
postgres=# \l
                                  List of databases
   Name    |  Owner   | Encoding |   Collate   |    Ctype    |   Access privileges
-----------+----------+----------+-------------+-------------+-----------------------
 postgres  | postgres | UTF8     | en_US.UTF-8 | en_US.UTF-8 |
 template0 | postgres | UTF8     | en_US.UTF-8 | en_US.UTF-8 | =c/postgres          +
           |          |          |             |             | postgres=CTc/postgres
 template1 | postgres | UTF8     | en_US.UTF-8 | en_US.UTF-8 | =c/postgres          +
           |          |          |             |             | postgres=CTc/postgres
(3 rows)
\c dbname 列举数据库
切换数据库,相当于mysql的use dbname。
postgres=# \c
You are now connected to database "postgres" as user "postgres".
\dt 查看表结构
查看表结构,相当于desc tblname,show columns from tbname。
postgres=# \dt pg_class;
            List of relations
   Schema   |   Name   | Type  |  Owner
------------+----------+-------+----------
 pg_catalog | pg_class | table | postgres
(1 row)
RPM安装方式进行卸载
在Linux上很多时候卸载要比安装还要费事很多,这里多次实验之后确认下面这套指令是删的比较干净的方案。
查看系统版本号和类型
cat /etc/redhat-release[root@localhost xander]# cat /etc/redhat-release
CentOS Linux release 7.9.2009 (Core)个人实验为CenterOs7.9。
关闭服务
为了确保操作安全,建议先停止服务。
sudo systemctl stop postgresql-14yum 删除软件包
yum remove postgresql*执行之后会出现下面的提示:
Dependencies Resolved
================================================================================================================
 Package                          Arch                Version                        Repository            Size
================================================================================================================
Removing:
 postgresql14                     x86_64              14.7-1PGDG.rhel7               @pgdg14              7.9 M
 postgresql14-libs                x86_64              14.7-1PGDG.rhel7               @pgdg14              923 k
 postgresql14-server              x86_64              14.7-1PGDG.rhel7               @pgdg14               22 M

Transaction Summary
================================================================================================================
Remove  3 Packages

Installed size: 31 M
Is this ok [y/N]:
除了上面的命令,还可以用下面的方式列出已安装的包, 并使用yum remove逐一删除。
rpm -qa | grep postgresql我们以上面提示Remove 3 Packages的其中一个包为例演示,其他两个重复操作即可:
[root@localhost xander]# yum rm postgresql14-server-14.7-1PGDG.rhel7.x86_64执行之后出现下面的提示:
Loaded plugins: fastestmirror
No such command: rm. Please use /usr/bin/yum --help
[root@localhost xander]# yum remove postgresql14-server-14.7-1PGDG.rhel7.x86_64
Loaded plugins: fastestmirror
Resolving Dependencies
--> Running transaction check
---> Package postgresql14-server.x86_64 0:14.7-1PGDG.rhel7 will be erased
--> Finished Dependency Resolution

Dependencies Resolved

================================================================================================================
 Package                          Arch                Version                        Repository            Size
================================================================================================================
Removing:
 postgresql14-server              x86_64              14.7-1PGDG.rhel7               @pgdg14               22 M

Transaction Summary
================================================================================================================
Remove  1 Package

Installed size: 22 M
Is this ok [y/N]: ^C
删除相关目录文件
rm -rf /var/lib/pgsqlrm -rf /usr/pgsql*删除pg相关用户组/用户
userdel -r postgresgroupdel postgres源码安装
创建安装用户及规划安装目录
创建安装用户指令如下。
useradd postgrespasswd postgres创建PostgreSQL软件安装目录。
mkdir -p /opt/postgres/pgsql15.2创建PostgreSQL数据文件目录
mkdir -p /opt/postgres/pgdata创建PostgreSQL数据库日志目录
mkdir -p /opt/postgres/logs 修改目录所属用户
chown postgres:postgres /opt/postgres -R上面的命令执行完成之后,观察结果如下:
[xander@localhost ~]$ ll /opt/postgres/
total 0
drwxr-xr-x 2 postgres postgres 6 Jun 26 01:19 logs
drwxr-xr-x 2 postgres postgres 6 Jun 26 01:19 pgdata
drwxr-xr-x 2 postgres postgres 6 Jun 26 01:18 pgsql15.2
安装依赖软件包
yum install -y zlib-devel readline-devel python perl perl-ExtUtils-Embedyum install zlib-develyum install readline-develyum install perlyum install perl-ExtUtils-Embed下载源码包
https://www.postgresql.org/ftp/source/
Ver15.3 :PostgreSQL: File Browser

上传到服务器之后进行解压。
编译安装PostgreSQL数据库软件
解压之后进入到对应的postgresql 目录,并且执行下面的命令。--prefix指定安装软件目录,--with-perl支持perl语言自定义函数,--with-python支持python语言自定义函数。
./configure --prefix=/opt/postgres/pgsql15.2 --with-perl --with-python这里的/opt/postgres/pgsql15.2并不是强制规定的,
[postgres@localhost postgresql-15.3]$ ./configure --prefix=/opt/postgres/pgsql15.2 --with-perl --with-python

checking build system type... x86_64-pc-linux-gnu
checking host system type... x86_64-pc-linux-gnu
checking which template to use... linux
checking whether NLS is wanted... no
checking for default port number... 5432
checking for block size... 8kB
checking for segment size... 1GB
checking for WAL block size... 8kB
checking for gcc... no
checking for cc... no
configure: error: in `/home/postgres/postgresql-15.3':
configure: error: no acceptable C compiler found in $PATH
我们需要安装合适的编译器。
sudo yum install gcc-c++安装之后发现还是存在问题。
configure: using perl 5.16.3
checking for Perl archlibexp... /usr/lib64/perl5
checking for Perl privlibexp... /usr/share/perl5
checking for Perl useshrplib... true
checking for CFLAGS recommended by Perl... -D_REENTRANT -D_GNU_SOURCE -fno-strict-aliasing -pipe -fstack-protector -I/usr/local/include -D_LARGEFILE_SOURCE -D_FILE_OFFSET_BITS=64
checking for CFLAGS to compile embedded Perl...
checking for flags to link embedded Perl... Can't locate ExtUtils/Embed.pm in @INC (@INC contains: /usr/local/lib64/perl5 /usr/local/share/perl5 /usr/lib64/perl5/vendor_perl /usr/share/perl5/vendor_perl /usr/lib64/perl5 /usr/share/perl5 .).
BEGIN failed--compilation aborted.
no
configure: error: could not determine flags for linking embedded Perl.
This probably means that ExtUtils::Embed or ExtUtils::MakeMaker is not
installed.
依然是存在依赖包问题,这里继续执行下面的命令。
yum install perl-ExtUtils-Embed继续编译,发现还是报错,继续解决依赖问题。发现CenterOs 默认安装了 Python2.7.X版本,但是要求Python3的版本,这里需要先卸载旧版本然后安装新版本。
configure: error: Python version 2.7 is too old (version 3 or later is required)安装Python3
安装Python3 的步骤这里简化罗列到一起:
# 安装 wget指令
yum install wget -y

# 拉取 3.7.10
wget https://www.python.org/ftp/python/3.7.10/Python-3.7.10.tgz

# 解压
tar -zxvf Python-3.7.10.tgz

# 进入解压目录编译安装
#创建一个空文件夹,存放python3程序
mkdir /usr/local/python3

#编译安装
./configure --prefix=/usr/local/python3
# 此处会出现大量的信息打印
#If you want a release build with all stable optimizations active (PGO, etc),
#如果你想获得一个具有所有稳定优化功能(PGO等)的发布版本
#please run ./configure --enable-optimizations
./configure --enable-optimizations


# 编译安装
make && make install
# 耐心等待即可
# 发现报错
# zipimport.ZipImportError: can't decompress data
yum -y install zlib*
# 修改Module路径的setup文件:  Modules/Setup.dist (或者 Modules/Setup) 文件
#Looking in links: /tmp/tmp7scqysgu
#Processing /tmp/tmp7scqysgu/setuptools-47.1.0-py3-none-any.whl
#Processing /tmp/tmp7scqysgu/pip-20.1.1-py2.py3-none-any.whl
#Installing collected packages: setuptools, pip
#Successfully installed pip-20.1.1 setuptools-47.1.0
# 出现上面的类似结果说明安装成功


## 建立Python3的软连接
ln -s /usr/local/python3/bin/python3.7 /usr/bin/python3
ln -s /usr/local/python3/bin/pip3.7 /usr/bin/pip3

# 检查Python3和pip3
python3

pip3 --version


# 安装 pykmip
pip3 install pykmip
下面是python3 和 pip3 安装成功之后的结果。
[root@localhost Python-3.7.10]# python3
Python 3.7.10 (default, Jun 26 2023, 08:43:00)
[GCC 4.8.5 20150623 (Red Hat 4.8.5-44)] on linux
Type "help", "copyright", "credits" or "license" for more information.
>>> quit
Use quit() or Ctrl-D (i.e. EOF) to exit
>>> exit
Use exit() or Ctrl-D (i.e. EOF) to exit
>>> exit();
[root@localhost Python-3.7.10]# pip3 --version
pip 20.1.1 from /usr/local/lib/python3.7/site-packages/pip (python 3.7)
处理异常之后,我们继续执行下面的命令。
./configure --prefix=/opt/postgres/pgsql15.2 --with-perl --with-pythonchecking build system type... x86_64-pc-linux-gnu
checking host system type... x86_64-pc-linux-gnu
checking which template to use... linux
checking whether NLS is wanted... no
checking for default port number... 5432
checking for block size... 8kB
checking for segment size... 1GB
checking for WAL block size... 8kB
checking for gcc... gcc
checking whether the C compiler works... yes
checking for C compiler default output file name... a.out
checking for suffix of executables...
checking whether we are cross compiling... no
checking for suffix of object files... o
checking whether we are using the GNU C compiler... yes
checking whether gcc accepts -g... yes
checking for gcc option to accept ISO C89... none needed
checking for gcc option to accept ISO C99... -std=gnu99
checking for g++... g++
checking whether we are using the GNU C++ compiler... yes
checking whether g++ accepts -g... yes
checking for gawk... gawk
checking whether gcc -std=gnu99 supports -Wdeclaration-after-statement, for CFLAGS... yes
checking whether gcc -std=gnu99 supports -Werror=vla, for CFLAGS... yes
checking whether gcc -std=gnu99 supports -Werror=unguarded-availability-new, for CFLAGS... no
checking whether g++ supports -Werror=unguarded-availability-new, for CXXFLAGS... no
checking whether gcc -std=gnu99 supports -Wendif-labels, for CFLAGS... yes
checking whether g++ supports -Wendif-labels, for CXXFLAGS... yes
checking whether gcc -std=gnu99 supports -Wmissing-format-attribute, for CFLAGS... yes
checking whether g++ supports -Wmissing-format-attribute, for CXXFLAGS... yes
checking whether gcc -std=gnu99 supports -Wimplicit-fallthrough=3, for CFLAGS... no
checking whether g++ supports -Wimplicit-fallthrough=3, for CXXFLAGS... no
checking whether gcc -std=gnu99 supports -Wcast-function-type, for CFLAGS... no
checking whether g++ supports -Wcast-function-type, for CXXFLAGS... no
checking whether gcc -std=gnu99 supports -Wformat-security, for CFLAGS... yes
checking whether g++ supports -Wformat-security, for CXXFLAGS... yes
checking whether gcc -std=gnu99 supports -fno-strict-aliasing, for CFLAGS... yes
checking whether g++ supports -fno-strict-aliasing, for CXXFLAGS... yes
checking whether gcc -std=gnu99 supports -fwrapv, for CFLAGS... yes
checking whether g++ supports -fwrapv, for CXXFLAGS... yes
checking whether gcc -std=gnu99 supports -fexcess-precision=standard, for CFLAGS... yes
checking whether g++ supports -fexcess-precision=standard, for CXXFLAGS... no
checking whether gcc -std=gnu99 supports -funroll-loops, for CFLAGS_UNROLL_LOOPS... yes
checking whether gcc -std=gnu99 supports -ftree-vectorize, for CFLAGS_VECTORIZE... yes
checking whether gcc -std=gnu99 supports -Wunused-command-line-argument, for NOT_THE_CFLAGS... no
checking whether gcc -std=gnu99 supports -Wcompound-token-split-by-macro, for NOT_THE_CFLAGS... no
checking whether gcc -std=gnu99 supports -Wdeprecated-non-prototype, for NOT_THE_CFLAGS... no
checking whether gcc -std=gnu99 supports -Wformat-truncation, for NOT_THE_CFLAGS... no
checking whether gcc -std=gnu99 supports -Wstringop-truncation, for NOT_THE_CFLAGS... no
checking whether the C compiler still works... yes
checking how to run the C preprocessor... gcc -std=gnu99 -E
checking for pkg-config... /usr/bin/pkg-config
checking pkg-config is at least version 0.9.0... yes
checking allow thread-safe client libraries... yes
checking whether to build with ICU support... no
checking whether to build with Tcl... no
checking whether to build Perl modules... yes
checking whether to build Python modules... yes
checking whether to build with GSSAPI support... no
checking whether to build with PAM support... no
checking whether to build with BSD Authentication support... no
checking whether to build with LDAP support... no
checking whether to build with Bonjour support... no
checking whether to build with SELinux support... no
checking whether to build with systemd support... no
checking whether to build with XML support... no
checking whether to build with LZ4 support... no
checking whether to build with ZSTD support... no
checking for ld used by GCC... /usr/bin/ld
checking if the linker (/usr/bin/ld) is GNU ld... yes
checking for ranlib... ranlib
checking for strip... strip
checking whether it is possible to strip libraries... yes
checking for ar... ar
checking for a BSD-compatible install... /usr/bin/install -c
checking for tar... /usr/bin/tar
checking whether ln -s works... yes
checking for a thread-safe mkdir -p... /usr/bin/mkdir -p
checking for bison... no
configure: WARNING:
*** Without Bison you will not be able to build PostgreSQL from Git nor
*** change any of the parser definition files.  You can obtain Bison from
*** a GNU mirror site.  (If you are using the official distribution of
*** PostgreSQL then you do not need to worry about this, because the Bison
*** output is pre-generated.)
checking for flex... no
configure: WARNING:
*** Without Flex you will not be able to build PostgreSQL from Git nor
*** change any of the scanner definition files.  You can obtain Flex from
*** a GNU mirror site.  (If you are using the official distribution of
*** PostgreSQL then you do not need to worry about this because the Flex
*** output is pre-generated.)
checking for perl... /usr/bin/perl
configure: using perl 5.16.3
checking for Perl archlibexp... /usr/lib64/perl5
checking for Perl privlibexp... /usr/share/perl5
checking for Perl useshrplib... true
checking for CFLAGS recommended by Perl... -D_REENTRANT -D_GNU_SOURCE -fno-strict-aliasing -pipe -fstack-protector -I/usr/local/include -D_LARGEFILE_SOURCE -D_FILE_OFFSET_BITS=64
checking for CFLAGS to compile embedded Perl...
checking for flags to link embedded Perl... -fstack-protector -L/usr/lib64/perl5/CORE -lperl -lresolv -lnsl -ldl -lm -lcrypt -lutil -lpthread -lc
checking for python3... /usr/local/bin/python3
configure: using python 3.7.10 (default, Jun 26 2023, 08:43:00)
checking for Python sysconfig module... yes
checking Python configuration directory... /usr/local/lib/python3.7/config-3.7m-x86_64-linux-gnu
checking Python include directory... -I/usr/local/include/python3.7m
checking how to link an embedded Python application... configure: error: could not find shared library for Python
You might have to rebuild your Python installation. Refer to the
documentation for details. Use --without-python to disable building
PL/Python.
发现还是存在问题,从英文描述可以得知,这里需要 Bison 以及 Flex 依赖才能通过配置检查。
configure: WARNING:
*** Without Bison you will not be able to build PostgreSQL from Git nor
*** change any of the parser definition files. You can obtain Bison from
*** a GNU mirror site. (If you are using the official distribution of
*** PostgreSQL then you do not need to worry about this, because the Bison
*** output is pre-generated.)
checking for flex... no
configure: WARNING:
*** Without Flex you will not be able to build PostgreSQL from Git nor
*** change any of the scanner definition files. You can obtain Flex from
*** a GNU mirror site. (If you are using the official distribution of
*** PostgreSQL then you do not need to worry about this because the Flex
*** output is pre-generated.)flex bison 依赖安装
CenterOs7.9 当中执行下面的命令进行安装。
yum install flex bison此时继续make,发现还是报错,这里开始怀疑不是依赖的问题,而是之前的编译命令存在问题,正确的方式应该是使用下面的命令。
./configure --prefix=/opt/postgres/pgsql15.2 --with-perl --with-python3make 命令编译安装检查,这一次终于正常执行了(只不过提示了 --with-python3这个配置指令)

make 过程耐心等待编译即可。
gcc -std=gnu99 -Wall -Wmissing-prototypes -Wpointer-arith -Wdeclaration-after-statement -Werror=vla -Wendif-labels -Wmissing-format-attribute -Wformat-security -fno-strict-aliasing -fwrapv -fexcess-precision=standard -O2 isolation_main.o pg_regress.o -L../../../src/port -L../../../src/common   -Wl,--as-needed -Wl,-rpath,'/opt/postgres/pgsql15.2/lib',--enable-new-dtags  -lpgcommon -lpgport -lz -lreadline -lpthread -lrt -ldl -lm  -o pg_isolation_regress
make[2]: Leaving directory `/home/postgres/postgresql-15.3/src/test/isolation'
make -C test/perl all
make[2]: Entering directory `/home/postgres/postgresql-15.3/src/test/perl'
make[2]: Nothing to be done for `all'.
make[2]: Leaving directory `/home/postgres/postgresql-15.3/src/test/perl'
make[1]: Leaving directory `/home/postgres/postgresql-15.3/src'
make -C config all
make[1]: Entering directory `/home/postgres/postgresql-15.3/config'
make[1]: Nothing to be done for `all'.
make[1]: Leaving directory `/home/postgres/postgresql-15.3/config'
make install 编译安装。
make[1]: Entering directory `/home/postgres/postgresql-15.3/config'
/usr/bin/mkdir -p '/opt/postgres/pgsql15.2/lib/pgxs/config'
/usr/bin/install -c -m 755 ./install-sh '/opt/postgres/pgsql15.2/lib/pgxs/config/install-sh'
/usr/bin/install -c -m 755 ./missing '/opt/postgres/pgsql15.2/lib/pgxs/config/missing'
make[1]: Leaving directory `/home/postgres/postgresql-15.3/config'
编译安装之后构建软连接。
构建软链接
注意这里的安装路径在/home/postgres/postgresql-15.3。
[postgres@localhost ~]$ pwd
/home/postgres

[postgres@localhost postgresql-15.3]$ pwd
/home/postgres/postgresql-15.3

[postgres@localhost pgsql15.2]$ pwd
/opt/postgres/pgsql15.2

# 我们进入到 /opt/postgres/pgsql15.2,这个目录的上一个目录
# /opt/postgres

[postgres@localhost postgresql-15.3]$ ln -sf pgsql15.2 pgsql
构建软链接的命令如下:
ln -sf pgsql15.2 pgsql添加环境变量
这里记住安装的位置为:
/opt/postgres/pgsql15.2修改 /etc/profile,添加环境变量(pgsql15.2 可以替换为软链接 pgsql)。
#postgres
export PATH=/opt/postgres/pgsql15.2/bin:$PATH
export LD_LIBRARY_PATH=/opt/postgres/pgsql15.2/lib:$LD_LIBRARY_PATH
export PGDATA=/opt/postgres/pgdata
使用initdb命令创建数据库实例
如果直接运行pg_ctl -D $PGDATA -l /opt/postgres/logs/logfile start,系统会提示$PGDATA里面不符合启动条件。
How to find out if a directory is a valid PostgreSQL cluster
我们需要进入 $PGDATA 的路径(/opt/postgres/pgdata),然后执行initdb,运行结果如下:
[postgres@localhost pgdata]$ initdb
The files belonging to this database system will be owned by user "postgres".
This user must also own the server process.

The database cluster will be initialized with locale "en_US.UTF-8".
The default database encoding has accordingly been set to "UTF8".
The default text search configuration will be set to "english".

Data page checksums are disabled.

fixing permissions on existing directory /opt/postgres/pgdata ... ok
creating subdirectories ... ok
selecting dynamic shared memory implementation ... posix
selecting default max_connections ... 100
selecting default shared_buffers ... 128MB
selecting default time zone ... America/New_York
creating configuration files ... ok
running bootstrap script ... ok
performing post-bootstrap initialization ... ok
syncing data to disk ... ok

initdb: warning: enabling "trust" authentication for local connections
initdb: hint: You can change this by editing pg_hba.conf or using the option -A, or --auth-local and --auth-host, the next time you run initdb.

Success. You can now start the database server using:

    pg_ctl -D /opt/postgres/pgdata -l logfile start
启动pgsql
注意pgsql不允许使用root启动数据库。
[postgres@localhost pgsql15.2]$ pg_ctl -D $PGDATA -l /opt/postgres/logs start
waiting for server to start..../bin/sh: /opt/postgres/logs: Is a directory
 stopped waiting
pg_ctl: could not start server
Examine the log output.
这里启动命令错误,需要调整命令。
pg_ctl -D $PGDATA -l /opt/postgres/logs/logfile start正确启动之后的控制打印如下:
[postgres@localhost pgsql15.2]$ pg_ctl -D $PGDATA -l /opt/postgres/logs/logfile start
waiting for server to start.... done
server started
观察日志,发现运行是成功的。
[postgres@localhost postgres]$ cat logs/logfile
2023-06-26 09:47:06.820 EDT [106274] LOG:  starting PostgreSQL 15.3 on x86_64-pc-linux-gnu, compiled by gcc (GCC) 4.8.5 20150623 (Red Hat 4.8.5-44), 64-bit
2023-06-26 09:47:06.829 EDT [106274] LOG:  listening on IPv6 address "::1", port 5432
2023-06-26 09:47:06.829 EDT [106274] LOG:  listening on IPv4 address "127.0.0.1", port 5432
2023-06-26 09:47:06.829 EDT [106274] LOG:  listening on Unix socket "/tmp/.s.PGSQL.5432"
2023-06-26 09:47:06.831 EDT [106277] LOG:  database system was shut down at 2023-06-26 09:40:41 EDT
2023-06-26 09:47:06.833 EDT [106274] LOG: database system is ready to accept connections然后我们用postgres这个用户执行psql。
[postgres@localhost postgres]$ psql
psql (15.3)
Type "help" for help.

postgres=#
运行成功。安装执行到这一步之后后续的操作思路和RPM的操作思路类似,这里就不过多赘述了。
写在最后
将RPM和源码安装两种方式的操作流程进行对比,会发现源码安装需要处理很多依赖问题的琐事,显然比较麻烦,这里个人更偏向官方推荐的RPM方式进行Postgresql安装搭建,省去很多钻牛角尖的时间。
参考资料
Linux部署postgresql并开启远程访问 - 掘金 (juejin.cn)
(3条消息) 【数据库】PostgreSQL编译安装详细过程_sdut菜鸟的博客-CSDN博客