vue使用three.js实现盒子上下左右开关门的效果
效果图:
默认是关闭状态。不管从哪个方向打开都需要关闭后才可以进行其他方向的打开操作。

具体实现的步骤:
1、新建文件
在src中创建views文件夹,在views中创建switch文件夹。在switch中创建components文件夹和index.vue文件,最后在components创建BoxSwitch.vue文件。
2、BoxSwitch.vue文件中
(1)、加载需要的js文件
import * as THREE from 'three'
import * as dat from 'dat.gui'
import {Stats} from '@/components/loaders/Stats.js'
import {OrbitControls} from '@/components/loaders/OrbitControls'
(2)、核心框架
 export default {
 	name:'BoxSwitch',
    data(){  //Vue实例的数据对象
        return{
            scene:null,
            camera:null,
            renderer:null,
            mesh:null,
            stats:null,
            geometry:null,
        }
    },
    props:{  //传递数据
        width:{type:Number,default:40},
        height:{type:Number,default:40},
        depth:{type:Number,default:20},
    },
    methods:{ 定义 init(); 和 animate();},
    mounted(){ //在模板渲染成html后调用,通常是初始化页面完成后,再对html的dom节点进行一些需要的操作
    	this.init();
        this.animate();}
}
(3)、init()方法
实现的思想:
设置六个不同的面,给每个面的外层贴上不同的纹理,里层贴上相同的纹理。外层mesh设置好后先不添加到scene中。内层主要通过cube旋转Math.PI,然后将其添加到mesh里。最后将mesh添加到scene中。然后通过属性设置将六个面按一定的位置以及group.add()方法组合成一个盒子。通过生成gui并添加5个参数,来设置关门和向左、向右、向上、向下开门。
开门的核心思想:
door_state和direction的初始设置为true。当door_state为true时,可进行开门操作。
将要旋转的某一个面绕着旋转后面中心位置坐标为0的轴进行一定角度的旋转。然后根据旋转角度计算得到旋转后该面中心位置的x、y、z的位置坐标,将其设置为该面的位置坐标。最后设置door_state和direction的布尔类型。
关门的核心思想:
当door_state为false时,可进行关门操作。direction为true时向左向右关门,否为向上向下关门。
首先设置旋转面的位置坐标是未进行旋转时面的位置坐标,并将上一个为实现开门效果所绕的旋转轴的旋转弧度设为0 。最后设置door_state的布尔类型。
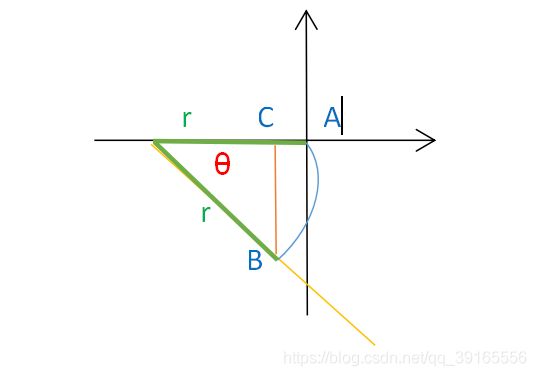
旋转位置核心计算方法:
假设在开门时面的中心位置从A移动到B点,且扇形半径为r,旋转角度为θ。建立如下坐标轴。那么问题就转化为如何计算B点坐标即可,下图中B点坐标为*(-(r-rcosθ),-rsinθ)。

具体实现过程
a、定义一个Scene。
b、定义一个PerspectiveCamera。
c、定义一个WebGLRenderer渲染器。
d、定义一个包含AmbientLight和DirectionalLight的混合光。
e、六面体两两对应面大小一致,定义3个不同大小的几何。
f、 六面体每个面设置加载不同纹理的材质,并设置mesh的position属性。
g、六面体每个面设置加载相同纹理的材质,并设置cube的旋转Math.PI弧度。
h、将每个cube分别添加到不同的mesh中,然后将mesh添加到scene中。
i、定义一个Group,将mesh组合在一起。
j、定义一个OrbitControls,用来控制dat.gui中参数。
k、使用dat.gui添加一个用户界面,选择不同的target参数添加到控制器中来控制开关门。
l、关门时,通过door_state和direction类型,将mesh的position设置为未旋转时位置坐标以及旋转轴的rotation弧度设为0 。
m、开门时通过设置的旋转角度来计算旋转后面中心位置坐标,并将mesh的position设置为该点坐标。最后设置door_state和direction的布尔类型。
n、定义性能监测器以及坐标轴助手。
 init(){
        this.scene = new THREE.Scene();
        this.scene.background = new THREE.Color( 0xCCE8CF);

        this.camera = new THREE.PerspectiveCamera(45, window.innerWidth / window.innerHeight, 1, 10000);
        this.camera.position.set(0,0,180);
        this.camera.updateProjectionMatrix(); //相机更新

        this.renderer = new THREE.WebGLRenderer({ antialias: true });
        this.renderer.setPixelRatio(window.devicePixelRatio);
        this.renderer.setSize(window.innerWidth, window.innerHeight);
        this.renderer.shadowMap.enabled = true;
        this.renderer.shadowMap.type = THREE.PCFSoftShadowMap;
        this.renderer.gammaInput = true;
        this.renderer.gammaOutput = true;
        document.getElementById("WebGL-output").appendChild(this.renderer.domElement);

        let light = new THREE.AmbientLight(0x666666);
        this.scene.add(light);
        let dirlight = new THREE.DirectionalLight(0xdfebff, 1);
        dirlight.position.set(10, 10, 100);
        dirlight.castShadow = true;

        let geometry1 = new THREE.PlaneBufferGeometry(this.width,this.height);
        let geometry2 = new THREE.PlaneBufferGeometry(this.width,this.depth);
        let geometry3 = new THREE.PlaneBufferGeometry(this.depth,this.height);

        let loader = new THREE.TextureLoader();

        let texture1 = loader.load('/static/texture/squirrelbox/1.jpg');
        let material1 = new THREE.MeshLambertMaterial({map:texture1});
        this.mesh1 = new THREE.Mesh(geometry1,material1);
        this.mesh1.position.set(0,0,this.depth/2);


        let texture3 = loader.load('/static/texture/squirrelbox/3.jpg');
        let material3 = new THREE.MeshLambertMaterial({map:texture3});
        this.mesh3 = new THREE.Mesh(geometry1,material3);
        this.mesh3.position.set(0,0,-this.depth/2);
        this.mesh3.rotation.x = -Math.PI;
        this.mesh3.rotation.z = -Math.PI;

        let texture2 = loader.load('/static/texture/squirrelbox/2.jpg');
        let material2 = new THREE.MeshLambertMaterial({map:texture2});
        this.mesh2 = new THREE.Mesh(geometry2,material2);
        this.mesh2.position.set(0,-this.height/2,0);
        this.mesh2.rotation.x = -Math.PI/2;

        let texture4 = loader.load('/static/texture/squirrelbox/4.jpg');
        let material4 = new THREE.MeshLambertMaterial({map:texture4});
        this.mesh4 = new THREE.Mesh(geometry2,material4);
        this.mesh4.position.set(0,this.height/2,0);
        this.mesh4.rotation.x = -Math.PI/2;

        let texture5 = loader.load('/static/texture/squirrelbox/5.jpg');
        let material5 = new THREE.MeshLambertMaterial({map:texture5});
        this.mesh5 = new THREE.Mesh(geometry3,material5);
        this.mesh5.position.set(-this.width/2,0,0);
        this.mesh5.rotation.y = -Math.PI/2;

        let texture6 = loader.load('/static/texture/squirrelbox/5.jpg');
        let material6 = new THREE.MeshLambertMaterial({map:texture6});
        this.mesh6 = new THREE.Mesh(geometry3,material6);
        this.mesh6.position.set(this.width/2,0,0);
        this.mesh6.rotation.y = Math.PI/2;

        let material0 = new THREE.MeshLambertMaterial({map:texture2});
        let cube = new THREE.Mesh(geometry1,material0);
        cube.rotation.y = Math.PI;
        this.mesh1.add(cube);
        this.scene.add(this.mesh1);

        let cube3 = new THREE.Mesh(geometry1,material0);
        cube3.rotation.y = Math.PI;
        this.mesh3.add(cube3);
        this.scene.add(this.mesh3);

        let cube2 = new THREE.Mesh(geometry2,material0);
        cube2.rotation.y = Math.PI;
        this.mesh2.add(cube2);
        this.scene.add(this.mesh2);

        let cube4 = new THREE.Mesh(geometry2,material0);
        cube4.rotation.y = Math.PI;
        this.mesh4.add(cube4);
        this.scene.add(this.mesh2);

        let cube5 = new THREE.Mesh(geometry3,material0);
        cube5.rotation.y = Math.PI;
        this.mesh5.add(cube5);
        this.scene.add(this.mesh5);

        let cube6 = new THREE.Mesh(geometry3,material0);
        cube6.rotation.y = Math.PI;
        this.mesh6.add(cube6);
        this.scene.add(this.mesh6);

        let self = this;

        this.group = new THREE.Group();
        this.group.add(this.mesh1);
        this.group.add(this.mesh2);
        this.group.add(this.mesh3);
        this.group.add(this.mesh4);
        this.group.add(this.mesh5);
        this.group.add(this.mesh6);
        this.scene.add(this.group);

        let controls = new OrbitControls(this.camera, this.renderer.domElement);
        this.controls = new function(){
            this.target = "closeDoor";
        };

        let gui = new dat.GUI();
        let door_state = true;
        let direction = true;
        gui.add(this.controls, 'target', ['closeDoor','openLeft','openRight','openUp','openDown']).onChange(function (e) {
            console.log(e);
            switch (e) {
                case "closeDoor":
                if(!door_state){
                    if(direction){
                        self.mesh1.position.set(0,0,self.depth/2);
                        self.mesh1.rotation.y =0 ;
                    }else{
                        self.mesh1.position.set(0,0,self.depth/2);
                        self.mesh1.rotation.x =0 ;
                    }
                    door_state = true;
                }
                break;

                case "openLeft":
                    if(door_state){
                        let angle = -Math.PI/4;
                        self.mesh1.rotation.y = angle;
                        let a = 0 - (self.width * 0.5 *(1-Math.cos(angle)));
                        let b = 0;
                        let c = self.depth/2 + self.width *0.5 *Math.sin(Math.abs(angle));
                        self.mesh1.position.set(a, b,c);
                        door_state = false;
                        direction = true;
                    }
                    break;

                 case "openRight":
                    if(door_state){
                        let angle = Math.PI/4;
                        self.mesh1.rotation.y = angle;
                        let a = 0 + (self.width * 0.5 *(1-Math.cos(angle)));
                        let b = 0;
                        let c = self.depth/2 + self.width *0.5 *Math.sin(Math.abs(angle));
                        self.mesh1.position.set(a, b,c);
                        door_state = false;
                        direction = true;
                    }
                    break;

                case "openUp":
                    if(door_state){
                        let angle = -Math.PI/4;
                        self.mesh1.rotation.x = angle;
                        let a2 = 0;
                        let b2 = 0 + (self.height * 0.5 *(1-Math.cos(angle)));
                        let c2 = self.depth/2 + self.height *0.5 *Math.sin(Math.abs(angle));
                        self.mesh1.position.set(a2, b2,c2);
                        door_state = false;
                        direction = false;
                    }
                    break;

                case "openDown":
                    if(door_state){
                        let angle = Math.PI/4;
                        self.mesh1.rotation.x = angle;
                        let a2 = 0;
                        let b2 = 0 - (self.height * 0.5 *(1-Math.cos(angle)));
                        let c2 = self.depth/2 + self.height *0.5 *Math.sin(Math.abs(angle));
                        self.mesh1.position.set(a2, b2,c2);
                        door_state = false;
                        direction = false;
                    }
                    break;
            }
        });
        this.stats = new Stats(); // 页面中添加性能监测器
        this.stats.domElement.style.position = 'absolute';
        this.stats.domElement.style.left = '0px';
        this.stats.domElement.style.top = '0px';
        document.getElementById("Stats-output").appendChild(this.stats.domElement);

        let axes = new THREE.AxisHelper(200); // 坐标轴助手
        this.scene.add(axes);
    },
(4)、animate()
当改变了物体的属性时,需要重新调用render()函数,浏览器才会自动刷新场景。
为了循环渲染,要使用requestAnimationFrame函数,传递一个callback参数。
animate() {
      requestAnimationFrame(this.animate);
      this.renderer.render(this.scene, this.camera);
      this.stats.update();   //性能监测器更新
 }
3、index.vue文件中
(1)
自定义标签,使用变量存储 prop 的初始值,并用 watch 来观察 prop 值得变化,发生变化时,更新变量的值。
(2)
a、引入组件
b、url表现形式例子:http://localhost:8080/#/onoff?a=80&b=40 通过this. r o u t e . q u e r y 获 取 u r l 中 参 数 值 。 c 、 最 后 调 用 c r e a t e ( ) , 通 过 t h i s . route.query获取url中参数值。 c、最后调用create(),通过this. route.query获取url中参数值。c、最后调用create(),通过this.watch监听获取到的参数,并返回给标签中变量wid和hei。
4、router文件夹下index.js文件中
设置路由
routes: [
    {
      path: '/onoff',
      name: 'onoff',
      component: () => import('@/views/switch/index')
    }
 ]
全部代码网址:
https://github.com/karroy0715/vue_three_3d/tree/master/src/views/switch