angular父子组件间传值
父传子
父组件向子组件传入值
父组件名为home,子组件为head
home.component.html代码:【父组件】
//通过[]定义一个子组件的属性,该值必须与子组件中所引用的名字相同
//等号后面的值为父组件所要传递的属性名【类里面定义的属性】或者方法
//这里等于将父组件中msgParent的值,绑定在子组件的属性上
//将parentRun的方法赋予给childRun的属性中
<app-header [msgChild]="msgParent" [childRun]="parentRun">app-header>
home.component.ts代码【父组件】
import { Component, OnInit } from '@angular/core';

@Component({
  selector: 'app-home',
  templateUrl: './home.component.html',
  styleUrls: ['./home.component.scss']
})
export class HomeComponent implements OnInit {
  public msgParent:string = '我是父组件的数据';	//定义一个属性并赋予值
  ngOnInit(): void {
  }
  parentRun(){
    console.log('点击了子组件的button触发了父组件中的方法');
  }
}
header.componen.html【子组件】
//在页面中展示父组件中传递的数值
<h2>{{msgChild}}h2>
<button (click)='childRun()'>子组件button>
head.component.ts代码【子组件】
import { Component, OnInit, Input } from '@angular/core'; //必须先导入Input模块
@Component({
selector: 'app-header',
templateUrl: './header.component.html',
styleUrls: ['./header.component.scss']
})
export class HeaderComponent implements OnInit {
@Input() msgChild:string; //通过@input来修饰父组件中在子组件上定义的属性名
@Input() childRun:any; //修饰完后就可以在子组件中,通过this.msgChild来访问值
//如同在子组件定义的属性一样
//至于为啥修饰后,就可以用,本人很辣鸡,也没办法给出答案。
/**
第二种写法
@Input("msgChild") msg:string;
//括号内为父组件种为子组件定义的属性名,
//括号外为在子组件的类中定义的属性名,如第这种写法的话,html文件应该这样写
{{msg}}
**/
constructor() { }
ngOnInit(): void {
console.log(this.msgChild);
}
}
子传父
通过广播事件传值
header.componen.html【子组件】
定义发送事件,这里通过 点击按钮后将子组件中的数值与方法传递给父组件
<button (click)='send()'>子组件发送值给父组件button>
head.component.ts代码【子组件】
- 必须在子组件中导入output跟EventEmitter 为事件驱动
- 然后通过@Output()来修饰一个EventEmitter实例的变量
- 定义触发传值的触发事件
- 通过EventEmitter实例的变量名来广播所要传递值与方法
import { Component, OnInit, Input,Output,EventEmitter } from '@angular/core';

@Component({
  selector: 'app-header',
  templateUrl: './header.component.html',
  styleUrls: ['./header.component.scss']
})
export class HeaderComponent implements OnInit {
  @Input() msgChild:string;
  @Input() childRun:any;
  @Output() public childSend = new EventEmitter();   //通过Output装饰器声明一个变量 变量等于EventEmitter的实例
  constructor() { }

  ngOnInit(): void {
  }
  send(){
    this.childSend.emit('我是子组件的数据')
  }
}
home.component.html代码:【父组件】
通过监听EventEmitter实例的变量名。来监听广播,通过$event来获取到子组件传递的值。
这边通过将 $event当作形参传入方法中,赋值给title。也可以监听的时候直接赋值给title
<h2>{{title}}h2>
<app-header (childSend)="getChild($event)">app-header>
home.component.ts代码【父组件】
import { Component, OnInit } from '@angular/core';

@Component({
  selector: 'app-home',
  templateUrl: './home.component.html',
  styleUrls: ['./home.component.scss']
})
export class HomeComponent implements OnInit {
  public title:string = '父组件初始的title'
  constructor() { }
  public msgParent:string = '我是父组件的数据';
  ngOnInit(): void {
  }
  change(){
    this.title='改变了'
  }
  parentRun(){
    console.log('点击了子组件的button触发了父组件中的方法');
  }
  getChild(e:any){
    this.title = e;
  }
}
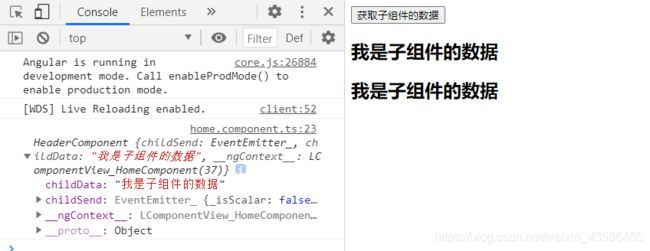
通过视图节点传值
home.component.html代码:【父组件】
在父组件中通过#来定义子组件的视图节点名
<button (click)="getChild()">获取子组件的数据button>
<h2>{{title}}h2>
<app-header #child >app-header>
home.component.ts代码【父组件】
- 导入ViewChild
- 通过ViewChild(‘视图节点名’)来修饰一个自己属性名,等于将子组件的整个组件对象赋予给了属性
- 通过属性名来获取子组件里的方法与变量名
import { Component, OnInit,ViewChild } from '@angular/core';

@Component({
  selector: 'app-home',
  templateUrl: './home.component.html',
  styleUrls: ['./home.component.scss']
})
export class HomeComponent implements OnInit {
  public title:string = '父组件初始的title'
  constructor() { }
  @ViewChild('child') son:any;
  ngOnInit(): void {
  }
  getChild(){
  	console.log(this.son)
    this.title = this.son.childData
  }
}
header.componen.html【子组件】
<h2>{{childData}}h2>
header.componen.ts【子组件】
import { Component, OnInit, Input,Output,EventEmitter } from '@angular/core'; //EventEmitter 为事件驱动

@Component({
  selector: 'app-header',
  templateUrl: './header.component.html',
  styleUrls: ['./header.component.scss']
})
export class HeaderComponent implements OnInit {
  @Input() msgChild:string;
  @Input() childRun:any;
  constructor() { }
  public childData:string = '我是子组件的数据'
  ngOnInit(): void {
  }
}


