mongoose Web服务器 嵌入式 web服务器
mongoose Web服务器
Mongoose - Embedded Web Server
参考链接
https://github.com/tashaxing/CppHttpDemo
https://cesanta.com/docs/
https://forum.cesanta.com/c/mongoose-library/6
https://github.com/cesanta/mongoose/releases
https://support.huaweicloud.com/prtg-kunpengweb/mongoose_01_0001.html
https://github.com/cesanta/mongoose/tree/master/examples
https://github.com/cesanta/mongoose
- Download Mongoose Source Code here
- Ask questions on support forum
- Read User Guide and API reference
- Study mongoose example code
https://forum.cesanta.com/c/mongoose-library/6
mongoose魔改历程(C++封装http和ws服务、多线程、优化)
http://www.fenlog.com/post/126.html
基于mongoose + MFC 搭建本本地HTTP服务器
https://blog.csdn.net/moyebaobei1/article/details/81042336
Our customers use Mongoose Web Server to implement:
Our customers use Mongoose Web Server to implement:
Web UI interface on devices
RESTful API services
Telemetry data exchange
Remote control for a product
Remote software / firmware updates
Remote monitoring
Mongoose是一个web服务器
通过提供一个web接口给它,
它可以嵌入到现有的应用程序中去。
Mongooseweb服务器的执行是自满足的,它不依赖于任何其他服务。
如果你将它复制到任何目录并执行,
它将将启动web服务并将当前目录作为主目录、端口号是8080。
mongoose的源码地址:https://github.com/cesanta/mongoose
mongoose的用户手册:https://www.cesanta.com/developer/mongoose
软件简介
Mongoose Web Server是一款易于使用的Web服务器,它可以嵌入到其它应用程序中,为其提供Web接口。
主要特写:
跨平台,支持 Windows、OS X 和 Linux
支持 CGI, SSL, SSI, Digest (MD5) 认证,WebSocket 和 WebDAV
支持断点续传和 URL 重写
基于 IP 的 ACL,支持 Windows 服务,支持 GET, POST, HEAD, PUT, DELETE 方法
Excluding files from serving by URI pattern
下载速度限制,基于客户端子网和 URI 模式
体积小,可执行文件只有 40k 左右
可嵌入式,提供简单的 API (mongoose.h). 只需一个源码文件 mongoose.c
嵌入式实例: hello.c, post.c, upload.c, websocket.c
提供 Python 和 C# 版本
采用 MIT 授权协议
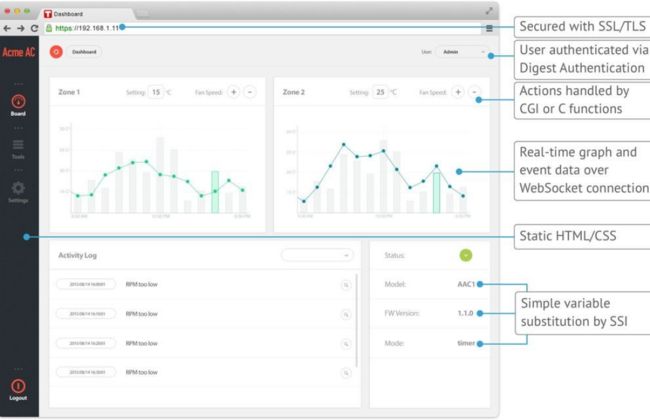
Dashboard (仪表面板) Example
Mongoose is often used to implement device dashboards and real-time
data exchange over Websocket. Here is a dashboard example that illustrates
the functionality:
[外链图片转存失败,源站可能有防盗链机制,建议将图片保存下来直接上传(img-BIEabZik-1619516637767)(http://www.cesanta.com/hubfs/www.cesanta.com/diagrams/dash_mongoose_diagram.png)]
Developing a new product? Contact us today to discuss how Mongoose can help
buildroot中包含
make mongoose-rebuild
mongoose-6.2.tar.gz
package/swupdate/swupdate.mk:# swupdate bundles its own version of mongoose (version 3.8)
nmap-7.40/nmap-service-probes:
output/host/usr/arm-buildroot-linux-uclibcgnueabihf/sysroot/usr/include/mongoose.h:
https://github.com/cesanta/mongoose/tree/master/examples/captive_dns_server[captive_dns_server]
output/build/nmap-7.40/nmap-service-probes:# http://code.google.com/p/mongoose/
例子
api_server/
arduino_restful_client/
arduino_restful_server/
big_upload/
captive_dns_server/
coap_client/
coap_server/
connected_device_1/
connected_device_2/
connected_device_3/
connected_device_4/
ESP8266_RTOS/
examples.mk
.gitignore
http_client/
json_rpc_server/
load_balancer/
Makefile
mqtt_broker/
mqtt_client/
multithreaded_restful_server/
netcat/
publish_subscribe/
raspberry_pi_mjpeg_led/
restful_client/
restful_server/
restful_server_s3/
rules.mk
settings_panel_for_a_device/
simplest_web_server/
tcp_echo_server/
websocket_chat/
mongoose 与 websocket
mongoose 与 ajax
mongoose 与 rest
mongoose 与 django
mongoose 与 mqtt
别人的应用
Civetweb是一款小型HTTP服务器,具有用C编写的可选Lua和SQLite支持。它可以嵌入到C / C ++应用程序中,或用作Windows,Linux,BSD或Mac-OS的独立Web服务器。 该项目基于Mongoose Web服务器,但是维护MIT许可证,并且没有GPL许可证。 安装指南https://github.com/civetweb/civetweb/blob/master/docs/Installing.md我们欢迎并鼓励您贡献自己的力量。 官方源代码位于https://github.com/civetweb/civetweb。可能在https://github.com/civetweb/civetweb/issues报告问题。使用“ Civetweb” Google小组进行问题和讨论https:// groups.google.com/d/forum/civetweb
acu项目 使用的它
![]()
![]()
jquery.js
![]()
网页定时 执行的语法
jquery 定时执行
setInterval(func,2700)
jquery
多国语言设置
动态数据更新
11
跨平台:Linux / Unix,QNX,eCos,Windows,Android,iPhone支持
单线程,异步,基于事件的非阻塞API
内置的协议:
普通TCP,UDP的平原,SSL / TLS(传输,单向或双向)
HTTP客户端,服务器
WebSocket客户端,服务器
JSON-RPC客户端,服务器
MQTT客户端,服务器
CoAP客户端,服务器
DNS客户端、DNS服务器、异步DNS解析器
目录
/home/sama5d2/buildroot/buildroot-2017.02.2/output/build/mongoose-6.2
.
├── examples
│ ├── api_server
│ │ ├── api_server.c
│ │ ├── db_plugin.h
│ │ ├── db_plugin_sqlite.c
│ │ ├── Makefile
│ │ ├── sqlite3.c
│ │ ├── sqlite3.h
│ │ ├── unit_test.sh
│ │ └── web_root
│ │ └── index.html
│ ├── arduino_restful_client
│ │ ├── arduino_restful_client.ino
│ │ ├── Makefile
│ │ └── README.md
│ ├── arduino_restful_server
│ │ ├── arduino_restful_server.ino
│ │ ├── Makefile
│ │ └── README.md
│ ├── big_upload
│ │ ├── big_upload.c
│ │ └── Makefile
│ ├── captive_dns_server
│ │ ├── captive_dns_server.c
│ │ └── Makefile
│ ├── coap_client
│ │ ├── coap_client.c
│ │ └── Makefile
│ ├── coap_server
│ │ ├── coap_server.c
│ │ └── Makefile
│ ├── connected_device_1
│ │ ├── Makefile
│ │ ├── server.c
│ │ └── web_root
│ │ ├── index.shtml
│ │ ├── logo.png
│ │ └── style.css
│ ├── connected_device_2
│ │ ├── Makefile
│ │ ├── server.c
│ │ └── web_root
│ │ ├── index.shtml
│ │ ├── logo.png
│ │ └── style.css
│ ├── connected_device_3
│ │ ├── Makefile
│ │ ├── server.c
│ │ └── web_root
│ │ ├── index.shtml
│ │ ├── jquery-1.11.3.min.js
│ │ ├── logo.png
│ │ ├── main.js
│ │ └── style.css
│ ├── connected_device_4
│ │ ├── Makefile
│ │ ├── server.c
│ │ └── web_root
│ │ ├── index.shtml
│ │ ├── jquery-1.11.3.min.js
│ │ ├── jquery.flot.min.js
│ │ ├── jquery.flot.time.js
│ │ ├── logo.png
│ │ ├── main.js
│ │ └── style.css
│ ├── ESP8266_RTOS
│ │ ├── gen_misc.sh
│ │ ├── ld
│ │ │ └── eagle.app.v6.512.compact.ld
│ │ ├── Makefile
│ │ ├── README.md
│ │ ├── readme.txt
│ │ └── user
│ │ ├── esp_libc.c
│ │ ├── Makefile
│ │ ├── mongoose.c -> …/…/…/mongoose.c
│ │ ├── mongoose.h -> …/…/…/mongoose.h
│ │ └── user_main.c
│ ├── examples.mk
│ ├── http_client
│ │ ├── http_client.c
│ │ ├── http_client.vcxproj
│ │ └── Makefile
│ ├── json_rpc_server
│ │ ├── json_rpc_server.c
│ │ └── Makefile
│ ├── load_balancer
│ │ ├── Dockerfile
│ │ ├── load_balancer.c
│ │ ├── Makefile
│ │ ├── README.md
│ │ └── unit_test.sh
│ ├── Makefile
│ ├── mqtt_broker
│ │ ├── Makefile
│ │ └── mqtt_broker.c
│ ├── mqtt_client
│ │ ├── Makefile
│ │ └── mqtt_client.c
│ ├── multithreaded_restful_server
│ │ ├── Makefile
│ │ └── multithreaded_restful_server.c
│ ├── netcat
│ │ ├── Makefile
│ │ └── nc.c
│ ├── publish_subscribe
│ │ ├── Makefile
│ │ └── publish_subscribe.c
│ ├── raspberry_pi_mjpeg_led
│ │ ├── cloud_side.c
│ │ ├── device_side.c
│ │ ├── docs
│ │ │ └── arch.png
│ │ ├── Makefile
│ │ ├── README.adoc
│ │ └── web_root
│ │ ├── doc.html
│ │ ├── docs
│ │ │ └── arch.png -> …/…/docs/arch.png
│ │ ├── framework7.min.css
│ │ ├── framework7.min.js
│ │ └── index.html
│ ├── restful_client
│ │ ├── Makefile
│ │ ├── restful_client.c
│ │ └── restful_client.vcxproj
│ ├── restful_server
│ │ ├── index.html
│ │ ├── Makefile
│ │ ├── restful_server.c
│ │ └── restful_server.vcxproj
│ ├── restful_server_s3
│ │ ├── index.html
│ │ ├── Makefile
│ │ ├── README.md
│ │ └── restful_server_s3.c
│ ├── rules.mk
│ ├── settings_panel_for_a_device
│ │ ├── Makefile
│ │ ├── settings_panel.c
│ │ └── web_root
│ │ ├── fossa.jpg
│ │ ├── index.shtml
│ │ └── jquery-1.11.3.min.js
│ ├── simplest_web_server
│ │ ├── Makefile
│ │ └── simplest_web_server.c
│ ├── tcp_echo_server
│ │ ├── echo_server.c
│ │ └── Makefile
│ └── websocket_chat
│ ├── index.html
│ ├── Makefile
│ └── websocket_chat.c
├── jni
│ └── Android.mk
├── libmongoose.a
├── LICENSE
├── mongoose.c
├── mongoose.h
├── mongoose.o
└── README.md
41 directories, 121 files
package/swupdate/swupdate.mk:# swupdate bundles its own version of mongoose (version 3.8)
SWUpdate: 嵌入式系统的软件升级
package/swupdate/swupdate.mk:# swupdate bundles its own version of mongoose (version 3.8)
https://github.com/cesanta/mongoose
概述
本项目被认为有助于从存储媒体或网络更新嵌入式系统。但是,它应该主要作为一个框架来考虑,在这个框架中可以方便地向应用程序添加更多的协议或安装程序(在SWUpdate中称为处理程序)。
一个用例是从外部本地媒体(如USB-Pen或sd卡)进行更新。在这种情况下,更新是在没有操作员干预的情况下完成的:它被认为是“一键更新”,软件在复位时启动,只需按下一个键(或者以任何目标可以识别的方式),自动进行所有检查。最后,更新过程只向操作员报告状态(成功或失败)。
输出可以使用帧缓冲设备显示在LCD上,也可以定向到串行通讯端口上(Linux控制台)。
它通常用于单拷贝方案中,在initrd中运行(用Yocto提供的配方生成)。但是,通过使用软件集合( collections ),可以在双拷贝方案中使用它。
如果启动了远程更新,SWUpdate将启动嵌入式web服务器并等待请求。操作者必须上传一个合适的映像,然后SWUpdate会进行检查并安装。所有输出都通过AJAX通知的方式通知操作人员的浏览器。
111
最近在产品中嵌入mongoose作web服务器,对外提供Ajax接口以及提供一个简单的web管理界面。从我们的开发和使用情况看,mongoose确实是个很不错的产品。将SSL的功能删除后,整个功能模块非常小巧,非常适合作产品的配置管理服务器。
由于我们的产品主要面向windows平台,因此我们需要花点时间对mongoose进行改动。这两天遇到一个非常奇怪的问题,mongoose发出的json流是空的,而我们调试发现送给mongoose的数据是正确的、情绪很稳定的json流。这让人很纠结。
当然这个问题最终解决了。mongoose代码中使用了BUFSIZ的宏定义,这个定义在windows中是标准库中有定义,缺省值是512。当需要发送的数据超出这个限制时,mongoose会丢弃整个包。去修改windows的标准定义显然是不合适的,因此在mongoose.c文件头,重定义后再编译即可。考虑到我们发送的数据量比较大,我们直接将它重定义为4096:
#ifdef BUFSIZ
#undef BUFSIZ
#endif
#define BUFSIZ 4096
华为云的一个文章
建议的版本
建议使用版本为“6.10”
安装
下载和解压Mongoose软件包。
cd /usr/local/src
wget https://github.com/cesanta/mongoose/archive/6.10.tar.gz
tar -zxvf 6.10.tar.gz
运行和验证
创建Web服务器。
Mongoose提供的是源代码,分别为“mongoose.c”和“mongoose.h”, 通过测试调用它们创建Web服务器。
cd /usr/local/src/mongoose-6.10/
touch server.c
vi server.c
插入如下代码,并保存。
#include "mongoose.h"
static const char *s_http_port = "8001";
static struct mg_serve_http_opts s_http_server_opts;
static void event_handler(struct mg_connection *nc, int ev, void *p) {
  if (ev == MG_EV_HTTP_REQUEST) {
    mg_serve_http(nc, (struct http_message *) p, s_http_server_opts);
  }
}

int main(void) {
  struct mg_mgr mgr;
  struct mg_connection *nc;
  mg_mgr_init(&mgr, NULL);
  printf("Starting web server on port %s\n", s_http_port);
  nc = mg_bind(&mgr, s_http_port, event_handler);
  if (nc == NULL) {
    printf("Failed to create listener\n");
    return 1;
  }
  mg_set_protocol_http_websocket(nc);
  s_http_server_opts.document_root = ".";
  s_http_server_opts.enable_directory_listing = "yes";
  while(1) {
    mg_mgr_poll(&mgr, 1000);
  }
  mg_mgr_free(&mgr);
  return 0;
}
编译源码。
gcc -o server server.c mongoose.h mongoose.c
./server
验证。
放通云服务器安全组中入口规则里的8001端口,在浏览器中输入“http://[ECS IP]:8001”,可以看到“server.c”所在目录的文件列表信息。
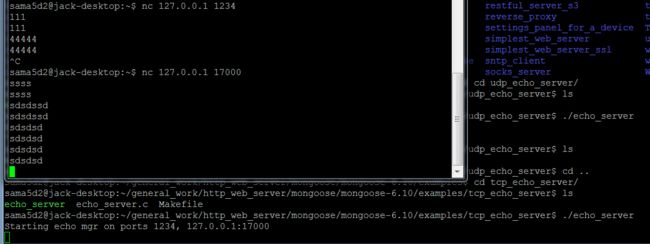
运行效果:
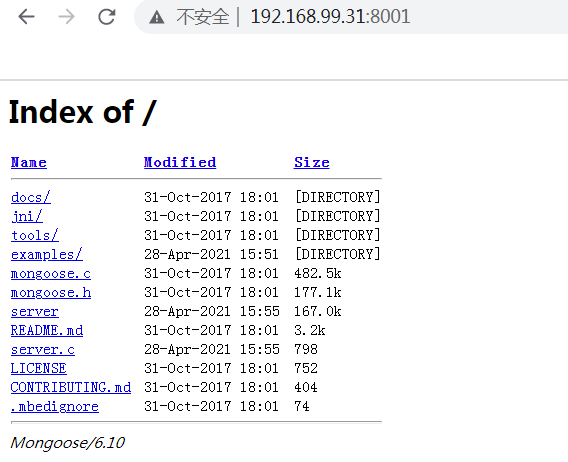
./http_client www.baidu.com
tcp_echo_server
C语言实用之道 里面有讲 mongoose的部分 第十三章
作者: [美]Giulio Zambon
《C语言实用之道》先用一章介绍了C的易错难点,阴暗角落,为后面章节扫平障碍,然后用了几章阐述迭代,递归,二叉树,链表,栈与队列,字符串,动态数组,搜索与排序这些最常用也是所有业界项目一定会用到的基础组件,最主要的是作者用的都是工业级的方法,而非教学演示例子,无论从标识符命名还是代码规范,都具备工业实战水准。 这对于那些写C的专业程序员会让他们先会产生共鸣,经验比较少的可以学习到优秀的经验并见识一种正规做法,经验丰富的可以从中提取自己所需,并与自己的认知进行对比,反思自己的实现方式的优与劣,而且这几章数据结构的讲解都给出了一个数据结构库的实现。
第1章 引言 1
第2章 微妙之C 9
第3章 迭代、递归和二叉树 55
第4章 列表、栈和队列 97
第5章 异常处理 133
第6章 字符串辅助功能 153
第7章 动态数组 205
第8章 搜索 227
第9章 排序 279
第10章 数值积分 303
第11章 嵌入式软件 345
第12章 数据库 373
第13章 使用Mongoose开发Web服务器 409
第14章 游戏应用:MathSearch 433

