谷粒商城(一)
谷粒商城
一、项目介绍
谷粒商城是一个分布式电商项目
二、分布式基础概念
简单说就是一个分布式系统服务就是把一个服务拆分成多个服务
百度百科
分布式系统(distributed system)是建立在网络之上的软件系统。正是因为软件的特性,所以分布式系统具有高度的内聚性和透明性。因此,网络和分布式系统之间的区别更多的在于高层软件(特别是操作系统),而不是硬件。
集群是个物理形态,分布式是个工作方式。
远程调用:在分布式系统中,各个服务可能处于不同主机,但是服务之间不可避免的相互调用,我们成为远程调用
springcloud中使用HTTP+JSON的方式完成远程调用
服务注册/发现&注册中心
A服务调用B服务,A服务并不知道B服务当前在哪几台服务器有,那些是正常的,那些服务已经下线。解决这个问题可以引入注册中心。
配置中心用来几种管理微服务的配置信息。
服务熔断&服务降级
在微服务架构中,微服务之间通过网络进行通信,存在相互依赖,当其中一个服务不可用时,有可能会造成雪崩效应。要防止这样的情况,必须要有容错机制来保护服务。
rpc远程调用情景:
订单服务 --> 商品服务 --> 库存服务
库存服务出现故障导致响应慢,导致商品服务需要等待,可能等到10s后库存服务才能响应。库存服务的不可用导致商品服务阻塞,商品服务等的期间,订单服务也处于阻塞。一个服务不可用导致整个服务链都阻塞。如果是高并发,第一个请求调用后阻塞10s得不到结果,第二个请求直接阻塞10s。更多的请求进来导致请求积压,全部阻塞,最终服务器的资源耗尽。导致雪崩
解决方案:
服务熔断
指定超时时间,库存服务3s没有响应就超时,如果经常失败,比如10s内100个请求都失败了。开启断路保护机制,下一次请求进来不调用库存服务了,因为上一次100%错误都出现了,我们直接在此中断,商品服务直接返回,返回一些默认数据或者null,而不调用库存服务了,这样就不会导致请求积压。
设置服务的超时,当被调用的服务经常失败到达某个阈值,我们可以开启断路保护机制,后来的请求不再去调用这个服务。本地直接返回默认的数据
2 服务降级
在运维期间,当系统处于高峰期,系统资源紧张,我们可以让非核心业务降级运行。降级:某些服务不处理,或者处理简单【抛异常、返回NULL、调用Mock数据、调用Fallback处理逻辑】
API网关
客户端发送请求到服务器路途中,设置一个网关,请求都先到达网关,网关对请求进行统一认证(合法非法)和处理等操作。他是安检。
在微服务架构中,API gateway作为整体架构的重要组件,它抽象了微服务中都需要的公共功能,同时提供了客户端负载均衡,服务自动熔断,灰度发布,统一认证,限流流控,日志统计等丰富的功能,帮助我们解决很多API管理难题。
前后分离开发,分为内网部署和外网部署,外网是面向公众访问的,部署前端项目,可以有手机APP,电脑网页;内网部署的是后端集群,前端在页面上操作发送请求到后端,在这途中会经过Nginx集群,Nginx把请求转交给API网关(springcloud gateway)(网关可以根据当前请求动态地路由到指定的服务,看当前请求是想调用商品服务还是购物车服务还是检索),从路由过来如果请求很多,可以负载均衡地调用商品服务器中一台(商品服务复制了多份),当商品服务器出现问题也可以在网关层面对服务进行熔断或降级(使用阿里的sentinel组件),网关还有其他的功能如认证授权、限流(只放行部分到服务器)等。
到达服务器后进行处理(springboot为微服务),服务与服务可能会相互调用(使用feign组件),有些请求可能经过登录才能进行(基于OAuth2.0的认证中心。安全和权限使用springSecurity控制)
服务可能保存了一些数据或者需要使用缓存,我们使用redis集群(分片+哨兵集群)。持久化使用mysql,读写分离和分库分表。
服务和服务之间会使用消息队列(RabbitMQ),来完成异步解耦,分布式事务的一致性。有些服务可能需要全文检索,检索商品信息,使用ElaticSearch。
服务可能需要存取数据,使用阿里云的对象存储服务OSS。
项目上线后为了快速定位问题,使用ELK对日志进行处理,使用LogStash收集业务里的各种日志,把日志存储到ES中,用Kibana可视化页面从ES中检索出相关信息,帮助我们快速定位问题所在。
在分布式系统中,由于我们每个服务都可能部署在很多台机器,服务和服务可能相互调用,就得知道彼此都在哪里,所以需要将所有服务都注册到注册中心。服务从注册中心发现其他服务所在位置(使用阿里Nacos作为注册中心)。
每个服务的配置众多,为了实现改一处配置相同配置就同步更改,就需要配置中心,也使用阿里的Nacos,服务从配置中心中动态取配置。
服务追踪,追踪服务调用链哪里出现问题,使用springcloud提供的Sleuth、Zipkin、Metrics,把每个服务的信息交给开源的Prometheus进行聚合分析,再由Grafana进行可视化展示,提供Prometheus提供的AlterManager实时得到服务的告警信息,以短信/邮件的方式告知服务开发人员。
还提供了持续集成和持续部署。项目发布起来后,因为微服务众多,每一个都打包部署到服务器太麻烦,有了持续集成后开发人员可以将修改后的代码提交到github,运维人员可以通过自动化工具Jenkins Pipeline将github中获取的代码打包成docker镜像,最终是由k8s集成docker服务,将服务以docker容器的方式运行。
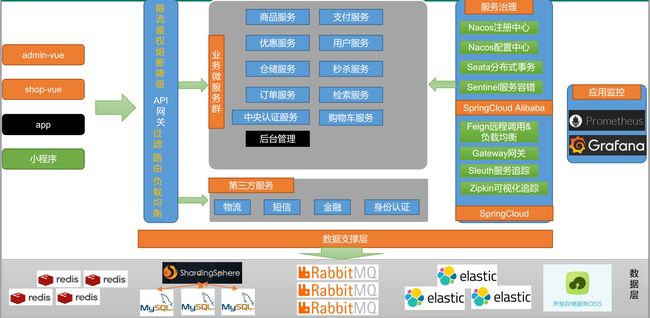
微服务划分图
反映了需要创建的微服务以及相关技术。
前后分离开发。前端项目分为admin-vue(工作人员使用的后台管理系统)、shop-vue(面向公众访问的web网站)、app(公众)、小程序(公众)
商品服务:商品的增删改查、商品的上下架、商品详情
支付服务
优惠服务
用户服务:用户的个人中心、收货地址
仓储服务:商品的库存
秒杀服务:
订单服务:订单增删改查
检索服务:商品的检索ES
中央认证服务:登录、注册、单点登录、社交登录
购物车服务:
后台管理系统:添加优惠信息等
三、阿里云服务器安装docke,docker安装MySQL;
1、查询MySQL可以安装版本 docker search mysql
2、拉取MySQL镜像最新版 docker pull mysql:latest
3、查看镜像 docker images
4、运行容器(端口号映射 以及root 密码)
docker run -itd --name mysql-test -p 3306:3306 -e MYSQL_ROOT_PASSWORD=123456 mysql
云服务器好像要设置安全组(开启3306端口 这要navcat能连接上数据库)
如果出现端口号被占用(查看端口号使用的进程,杀死该进程)
5、查看docker 运行中的容器 docker ps
6、进入MySQL mysql -h 47.108.170.87 -u root -p 你自己的ip
7、navicat 连接云服务器的数据库
7、1设置安全组规则,开启3306端口、允许你电脑ip能访问 设置你的ip 也可以设置0.0.0.0所有能都能访问。
7、2进入docker里面MySQL数据库设置允许远程连接的密码
navicat新建mysql连接输入你的ip和密码,连接就可以了。
进入docker mysql: docker exec -it mysql3307(你的mysql docker容器名字) /bin/bash
5.7设置远程连接
GRANT ALL PRIVILEGES ON . TO ‘root’@’%’ IDENTIFIED BY ‘root’ WITH GRANT OPTION;
flush privileges;刷新权限
8.0设置远程连接
mysql>use mysql;
//修改8.0密码策略
mysql> ALTER USER ‘root’@’%’ IDENTIFIED WITH mysql_native_password BY ‘root’;
//重新修改密码后可连接成功
mysql> alter user ‘root’@’%’ identified by ‘123456’;
//刷新数据库
mysql> flush privileges;
阿里云购买一个弹性云服务器,重置好你的实例密码,百度下载破解版xshell 输入你的云服务器的公网ip和实例密码,xshell就能远程连接你的云服务器。
三、搭建环境
主项目是一个maven项目,子项目都是springboot项目,springboot 建议用2.4.2的项目
1、商品服务搭建
1、首先搭建一个公共项目,里面存放所有服务都能用到的代码
总体是MySQL5.7,springboot 2.4.2,springcloud 2020.0.3
其余的比如springcloud alibaba ,redis,mybatis,mybatisplus等都要满足上面依赖
然后在gitee 上克隆renren-fast项目,把里面的 utils包下的Query和PageUtils、R、Constant复制到你自己创建项目的utils包下,还要复制xss 和exception的类
2、根据评论区的sql,创建你的数据表文件,下载renren-generator(逆向工程)导入idea,修改配置文件,以及yaml配置成你的数据库,这样就能通过你数据库里面的表生成三层架构的代码(是springboot,mybatis的),逆向工程的代码
#\u4EE3\u7801\u751F\u6210\u5668\uFF0C\u914D\u7F6E\u4FE1\u606F

mainPath=com.wang.kcmall
#\u5305\u540D
package=com.wang.kcmall
moduleName=product          #与上一行构成你的包名
#\u4F5C\u8005
author=wangyihui
#Email
[email protected]
#\u8868\u524D\u7F00(\u7C7B\u540D\u4E0D\u4F1A\u5305\u542B\u8868\u524D\u7F00)
tablePrefix=pms_      #数据库里面的数据表名的前缀
3,生成逆向工程的代码替换掉你自己创建的商品服务的代码,修改yaml配置
server:
  port: 80

# mysql
spring:
  datasource:
    type: com.alibaba.druid.pool.DruidDataSource
    #MySQL配置
    driverClassName: com.mysql.jdbc.Driver
    url: jdbc:mysql://localhost:3306/kcmall_pms?useUnicode=true&characterEncoding=UTF-8&useSSL=false&serverTimezone=Asia/Shanghai
    username: root
    password: 123456

# sql映射文件位置
mybatis-plus:
  mapper-locations: classpath:/mapper/**/*.xml
  global-config:
    db-config:
      id-type: auto
测试
package com.wang.kcmall.product;

import com.wang.kcmall.product.entity.BrandEntity;
import com.wang.kcmall.product.service.BrandService;
import org.junit.jupiter.api.Test;
import org.springframework.beans.factory.annotation.Autowired;
import org.springframework.boot.test.context.SpringBootTest;

@SpringBootTest
class KcmallProductApplicationTests {
	@Autowired
	BrandService brandService;
	@Test
	void contextLoads() {
		BrandEntity brandEntity = new BrandEntity();
		brandEntity.setDescript("哈哈1哈");
		brandEntity.setName("华为ahdfer");
		brandService.save(brandEntity);
		System.out.println("保存成功");
	}

}
2、优惠服务
创建kcmall-coupon项目,逆向工程,替换,测试
yaml
spring:
  datasource:
    username: root
    password: 123456
    url: jdbc:mysql://127.0.0.1:3306/kcmall_sms?useUnicode=true&characterEncoding=UTF-8&useSSL=false&serverTimezone=Asia/Shanghai
    driver-class-name: com.mysql.jdbc.Driver


mybatis-plus:
  mapper-locations: classpath:/mapper/**/*.xml
  global-config:
    db-config:
      id-type: auto
      logic-delete-value: 1
      logic-not-delete-value: 0

server:
  port: 7000
浏览器访问
http://localhost:7000/coupon/coupon/list
返回结果
{"msg":"success","code":0,"page":{"totalCount":0,"pageSize":10,"totalPage":0,"currPage":1,"list":[]}}
3、会员服务
创建kcmall-member项目,逆向工程,替换,测试
yaml
spring:
  datasource:
    username: root
    password: 123456
    url: jdbc:mysql://127.0.0.1:3306/kcmall_ums?useUnicode=true&characterEncoding=UTF-8&useSSL=false&serverTimezone=Asia/Shanghai
    driver-class-name: com.mysql.jdbc.Driver


mybatis-plus:
  mapper-locations: classpath:/mapper/**/*.xml
  global-config:
    db-config:
      id-type: auto
      logic-delete-value: 1
      logic-not-delete-value: 0

server:
  port: 8000
浏览器访问
http://localhost:8000/member/growthchangehistory/list
返回结果
{"msg":"success","code":0,"page":{"totalCount":0,"pageSize":10,"totalPage":0,"currPage":1,"list":[]}}
4、订单管理
创建kcmall-order项目,逆向工程,替换,测试
yaml
server:
  port: 9000

# mysql
spring:
  datasource:
    type: com.alibaba.druid.pool.DruidDataSource
    #MySQL配置
    driverClassName: com.mysql.jdbc.Driver
    url: jdbc:mysql://localhost:3306/kcmall_oms?useUnicode=true&characterEncoding=UTF-8&useSSL=false&serverTimezone=Asia/Shanghai
    username: root
    password: 123456

# sql映射文件位置
mybatis-plus:
  mapper-locations: classpath:/mapper/**/*.xml
  global-config:
    db-config:
      id-type: auto
      logic-delete-value: 1
      logic-not-delete-value: 0
浏览器访问
http://localhost:9000/order/order/list
返回结果
{"msg":"success","code":0,"page":{"totalCount":0,"pageSize":10,"totalPage":0,"currPage":1,"list":[{"id":1,"memberId":3,"orderSn":"202007101511435951281486241929375746","couponId":null,"createTime":"2020-07-09T23:11:44.000+00:00","memberUsername":"firenayfly","totalAmount":8888.0000,"payAmount":8893.0000,"freightAmount":5.0000,"promotionAmount":0.0000,"integrationAmount":0.0000,"couponAmount":0.0000,"discountAmount":null,"payType":null,"sourceType":null,"status":4,"deliveryCompany":null,"deliverySn":null,"autoConfirmDay":7,"integration":0,"growth":0,"billType":null,"billHeader":null,"billContent":null,"billReceiverPhone":null,"billReceiverEmail":"[email protected]","receiverName":"firenayfly","receiverPhone":"15421564125","receiverPostCode":null,"receiverProvince":"陕西","receiverCity":"西安","receiverRegion":null,"receiverDetailAddress":"新城区","note":null,"confirmStatus":null,"deleteStatus":0,"useIntegration":null,"paymentTime":null,"deliveryTime":"2020-07-09T23:11:44.000+00:00","receiveTime":"2020-07-09T23:11:44.000+00:00","commentTime":"2020-07-09T23:11:44.000+00:00","modifyTime":"2020-07-09T23:11:44.000+00:00"},{"id":2,"memberId":3,"orderSn":"202007102108315951281576033585246209","couponId":null,"createTime":"2020-07-10T05:08:32.000+00:00","memberUsername":"firenayfly","totalAmount":8888.0000,"payAmount":8893.0000,"freightAmount":5.0000,"promotionAmount":0.0000,"integrationAmount":0.0000,"couponAmount":0.0000,"discountAmount":null,"payType":null,"sourceType":null,"status":4,"deliveryCompany":null,"deliverySn":null,"autoConfirmDay":7,"integration":0,"growth":0,"billType":null,"billHeader":null,"billContent":null,"billReceiverPhone":null,"billReceiverEmail":"[email protected]","receiverName":"firenayfly","receiverPhone":"15421564125","receiverPostCode":null,"receiverProvince":"陕西","receiverCity":"西安","receiverRegion":null,"receiverDetailAddress":"新城区","note":null,"confirmStatus":null,"deleteStatus":0,"useIntegration":null,"paymentTime":null,"deliveryTime":"2020-07-10T05:08:32.000+00:00","receiveTime":"2020-07-10T05:08:32.000+00:00","commentTime":"2020-07-10T05:08:32.000+00:00","modifyTime":"2020-07-10T05:08:32.000+00:00"}]}}
5、库存管理
创建kcmall-ware项目,逆向工程,替换,测试
yaml
server:
  port: 11000

# mysql
spring:
  datasource:
    type: com.alibaba.druid.pool.DruidDataSource
    #MySQL配置
    driverClassName: com.mysql.jdbc.Driver
    url: jdbc:mysql://localhost:3306/kcmall_wms?useUnicode=true&characterEncoding=UTF-8&useSSL=false&serverTimezone=Asia/Shanghai
    username: root
    password: 123456

# sql映射文件位置
mybatis-plus:
  mapper-locations: classpath:/mapper/**/*.xml
  global-config:
    db-config:
      id-type: auto
浏览器访问
http://localhost:11000/ware/wareinfo/list
返回结果
{"msg":"success","code":0,"page":{"totalCount":0,"pageSize":10,"totalPage":0,"currPage":1,"list":[{"id":1,"name":"1号仓库","address":"长沙市","areacode":"410000"}]}}
四、SpringCloudAlibaba
所有的微服务都要在注册中心注册,方便服务之间的调用
1、nacos注册中心
阿里云服务器的docker安装nacos
1、阿里云开启8848端口
2、拉取镜像
docker pull nacos/nacos-server
3、创建映射文件,添加配置内容
mkdir -p /root/nacos/init.d /root/nacos/logs
touch /root/nacos/init.d/custom.properties
写入
management.endpoints.web.exposure.include=*
4、创建容器:使用standalone模式并开放8848端口,并映射配置文件和日志目录,数据库默认使用 Derby
docker run -d -p 8848:8848 -e MODE=standalone -e PREFER_HOST_MODE=hostname -v /root/nacos/init.d/custom.properties:/home/nacos/init.d/custom.properties -v /root/nacos/logs:/home/nacos/logs --restart always --name nacos nacos/nacos-server
5、启动容器
docker start nacos
6、访问网址 用户名或密码 都是nacos
http://47.108.170.87:8848/nacos/
2、本机安装nacos
下载地址:
https://github.com/alibaba/nacos/releases
数据库创建ming名为nacos-mysql的数据库,并运行下面的sql脚本
然后修改配置文件application.properties
spring.datasource.platform=mysql
db.num=1
db.url.0=jdbc:mysql://127.0.0.1:3306/nacos_config?characterEncoding=utf8&connectTimeout=1000&socketTimeout=3000&autoReconnect=true&useUnicode=true&useSSL=false&serverTimezone=UTC
db.user=root
db.password=123456
如下图:
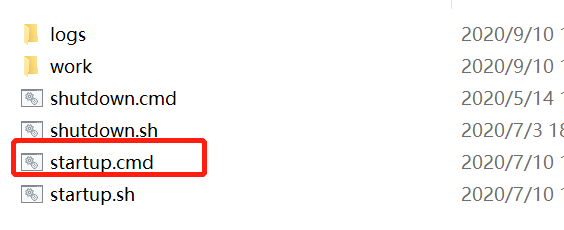
启动
注意
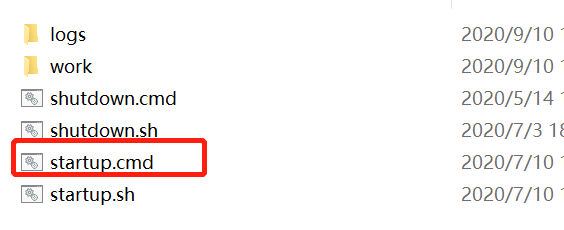
如果启动失败, 在\nacos\bin下 用cmd 启动
startup.cmd -m standalone
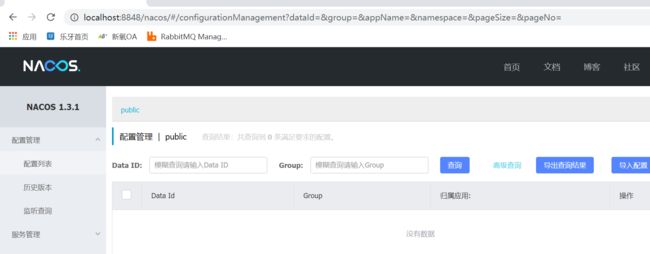
访问,账号:nacos,密码:nacos
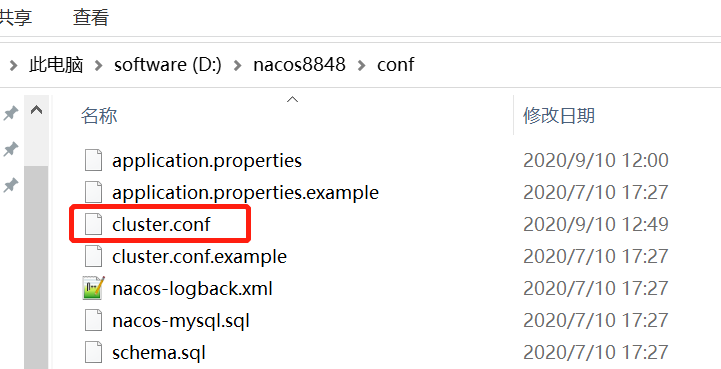
搭建集群,修改cluster.conf
127.0.0.1:8848
127.0.0.1:8847
如下图:
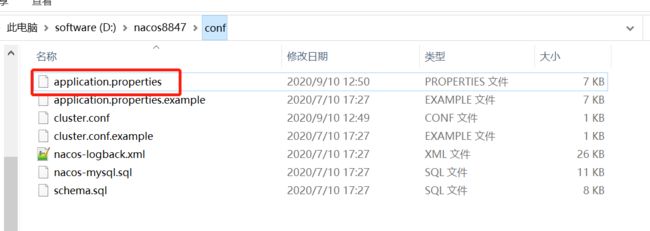
然后复制出来一份nacos8848,命名为nacos8847
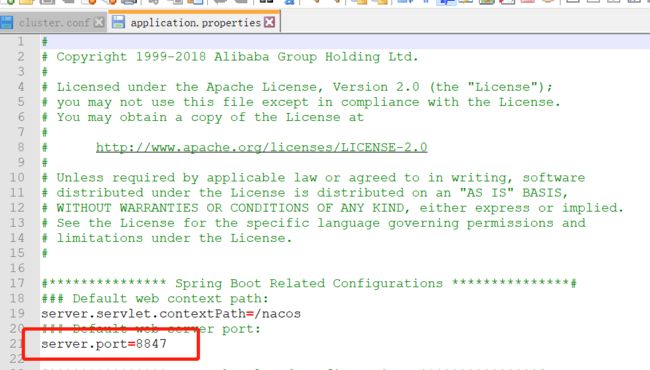
修改application.properties中的端口号即可
修改为8847
然后重新启动8848和8847
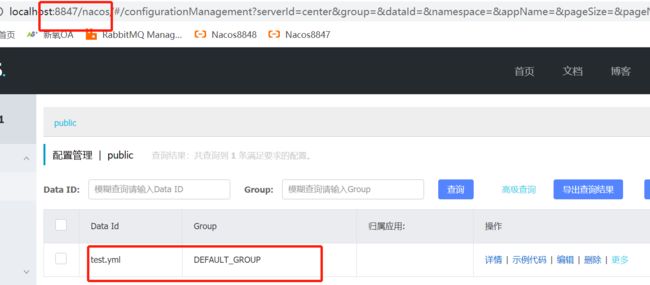
访问http://localhost:8847/nacos和http://localhost:8848/nacos
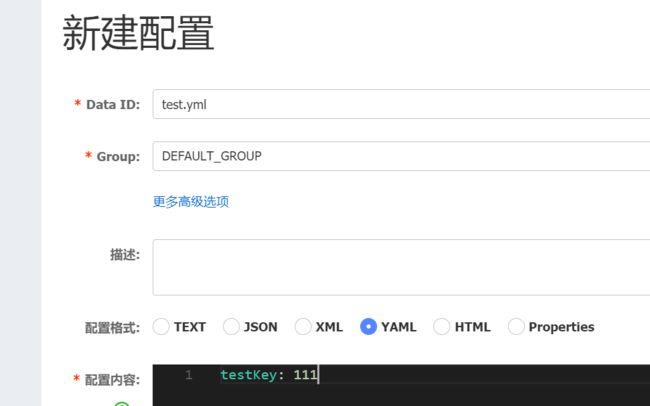
在8847新建配置文件
然后就可以在8848中看到,说明配置集群成功
3、服务注册member和coupon
1、公共模块导入nacos注册发现依赖
 <dependency>
            <groupId>com.alibaba.cloudgroupId>
            <artifactId>spring-cloud-starter-alibaba-nacos-discoveryartifactId>
dependency>
2、启动类加上注解
@EnableDiscoveryClient
3、yaml配置nacos网址(还要设置spring启动的名字)
cloud:
    nacos:
      discovery:
        server-addr: 127.0.0.1:8848   # Nacos Server 启动监听的ip地址和端口
        service: gulimall-member-abc  # 服务名
        #group: user                    设置分组
        #namespace: dev                 设置命名id
注意版本依赖
nacos安装1.4.1版本的,spring alibaba nacos 是2021.1班,springboot 是2.4.2版本
3、Feign(远程调用)与注册中心
会员调用优惠券服务
member调用coupon服务
1、member模块导入springcloud依赖,我的是springboot2.4.2所以springcloud是2020.0.3
<properties>
		<java.version>1.8java.version>
		<spring-cloud.version>2020.0.3spring-cloud.version>
	properties>
<dependencyManagement>
		<dependencies>
			<dependency>
				<groupId>org.springframework.cloudgroupId>
				<artifactId>spring-cloud-dependenciesartifactId>
				<version>${spring-cloud.version}version>
				<type>pomtype>
				<scope>importscope>
			dependency>
		dependencies>
dependencyManagement>
2、远程调用依赖openfegin
<dependency>
		<groupId>org.springframework.cloudgroupId>
		<artifactId>spring-cloud-starter-openfeignartifactId>
dependency>
<dependency>
		<groupId>org.springframework.cloudgroupId>
		<artifactId>spring-cloud-starter-loadbalancerartifactId>
dependency>
由于我的nacos 注册依赖是2021.1版的, 由于Spring Cloud Feign在Hoxton.M2 RELEASED版本之后不再使用Ribbon而是使用spring-cloud-loadbalancer,所以不引入spring-cloud-loadbalancer会报错 ,所以就要引入
spring-cloud-loadbalancer的依赖
3、准备优惠券内容,coupon模块的CouponController类添加以下内容
@RequestMapping("coupon/coupon")
public class CouponController {
    @Autowired
    private CouponService couponService;

    @RequestMapping("/member/list")
    public R membercoupons(){    //全系统的所有返回都返回R
        // 应该去数据库查用户对于的优惠券,但这个我们简化了,不去数据库查了,构造了一个优惠券给他返回
        CouponEntity couponEntity = new CouponEntity();
        couponEntity.setCouponName("满100-10");//优惠券的名字
        return R.ok().put("coupons",Arrays.asList(couponEntity));
    }
4、准备远程调用模块
member模块启动类添加注解 @EnableDiscoveryClient
/*
* 想要远程调用的步骤:
* 1 引入openfeign
* 2 编写一个接口,接口告诉springcloud这个接口需要调用远程服务
* 	2.1 在接口里声明@FeignClient("kcmall-coupon")他是一个远程调用客户端且要调用coupon服务
* 	2.2 要调用coupon服务的/coupon/coupon/member/list方法
* 3 开启远程调用功能 @EnableFeignClients,要指定远程调用功能放的基础包
* */
@EnableFeignClients(basePackages="com.wang.kcmall.member.feign")//扫描接口方法注解
@EnableDiscoveryClient
@SpringBootApplication
public class KcmallMemberApplication {

	public static void main(String[] args) {
		SpringApplication.run( KcmallMemberApplication.class, args);
	}
}
5、新建fegin包,新建接口
@FeignClient("kcmall-coupon") //告诉spring cloud这个接口是一个远程客户端,要调用coupon服务(nacos中找到),具体是调用coupon服务的/coupon/coupon/member/list对应的方法
public interface CouponFeignService {
    // 远程服务的url
    @RequestMapping("/coupon/coupon/member/list")//注意写全优惠券类上还有映射//注意我们这个地方不是控制层,所以这个请求映射请求的不是我们服务器上的东西,而是nacos注册中心的
    public R membercoupons();//得到一个R对象
}
注意
远程调用的服务名要写对
@FeignClient+@RequestMapping构成远程调用的坐标
其他类中看似只是调用了CouponFeignService.membercoupons(),而实际上该方法跑去nacos里和rpc里调用了才拿到东西返回
6、member 模块的MemberController新建一个测试方法
@RestController
@RequestMapping("member/member")
public class MemberController {
    @Autowired
    private MemberService memberService;

    @Autowired
    CouponFeignService couponFeignService;

    @RequestMapping("/coupons")
    public R test(){
        MemberEntity memberEntity = new MemberEntity();
        memberEntity.setNickname("会员昵称张三");
        R membercoupons = couponFeignService.membercoupons();//假设张三去数据库查了后返回了张三的优惠券信息

        //打印会员和优惠券信息
        return R.ok().put("member",memberEntity).put("coupons",membercoupons.get("coupons"));
    }
重新启动服务
http://localhost:8000/member/member/coupons
返回结果
{"msg":"success","code":0,"coupons":[{"id":null,"couponType":null,"couponImg":null,"couponName":"满100-10","num":null,"amount":null,"perLimit":null,"minPoint":null,"startTime":null,"endTime":null,"useType":null,"note":null,"publishCount":null,"useCount":null,"receiveCount":null,"enableStartTime":null,"enableEndTime":null,"code":null,"memberLevel":null,"publish":null}],"member":{"id":null,"levelId":null,"username":null,"password":null,"nickname":"会员昵称张三","mobile":null,"email":null,"header":null,"gender":null,"birth":null,"city":null,"job":null,"sign":null,"sourceType":null,"integration":null,"growth":null,"status":null,"createTime":null,"socialUid":null,"accessToken":null,"expiresIn":null}}
4、nacos配置中心
1)修改“gulimall-coupon”模块,在模块中 添加pom依赖:
    com.alibaba.cloud
    spring-cloud-starter-alibaba-nacos-config
创建bootstrap.properties文件,该配置文件会优先于“application.yml”加载。
spring.application.name=gulimall-coupon
spring.cloud.nacos.config.server-addr=127.0.0.1:8848
传统方式配置方式
为了详细说明config的使用方法,先来看原始的方式
创建“application.properties”配置文件,添加如下配置内容:
coupon.user.name="zhangsan"
coupon.user.age=30
修改“com.bigdata.gulimall.coupon.controller.CouponController”文件,添加如下内容:
@Value("${coupon.user.name}")
private String name;
@Value("${coupon.user.age}")
private Integer age;

@RequestMapping("/test")
public R getConfigInfo(){
   return R.ok().put("name",name).put("age",age);
}
启动“gulimall-coupon”服务:
访问:http://localhost:7000/coupon/coupon/test
返回结果
{"msg":"success","code":0,"name":"\"zhangsan\"","age":18}
这样做存在的一个问题,如果频繁的修改application.properties,在需要频繁重新打包部署。下面我们将采用Nacos的配置中心来解决这个问题。
nacos config
在项目启动的时候, 有打印如下的日志
该日志说的是会从gulimall-coupon.properties 中获取配置, 默认的是应用名称的properties的文件.
在nacos的配置中心中, 根据该名称新建配置
1、在Nacos注册中心中,点击“配置列表”,添加配置规则:
DataID:gulimall-coupon
配置格式:properties
文件的命名规则为: s p r i n g . a p p l i c a t i o n . n a m e − {spring.application.name}- spring.application.name−{spring.profiles.active}.${spring.cloud.nacos.config.file-extension}
${spring.application.name}:为微服务名
${spring.profiles.active}:指明是哪种环境下的配置,如dev、test或info
${spring.cloud.nacos.config.file-extension}:配置文件的扩展名,可以为properties、yml等
2、查看配置:
3、修改“com.bigdata.gulimall.coupon.controller.CouponController”类,添加“@RefreshScope”注解
@RestController
@RequestMapping("coupon/coupon")
@RefreshScope
public class CouponController {
这样都会动态的从配置中心读取配置.
4、访问:http://localhost:7000/coupon/coupon/test
能够看到读取到了nacos 中的最新的配置信息,并且在指明了相同的配置信息时,配置中心中设置的值优先于本地配置。
总结配置中心的使用方法
1.引入配置中心的依赖 nacos-config
2.创建一个boostrap.propertis
在这个propertis中指定应用的名称, nocas的地址
3.在nacos的配置列表中,新建立一个配置, 新建立配置的默认名称为 应用名称.properties
4.根据需求添加需要的配置
5.在代码中设置动态获取配置
	a.在获取配置的类上加上@RefreshScope注解,代表动态获取并刷新配置
	b.@Value("${配置的名称}") 获取对应的配置
	c.配置中心中设置的值优先于本地配置。
5、网关gateway
1、创建一个spring boot项目名字是kcmall-gateway,创建时选择Gateway,导入nacos注册依赖
2、nacaos新建一个命名gateway,在gateway新建一个配置列表kcmall-gateway,内容是
spring:
    application:
        name: gulimall-gateway
3、application.properties
spring.cloud.nacos.discovery.server-addr=127.0.0.1:8848
spring.application.name=kcmall-gateway
server.port=88
新建bootstrap.properties
#配置中心名
spring.application.name=kcmall-coupon
#指定注册中心的地址
spring.cloud.nacos.config.server-addr=127.0.0.1:8848
#指定使用那个配置中心命名空间
spring.cloud.nacos.config.namespace=35ce5f88-16bb-4765-b040-4b3a477ea6d0
application.yml
spring:
  cloud:
    gateway:
      routes:
        - id: test_route
          uri: https://www.baidu.com
          predicates:
            - Query=url,baidu

        - id: qq_route
          uri: https://www.qq.com
          predicates:
            - Query=url,qq

        - id: product_route
          uri: lb://gulimall-product
          predicates:
            - Path=/api/product/**
          filters:
            - RewritePath=/api/(?.*),/$\{segment}

        - id: third_party_route
          uri: lb://gulimall-third-party
          predicates:
            - Path=/api/thirdparty/**
          filters:
            - RewritePath=/api/thirdparty/(?.*),/$\{segment}

        - id: member_route
          uri: lb://gulimall-member
          predicates:
            - Path=/api/member/**
          filters:
            - RewritePath=/api/(?.*),/$\{segment}

        - id: ware_route
          uri: lb://gulimall-ware
          predicates:
            - Path=/api/ware/**
          filters:
            - RewritePath=/api/(?.*),/$\{segment}

        - id: admin_route
          uri: lb://renren-fast
          predicates:
            - Path=/api/**
          filters:  # 这段过滤器和验证码有关,api内容缓存了/renren-fast,还得注意/renren-fast也注册到nacos中
            - RewritePath=/api/(?.*),/renren-fast/$\{segment}


  ## 前端项目,/api前缀。开来到网关后断言先匹配到,过滤器修改url,比如跳转到renren微服务,所以要注意renren后端项目也注册到 nacos里
## http://localhost:88/api/captcha.jpg   http://localhost:8080/renren-fast/captcha.jpg
## http://localhost:88/api/product/category/list/tree ##http://localhost:10000/product/category/list/tree
启动类
@EnableDiscoveryClient //nacos注册服务
@SpringBootApplication(exclude = {DataSourceAutoConfiguration.class})
exclude = {DataSourceAutoConfiguration.class}
由于有mybatis依赖,要配置数据库连接,但是网关模块不需要,所以排除默认
五、安装vue脚手架
要提前安装node js 和npm
cmd输入以下命令:
npm install webpack -g
npm install -g @vue/cli-init
创建一个文件,cmd进入
vue init webpack vue-demo 初始化为vue项目,vue-demo是描述
创建过程,输入你自己的一些信息就行
完成:
To get started:

  cd vue-demo
  npm run dev

Documentation can be found at https://vuejs-templates.github.io/webpack
运行项目
进入cd vue-demo
npm run dev
访问
http://localhost:8080
端口占用
win + r 键
cm的进入dos
netstat -ano | findstr 9998 找到9998 的端口号进程 查看最后一列的pid
taskkill /f /pid 25224 杀死pid是25244的进程

