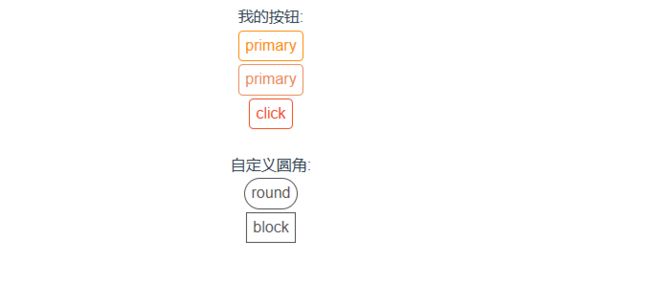
手搓vue3组件_1.封装一个button
我的icepro参考地址,内有参考代码,有条件的割割点点star
实现要求:
- 基于vue3
- 支持通过colors(更改颜色)
- 支持点击事件
- …支持其他的自定义样式(例如圆角,size等等)
最基础的第一步:
父组件引入并使用:
<template>
  <div class="buttonLim">
    我的按钮:
    <ice-button>
      primary
    ice-button>
  div>
template>
<script setup>
import IceButton from '../../components/other/ice-button.vue'
script>
<style scoped lang="less">
style>
子组件中使用slot去展示:
<template>
  <div class="ice-button">
    <slot>slot>
  div>
template>
<script setup>
script>
<style scoped lang="less">
style>
run:
那么,把它的样式改的好看一些:
父组件:
子组件:

当然,此时他的颜色并不够好看,那么如果想通过props向子组件自定义颜色:
子组件:
这样你传过来了,但是想怎么用呢,
这里要求颜色有未hover时的颜色和hover时的颜色,hover时的颜色自动计算出来
而此时可以考虑使用到css的变量了,像是:
子组件:
<template>
<div class="ice-button"
:class="[
color?'hoverColor':'defaultColor'
]"
:style="{ '--color': color,'--hover-color': hoverColor(color) }"
>
<slot>slot>
div>
template>
<script setup>
const props = defineProps({
  color: {
    type: String,
    default: ''
  }
})
const hoverColor = (rgb) => {
return rgb.replaceAll(')', ',.5)')
}
script>
<style scoped lang="less">
.ice-button {
border-radius: .3rem;
width: fit-content;
padding: .2rem .4rem;
margin: .1rem .2rem;
user-select: none;
transition-duration: .3s;
}
.defaultColor {
border: rgba(0, 0, 0, .7) 1px solid;
background: rgba(0, 0, 0, .2);
}
.hoverColor {
color: var(--color);
border: var(--color) 1px solid;
&:hover {
color: var(--hover-color);
border: var(--hover-color) 1px solid;
}
}
style>
父组件的调用:
<template>
<div class="buttonLim">
我的按钮:
<ice-button color="rgb(251, 139, 5)">
primary
ice-button>
<ice-button color="rgb(234, 137, 88)">
primary
ice-button>
div>
template>
<script setup>
import IceButton from '../../components/other/ice-button.vue'script>
<style scoped lang="less">
.buttonLim {
display: flex;
justify-content: center;
flex-direction: column;
align-items: center;
}
style>
解释一下:
子组件中,如果传入了color的值,那么子组件的类名hoverColor生效,反之defaultColor生效,这里是给class传入了一个数组,如果你查看elementui的源码,会发现他们也是这样实现组件的type的切换,用过了才知道这个技巧是如此好用
还有,这里只是传入了一个rgb的值,然后在子组件中自动计算出来另一个颜色值(直接改为rgba,opacity为0.5)
支持点击事件
如果你直接使用下面的方式来绑定:
父组件:
<template>
<div class="buttonLim">
我的按钮:
<ice-button color="rgb(251, 139, 5)">
primary
ice-button>
<ice-button color="rgb(234, 137, 88)">
primary
ice-button>
<ice-button @click="clickTrigger" color="rgb(242, 72, 27)" ref="btn">
click
ice-button>
div>
template>
<script setup>
import IceButton from '../../components/other/ice-button.vue'
import { ref } from 'vue'
const btn = ref()
const clickTrigger = async () => {
console.log('clickTrigger--->')
const str = '我即将要赋值的文字'
if (await copyText(str)) {
console.log('success')
} else {
console.log('error')
}
}
const copyText = function (str) {
return navigator.clipboard.writeText(str)
.then(() => {
return true
})
.catch(() => {
return false
})
}
script>
<style scoped lang="less">
.buttonLim {
display: flex;
justify-content: center;
flex-direction: column;
align-items: center;
}
style>
子组件:
<template>
  <div class="ice-button"
       :class="[
           color?'hoverColor':'defaultColor'
       ]"
       :style="{ '--color': color,'--hover-color': hoverColor(color) }"
  >
    <slot>slot>
  div>
template>

<script setup>
const props = defineProps({
  color: {
    type: String,
    default: ''
  }
})
const hoverColor = (rgb) => {
  return rgb.replaceAll(')', ',.5)')
}
script>

<style scoped lang="less">
.ice-button {
  border-radius: .3rem;
  width: fit-content;
  padding: .2rem .4rem;
  margin: .1rem .2rem;
  user-select: none;
  transition-duration: .3s;
}

.defaultColor {
  border: rgba(0, 0, 0, .7) 1px solid;
  background: rgba(0, 0, 0, .2);
}

.hoverColor {
  color: var(--color);
  border: var(--color) 1px solid;

  &:hover {
    color: var(--hover-color);
    border: var(--hover-color) 1px solid;
  }
}
style>
这样没问题可以,但是有时会报错,click不是原生事件,这里我没有复现,淡然,你也可以在复习bug的时候想起这篇文章
这里的逻辑是点击左侧的item,赋值文字,但是这里的子组件没有定义click的处理事件,上面的button也是,可能会报这种错,
- 如何解决:
在子组件中定义click事件:
子组件:
<template>
  <div class="ice-button"
       @click="clickCallBack"
       :class="[
           color?'hoverColor':'defaultColor'
       ]"
       :style="{ '--color': color,'--hover-color': hoverColor(color) }"
  >
    <slot>slot>
  div>
template>

<script setup>
const props = defineProps({
  color: {
    type: String,
    default: ''
  }
})
const hoverColor = (rgb) => {
  return rgb.replaceAll(')', ',.5)')
}

const emit = defineEmits(['click'])
const clickCallBack = (evt) => {

  emit('click', evt)
}
script>

<style scoped lang="less">
.ice-button {
  border-radius: .3rem;
  width: fit-content;
  padding: .2rem .4rem;
  margin: .1rem .2rem;
  user-select: none;
  transition-duration: .3s;
}

.defaultColor {
  border: rgba(0, 0, 0, .7) 1px solid;
  background: rgba(0, 0, 0, .2);
}

.hoverColor {
  color: var(--color);
  border: var(--color) 1px solid;

  &:hover {
    color: var(--hover-color);
    border: var(--hover-color) 1px solid;
  }
}
style>
这里的clickCallBack接收并emit一下click事件
emit函数会触发父组件绑定的click事件。当用户点击按钮时,父组件会接收到这个事件,并执行相应的操作。
自定义圆角
这里其实还是使用props来自定义圆角,例如我实现下面几个(round和block)按钮:

父组件的调用:
    自定义圆角:
    <ice-button round>roundice-button>
    <ice-button block>blockice-button>
子组件:
<template>
  <div class="ice-button"
       @click="clickCallBack"
       :class="[
           color?'hoverColor':'defaultColor',
           round?'round':'',
           block?'block':''
       ]"
       :style="{ '--color': color,'--hover-color': hoverColor(color) }"
  >
    <slot>slot>
  div>
template>

<script setup>
const props = defineProps({
  color: {
    type: String,
    default: ''
  },
  round: {
    type: Boolean,
    default: false
  },
  block: {
    type: Boolean,
    default: false
  }
})
const hoverColor = (rgb) => {
  return rgb.replaceAll(')', ',.5)')
}

const emit = defineEmits(['click'])
const clickCallBack = (evt) => {
  emit('click', evt)
}
script>

<style scoped lang="less">
.ice-button {
  border-radius: .3rem;
  width: fit-content;
  padding: .2rem .4rem;
  margin: .1rem .2rem;
  user-select: none;
  transition-duration: .3s;
}

.defaultColor {
  border: rgba(0, 0, 0, .7) 1px solid;
  color: rgba(0, 0, 0, .7);
  transition-duration: .3s;

  &:hover {
    color: rgba(0, 0, 0, .4);
    border: rgba(0, 0, 0, .4) 1px solid;
  }
}

.hoverColor {
  color: var(--color);
  border: var(--color) 1px solid;

  &:hover {
    color: var(--hover-color);
    border: var(--hover-color) 1px solid;
  }
}

.round {
  border-radius: 2rem;
}

.block {
  border-radius: 0;
}
style>
<ice-button block color="rgb(242, 72, 27)">混合ice-button>
以上说的功能能都实现了
注意这里的代码还有很多没有优化,颜色获取,其他自定义type之类的都没有处理,关于更多的细节优化,详见icepro


