【 云原生 kubernetes 】- 单点登录Authelia + OpenLdap
文章目录
-
- 简介
-
- Authelia
- OpenLdap
-
- 属性介绍
- Helm部署
-
- openldap
-
- 配置调整
- 数据持久化
- 部署
- 使用
-
- 命令行
- Web
- Authelia
- 页面访问
- 反向代理进行集成
-
- 流程
⚡️: OpenLDAP是轻量级目录访问协议(LDAP)的开源实现,它提供了一种存储和访问关于用户、组、计算机和其他资源的信息的中心化目录服务。
简介
Authelia
Authelia是一个开源的单点登录身份验证系统,可以用于保护Web应用程序、API和其他服务。它提供了多种身份验证方法,包括双因素身份验证、LDAP和SAML集成、OAuth2等,并且支持自定义主题和模板以实现与自己的品牌一致的UI。
OpenLdap
属性介绍
- cn(common name):通用名称,表示一个对象的名称。在用户条目中,通常与用户的姓名相对应;在组条目中,则与组名相对应。
- ou(organizational unit):组织单位,表示一个组织或部门。在LDAP目录服务中,可以使用ou来创建多级组织结构,并将用户和其他对象分配到相应的组织单元中,以便更好地管理它们。
- dc(domain component):域组件,表示域名的一部分。在LDAP中,域名通常是按照层次结构组织的,例如:example.com可以被拆分为dc=example,dc=com。这样做有利于有效地组织和管理大规模的目录服务。
- sn(surname):姓氏,表示一个人的姓氏。与cn属性不同,sn只表示姓氏,而且通常不唯一。
Helm部署
openldap
- helm repo add stable https://charts.helm.sh/stable
- helm install openldap stable/openldap
部署十分简单,但是我们可能需要调整Helm chart配置,所以建议把包拉取到本地调整之后再进行部署,下面是详细流程
[root@ycloud ~]# helm repo add stable https://charts.helm.sh/stable
"stable" has been added to your repositories
[root@ycloud ~]# helm pull stable/openldap
[root@ycloud ~]# tar -zxvf openldap-1.2.7.tgz
openldap/Chart.yaml
openldap/values.yaml
openldap/templates/NOTES.txt
openldap/templates/_helpers.tpl
openldap/templates/configmap-customldif.yaml
openldap/templates/configmap-env.yaml
openldap/templates/deployment.yaml
openldap/templates/pvc.yaml
openldap/templates/secret.yaml
openldap/templates/service.yaml
openldap/templates/tests/openldap-test-runner.yaml
openldap/templates/tests/openldap-tests.yaml
openldap/.helmignore
openldap/README.md
[root@ycloud ~]# cd openldap/ ;ls
charts  Chart.yaml  README.md  templates  values.yaml
配置调整
刚刚我们拉取的Chart包 部署openldap,需要调整的地方不是很多
env:
  LDAP_ORGANISATION: "GStrain Inc."
  LDAP_DOMAIN: "ldap-openldap.authelia"
  LDAP_BACKEND: "hdb"
  LDAP_TLS: "false"
  LDAP_TLS_ENFORCE: "false"
  LDAP_REMOVE_CONFIG_AFTER_SETUP: "false"
⚡️: LDAP_DOMAIN是指LDAP目录服务中的域名,它用于标识和区分不同的组织、部门或用户。
案例:cn=username,ou=department,dc=domain,dc=com
其中
dc=domain,dc=com部分就是LDAP_DOMAIN,我们只需要注意这一部分,其他根据自己情况选择。
数据持久化
当我添加pvc来做数据持久化,一直提示没有权限,暂时没能解决。
chown: changing ownership of ‘/var/lib/ldap/data’: Operation not permitted
只好退而求其次,使用hostPath来针对pod做持久化
...
    - hostPath:
        path: /data/openldap
        type: DirectoryOrCreate
      name: data
...
部署
helm chart调整好之后,我们只需要一个命令就可以进行安装部署
helm install
使用
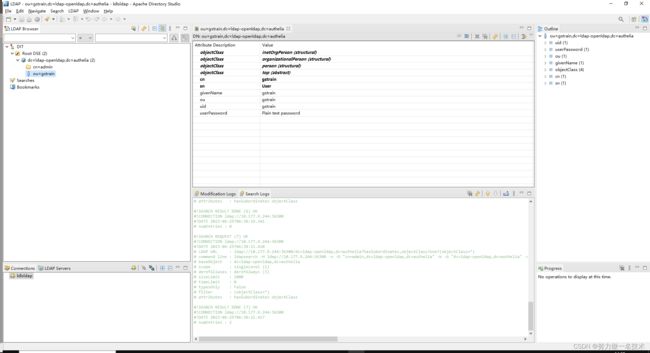
OpenLdap 有很多第三方的控制工具,也可以使用命令行来进行操作,我这里推荐使用的是 Apache Directory Studio, 下面是一些简单的使用案例:
命令行
ldapadd -x -D "cn=admin,dc=ldap-openldap,dc=authelia" -w "W58jkiat0wt0hkUXSBUwJBbVFhaEmDr8" <<EOF
dn: uid=ycloud,ou=ycloud,dc=ldap-openldap,dc=authelia
objectClass: top
objectClass: person
objectClass: organizationalPerson
objectClass: inetOrgPerson
cn: ycloud
sn: User
givenName: ycloud
uid: ycloud
userPassword: {SHA}ICy5YqxZB1uWSwcVLSNLcA==
ou: ycloud
EOF
这是一个简单的添加功能
Web
使用WEB,查看我们刚刚添加的用户属性,针对我们部署的openldap进行连接。
Authelia
整体跟OpenLdap部署流程是一致的,配置中我们只需要调整,authelia绑定的ldap信息,所以我们这里只提供下最终的配置文件
- helm repo add truecharts https://charts.truecharts.org/
- helm install authelia truecharts/authelia --version 15.1.29
---
theme: light


default_redirection_url: ""
default_2fa_method: 'totp'
server:
  host: 0.0.0.0
  port: 9091
  path: auth
  asset_path: ''

  headers:
    csp_template: ''
  buffers:
    read: 4096
    write: 4096
  tls:
    key: "/app/ssl/tls.key"
    certificate: "/app/ssl/tls.crt"
  timeouts:
    read: 6s
    write: 6s
    idle: 30s
  enable_pprof: false
  enable_expvars: false
log:
  level: debug
  format: text
  file_path: ''
  keep_stdout: true


totp:
  disable: false
  issuer: shmao.net
  algorithm: sha1
  digits: 6
  period: 30
  skew: 1
  secret_size: 32
webauthn:
  disable: false
  display_name: Authelia
  attestation_conveyance_preference: indirect
  user_verification: preferred
  timeout: 60s
ntp:
  address: time.cloudflare.com:123
  version: 4
  max_desync: 3s
  disable_startup_check: false
  disable_failure: false
authentication_backend:
  password_reset:
    disable: false
    custom_url: ''
  ldap:
    implementation: activedirectory
    url: ldap://ldap-openldap:389
    timeout: 5s
    start_tls: false
    tls:
      server_name: ''
      skip_verify: false
      minimum_version: TLS1.2
      maximum_version: TLS1.3
    base_dn: dc=ldap-openldap,dc=authelia
    additional_users_dn: OU=ycloud
    permit_referrals: false
    permit_unauthenticated_bind: false
    permit_feature_detection_failure: false
    users_filter: "(&({username_attribute}={input})(objectClass=person))"
    username_attribute: uid
    user: CN=admin,DC=ldap-openldap,DC=authelia


password_policy:
  standard:
    enabled: false
    min_length: 8
    max_length: 0
    require_uppercase: true
    require_lowercase: true
    require_number: true
    require_special: true
  zxcvbn:
    enabled: false
    min_score: 0
session:
  name: 'authelia_gs_session'
  domain: 'shmao.net'
  same_site: 'lax'
  expiration: 1h
  inactivity: 5m
  remember_me_duration: 1M
  redis:
    host: redis-master
    port: 6379
    username: default
    password: qweasdzxc


regulation:
  ban_time: 5m
  find_time: 2m
  max_retries: 3
storage:
  mysql:
    host: mysql
    port: 3306
    database: authelia
    username: root
    timeout: 5s
...
server:设置Authelia服务器的相关参数,包括主机名、端口号、路径、SSL证书等。totp:启用或禁用基于时间的一次性密码(TOTP)身份验证,并设置相关参数,如加密算法、密码周期等。webauthn:启用或禁用WebAuthn身份验证,并设置相关参数,如认证器名称、用户验证方式等。ldap:设置LDAP身份验证后端的相关参数,包括LDAP服务器的URL、基本DN、用户名属性、过滤器等。password_policy:设置密码策略,包括标准模式和zxcvbn模式两种,可以设置最小长度、大小写字母、数字和特殊字符等要求。session:设置会话参数,如名称、域名、过期时间等。regulation:设置访问限制参数,包括失败尝试次数、封禁时间、发现时间等。storage:设置存储参数,包括MySQL数据库的连接信息。notifier:设置通知功能的参数,包括SMTP服务器的连接信息、身份验证器等。
部署好之后我们先查看一下我们的应用是否正常,然后针对端口进行访问尝试
[root@sztcyl-177-9-244 authelia]# kubectl get svc -n authelia
NAME             TYPE        CLUSTER-IP       EXTERNAL-IP   PORT(S)                       AGE
authelia         NodePort    10.253.246.20    <none>        80:5716/TCP                   37d
ldap-openldap    NodePort    10.253.165.233   <none>        389:36300/TCP,636:26749/TCP   25d
mysql            ClusterIP   10.253.43.75     <none>        3306/TCP                      38d
mysql-headless   ClusterIP   None             <none>        3306/TCP                      38d
redis-headless   ClusterIP   None             <none>        6379/TCP                      38d
redis-master     ClusterIP   10.253.129.138   <none>        6379/TCP                      38d
redis-replicas   ClusterIP   10.253.85.35     <none>        6379/TCP                      38d
[root@sztcyl-177-9-244 authelia]# kubectl get po  -n authelia
NAME                            READY   STATUS    RESTARTS        AGE
authelia-p6qhp                  1/1     Running   0               25d
authelia-stgzs                  1/1     Running   0               25d
authelia-vxwgl                  1/1     Running   0               25d
ldap-openldap-b5f757dc9-tqnv9   1/1     Running   0               25d
mysql-0                         1/1     Running   1 (5d23h ago)   25d
redis-master-0                  1/1     Running   0               25d
redis-replicas-0                1/1     Running   0               25d
redis-replicas-1                1/1     Running   1               26d
redis-replicas-2                1/1     Running   1 (25d ago)     26d
页面访问
访问地址 https://authelia.shmao.net/auth 这里域名已经绑定到对应的 authelia 服务,访问界面会是这样
⚡️: 这里的用户名密码就用我们上面,我们再openldap中创建的用户密码,填写之后点击登录,
反向代理进行集成
我们需要把Authelia,针对 url 来进行单点登录控制访问权限,这里我们得用到反向代理。
流程
访问 A 地址 --> 跳转到https://authelia.shmao.net/auth --> Authelia认证接口成功
    server {
      listen       8080 ssl;
      listen  [::]:8080 ssl;
      server_name  localhost;
      ssl_certificate      /etc/nginx/ssl/tls.crt;
      ssl_certificate_key  /etc/nginx/ssl/tls.key;
      location / {
          auth_request /auth;
          error_page 401 = /login;

          proxy_set_header Host $host;
          proxy_set_header X-Real-IP $remote_addr;
          proxy_set_header X-Forwarded-For $proxy_add_x_forwarded_for;
          proxy_set_header Authorization "Bearer $cookie_authelia_session";
          proxy_set_header Cookie $http_cookie;
          proxy_hide_header Strict-Transport-Security;
          proxy_pass http://127.0.0.1:80;
      }

      location /auth {
        internal;
        proxy_pass_request_body off;
        proxy_set_header Content-Length "";
        proxy_set_header X-Original-URI $request_uri;
        proxy_set_header Authorization "Bearer $cookie_authelia_session";
        proxy_set_header Cookie $http_cookie;
        proxy_pass https://authelia.shmao.net/auth/api/verify;
      }

      location /login {
        return 302  https://authelia.shmao.net/auth;
      }
    }


