webpack基本配置
文章目录
- 前言
- 一、基本配置
-
- 1.入口文件配置
-
- 1.1 单一入口
- 1.2 多个入口
- 2.出口文件配置
-
- 2.1 单个出口文件
- 2.2多个出口文件
- 3.module配置
- 4.自定义loader使用
- 5.插件配置
-
- 5.1 CleanWebpackPlugin插件
- 5.2 HTMLWebpackPlugin插件
- 5.3 MiniCssExtractPlugin 插件
- 6.开发服务器devServer配置
-
- 6.1 配置proxy解决跨域问题
- 6.2 跨域的最终解决方案
- 7.模块热替换
-
- 7.1HMR实现原理
- 7.2配置热更新
- 7.3映射错误配置
- 8.打包优化配置
-
- 8.1分割代码
- 8.2预加载和预获取
-
- 8.3外部扩展
- 8.4 tree-shaking
- 9.多打包文件配置文件
前言
记录下webpack的基本配置,方便后续使用,加深对配置项了解。
一、基本配置
webpack打包的基本流程
1.入口文件配置
1.1 单一入口
module.exports = {
	entry:'./src/mian.js'
}
1.2 多个入口
module.exports = {
	entry:['./src/main.js','./src/bus.js']
}
2.出口文件配置
2.1 单个出口文件
const path = require('path');
module.exports = {
	entry:'./scr/mian.js',
	output:{
		filename:"build.js",
		path:path.resolve(__dirname,'dist')
	}
}
2.2多个出口文件
const path = require('path');
module.exports = {
	entry:['./src/main.js','./src/bus.js'],
	output:{
		filename:"[name].js",
		path:path.resolve(__dirname,'dist')
	}
}
3.module配置
当webpack遇到不能解析的模块时,webpack会找到module对象下面的rules,去匹配对应的规则。如果有对应的loader匹配时,我们就使用对应的规则解析。
示例:当我们直接导入一个文字作为变量时,这时候是不能被浏览器直接解析的,我们可以使用raw-loader。
const path = require('path');
module.exports = {
	entry:'./src/mian.js',
	output:{
		filename:'build.js',
		path:path.resolve(__dirname,'dist');
	},
	module:{
		//使用raw-loader,用来处理txt文本文件
		rules:[
		{
			test:/\.txt$/,
			use:'raw-loader'
		},
		//使用file-loader,用来处理图片文件
		{
			test:'/\.(png|jpg|jpe?g)$/',
			use:{
				loader:'file-loader',
				options:{
					//打包后的文件名
					name:'[name]_[contenthash].[ext]',
					//打包后存放目录,相对于打包文件夹dist
					outputPath:'./images',
					//打包后引入文件URL,相对于config文件
					publicPath:'./dist/iamges'
				}
			}
		},
		{
			test:/\.css$/,
			//同一类loader中执行顺序,先下后上,先右后左。先执行css-loader->style-loader
			use:[
				'style-loader',
				{
					loader:'css-loader',
					options:{
						//是否启用URL
						url:true,
						//是否启用@import
						import:true,
						//是否启用sourceMap
						sourceMap:false
					}
				}
			]
		}
		]
	}
}
4.自定义loader使用
const path = require('path');
module.exports = {
	entry:'./src/mian.js',
	output:{
		filename:'build.js',
		path:path.resolve(__dirname,'dist');
	},
	//配置loader解析路径
	resolveLoader:{
	//在根目录下面新建loaders目录
		modules:['node_modules',path.resolve(__dirname,'loaders')];
	}
	module:{

		//使用raw-loader,用来处理txt文本文件
		rules:[
		//使用doc-loader,用来解析doc文件内容
			{
				test:'/\.doc$/',
				use:'doc-loader'
			}
		]
	}
}
//路径:loaders/doc-loader/index.js

const MarkDown require('markdown-it');
const markdown = new MarkDown();

	module.exports = (source)=>{
		return marrkdown.render(source);
	}
5.插件配置
5.1 CleanWebpackPlugin插件
这个插件是用来清除打包的文件的,当我们修改要打包的文件名称时,如果我们不加上这个插件,就会另外生成一个打包的文件,原来的那个不会自动删除,所以这个插件是用来偷懒的,会自动帮助我们删除原来打包的文件。
webpack 4这个插件的使用方法
const path = require('path');
const {CleanWebpackPlugin}  = require('clean-webpack-plugin')
module.exports = {
	mode:'production',
	entry:'./src/index.js',
	output:{
		path:path.resolve(__dirname,'dist'),
		filename:'index.js'
	},
	//注册插件
	//webpack 会自动调用apply方法,把插件注册到webpack中
	plugins:[
		new CleanWebpackPlugin();
	]
}
webpack 5使用这个插件的方法,直接加上 clean:true
const path = require('path');
module.exports = {
	mode:'production',
	entry:'./src/index.js',
	output:{
		path:path.resolve(__dirname,'dist'),
		filename:'index.js',
		//webpack 5使用这个这个方法
		clean:true
	}
}
5.2 HTMLWebpackPlugin插件
这个插件主要是用来解决,原来的index文件的引用问题,当我们上面修改了打包文件的名称,那我们还得手动修改index.html文件引用的打包文件的名称,比较麻烦;同时这个引用是相对路径,并且这个文件不能和打包文件放在一起,否则会被上面这个插件清理掉。所以使用这个插件来自动生成一个index.html文件。
const path = require('path');
module.exports = {
	mode:'production',
	entry:'./src/index.js',
	output:{
		path:path.resolve(__dirname,'dist'),
		filename:'index.js',
		//webpack 5使用这个这个方法
		clean:true
	},
	plugins:[
		new HTMLWebpackPlugin({
		//自动生成一个index.html 文件到打包目录中,并且自动引入打包文件。
			filename:'app.html',
			//防止根目录下的index.html文件的元素或者属性丢失,跟自动生产的index做合并处理。
			template:'./index.html',
			//设置浏览器显示的title名称,然后在根目录下的index文件中使用,如下图所示。
			title:'my app'
		});
	]
}
5.3 MiniCssExtractPlugin 插件
这个插件是用来处理当我们使用css-loader 时候,我们样式会展示在html中的header中的style里面这样不方便我们以后进行优化,这个插件可以把相应的css生成一个单独的css文件中,放在打包的目录中。
const path = require('path');
module.exports = {
	mode:'production',
	entry:'./src/index.js',
	output:{
		path:path.resolve(__dirname,'dist'),
		filename:'index.js',
		//webpack 5使用这个这个方法
		clean:true
	},
	module:{
		//使用raw-loader,用来处理txt文本文件
		rules:[
		{
			test:/\.css$/,
			//同一类loader中执行顺序,先下后上,先右后左。先执行css-loader->style-loader
			use:[
			//替换style-loader 为插件内置的loader
				{
					loader:MiniCssExtractPlugin.loader
				},
				'css-loader'
			]
		},
	plugins:[
		new MiniCssExtractPlugin({
		//这个插件内置一个loader,需要我们替换掉style-loader
			filename:'[name].css'
		})
	]
}
6.开发服务器devServer配置
启动开发服务器,打包后生成的文件,会存到内存中,不会写入硬盘,提高开发效率。
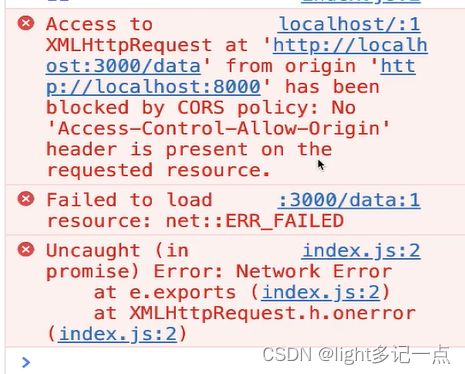
模拟跨域代码,node后端仿写
const Koa = require('koa');
const Router = require('koa-router')
const app = new Koa();
const router = new Router();

//后端接口
router.get('/data',ctx=>{
	ctx.body = 10;
})

app.use(router.routes())
app.listen(3000);
前端发送请求,请求后端接口
import axios from 'axios';
axios.get('http://localhost:3000/data').then(({data})=>{
	console.log(data);
})
6.1 配置proxy解决跨域问题
const path = require('path');
module.exports = {
	mode:'production',
	entry:'./src/index.js',
	output:{
		path:path.resolve(__dirname,'dist'),
		filename:'index.js',
		//webpack 5使用这个这个方法
		clean:true
	},
	module:{},
	plugins:[],
	devServer:{
	//端口号
	port:8000,
	//自动开启浏览器
	open:true,
	//访问打包后html文件名
	index:'app.html',
	//前端解决跨域问题,也可以后端解决,直接加入访问白名单,但是可能会存在安全问题
	proxy:{
		'/data':'http://localhost:3000'
	}
}
}
修改前端请求代码
import axios from 'axios';
axios.get('/data').then(({data})=>{
	console.log(data);
})
现在请求成功了,没有跨域的问题了
6.2 跨域的最终解决方案
但是我们还是得思考下面的问题:如果后端有多个接口,不同的地址,那我们前端还要配置多个proxy吗,这明显是不合理的,所以我们使用下面的方式来解决这个问题
后端示例
const Koa = require('koa');
const Router = require('koa-router')
const app = new Koa();
const router = new Router();

//后端接口
router.get('/data',ctx=>{
	ctx.body = 10;
});
router.get('/data2',ctx=>{
	ctx.body = 10;
});
router.get('/data3',ctx=>{
	ctx.body = 10;
})


app.use(router.routes())
app.listen(3000);
修改配置
devServer:{
	//端口号
	port:8000,
	//自动开启浏览器
	open:true,
	//访问打包后html文件名
	index:'app.html',
	//前端解决跨域问题,也可以后端解决,直接加入访问白名单,但是可能会存在安全问题
	//	使用api来解决后端多个接口不同的问题
	proxy:{
		'/api':{
			target:'http://localhost:3000',
			pathRewrite:{
				'^api':''
			}
		}
	}
}
修改前端请求代码
import axios from 'axios';
axios.get('/api/data').then(({data})=>{
	console.log(data);
});
axios.get('/api/data2').then(({data})=>{
	console.log(data);
});
axios.get('/api/data3').then(({data})=>{
	console.log(data);
})
成功解决跨域问题
7.模块热替换
官网的介绍
模块热替换(HMR - hot module replacement)功能会在应用程序运行过程中,替换、添加或删除 模块,而无需重新加载整个页面。主要是通过以下几种方式,来显著加快开发速度:
- 保留在完全重新加载页面期间丢失的应用程序状态。
- 只更新变更内容,以节省宝贵的开发时间。
- 在源代码中 CSS/JS 产生修改时,会立刻在浏览器中进行更新,这几乎相当于在浏览器 devtools 直接更改样式。
项目中实际的应用场景示例
当我们没有热更新的时候,例如我们的登录页面或者是表单页特别多的时候,当我们修改其中一项,那么浏览器会刷新整个页面,所有的数据都会丢失,对我们的开发造成很大的影响。
7.1HMR实现原理
上面步骤完成之后,但是业务代码不知道模块发生了更新,所以这里还需要使用到module.hot这个属性对象,在使用这个判断的时候我们首先得先配置启动热更新,也就是 hot:true
import a from './a.js'
//module.hot 启动热替换
if(module.hot){
	//accept方法就是用来更新业务代码中逻辑的方法,接收两个参数,第一个是模块的路径,第二个是要执行的回调函数。
	module.hot.accept('./a.js',()=>{
		button.onclick = ()=>{
			console.log(value);
			console.log(a);
		}
	})
}
当我们不使用上面的module.hot这个判断的话,浏览器会刷新页面,这是因为HMR的避错机制,当我们的HMR宕机或者无法监测热更新时,这时候就会回退到live reload 导致浏览器刷新,所以我们还得配置hotOnly:true
7.2配置热更新
devServer:{
	//端口号
	port:8000,
	//自动开启浏览器
	open:true,
	//访问打包后html文件名
	index:'app.html',
	//前端解决跨域问题,也可以后端解决,直接加入访问白名单,但是可能会存在安全问题
	//	使用api来解决后端多个接口不同的问题
	proxy:{
		'/api':{
			target:'http://localhost:3000',
			pathRewrite:{
				'^api':''
			}
		}
	},
	//启动热更新
	hot:true,
	//仅启动HMR,就算是宕机状态 live reload,浏览器也不会刷新页面
	hotOnly:true
}
7.3映射错误配置
当我们在开发的过程中有错误出现的时候,这个时候我们没有配置对应的代码,我们点击错误信息,是无法定位到错误的具体位置,换句话说,浏览器的代码跟我们源码完全不一致,导致我们无法定位错误。如果想要让错误的的代码跟源码保持一致,我们需要做下面的配置。
devtool:'需要的配置项'
在开发环境下,才能够配置devtool,默认项是eval
- 当配置eval时,这时候错误的代码中会标注相关的模块信息,跟源码还是不完全相同。
devtool配置
const path = require('path');
module.exports = {
	entry:'./src/index.js',
	output{
		filename:'build.js',
		path:path.resolve(__dirname,'dist');
		clear:true
	},
	//可以准确地定位报错信息,跟源码一一致。
	devtool:'eval-cheap-source-map'
}
8.打包优化配置
8.1分割代码
当我们使用多对多的方式进行打包的时候,会出现一种情况就是,同一个模块被打包进了多个chunk。例如两个入口文件都引入了axios ,然后打包之后两个打包文件中都包含axios模块。
代码分割配置
module.exports = {
	entry:{
		index:{
			//引入入口路径
			import :'./index.js',
			//引入依赖
			dependOn:['axios','a']
		},
		main:{
			import:'./main.js',
			dependOn:['axios','a']
		},
		axios:'axios',
		a:'./js/a.js'
	},
	output:{
		path:resolve(__dirname,'dist'),
		filename:'[name].js'
	}
}
使用这种方式,会导致多个chuank中出现多个axios 实例,这会导致很多的bug,下面是官方的介绍和解决方案。
使用 optimization.runtimeChunk解决上面的问题
module.exports = {
	entry:{
		index:{
			//引入入口路径
			import :'./index.js',
			//引入依赖
			dependOn:['axios','a']
		},
		main:{
			import:'./main.js',
			dependOn:['axios','a']
		},
		axios:'axios',
		a:'./js/a.js'
	},
	output:{
		path:resolve(__dirname,'dist'),
		filename:'[name].js'
	},
	//配置runtimeChunk为single,webpack会帮忙生成一个runtime chunk,然后他会把加载的包移动到runtime中。
	optimization:{
		runtimeChunk:'single'
	}
}
另一种方式 splitChunks
module.exports = {
	entry:{
		index:'./index.js',
		main:'./mian.js'
	},
	output:{
		path:resolve(__dirname,'dist'),
		filename:'[name].js'
	},
	optimization:{
		splitChunks:{
			//splitChunks下面有三种模式:
			//1.async:只从异步模块中进行拆分,
			//2.initial:表示从入口模块进行拆分,
			//3.all:表示包含上面两种模式。
			chunks:'all'
		}
	}
}
关于异步导入的方式配置
当我们导入的时候是异步的时候可以通过promise中的
.then()方法获取模块化内容;
import ('axios').then(res=>{
	//res接收模块对象,他下面的defaul属性,就是我们需要的模块
	console.log(res);
})
但是这种打包之后的文件名不是我们自定义,所以我们使用起来不方便,我们可以自动义成我们需要的文件名,我们可以通过内联注释 /*webpackChunkName: 'axios'*/ 的方式修改文件名
import (/*webpackChunkName: 'axios'*/'axios').then(res=>{
	//res接收模块对象,他下面的defaul属性,就是我们需要的模块
	console.log(res);
})
8.2预加载和预获取
preload 预加载,prefetch预获取,其实就是针对于动态导入资源和加载资源。
当我们配置preload预加载时,被配置的模块会在父chunk加载时并行加载该模块。
当我们配置prefetch时,被配置的模块,会在浏览器闲置时,也就是未来的某个时刻下载模块。
8.3外部扩展
外部扩展就是对于比较稳定的包,我们可以通过cdn等形式直接引入外部链接,而不用打包到项目中,减少项目的大小。
const {resolve} = require('path');

module.exports = {
	entry:'./index.js',
	output:{
		path:resolve(__dirname,'dist'),
		filename:'[name].js'
	},
	externals:{
		//key 是我们需要进行外部扩展的包名,后续打包时不会将该包打包,
		//value 是该库声明的全局变量 jquery $
		jquery:'$'
	}
}
8.4 tree-shaking
是用来去除我们打包项目没有使用的代码
const {resolve} = require('path');

module.exports = {
	mode:'production',
	entry:'./index.js',
	output:{
		path:resolve(__dirname,'dist'),
		filename:'[name].js'
	},
	optimization:{
		//启动tree-shaking
		usedExports:true
	}
}
9.多打包文件配置文件
当我们同时在一个配置文件中,配置开发和生产环境,这是很不好的事情,所以我们需要把他们分成多个换成来配置。
页面结构
首先需要先配置packjson的启动命令
配置项代码
//webpack.prod.js
const {HTMLWebpackPlugin} from 'html-webpack-plugin';
const {resolve}  = require('path');

module.exports = {
	mode:'production',
	//这个入口路径是根据执行webpack命令所在的目录,不是根据webpack.prod.js文件
	entry:'./index.js',
	output:{
		path:resolve(__dirname,'dist');
		filename:'[name].js'
	},
	module:{
		rules:[
			{
				test:/\.txt$/,
				use:'raw-loader'
			}
		]
	},
	plugins;[
		new HTMLWebpackPlugin({
			filename:'index.html',
			//可以使相对路径,也可以是绝对路径
			template:resolve(__dirname,'../index.html')
		})
	]
}
//webpack.dev.js
const {HTMLWebpackPlugin} from 'html-webpack-plugin';
const {resolve}  = require('path');
module.exports = {
	mode:'development',
	//这个入口路径是根据执行webpack命令所在的目录,不是根据webpack.dev.js文件
	entry:'./index.js',
	output:{
		path:resolve(__dirname,'dist');
		filename:'[name].js'
	},
	module:{
		rules:[
			{
				test:/\.txt$/,
				use:'raw-loader'
			}
		]
	},
	plugins;[
		new HTMLWebpackPlugin({
			filename:'index.html',
			//可以使相对路径,也可以是绝对路径
			template:resolve(__dirname,'../index.html')
		})
	],
	devServer:{
		port:8000,
		open:true
	}
}
}
通过上面两个配置文件,我们可以看出来,这两个文件重复的内容很多,所以我们可以把两个文件中公共的部分抽离出来,用作一个公共的配置文件。
//webpack.common.js
module.exports = {
	entry:'./index.js',
	output:{
		path:resolve(__dirname,'dist');
		filename:'[name].js'
	},
	module:{
		rules:[
			{
				test:/\.txt$/,
				use:'raw-loader'
			}
		]
	},
	plugins;[
		new HTMLWebpackPlugin({
			filename:'index.html',
			//可以使相对路径,也可以是绝对路径
			template:resolve(__dirname,'../index.html')
		})
	]
}
修改后的webpack.dev.js文件
const {merge} = require('webpack-merge);
const common = require('./webpack.common.js);

//合并配置项
module.exports = merge(common,{
	mode:'development',
	devServer:{
		port:8000,
		open:true
	}
})
修改后的webpack.prod.js文件
const {merge} = require('webpack-merge);
const common = require('./webpack.common.js);

//合并配置项
module.exports = merge(common,{
	mode:'production'
})
完成配置


