CentOS 7 安装MySQL8.0.33
一、查看 CentOS 版本
要查看当前 CentOS 版本,你可以执行以下命令:
cat /etc/centos-release该命令将显示当前 CentOS 的版本信息,例如:
CentOS Linux release 7.9.2009 (Core)在这个示例中,CentOS 版本为 7.9.2009。
二、安装MySQL 8.0.33
MySQL安装方式有很多,我们这里只讲一种
1、下载
尝试使用国内镜像站点:访问 MySQL 官方网站可能会受到地域限制和网络延迟的影响。可以尝试使用国内的镜像站点来加快下载速度。例如,你可以尝试使用清华大学的镜像站点进行下载:
wget https://mirrors.tuna.tsinghua.edu.cn/mysql/downloads/MySQL-8.0/mysql-8.0.33-1.el7.x86_64.rpm-bundle.tar
2、解压
tar -xvf mysql-8.0.33-1.el7.x86_64.rpm-bundle.tar
3、安装
依次执行,下列命令,顺序不能改变
- rpm -ivh --nodeps --force mysql-community-common-8.0.33-1.el7.x86_64.rpm
- rpm -ivh --nodeps --force mysql-community-libs-8.0.33-1.el7.x86_64.rpm
- rpm -ivh --nodeps --force mysql-community-client-8.0.33-1.el7.x86_64.rpm
- rpm -ivh --nodeps --force mysql-community-server-8.0.33-1.el7.x86_64.rpm
4、启动服务
启动服务:
systemctl start mysqld5、查看MySQL运行状态
systemctl status mysqld.service
6、查找MySQL初始密码
grep "password" /var/log/mysqld.log密码为:ePk)nzHQH3#Z
7、登录MySQL
[root@hecs-357186 chenshuai]# mysql -uroot -p
Enter password:
8、重置MySQL密码
ALTER USER 'root'@'localhost' IDENTIFIED BY 'Css123456!';设置一个复杂密码,新密码为Css123456!
三、设置MySQL密码为简单密码
密码太复杂了,我想要设置一个简单密码,如123456
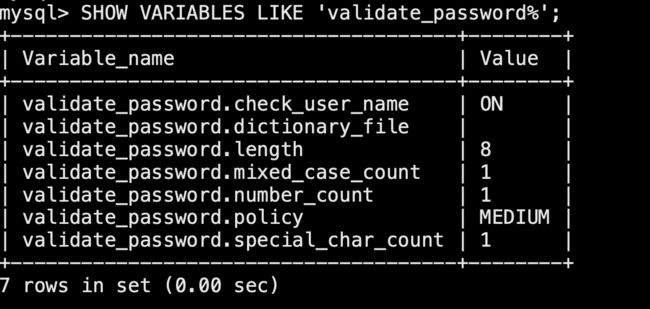
1、查看MySQL密码校验规则
mysql> SHOW VARIABLES LIKE 'validate_password%';解释:
- validate_password.length 密码长度校验,最小为8位
- validate_password.mixed_case_count 要有大小写
- validate_password.special_char_count 要有特殊字符
2、修改校验规则
1、设置密码长度最小为1位
SET GLOBAL validate_password.length = 1;如:
2、设置 禁用大小写敏感性
SET GLOBAL validate_password.mixed_case_count = 0;3、设置不要求特殊字符
SET GLOBAL validate_password.special_char_count = 0;3、重新设置密码
ALTER USER 'root'@'localhost' IDENTIFIED BY '123456';现在密码就是123456了。
四、创建可登录的远程登录用户
设置root用户支持远程访问
1、创建可登录的远程登录用户
create user 'root'@'%' identified with mysql_native_password by '123456';2、授权
grant all privileges on *.* to root@'%';3、刷新
flush privileges;
mysql> create user 'root'@'%' identified with mysql_native_password by 'root';
Query OK, 0 rows affected (0.00 sec)

mysql> grant all privileges on *.* to root@'%';
Query OK, 0 rows affected (0.00 sec)

mysql> flush privileges;


