Spring Cloud——Consul服务注册中心的介绍安装与使用
Consul介绍
用于实现分布式系统的服务发现与配置,内置了服务注册与发现框架,分布一致性协议实现,健康检查,Key/Value存储,多数据中心方案,不再需要依赖其它工具,使用起来比较简单
Consul 特性
Raft 算法
服务发现
健康检查
key/Value 存储
多数据中心
支持http和dns 协议接口
官方提供web管理界面
Consul角色
client:客户端,无状态,将HTTP和DNS接口请求转发给局域网内的服务端集群。
server:服务端,保存配置信息,高可用集群,每个数据中心的server数量推荐3个或者5个
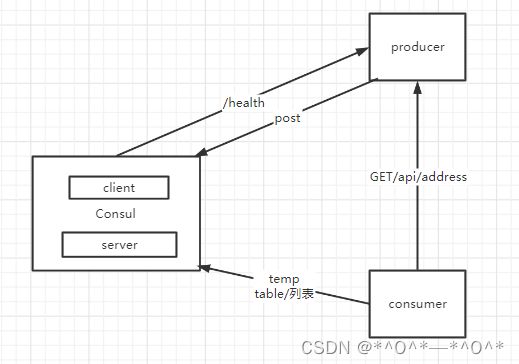
Consul 工作原理
Consul 安装
先去到官网下载
https://www.consul.io/
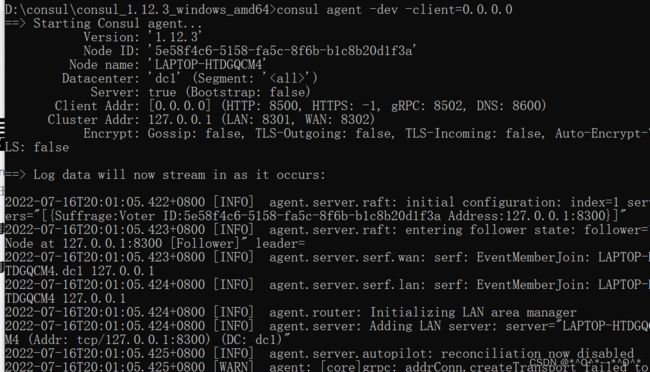
我下载的是Windows下的64文件,完了之后解压缩,在同级目录下打开cmd窗口,输入consul agent -dev -client=0.0.0.0
如下图所示就跑起来了

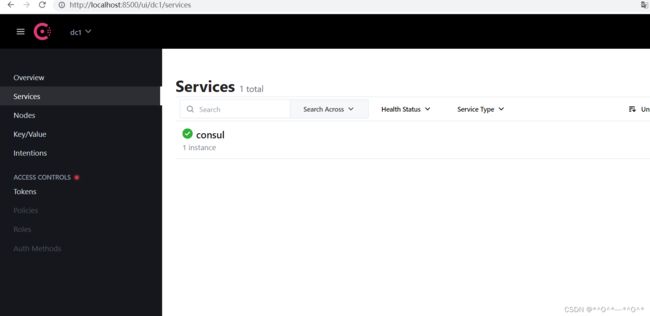
在浏览器输入http://localhost:8500/
就会进入这样的界面

Consul 入门案例
service-provider
build.gradle.kts
import org.jetbrains.kotlin.gradle.tasks.KotlinCompile

plugins {
    id("org.springframework.boot") version "2.3.7.RELEASE"
    id("io.spring.dependency-management") version "1.0.10.RELEASE"
    kotlin("jvm") version "1.3.72"
    kotlin("plugin.spring") version "1.3.72"
}

group = "com"
version = "0.0.1-SNAPSHOT"
java.sourceCompatibility = JavaVersion.VERSION_1_8

repositories {
    mavenCentral()
}

dependencies {
    implementation("org.springframework.boot:spring-boot-starter-web")
    implementation("com.fasterxml.jackson.module:jackson-module-kotlin")
    implementation("org.jetbrains.kotlin:kotlin-reflect")
    implementation("org.jetbrains.kotlin:kotlin-stdlib-jdk8")
    testImplementation("org.springframework.boot:spring-boot-starter-test") {
        exclude(group = "org.junit.vintage", module = "junit-vintage-engine")
    }
    // https://mvnrepository.com/artifact/org.springframework.cloud/spring-cloud-dependencies
    implementation("org.springframework.cloud:spring-cloud-dependencies:Hoxton.SR12")
    // https://mvnrepository.com/artifact/org.springframework.cloud/spring-cloud-starter-consul-discovery
    implementation("org.springframework.cloud:spring-cloud-starter-consul-discovery:2.2.8.RELEASE")
// https://mvnrepository.com/artifact/org.springframework.boot/spring-boot-starter-actuator
    implementation("org.springframework.boot:spring-boot-starter-actuator:2.6.6")

}

tasks.withType<Test> {
    useJUnitPlatform()
}

tasks.withType<KotlinCompile> {
    kotlinOptions {
        freeCompilerArgs = listOf("-Xjsr305=strict")
        jvmTarget = "1.8"
    }
}
appliaction.yml
server:
  port: 7070

spring:
  application:
    name: service-provider

  cloud:
    consul:
      # 注册中心地址
      host: localhost
      port: 8500
      # 服务提供者信息
      discovery:
        register: true      #是否注册
        instance-id: ${spring.application.name}-01   #注册实例id(必须唯一)
        service-name: ${spring.application.name}     #服务名称
        port: ${server.port}            #服务端口
        prefer-ip-address: true         #是否使用ip 地址注册
        ip-address: ${spring.cloud.client.ip-address}      # 服务请求IP
import org.springframework.web.bind.annotation.GetMapping
import org.springframework.web.bind.annotation.RequestMapping
import org.springframework.web.bind.annotation.RestController

@RestController
@RequestMapping("/product")
class TestController {

    @GetMapping("/test")
    fun getTest():String{
        return "hello"
    }
}
service-consumer
两个的依赖文件一样
appliaction.yml 因为使用的单节点的dev模式,consumer就不进行注册
server:
  port: 9091

spring:
  application:
    name: service-consumer

  cloud:
    consul:
      # 注册中心地址
      host: localhost
      port: 8500
      # 服务提供者信息
      discovery:
        register: false      #是否注册
        instance-id: ${spring.application.name}-01   #注册实例id(必须唯一)
        service-name: ${spring.application.name}     #服务名称
        port: ${server.port}            #服务端口
        prefer-ip-address: true         #是否使用ip 地址注册
        ip-address: ${spring.cloud.client.ip-address}      # 服务请求IP
RestTemplate的配置注入
import org.springframework.cloud.client.loadbalancer.LoadBalanced
import org.springframework.context.annotation.Bean
import org.springframework.context.annotation.Configuration
import org.springframework.web.client.RestTemplate

@Configuration
class RestTemplateConfig {
    @Bean
    @LoadBalanced //负载均衡注解
    fun restTemplate(): RestTemplate {
        return RestTemplate()
    }
}
import org.springframework.beans.factory.annotation.Autowired
import org.springframework.core.ParameterizedTypeReference
import org.springframework.http.HttpMethod
import org.springframework.http.ResponseEntity
import org.springframework.web.bind.annotation.GetMapping
import org.springframework.web.bind.annotation.RequestMapping
import org.springframework.web.bind.annotation.RestController
import org.springframework.web.client.RestTemplate

@RestController
@RequestMapping("/consumer")
class TestController {

    @Autowired
    lateinit var restTemplate: RestTemplate

    @GetMapping
    fun test(id:String):String{
        return "${selectProductListByLoadBalancerAnnotation()}  id$id"
    }
    fun selectProductListByLoadBalancerAnnotation(): String? {
        class ListOfPeople : ParameterizedTypeReference<String>()
        var respeonse: ResponseEntity<String> = restTemplate.exchange(
                "http://service-provider/product/test",
                HttpMethod.GET,
                null,
                ListOfPeople()
        )
        return respeonse.body
    }
}
Consul 集群
启动三个Linux服务器作为服务端,需要下载文件,并进行解压

每个节点的启动命令

客户端的启动命令
![]()
关联集群,将所有的附属节点关联到主节点上,在附属节点执行如下命令

服务只需要通过client注册进去,所以需要配的地址是client的地址
host: localhost
port: 8500
