前端技术Vue学习笔记--005
Vue学习笔记
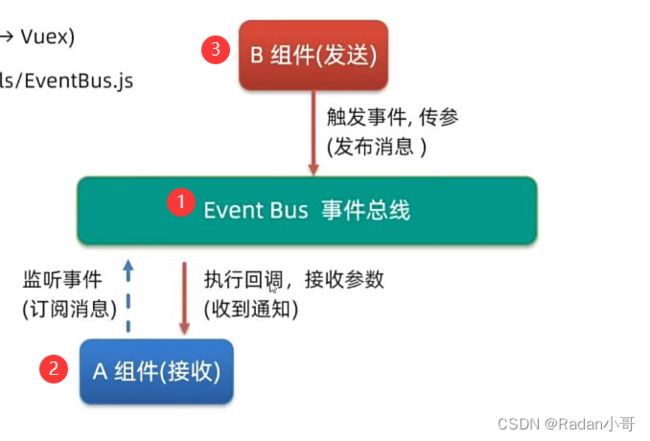
一、非父子通信-event bus 事件总线
作用:非父子组件之间,进行简易消息传递。(复杂场景用----Vuex)
使用步骤:
- 创建一个都能访问的事件总线 (空Vue实例)-----utils/EventBus.js
// 1.创建一个都能访问你的时间总线(空闲的Vue实例)
import Vue from "vue"

const Bus = new Vue()

export default Bus
- A组件(接受方),监听Bus的 $on事件
<script>
import Bus from '../utils/EventBus'
export default {
  created(){
    // 2.在A组件(接收方),进行监听Bus的事件(订阅消息)
    Bus.$on('sendMsg',(msg) => {
       consloe.log(msg)
    })
  }
}
</script>
- B组件(发送方),触发Bus实例的事件
<script>
//导入事件总线
import Bus from '../utils/EventBus'
export default {
  methods:{
    clickSend(){
      // 3.B组件(发送方)触发事件的方式来传递参数(发布消息)
      Bus.$emit('sendMsg','今日天气不错')
    }
  }
}
</script>
二、非父子通信(拓展)----provide&indect(跨层级共享数据)
provide&indect作用:跨层级共享数据
语法:
- 父组件 provide提供数据
export default {
  provide () {
    return {
       // 普通类型【非响应式】
       color: this.color,
       // 复杂类型【响应式】
       userInfo: this.userInfo,
    }
  }
}
- 子/孙组件 inject获取数据
export default {
  inject: ['color','userInfo'],
  created () {
    console.log(this.color, this.userInfo)
  }
}
注意:
- provide提供的简单类型的数据不是响应式的,复杂类型数据是响应式。(推荐提供复杂类型数据)
- 子/孙组件通过inject获取的数据,不能在自身组件内修改
三、子组件与父组件之间的双向绑定
3.1、原理介绍
v-model本质上是一个 语法糖(语法的简写)。例如应用在输入框上,就是value属性 和 input事件 的合写(不同的表单元素会有所不同)
作用:提供数据的双向绑定
- 数据发生改变,页面就会自动变 :value(v-bind:value=‘实例中的数据’)
- 页面输入改变,数据会自动变化 @input
注意:$event 用于在模板中,获取事件的形参
下面两种写法等价:
<template>
  <div class="app">
        1:<input v-model="msg1"  type="text"/><br>
        <!-- 模版中获取事件的形参  ->  $event获取 -->
       2:<input :value="msg2" @input=" msg2 = $event.target.value" type="text"/>
  </div>
</template>
不同的表单元素, v-model在底层的处理机制是不一样的。比如给checkbox使用v-model
底层处理的是 checked属性和change事件。
3.2、表单类组件封装&v-model简化代码
- 表单类组件封装—>实现了子组件和父组件数据的双向绑定
- 父传子:数据 应该是父组件props传递过来的,v-model拆解绑定数据
- 子传父:监听输入,子传父值给父组件修改
<template>
  <div class="app">
    <!-- $event就可以拿到当前子传父的形参 -->
       <BaseSelect :cityId="selectId" @changeId=" selectId = $event"></BaseSelect>
  </div>
</template>

<script>
import BaseSelect from './components/BaseSelect.vue'
export default {
    data(){
        return{
            selectId: '102'
        }
    },
    components:{
        BaseSelect:BaseSelect
    }
}
BaseSelect
<template>
  <div>
    <!-- 父传子 ::value="cityId" -->
    <select :value="cityId" @change="handlerChange" >
      <option value="101">北京</option>
      <option value="102">上海</option>
      <option value="103">武汉</option>
      <option value="104">广州</option>
      <option value="105">深圳</option>
    </select>
  </div>
</template>

<script>
export default {
  props:{
    cityId: String
  },
  methods:{
    handlerChange(e){
      //e.target.value 获取下拉菜单的值
      // alert(e.target.value)
      this.$emit('changeId',e.target.value)
    }
  }

}
</script>

<style>
</style>
注意:不是自己的数据不能用v-model实现双向绑定,只能通过将v-model拆解,利用父子通信的手段进行修改。’
- 父组件v-model简化代码,实现子组件和父组件的双向绑定
相比与上述代码并没有大致区别,只是将子组件的一些名字替换为value与input,从而在父组件中利用v-model实现数据绑定
v-model其实就是 :value和@input事件的简写
步骤:
输入框子组件通信
App.vue
<template>
  <div class="app">

       <!-- <BaseSelect :value="inputValue" @input="inputValue = $event"></BaseSelect> -->
       <!-- :value="inputValue" @input="inputValue = $event" 等价于v-model="inputValue" -->
       <BaseSelect v-model="inputValue"></BaseSelect>
  </div>
</template>

<script>
import BaseSelect from './components/BaseSelect.vue'
export default {
    data(){
        return{
            inputValue: 'i love china'
        }
    },
    components:{
        BaseSelect:BaseSelect
    }

}
</script>

<style>

</style>
BaseSelect
<template>
  <div>
    <!-- 父传子 ::value="cityId" -->
   <input type="text" :value="value" @change="handleChange">

  </div>
</template>

<script>
export default {
  props:{
    value: String
  },
  methods:{
    handleChange(e){
      //e.target.value 获取下拉菜单的值
      // alert(e.target.value)
      this.$emit('input',e.target.value)
    }
  }

}
</script>

<style>
</style>
四、.sync修饰符(重要)
作用:可以实现子组件与父组件的双向绑定,简化代码
特点:prop属性名,可以自定义,非固定为value(用v-model)
场景:封装弹框类的基础组件,visible属性 true显示 false隐藏
本质:就是 :属性名和@update:属性名 合写
子父组件的使用方式

弹出框数据
App.vue
<template>
  <div class="app">
    <button @click=" isShow = true ">退出按钮</button>
    <!-- :visible.sync 等价于  :visible  和@update:visible整合 -->
    <!-- <BaseDialog :visible.sync="isShow"></BaseDialog> -->
    <!-- $event用来接收  this.$emit('update:visible',false)的参数 -->
    <BaseDialog :visible="isShow"  @update:visible=" isShow = $event"></BaseDialog>
  </div>
</template>

<script>
import BaseDialog from './components/BaseDialog.vue'
export default {
  data() {
    return {
      isShow: false,
    }
  },
  components: {
    BaseDialog,
  }
}
</script>

<style>
</style>
BaseDialog
<template>
  <div class="base-dialog-wrap" v-show="visible">
    <div class="base-dialog">
      <div class="title">
        <h3>温馨提示:</h3>
        <button class="close" @click="close">x</button>
      </div>
      <div class="content">
        <p>你确认要退出本系统么?</p>
      </div>
      <div class="footer">
        <button @click="close">确认</button>
        <button @click="close">取消</button>
      </div>
    </div>
  </div>
</template>

<script>
export default {
  props: {
    visible: Boolean,
  },
  methods:{
    close(){

      this.$emit('update:visible',false)
    }
  }
}
</script>

<style scoped>
.base-dialog-wrap {
  width: 300px;
  height: 200px;
  box-shadow: 2px 2px 2px 2px #ccc;
  position: fixed;
  left: 50%;
  top: 50%;
  transform: translate(-50%, -50%);
  padding: 0 10px;
}
.base-dialog .title {
  display: flex;
  justify-content: space-between;
  align-items: center;
  border-bottom: 2px solid #000;
}
.base-dialog .content {
  margin-top: 38px;
}
.base-dialog .title .close {
  width: 20px;
  height: 20px;
  cursor: pointer;
  line-height: 10px;
}
.footer {
  display: flex;
  justify-content: flex-end;
  margin-top: 26px;
}
.footer button {
  width: 80px;
  height: 40px;
}
.footer button:nth-child(1) {
  margin-right: 10px;
  cursor: pointer;
}
</style>
五、ref和$ref
5.1、获取dom
BaseChart
<template>
  <div class="base-chart-box"  ref="myCharts">子组件</div>
  <!--  -->
</template>

<script>
// yarn add echarts 或者 npm i echarts
import * as echarts from 'echarts'
// import echarts from 'echarts'

export default {
  mounted() {
    // 基于准备好的dom,初始化echarts实例
    // this.$refs.myCharts替代document.querySelector('.base-chart-box')查找范围是当前页面的盒子
    var myChart = echarts.init(this.$refs.myCharts)
    // 绘制图表
    myChart.setOption({
      title: {
        text: 'ECharts 入门示例',
      },
      tooltip: {},
      xAxis: {
        data: ['衬衫', '羊毛衫', '雪纺衫', '裤子', '高跟鞋', '袜子'],
      },
      yAxis: {},
      series: [
        {
          name: '销量',
          type: 'bar',
          data: [5, 20, 36, 10, 10, 20],
        },
      ],
    })
  },
}
</script>

<style scoped>
.base-chart-box {
  width: 400px;
  height: 300px;
  border: 3px solid #000;
  border-radius: 6px;
}
</style>
5.2、获取组件实例
<template>
  <div class="app">
    <h4>父组件 -- <button @click="getData">获取组件实例</button></h4>
    <BaseFromVue ref="fromVue"></BaseFromVue>
      <div>
      <button @click="getData">获取数据</button>
      <button @click="resetData">重置数据</button>
    </div>
  </div>
</template>

<script>
import BaseFromVue from './components/BaseFrom.vue'

export default {
  components: {
    BaseFromVue :BaseFromVue
  },
  data(){

    return{
        user :{
            username : '',
            password : ''
        }
    }
  },
  methods: {
   getData(){
    var user =this.$refs.fromVue.getFromValue()
    // alert(user.username)
    this.user=user
   },
   resetData(){
   this.$refs.fromVue.resetFrom()
   }
  }
}
</script>

<style>
</style>
BaseFrom.vue
<template>
  <div class="app">
    <div>
      账号: <input v-model="username" type="text">
    </div>
     <div>
      密码: <input v-model="password" type="text">
    </div>

  </div>
</template>

<script>
export default {
    data(){
        return{
            //定义数据
            username : '',
            password : ''
        }
    },
    methods:{
        //获取到表单数据并返回
        getFromValue(){
            console.log("用户名:"+this.username)

            return{
                username : this.username,
                password : this.password
            }
        },
        resetFrom(){
            this.username=''
            this.password=''
        }
    }
}
</script>

<style scoped>
.app {
  border: 2px solid #ccc;
  padding: 10px;
}
.app div{
  margin: 10px 0;
}
.app div button{
  margin-right: 8px;
}
</style>
六、Vue异步更新、$nextTick
需求:点击编辑按钮,显示编辑框,并让编辑框自动聚焦
this.isShowEdit = true   //控制显示
 this.$refs.inp.focus()  //利用ref得到Dom聚焦
问题:“显示后”,立即获取焦点失败
原因:Vue是异步更新Dom(提升性能)
解决方法:
$nextTick:等Dom更新后,才会触发方法里的函数体
语法:this. $ nextTick
 methods: {
    editFn() {
        // 显示输入框(异步dom更新)---this.$refs.inp获取不到Dom
        this.isShowEdit = true
        //$nextTick()
       this.$nextTick(()=>{
         // 获取焦点
        this.$refs.inp.focus()
       })
       //setTimeout等待的时间不精准 -------- 推荐使用 $nextTick()
    //    setTimeout(() => {
    //      this.$refs.inp.focus()
    //    }, 100);
    }  }


