Linux下部署Samba服务(实现windows和linux共享)
关于Linux和Windows系统之间的文件传输,很多人选择使用FTP,相对较安全,但是有时还是会出现一些问题,比如上传文件时,文件名莫名出现乱码,文件大小改变等问题。相比较来说,使用Samba作为文件共享,就省事简洁多了。
Samba服务器通信协议(Server Messages Block)就是是为了解决局域网内的文件或打印机等资源的共享服务问题,让多个主机之间共享文件变成越来越简单。下面简单介绍下,在Centos7下部署Samba服务的操作记录(测试机192.168.1.35)
安装Samba
[root@localhost ~]# hostnamectl set-hostname samba-server    #修改主机名

[root@samba-server ~]# cat /etc/redhat-release     #查看系统版本
CentOS Linux release 7.6.1810 (Core)

[root@samba-server ~]# rpm -qa|grep samba    #查看是否安装过samba

[root@samba-server ~]# yum install -y samba    #安装samba

[root@samba-server ~]# rpm -qa|grep samba    #查看安装包
安全角度考虑,需要设置防火墙策略(不要关闭防火墙)
#添加samba服务到防火墙策略中
[root@samba-server ~]# firewall-cmd --add-service samba --permanent
success

#重启防火墙
[root@samba-server ~]# firewall-cmd --reload
success

#查看samba服务是否添加到防火墙中:
[root@samba-server ~]# firewall-cmd --list-all|grep samba
  services: ssh dhcpv6-client samba
记住:一定要关闭selinux(否则会造成windows客户机连接Samba失败)
[root@samba-server ~]# vim /etc/sysconfig/selinux
.....
SELINUX=disabled

[root@samba-server ]# setenforce 0
[root@samba-server ]# getenforce
Permissive
配置Samba服务
[root@samba-server ~]# cp /etc/samba/smb.conf /etc/samba/smb.conf.bak

[root@samba-server ~]# vim /etc/samba/smb.conf
# See smb.conf.example for a more detailed config file or
# read the smb.conf manpage.
# Run 'testparm' to verify the config is correct after
# you modified it.

[global]                                                   //全局配置
     workgroup = SAMBA
     security = user

     passdb backend = tdbsam

     printing = cups
     printcap name = cups
     load printers = yes
     cups options = raw

[homes]
     comment = Home Directories
     valid users = %S, %D%w%S
     browseable = No
     read only = No
     inherit acls = Yes

[printers]                                                 //共享打印机配置
     comment = All Printers
     path = /var/tmp
     printable = Yes
     create mask = 0600
     browseable = No

[print$]
     comment = Printer Drivers
     path = /var/lib/samba/drivers
     write list = root
     create mask = 0664
     directory mask = 0775

[backupfile]                                                 //这个是共享文件夹标识,表示登录samba打开时显示的文件夹名称。配置了多少个共享文件夹标识,登录samba时就会显示多少文件夹。
       comment = please do not modify it all will           //comment是对该共享的描述,可以是任意字符串
       path= /home/backupfile                              //共享的路径
       writable = yes                                     //是否写入
       public = no                                       //是否公开
添加backupfile账号(如上配置中添加的内容)
#设置为不予许登入系统,且用户的家目录为 /home/backupfile(相当于虚拟账号)的backupfile账号。
[root@samba-server ~]# useradd -d /home/backupfile -s /sbin/nologin backupfile
pdbedit 命令说明
pdbedit 命令用于管理Samba服务的帐户信息数据库,格式为:"pdbedit [选项] 帐户"
第一次把用户信息写入到数据库时需要使用-a参数,以后修改用户密码、删除用户等等操作就不再需要了。
pdbedit -L :查看samba用户
pdbedit -a -u user:添加samba用户
pdbedit -r -u user:修改samba用户信息
pdbedit -x -u user:删除samba用户

samba服务数据库的密码也可以用 smbpasswd 命令 操作
smbpasswd -a user:添加一个samba用户
smbpasswd -d user:禁用一个samba用户
smbpasswd -e user:恢复一个samba用户
smbpasswd -x user:删除一个samba用户
将backupfile添加为samba用户
[root@samba-server ~]# id backupfile
uid=1000(backupfile) gid=1000(backupfile) 组=1000(backupfile)

[root@samba-server ~]# pdbedit -a -u backupfile
#接着修改samba用户的家目录权限
[root@samba-server ~]# chown -Rf backupfile.backupfile /home/backupfile
启动Samba服务
[root@samba-server ~]# systemctl start smb

[root@samba-server ~]# systemctl enable smb

Created symlink from /etc/systemd/system/multi-user.target.wants/smb.service to /usr/lib/systemd/system/smb.service.

[root@samba-server ~]# systemctl restart smb

[root@samba-server ~]# systemctl status smb
开始测试
#先往共享路径/home/backupfile里添加点内容
[root@samba-server ~]# cd /home/backupfile

[root@samba-server backupfile]# touch test1 test2 test3

[root@samba-server backupfile]# mkdir a1 a2 a3

[root@samba-server backupfile]# echo "HELLO WORD" > test1

[root@samba-server backupfile]# cat test1
HELLO WORD
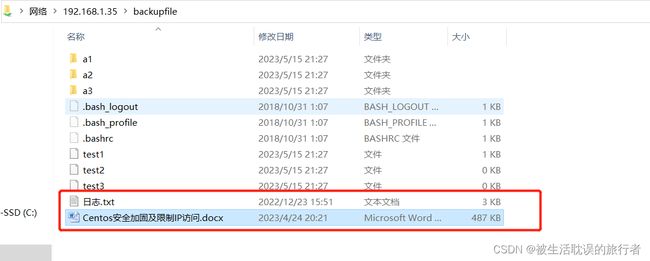
接着再windos 客户机本地测试。”打开cmd窗口或者Win+E键"打开,在最上面的"网络"地址栏输入“\\192.168.1.35”,然后回车,输入上面设置的samba账号backupfile及其密码,就能共享到linux上的/home/backupfile下的文件了
 连接上后,就可以在windows和linux直接进行文件夹的共享操作了,可以让里面放点测试文件
可以在一个samba环境下建立多个业务组的共享目录
比如:
创建一个运维部门的samba共享磁盘,可以看到所有的共享内容;
创建一个产品风控组的samba共享磁盘,只能看到自己组的共享内容;
[root@samba-server backupfile]# cd /etc/samba/

[root@samba-server samba]# ls
lmhosts  ops.smb.conf  smb.conf  smb.conf.bak  smbusers  chanpinfengkong.smb.conf

[root@samba-server samba]# vim ops.smb.conf
[信息科技部-运维]
       comment = please do not modify it all will
       path= /data/samba
       public = no
       valid users = xiaoqiang,xiaohong,@samba
       printable = no
       write list = @samba

[root@samba-server samba]# vim chanpinfengkong.smb.conf
[产品风控组共享目录]
       comment = please do not modify it all will
       path= /data/samba/产品风控组
       public = no
       valid users = xiaomin,mazi,@samba
       printable = no
       write list = @samba
将这几个用户添加到samba里
[root@samba-server ~]# pdbedit -a -u xiaoqiang
[root@samba-server ~]# pdbedit -a -u xiaohong
[root@samba-server ~]# pdbedit -a -u xiaomin
[root@samba-server ~]# pdbedit -a -u mazi

[root@samba-server ~]# pdbedit –L
backupfile:1000:
xiaohong:1002:
mazi:1004:
xiaoqiang:1001:
xiaomin:1003:

创建chanpinfengkong组,将xiaomin和mazi添加到这个组内
[root@samba-server ~]# useradd chanpinfengkong
[root@samba-server ~]# usermod -G chanpinfengkong xiaomin
[root@samba-server ~]# usermod -G chanpinfengkong mazi

创建samba共享目录
[root@samba ~]# cd /data/
[root@samba-server data]# mkdir samba
[root@samba-server data]# mkdir samba/产品风控组
[root@samba-server data]# chown -R samba.samba samba
[root@samba-server data]# chmod -R 777 samba
[root@samba-server data]# setfacl -R -m g:chanpinfengkong:rwx samba/产品风控组


如上配置后,登录samba:
1)用xiaoqiang,xiaohong账号登录samba,能看到"/data/samba"下面所有的共享内容。
2)用xiaomin,mazi账号登录samba,只能看到"/data/samba/产品风控组" 下面的共享内容
3)如果还需要分更多的组,就如上面的"产品风控组"一样进行配置即可!
注意事项
如果在windows客户机上连接Samba出现网络错误:Windows 无法访问\\192.168.1.35\backupfile,解决办法如下:
查看上下文的安全关系
[root@samba-server ~]# semanage backupfile -a -t samba_share_t /home/backupfile/
-bash: semanage: command not found

如果系统出现上面的报错 ,说明你系统里没有安装 semanage命令,下面开始安装semanage:

[root@samba-server ~]# yum provides /usr/sbin/semanage
Loaded plugins: fastestmirror
Loading mirror speeds from cached hostfile
 * base: mirror.0x.sg
 * epel: mirror.dmmlabs.jp
 * extras: mirror.0x.sg
 * updates: mirror.0x.sg
policycoreutils-python-2.5-17.1.el7.x86_64 : SELinux policy core python utilities        //这个是安装包
Repo        : base
Matched from:
Filename    :

[root@samba-server ~]# yum install -y policycoreutils-python

然后再执行一次,执行完成后,不要忘了刷新上下文关系
[root@samba-server ~]# semanage fcontext -a -t samba_share_t /home/backupfile
[root@samba-server ~]# restorecon -Rv /home/backupfile

允许SElinux对于SMB用户共享家目录的布尔值

重启Samba
[root@samba-server ~]# systemctl restart smb
如何在windows本机访问samba时用切换另一个用户登录
方法如下:
1)按键ctrl+r,打开"运行",输入"cmd"
2)输入命令"net use * /delete",接着输入"Y",即先取消所有的net 连接
3)输入切换账号的命令"net use \\192.168.1.35\IPC$ grace@123 /user:grace",即表示切换到grace账号(密码为grace@123)

重置samba账号密码
[root@samba-server ~]# smbpasswd -a kevin     //即重置kevin密码
清理windows下连接linux的samba服务缓存
在安装配置linux服务器samba服务之初,samba服务难免会经过多次修改配置/重启,在期间win的系统或许早已连接上了samba。samba修改配置修改后,特别是用户权限,再次从win登录就很容易出现因缓存的权限原因导致不允许访问或者操作。
这时一般要等很久会清理缓存,另外重启win也会清理。但这效率很低。用以下手动的方法可以实时清理。
清理步骤:
1)打开win的命令行(ctrl+R,输入cmd)。
2)在命令行里输入net use,就会打印出当前缓存的连接上列表。
3)根据列表,一个个删除连接: net use 远程连接名称 /del;
或者一次性全部删除:net use * /del。

这样再次命令行输入samba服务地址的时候,就会重新让你输入访问的账户和密码了。
本文参考地址跳转


