Libvirt安装
目录
建立在上一章的基础上
一、Libvirt安装与配置
1.修改/etc/selinux/config 文件
2.配置yum源为阿里源
3.清理yum源
4.重新生成新缓存
5.检查系统是否安装 libvirt,qemu
6.检查kvm模块是否被系统加载
7.安装qemu及libvirt
8.配置/etc/libvirt/libvirt.conf
9.重启服务并连接
10.配置/etc/libvirt/libvirtd.conf
10.映射
11.测试
二、使用virsh创建虚拟机
1.创建虚拟机硬盘
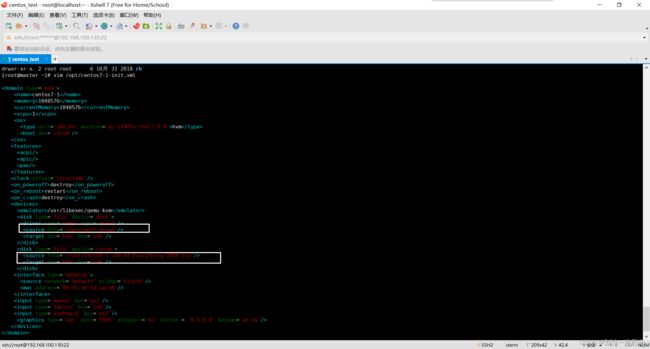
2.传输centos7-1-init.xml并编辑
3.修改/etc/libvirt/qemu.conf ,在末尾插入
4.重启服务
5.创建虚拟机
6.进入centos,连接虚拟机
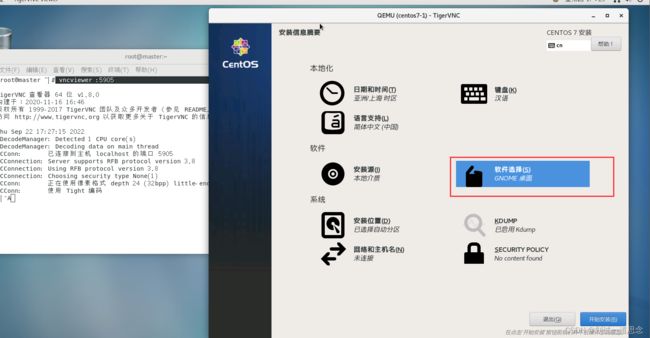
7.安装虚拟机至重启页面
8.不要重启虚拟机,直接关闭虚拟机(ctrl+c),并将centos7-1-init.xml文件启动方式更改
9.重新创建虚拟机
10.重新进入虚拟机、
三、virsh管理
1.查看域(虚拟机)列表
2.查看域的基本信息
3.设置域的内存大小
4.查看域的 vCPU基本信息
5.将域的vCPU绑定到物理CPU上运行(把2号机器的0号vcpu绑定到宿主机0号CPU上)
6.暂停域
7.唤醒域
8.让域关机
9.保存域的状态到文件中,而后被关闭
10.从文件中恢复域的运行
11.以xml格式转存域的信息到标准输出
12.向域添加硬盘,使用qemu-img制作虚拟机硬盘,并附着到虚拟机上
建立在上一章的基础上
一、Libvirt安装与配置
1.修改/etc/selinux/config 文件
2.配置yum源为阿里源
[root@localhost ~]# rm -rf /etc/yum.repos.d/*
[root@localhost ~]# curl -o /etc/yum.repos.d/CentOS-Base.repo http://mirrors.aliyun.com/repo/Centos-7.repo
% Total % Received % Xferd Average Speed Time Time Time Current
Dload Upload Total Spent Left Speed
100 2523 100 2523 0 0 26225 0 --:--:-- --:--:-- --:--:-- 26557
3.清理yum源
yum clean all
4.重新生成新缓存
yum makecache
5.检查系统是否安装 libvirt,qemu
[root@localhost ~]# rpm -q libvirt
未安装软件包 libvirt
[root@localhost ~]# rpm -q qemu
未安装软件包 qemu
6.检查kvm模块是否被系统加载
[root@localhost ~]# lsmod |grep kvm
kvm_intel 188740 0
kvm 637289 1 kvm_intel
irqbypass 13503 1 kvm
7.安装qemu及libvirt
yum install -y qemu-kvm libvirt
8.配置/etc/libvirt/libvirt.conf
uri_aliases = [
"hail=qemu+ssh://[email protected]/system",
"sleet=qemu+ssh://[email protected]/system",
"remote=qemu+ssh://[email protected]/system",
]
9.重启服务并连接
[root@localhost ~]# systemctl restart libvirtd
[root@localhost ~]# virsh -c remote
The authenticity of host '192.168.100.130 (192.168.100.130)' can't be established.
ECDSA key fingerprint is SHA256:Zc5Cgp78zu5A/YgncnLyIoNlA8NAaq/B9y+uwRhzBQw.
ECDSA key fingerprint is MD5:d4:e6:c5:c5:84:7c:c4:c6:23:56:66:7b:46:5b:45:8a.
Are you sure you want to continue connecting (yes/no)? yes
[email protected]'s password:
欢迎使用 virsh,虚拟化的交互式终端。输入:'help' 来获得命令的帮助信息
'quit' 退出virsh #
10.配置/etc/libvirt/libvirtd.conf
将如下内容找出并在配置文件中把注释取消并修改
listen_tls = 0
listen_tcp = 1
tcp_port = "16509"
unix_sock_dir = "/var/run/libvirt"
auth_tcp = "none"
[root@localhost ~]# cat /etc/libvirt/libvirtd.conf |egrep -v "^#|^$"
listen_tls = 0
listen_tcp = 1
tcp_port = "16509"
unix_sock_dir = "/var/run/libvirt"
auth_tcp = "none"
10.映射
[root@localhost ~]# hostnamectl set-hostname master
[root@localhost ~]# bash
进入/etc/hosts配置
11.测试
[root@master ~]# libvirtd --listen -d
libvirtd:错误:Unable to obtain pidfile。查看 /var/log/messages 或者运行不带 --daemon 的命令查看更多信息。
[root@master ~]# rm -rf /run/libvirtd.pid
[root@master ~]# libvirtd --listen -d
[root@master ~]# virsh -c qemu+tcp://localhost:16509/system
欢迎使用 virsh,虚拟化的交互式终端。输入:'help' 来获得命令的帮助信息
'quit' 退出virsh # quit
二、使用virsh创建虚拟机
1.创建虚拟机硬盘
[root@master ~]# qemu-img create -f qcow2 /opt/cent7.qcow2 20g
Formatting '/opt/cent7.qcow2', fmt=qcow2 size=21474836480 encryption=off cluster_size=65536 lazy_refcounts=off
[root@master ~]# ll CentOS-7-x86_64-Everything-2009.iso
-rw-r--r--. 1 root root 10200547328 9月 8 09:28 CentOS-7-x86_64-Everything-2009.iso
2.传输centos7-1-init.xml并编辑
    centos7-1
    1048576
    1048576
    1

      hvm


   destroy
   restart
   destroy

     /usr/libexec/qemu-kvm
3.修改/etc/libvirt/qemu.conf ,在末尾插入
user = "root"
grout = "root"
dynamic_ownership = 0
4.重启服务
systemctl restart libvirtd
5.创建虚拟机
[root@master ~]# virsh define /opt/centos7-1-init.xml
定义域 centos7-1(从 /opt/centos7-1-init.xml)[root@master ~]# virsh list --all
Id 名称 状态
----------------------------------------------------
- centos7-1 关闭
[root@master ~]# virsh start centos7-1
域 centos7-1 已开始[root@master ~]# virsh start centos7-1
域 centos7-1 已开始[root@master ~]# virsh list --all
Id 名称 状态
----------------------------------------------------
1 centos7-1 running
6.进入centos,连接虚拟机
7.安装虚拟机至重启页面
8.不要重启虚拟机,直接关闭虚拟机(ctrl+c),并将centos7-1-init.xml文件启动方式更改
9.重新创建虚拟机
[root@master ~]# vim /opt/centos7-1-init.xml
[root@master ~]#
[root@master ~]# virsh define /opt/centos7-1-init.xml
定义域 centos7-1(从 /opt/centos7-1-init.xml)[root@master ~]# virsh list --all
Id 名称 状态
----------------------------------------------------
- centos7-1 关闭[root@master ~]# virsh start centos7-1
域 centos7-1 已开始
10.重新进入虚拟机、
三、virsh管理
1.查看域(虚拟机)列表
[root@master ~]# virsh list --all
Id 名称 状态
----------------------------------------------------
2 centos7-1 running
2.查看域的基本信息
[root@master ~]# virsh dominfo 2
Id: 2
名称: centos7-1
UUID: d5fb2624-d259-42e1-98d8-40955bddb76c
OS 类型: hvm
状态: running
CPU: 1
CPU 时间: 492.4s
最大内存: 1048576 KiB
使用的内存: 1048576 KiB
持久: 是
自动启动: 禁用
管理的保存: 否
安全性模式: selinux
安全性 DOI: 0
安全性标签: system_u:system_r:svirt_t:s0:c718,c977 (enforcing)
3.设置域的内存大小
virsh setmem 2 51200
4.查看域的 vCPU基本信息
[root@master ~]# virsh vcpuinfo 2
VCPU: 0
CPU: 0
状态: running
CPU 时间: 683.5s
CPU关系: y
5.将域的vCPU绑定到物理CPU上运行(把2号机器的0号vcpu绑定到宿主机0号CPU上)
[root@master ~]# virsh list --all
Id 名称 状态
----------------------------------------------------
2 centos7-1 running
[root@master ~]# virsh vcpupin 2 0 0
6.暂停域
[root@master ~]# virsh start centos7-1
域 centos7-1 已开始[root@master ~]# virsh list --all
Id 名称 状态
----------------------------------------------------
2 centos7-1 running
[root@master ~]# virsh suspend 2
域 2 被挂起
[root@master ~]# virsh list --all
Id 名称 状态
----------------------------------------------------
2 centos7-1 暂停
7.唤醒域
[root@master ~]# virsh resume 2
域 2 被重新恢复[root@master ~]# virsh list --all
Id 名称 状态
----------------------------------------------------
2 centos7-1 running
8.让域关机
[root@master ~]# virsh shutdown 2
域 2 被关闭
9.保存域的状态到文件中,而后被关闭
[root@master ~]# virsh list --all
Id 名称 状态
----------------------------------------------------
2 centos7-1 running[root@master ~]# virsh shutdown 2
域 2 被关闭[root@master ~]# virsh list --all
Id 名称 状态
----------------------------------------------------
2 centos7-1 running[root@master ~]# virsh save 2 cent.img
保存到 2 的域 cent.img
[root@master ~]# virsh list --all
Id 名称 状态
----------------------------------------------------
- centos7-1 关闭
10.从文件中恢复域的运行
[root@master ~]# virsh restore cent.img
从 cent.img 恢复域[root@master ~]# virsh list --all
Id 名称 状态
----------------------------------------------------
3 centos7-1 running
11.以xml格式转存域的信息到标准输出
[root@master ~]# virsh dumpxml 3
centos7-1
d5fb2624-d259-42e1-98d8-40955bddb76c
1048576
1048576
1
........
12.向域添加硬盘,使用qemu-img制作虚拟机硬盘,并附着到虚拟机上
[root@master ~]# qemu-img create -f raw vda.img 10g
Formatting 'vda.img', fmt=raw size=10737418240
[root@master ~]# virsh attach-disk 3 /root/vda.img vda
成功附加磁盘
登录到虚拟机上查看
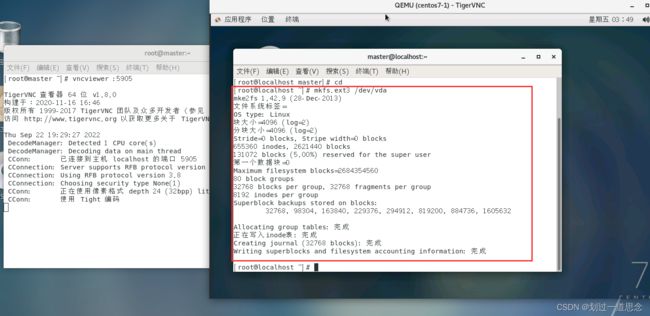
在登录的虚拟机上为添加的硬盘创建文件系统并查看
mkfs.ext3 /dev/vda
mount /dev/vda /mnt
![]()
ls /mnt
df -h


