@选人功能的具体实现
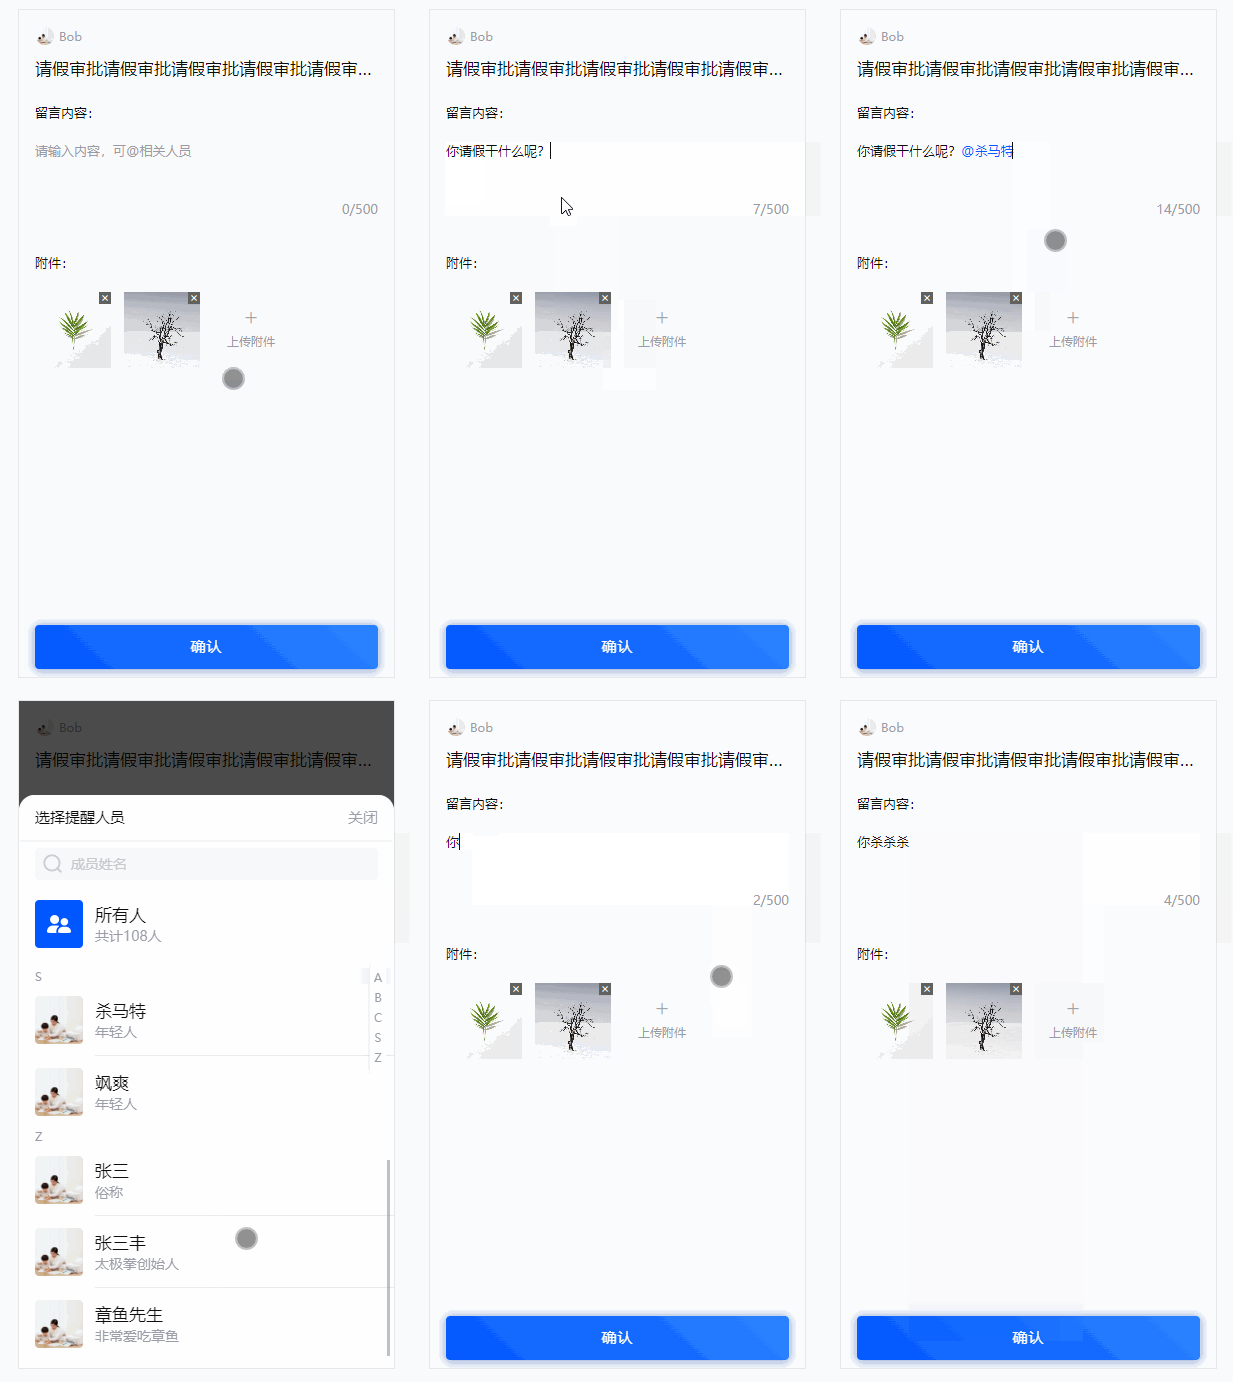
最终实现效果预览
功能描述
1.多文本框中输入普通文本内容,并支持使用@相关人员
2.@输入后,自动弹出选人悬浮框,选择相应的人员,选中后文本框显示@+人员
3.@+人员,蓝色高亮显示,并且该内容不支持编辑,删除的时候会一并删除(@+人员)
4.如果@后未选择人员,可随意输入字符,此时@作为普通字符使用
5.支持字数统计
涉及主要的浏览器功能或方法
1.光标控制:window.getSelection()
removeAllRanges 移除光标选择
addRange 添加光标选择范围
2.键盘事件
keydown ,keyup,键盘按下和弹起的回调
paste 编辑时,粘贴功能回调
实现步骤(代码部分)
说明:以下主要示例Html为Vue版本,其他框架也类似,主要代码侧重点在Js部分,与html关系不大。
1.Html部分(vue的template)
      请输入内容,可@相关人员
      {{ computedMessage }}/500
说明:以上仅包含一个组件,
选择人员后触发的方法为handlePickUser,下文中会提到。
computedMessage: 统计文本长度,计算字数。下文中会提及。
重点:未采用Textarea标签,而是使用了Div的contenteditable=true属性,想了解更多关于它的用法,可自行去搜索相关资料。或 初步了解。
2.主要的js方法:
1)输入框@的监听,弹起选择框
// 键盘抬起事件
    async handkeKeyUp() {
      if (this.isShowAt()) {
        const node = this.getRangeNode()
        const endIndex = this.getCursorIndex()
        this.node = node
        this.endIndex = endIndex
        this.position = this.getRangeRect()
        this.queryString = this.getAtUser() || ''
        this.$refs.editor.blur()
        await this.$nextTick()
        this.showAt = true
      } else {
        this.showAt = false
      }
      this.computeMessage()
    },
    // 键盘按下事件
    handleKeyDown(e) {
      if (this.showDialog) {
        if (e.code === 'ArrowUp' ||
          e.code === 'ArrowDown' ||
          e.code === 'Enter') {
          e.preventDefault()
        }
      }
    },
// 获取 @ 用户
    getAtUser() {
      const content = this.getRangeNode().textContent || ''
      const regx = /@([^@\s]*)$/
      const match = regx.exec(content.slice(0, this.getCursorIndex()))
      if (match && match.length === 2) {
        return match[1]
      }
      return undefined
    },
// 是否展示 @ 悬浮弹框:此处逻辑可以根据业务需求进行调整
    isShowAt() {
      const node = this.getRangeNode()
      if (!node || node.nodeType !== Node.TEXT_NODE) return false
      const content = node.textContent || ''
      const regx = /@([^@\s]*)$/
      const match = regx.exec(content.slice(0, this.getCursorIndex()))
      // console.log('match', match)
      return match && match.length === 2 && ( match[0] === '@' || match[1] === '@' )
    },
2.光标控制相关:window.getSelection,它包括一些方法 getRangeAt,getClientRects
 // 获取光标位置
    getCursorIndex() {
      const selection = window.getSelection()
      return selection.focusOffset // 选择开始处 focusNode 的偏移量
    },
    // 获取节点
    getRangeNode() {
      const selection = window.getSelection()
      return selection.focusNode // 选择的结束节点
    },
    // 弹窗出现的位置
    getRangeRect() {
      const selection = window.getSelection()
      const range = selection.getRangeAt(0) // 是用于管理选择范围的通用对象
      const rect = range.getClientRects()[0] // 择一些文本并将获得所选文本的范围
      const LINE_HEIGHT = 30
      return {
        x: rect.x,
        y: rect.y + LINE_HEIGHT
      }
    },
3. 选中人员后,触发的 handlePickUser
控制光标,插入span标签数据和样式
// 插入@+人员标签
    handlePickUser(user) {
      this.replaceAtUser(user)
      this.user = user
      this.showAt = false
    },
 replaceString(raw, replacer) {
      return raw.replace(/@([^@\s]*)$/, replacer)
    },
    // 插入@标签
    replaceAtUser(user) {
      const node = this.node
      if (node && user) {
        const content = node.textContent || ''
        const endIndex = this.endIndex
        const preSlice = this.replaceString(content.slice(0, endIndex), '')
        const restSlice = content.slice(endIndex)
        const parentNode = node.parentNode
        const nextNode = node.nextSibling
        const previousTextNode = new Text(preSlice)
        // const nextTextNode = new Text('\u200b' + restSlice) // 添加 0 宽字符
        const nextTextNode = new Text(restSlice) // 0 宽字符有问题,已移除
        const atButton = this.createAtButton(user)
        parentNode.removeChild(node)
        // 插在文本框中
        if (nextNode) {
          parentNode.insertBefore(previousTextNode, nextNode)
          parentNode.insertBefore(atButton, nextNode)
          parentNode.insertBefore(nextTextNode, nextNode)
        } else {
          parentNode.appendChild(previousTextNode)
          parentNode.appendChild(atButton)
          parentNode.appendChild(nextTextNode)
        }
        // 重置光标的位置
        const range = new Range()
        const selection = window.getSelection()
        range.setStart(nextTextNode, 0)
        range.setEnd(nextTextNode, 0)
        selection.removeAllRanges()
        selection.addRange(range)
      }
      // 计算字数 - 由于包含div,需要重新统计
      this.computeMessage()
    },
// 创建标签
    createAtButton(user) {
      const btn = document.createElement('span')
      btn.style.display = 'inline-block'
      btn.style.color = '#0056FF'
      btn.contentEditable = 'false'
      btn.textContent = `@${user.name}`
      const wrapper = document.createElement('span')
      wrapper.style.display = 'inline-block'
      wrapper.contentEditable = 'false'
      const spaceElem = document.createElement('span')
      spaceElem.style.whiteSpace = 'pre'
      spaceElem.textContent = '\u200b'
      spaceElem.contentEditable = 'false'
      const clonedSpaceElem = spaceElem.cloneNode(true)
      wrapper.appendChild(spaceElem)
      wrapper.appendChild(btn)
      wrapper.appendChild(clonedSpaceElem)
      return wrapper
    },
    // 计算-留言-长度
    computeMessage() {
      const message = document.getElementById('editor')
      if (message && message.innerHTML) {
        // console.log('原内容', message.innerHTML)
        const copyTxt = message.innerHTML
        const text = replaceText({ str: copyTxt })
        const innerLen1 = text.replace(/<\/?.+?>/g, '')
        const innerLen2 = innerLen1.replace(/ /gi, '')
        const innerLen3 = innerLen2.replace(/\r/gi, '')
        const innerLen4 = this.unescape(innerLen3.replace(/\n/gi, ''))
        // console.log('修正后的内容', innerLen4)
        // console.log('修正后的长度', innerLen4.length)
        this.computedMessage = innerLen4.replace(/ /g, '\n').length
      } else {
        this.computedMessage = 0
      }
    },
     // 将HTML转义为实体
     escape(html) {
      if (typeof html !== 'string') return ''
      return html.replace(entityReg.escape, function(match) {
        return entityMap.escape[match]
      })
    },
    // 实体转html
    unescape(str) {
      if (typeof str !== 'string') return ''
      return str.replace(entityReg.unescape, function(match) {
        return entityMap.unescape[match]
      })
    },
4.由于div包含各种样式,粘贴功能自带过来的一些样式或者特殊字符,标签等,会影响体验,导致预期之外的情况发生;需要监听粘贴事件
此处代码未实现,可根据自身业务情况考虑;可参考其他文章:可编辑的DIV
handlePast() {
      console.log('====')
      console.log('粘贴限制')
    },
5. 以上是部分代码,下面提供整个js文件(由于样式部分 和 mock数据 没有参考性,已删除)
1)@/utils/replace:主要处理 标签和特殊字符,计算文本字数
// 正则匹配标签
// 先匹配'用户昵称' %NICKNAME%
// const nickName=//g
// const nickName = //g
// var classTag=/[\s]+style=("?)(.[^<>"]*)\1/ig
var styleTag = /.*?/gim // 这个只能匹配单标签
var styleTag2 = /.*?/gim // 这个只能匹配单标签
// const divReg = /(
参考文章
1.https://blog.csdn.net/qq_53225741/article/details/126086845
2.https://www.codenong.com/cs109452723/
3.http://soiiy.com/Vue-js/14547.html
内容逐步更新中:有任何问题可评论
