前端学习笔记之——其他 CSS 属性和特性
其他 CSS 属性和特性
1、设置元素的颜色和透明度
| 属性 | 说明 | 值 |
|---|---|---|
| color | 设置元素的前景色 | <颜色> |
| opacity | 设置颜色的透明度 | <数值> |
1.1、设置前景色
color 属性一般用来设置文本的颜色。
<html>
    <head>
        <title>Exampletitle>
        <meta name="author" content="Adam Freeman"/>
        <meta name="description" content="A simple example"/>
        <link rel="shortcut icon" href="favicon.ico" type="image/x-icon" />
        <style>
            p {
                padding: 5px;
                border: medium double black;
                background-color: lightgrey;
                font-family: sans-serif;
            }
            #banana {
                font-size: x-large;
                border: medium solid white;
                background-color: green;
                color: rgba(255, 255, 255, 0.7);
            }
            a:hover {
                color: red;
            }

        style>
    head>
    <body>
        <p id="fruittext">
            There are lots of different kinds of fruit - there are over 500
            varieties of <span id="banana">bananaspan> alone. By the time we add the
            countless types of apples, oranges, and other well-known fruit, we are faced
            with thousands of choices.
            <a href="http://en.wikipedia.org/wiki/Banana">Learn more about Bananasa>
        p>
    body>
html>

1.2、设置元素的透明度
可以使用 opacity 属性让整个元素和文本内容透明。这个属性的取值范围是 0~1,前者代表完全透明,后者代表完全不透明。
<html>
    <head>
        <title>Exampletitle>
        <meta name="author" content="Adam Freeman"/>
        <meta name="description" content="A simple example"/>
        <link rel="shortcut icon" href="favicon.ico" type="image/x-icon" />
        <style>
            p {
                padding: 5px;
                border: medium double black;
                background-color: lightgrey;
                font-family: sans-serif;
            }
            #banana {
                font-size: x-large;
                border: medium solid white;
                background-color: green;
                color: white;
                opacity: 0.4;
            }
            a:hover {
                color: red;
            }
        style>
    head>
    <body>
        <p id="fruittext">
            There are lots of different kinds of fruit - there are over 500
            varieties of <span id="banana">bananaspan> alone. By the time we add the
            countless types of apples, oranges, and other well-known fruit, we are faced
            with thousands of choices.
            <a href="http://en.wikipedia.org/wiki/Banana">Learn more about Bananasa>
        p>
    body>
html>

2、设置表格样式
| 属性 | 说明 | 值 |
|---|---|---|
| border-collapse | 设置相邻单元格的边框处理样式 | collapse separate |
| border-spacing | 设置相邻单元格边框的间距 | 1~2 个长度值 |
| caption-side | 设置表格标题的位置 | top bottom |
| empty-cells | 设置空单元格是否显示边框 | hide show |
| table-layout | 指定表格的布局样式 | auto fixed |
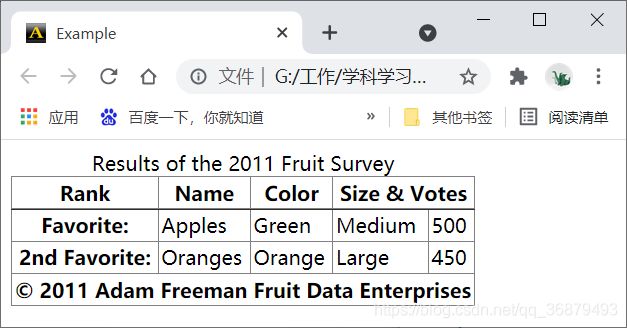
2.1、合并表格边框
border-collapse 用来控制 table 元素相邻单元格边框的样式:

浏览器为表格绘制了一个边框,同时还为每个单元格绘制了边框,显示出来就是双边框。使用 border-collapse 属性可以改变这种效果。
<html>
    <head>
        <title>Exampletitle>
        <meta name="author" content="Adam Freeman"/>
        <meta name="description" content="A simple example"/>
        <link rel="shortcut icon" href="favicon.ico" type="image/x-icon" />
        <style>
            table {
                border-collapse: collapse;
            }
            th, td {
                padding: 2px;
            }
        style>
    head>
    <body>
        <table border="1">
            <caption>Results of the 2011 Fruit Surveycaption>
            <colgroup id="colgroup1">
                <col id="col1And2" span="2"/>
                <col id="col3"/>
            colgroup>
            <colgroup id="colgroup2" span="2"/>
            <thead>
                <tr>
                    <th>Rankth><th>Nameth><th>Colorth>
                    <th colspan="2">Size & Votesth>
                tr>
            thead>
            <tbody>
                <tr>
                    <th>Favorite:th><td>Applestd><td>Greentd>
                    <td>Mediumtd><td>500td>
                tr>
                <tr>
                    <th>2nd Favorite:th><td>Orangestd><td>Orangetd>
                    <td>Largetd><td>450td>
                tr>
            tbody>
            <tfoot>
                <tr>
                    <th colspan="5">© 2011 Adam Freeman Fruit Data Enterprisesth>
                tr>
            tfoot>
        table>
    body>
html>
collapse 值告诉浏览器不要为相邻元素绘制两个边框。
2.2、配置独立边框
如果你一定要为 border-collapse 属性使用默认值 separate,再加几个其他属性同样可以改善表格外观。border-spacing 属性定义相邻元素边框的间距。
<html>
    <head>
        <title>Exampletitle>
        <meta name="author" content="Adam Freeman"/>
        <meta name="description" content="A simple example"/>
        <link rel="shortcut icon" href="favicon.ico" type="image/x-icon" />
        <style>
            table {
                border-collapse: separate;
                border-spacing: 10px;
            }
            th, td {
                padding: 2px;
            }
        style>
    head>
    <body>
        <table border="1">
            <caption>Results of the 2011 Fruit Surveycaption>
            <colgroup id="colgroup1">
                <col id="col1And2" span="2"/>
                <col id="col3"/>
            colgroup>
            <colgroup id="colgroup2" span="2"/>
            <thead>
                <tr>
                    <th>Rankth><th>Nameth><th>Colorth>
                    <th colspan="2">Size & Votesth>
                tr>
            thead>
            <tbody>
                <tr>
                    <th>Favorite:th><td>Applestd><td>Greentd>
                    <td>Mediumtd><td>500td>
                tr>
                <tr>
                    <th>2nd Favorite:th><td>Orangestd><td>Orangetd>
                    <td>td><td>td>
                tr>
            tbody>
            <tfoot>
                <tr>
                    <th colspan="5">© 2011 Adam Freeman Fruit Data Enterprisesth>
                tr>
            tfoot>
        table>
    body>
html>
在边框之间指定了 10 像素的空白。

2.3、处理空单元格
默认情况下,即使单元格为空,浏览器也会为单元格设置独立的边框。可以使用 empty-cells 属性控制这种行为。empty-cells 的默认值为 show,如果将该属性设置为 hide,浏览器就不会绘制边框。
<style>
       table {
              border-collapse: separate;
              border-spacing: 10px;
			  empty-cells: hide;
        }
        th, td {
              padding: 2px;
        }
style>

2.4、设置标题的位置
<html>
    <head>
        <title>Exampletitle>
        <meta name="author" content="Adam Freeman"/>
        <meta name="description" content="A simple example"/>
        <link rel="shortcut icon" href="favicon.ico" type="image/x-icon" />
        <style>
            table {
                border-collapse: collapse;
                caption-side: bottom;
            }
            th, td {
                padding: 5px;
            }
        style>
    head>
    <body>
        <table border="1">
            <caption>Results of the 2011 Fruit Surveycaption>
            <colgroup id="colgroup1">
                <col id="col1And2" span="2"/>
                <col id="col3"/>
            colgroup>
            <colgroup id="colgroup2" span="2"/>
            <thead>
                <tr>
                    <th>Rankth><th>Nameth><th>Colorth>
                    <th colspan="2">Size & Votesth>
                tr>
            thead>
            <tbody>
                <tr>
                    <th>Favorite:th><td>Applestd><td>Greentd>
                    <td>Mediumtd><td>500td>
                tr>
                <tr>
                    <th>2nd Favorite:th><td>Orangestd><td>Orangetd>
                    <td>td><td>td>
                tr>
            tbody>
            <tfoot>
                <tr>
                    <th colspan="5">© 2011 Adam Freeman Fruit Data Enterprisesth>
                tr>
            tfoot>
        table>
    body>
html>

2.5、指定表格布局
默认情况下,浏览器会根据表格每一列中最宽的单元格设置整列单元格的宽度。这意味着你不需要担心还要亲自解决单元格大小的问题,不过,这同时意味着在能够确定页面布局之前,浏览器必须获取所有的表格内容。
浏览器显示表格采用的方法是由 table-layout 属性决定的,它的默认值为 auto。使用另一个值 fixed 可以禁用自动布局。在 fixed 模式中,表格的大小由表格自身和单独每列的 width 值设定的。如果没有列宽值可用,浏览器会设置等距离的列宽。
因此,只要获取了一行的表格数据,浏览器就可以确定列宽。其他行内的数据会自动换行以适应列宽。
<html>
    <head>
        <title>Exampletitle>
        <meta name="author" content="Adam Freeman"/>
        <meta name="description" content="A simple example"/>
        <link rel="shortcut icon" href="favicon.ico" type="image/x-icon" />
        <style>
            table {
                border-collapse: collapse;
                caption-side: bottom;
                table-layout: fixed;
                width: 100%;
            }
            th, td {
                padding: 5px;
            }
        style>
    head>
    <body>
        <table border="1">
            <caption>Results of the 2011 Fruit Surveycaption>
            <colgroup id="colgroup1">
                <col id="col1And2" span="2"/>
                <col id="col3"/>
            colgroup>
            <colgroup id="colgroup2" span="2"/>
            <thead>
                <tr>
                    <th>Rankth><th>Nameth><th>Colorth>
                    <th colspan="2">Size & Votesth>
                tr>
            thead>
            <tbody>
                <tr>
                    <th>Really Really Really Long Title:th>
                    <td>Applestd><td>Greentd>
                    <td>Mediumtd><td>500td>
                tr>
                <tr>
                    <th>2nd Favorite:th><td>Orangestd><td>Orangetd>
                    <td>td><td>td>
                tr>
            tbody>
            <tfoot>
                <tr>
                    <th colspan="5">© 2011 Adam Freeman Fruit Data Enterprisesth>
                tr>
            tfoot>
        table>
    body>
html>

3、设置列表样式
| 属性 | 说明 | 值 |
|---|---|---|
| list-style-type | 指定列表中使用的标记的类型 | |
| list-style-image | 指定图像作为列表标记 | <图像> |
| list-style-position | 指定标记相对于列表项目盒子的位置 | inside outside |
| list-style | 设置所有列表特征的简写属性 |
list-style 简写属性的格式如下:
list-style: <list-style-type> <list-style-position> <list-style-image>
3.1、设置列表标记的类型
list-style-type 属性用来设置标记的样式。
| 值 | 说明 |
|---|---|
| none | 没有标记 |
| box check circle diamond disc dash square |
使用指定形状的标记 |
| decimal | 使用十进制数字作为标记 |
| binary | 使用二进制数字作为标记 |
| lower-alpha | 使用小写字母作为标记 |
| upper-alpha | 使用大写字母作为标记 |
<html>
    <head>
        <title>Exampletitle>
        <meta name="author" content="Adam Freeman"/>
        <meta name="description" content="A simple example"/>
        <link rel="shortcut icon" href="favicon.ico" type="image/x-icon" />
        <style>
            ol {
                list-style-type: lower-alpha;
            }
        style>
    head>
    <body>
        I like apples and oranges.

        I also like:
        <ol>
            <li>bananasli>
            <li>mangoesli>
            <li style="list-style-type: decimal">cherriesli>
            <li>plumsli>
            <li>peachesli>
            <li>grapesli>
        ol>
    body>
html>

3.2、使用图像作为列表标记
list-style-image 属性可以将图像作为列表标记。
<html>
    <head>
        <title>Exampletitle>
        <meta name="author" content="Adam Freeman"/>
        <meta name="description" content="A simple example"/>
        <link rel="shortcut icon" href="favicon.ico" type="image/x-icon" />
        <style>
            ul {
                list-style-image: url('banana-vsmall.png');
            }
        style>
    head>
    <body>
        I like apples and oranges.

        I also like:
        <ul>
            <li>bananasli>
            <li>mangoesli>
            <li>cherriesli>
            <li>plumsli>
            <li>peachesli>
            <li>grapesli>
        ul>
    body>
html>

3.3、设置列表标记的位置
可以使用 list-style-position 属性指定标记相对于 li 元素内容框的位置。这个属性有两个值:inside 和 outside,前者定义标记位于内容框的内部,后者定义标记位于内容框外部。
<html>
    <head>
        <title>Exampletitle>
        <meta name="author" content="Adam Freeman"/>
        <meta name="description" content="A simple example"/>
        <link rel="shortcut icon" href="favicon.ico" type="image/x-icon" />
        <style>
            li.inside {
                list-style-position: inside;
            }
            li.outside {
                list-style-position: outside;
            }
            li {
                background-color: lightgrey;
            }
        style>
    head>
    <body>
        I like apples and oranges.

        I also like:
        <ul>
            These are the inside items:
            <li class="inside">bananasli>
            <li class="inside">mangoesli>
            <li class="inside">cherriesli>
            These are the outside items:
            <li class="outside">plumsli>
            <li class="outside">peachesli>
            <li class="outside">grapesli>
        ul>
    body>
html>

4、设置光标样式
cursor 属性用来改变光标的外形。
| 属性 | 说明 | 值 |
|---|---|---|
| cursor | 设置光标的样式 | auto、crosshair、default、help、move、pointer、progress、text、wait、n-resize、e-resize、w-resize、ne-resize、nw-resize、se-resize |
<html>
    <head>
        <title>Exampletitle>
        <meta name="author" content="Adam Freeman"/>
        <meta name="description" content="A simple example"/>
        <link rel="shortcut icon" href="favicon.ico" type="image/x-icon" />
        <style>
            p {
                padding: 5px;
                border: medium double black;
                background-color: lightgrey;
                font-family: sans-serif;
            }
            #banana {
                font-size: x-large;
                border: medium solid white;
                background-color: green;
                color: rgba(255, 255, 255, 0.7);
                cursor: progress;
            }

        style>
    head>
    <body>
        <p id="fruittext">
            There are lots of different kinds of fruit - there are over 500
            varieties of <span id="banana">bananaspan> alone. By the time we add the
            countless types of apples, oranges, and other well-known fruit, we are faced
            with thousands of choices.
        p>
    body>
html>