看了这篇不再怕面试问线程池了!(建议收藏!)
小伙伴们好久不见呀~
嘿嘿 迎来了自己的第一篇 万字长文! (中间除了看看金色的雨外,还在做其他笔记~ 所以就拖到现在了 ,ԾㅂԾ,
这篇长文除了详细介绍线程池这个点以及它的使用场景外,还分享了下几种连接池滴用法以及避开一些坑,(图还挺多的~) 希望对你有所帮助!!冲冲冲!
池化技术~,不知道小伙伴们对这个词是怎么理解的?
为什么要有这个技术呢?解决什么 痛点 呢?哈哈哈
带着小小的思考和 4ye 一起往下看看叭~
[外链图片转存失败,源站可能有防盗链机制,建议将图片保存下来直接上传(img-phCsH2ff-1622594179220)(http://img.ryzeyang.top/lQ3gq)]
池化技术,故名思意,就是 把资源池子化
这么做有啥好处呢?
这得从我们的程序说起啦~ 嘿嘿,又回到我们之前提到的那些底层知识了,程序运行起来就会占用一定的系统资源,比如 CPU,内存,IO 等,而为了优化对这些系统资源的使用,就有了这个池化技术啦~
常见的池化技术
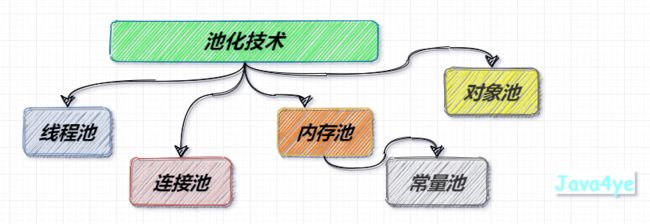
比如,线程池,连接池,内存池,对象池,常量池 等等
大概有下面这些叭
线程池
相信小伙伴们看完上一篇 《深入 JVM 源码之探索线程 Thread start 的奥秘》后,对这个线程的创建和启动有了粗略的一个印象~
比如
线程的创建
- 最后是调用到了
linux的pthread_create方法 - 用户线程和内核线程是1比1的关系
线程的开启
-
如果是 Java 线程,会先更改用户线程的状态为
Runnable -
最后在开启内核线程的时候,也会更改内核线程的状态为
RUNNABLE,然后再调用pd_start_thread(thread);
还有每个线程大概占用 1M 的内存,咳咳,总之就是很麻烦~
哪里麻烦呢?
可以看到创建线程的步骤是很繁琐的,每次创建都得去创建一个内核线程,操作系统都烦死了
要是我是操作系统,我肯定和你说,你就不能先存着吗,等真的不用了再给我销毁,老让我创建销毁,创建销毁,你搁这 nao tai tao 呢?
小小总结下线程池的优点:
通过创建一定数量的线程,充分利用系统资源,来减少程序运行过程中频繁创建和销毁线程所带来的开销,进而提高程序的响应速度
那么我们直接来看下这个Java中的线程池叭!
创建方式
这里的创建方式主要有两种
- 通过
Executors - 通过
ThreadPoolExecutor
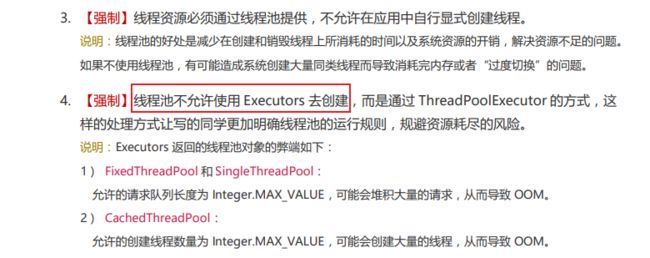
这里我们先重点介绍这个 ThreadPoolExecutor ,这个是非常重要的, 在阿里巴巴的编程规范(《Java开发手册(嵩山版)》)中有提到 如下图:
冲冲冲!
ThreadPoolExecutor 详解
参数介绍
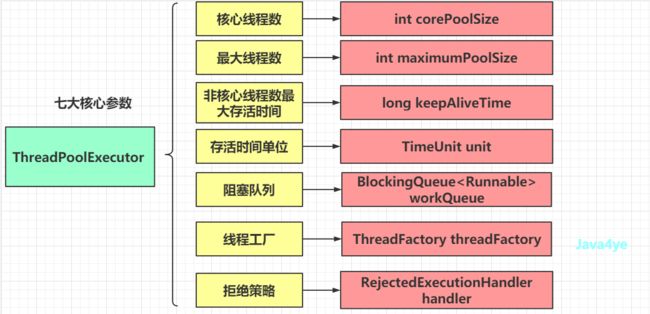
如果所示, ThreadPoolExecutor 一共有七个参数,分别是
- 核心线程数:
int corePoolSize - 最大线程数:
int maximumPoolSize - 非核心线程数最大存活时间:
long keepAliveTime - 存活时间单位:
TimeUnit unit - 阻塞队列:
BlockingQueueworkQueue - 线程工厂:
ThreadFactory threadFactory - 拒绝策略:
RejectedExecutionHandler handler
核心参数图
下面再展开介绍下 阻塞队列 和 拒绝策略
阻塞队列
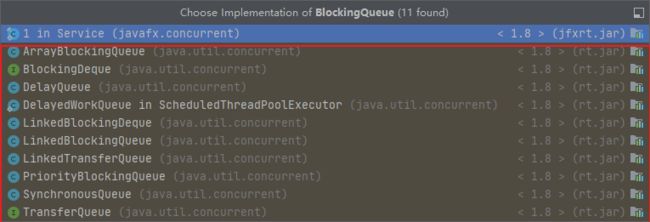
大概有下面这些,下面简单介绍先啦
(后面写 [[集合]] 这类文章再具体介绍下他们啦,有兴趣的小伙伴小小支持下呀)
ArrayBlockingQueue: 由数组组成的有界阻塞队列,FIFODelayQueue: 一个延时无界阻塞队列,内部包含了PriorityQueue(一个由优先级堆构成的无界队列)DelayedWorkQueue: 这个属于ThreadPoolExecutor的内部类,专门来储存RunnableScheduledFuture任务的,也是一个基于堆的延时队列LinkedBlockingDeque:由链表结构组成的双向阻塞队列,可选有界LinkedBlockingQueue: 由链表组成的阻塞队列,可选有界LinkedTransferQueue: 由链表结构组成的无界阻塞队列TransferQueue组成PriorityBlockingQueue: 由堆构成的无界优先级队列PriorityQueue组成的无界阻塞队列,支持排序SynchronousQueue: 一个大小为0的特殊集合(可以是队列,也可以是栈),插入数据和获取数据要同时存在,才能成功获取或添加数据,公平模式下是队列:由TransferQueue组成,FIFO;非公平模式下是栈:由TransferStack组成,LIFO
拒绝策略
如图,这里提供了四种给我们选择
拒绝策略图
AbortPolicy
默认的拒绝策略
作用:拒绝并抛出异常
源码如下:
public static class AbortPolicy implements RejectedExecutionHandler {

        public AbortPolicy() { }

        /**
         * Always throws RejectedExecutionException.
         *
         * @param r the runnable task requested to be executed
         * @param e the executor attempting to execute this task
         * @throws RejectedExecutionException always
         */
        public void rejectedExecution(Runnable r, ThreadPoolExecutor e) {
            throw new RejectedExecutionException("Task " + r.toString() +
                                                 " rejected from " +
                                                 e.toString());
        }
    }
CallerRunsPolicy
作用: 除非线程池已经关闭,不然直接调用 run 方法来执行任务
源码如下:
public static class CallerRunsPolicy implements RejectedExecutionHandler {

    public CallerRunsPolicy() { }

    /**
     * Executes task r in the caller's thread, unless the executor
     * has been shut down, in which case the task is discarded.
     *
     * @param r the runnable task requested to be executed
     * @param e the executor attempting to execute this task
     */
    public void rejectedExecution(Runnable r, ThreadPoolExecutor e) {
        if (!e.isShutdown()) {
            r.run();
        }
    }
}
DiscardPolicy
作用: 直接丢弃,什么也不做
源码如下:
public static class DiscardPolicy implements RejectedExecutionHandler {

    public DiscardPolicy() { }

    /**
     * Does nothing, which has the effect of discarding task r.
     *
     * @param r the runnable task requested to be executed
     * @param e the executor attempting to execute this task
     */
    public void rejectedExecution(Runnable r, ThreadPoolExecutor e) {
    }
}
DiscardOldestPolicy
作用: 线程池没关闭的条件下,移除队列中头部的任务,然后再通过 execute 方法来执行任务
源码如下:
public static class DiscardOldestPolicy implements RejectedExecutionHandler {

    public DiscardOldestPolicy() { }

    /**
     * Obtains and ignores the next task that the executor
     * would otherwise execute, if one is immediately available,
     * and then retries execution of task r, unless the executor
     * is shut down, in which case task r is instead discarded.
     *
     * @param r the runnable task requested to be executed
     * @param e the executor attempting to execute this task
     */
    public void rejectedExecution(Runnable r, ThreadPoolExecutor e) {
        if (!e.isShutdown()) {
            e.getQueue().poll();
            e.execute(r);
        }
    }
}
队列小知识补充
这个 poll 是队列的一个删除方法,作用是删除队列的头部,如果删除失败就返回 null
队列 Queue 所有方法如下图
阻塞队列 BlockingQueue 增删查方法
多了 阻塞 和 timeout 这两种类型的方法
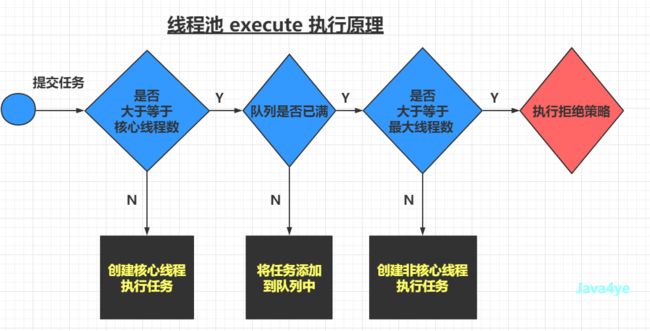
execute 执行原理
原理图
源码如下
源码中有非常棒的代码注释,如下
public void execute(Runnable command) {
    if (command == null)
        throw new NullPointerException();
    /*
     * Proceed in 3 steps:
     *
     * 1. If fewer than corePoolSize threads are running, try to
     * start a new thread with the given command as its first
     * task.  The call to addWorker atomically checks runState and
     * workerCount, and so prevents false alarms that would add
     * threads when it shouldn't, by returning false.
     *
     * 2. If a task can be successfully queued, then we still need
     * to double-check whether we should have added a thread
     * (because existing ones died since last checking) or that
     * the pool shut down since entry into this method. So we
     * recheck state and if necessary roll back the enqueuing if
     * stopped, or start a new thread if there are none.
     *
     * 3. If we cannot queue task, then we try to add a new
     * thread.  If it fails, we know we are shut down or saturated
     * and so reject the task.
     */
    int c = ctl.get();
    if (workerCountOf(c) < corePoolSize) {
        if (addWorker(command, true))
            return;
        c = ctl.get();
    }
    if (isRunning(c) && workQueue.offer(command)) {
        int recheck = ctl.get();
        if (! isRunning(recheck) && remove(command))
            reject(command);
        else if (workerCountOf(recheck) == 0)
            addWorker(null, false);
    }
    else if (!addWorker(command, false))
        reject(command);
}
submit 方法
这个是线程池执行任务的另外一种方式,通常是用来执行有返回值的任务
源码如下:
submit 方法在源码中被重载了三次,这里只举其中一个例子。
可以看到实际上还是调用到了 execute 方法
[外链图片转存失败,源站可能有防盗链机制,建议将图片保存下来直接上传(img-DlMmus50-1622594179263)(http://img.ryzeyang.top/image-20210519221801248.png)]
对于如何创建带返回结果的任务(阻塞和异步两种模式),可以参考下博主之前的这篇文章《 面试官:线程有几种创建方式?》,里面提到 Callable , FutureTask (阻塞式)和 CompletableFuture (异步式)
shutdown 和 shutdownNow
说完执行,咱们再来说说这个关闭啦~
线程池的关闭有两种方式,一个是 shutdown , 另一个是 shutdownNow
区别
shutdown会将线程池的状态更改为SHUTDOWN,同时将队列中的任务执行完,再关闭线程池shutdownNow则会将线程池的状态更改为STOP,并终止正在运行的任务,同时将队列中的任务导出到一个列表上,再关闭线程池
共同点
- 调用关闭线程池的方法后,再提交任务,会触发拒绝策略
shutdown 源码如下
public void shutdown() {
    final ReentrantLock mainLock = this.mainLock;
    mainLock.lock();
    try {
        checkShutdownAccess();
        advanceRunState(SHUTDOWN);
        interruptIdleWorkers();
        onShutdown(); // hook for ScheduledThreadPoolExecutor
    } finally {
        mainLock.unlock();
    }
    tryTerminate();
}
这里通过 onShutdown 去清楚 ScheduledThreadPoolExecutor 中的延迟任务
shutdownNow 源码如下
public List<Runnable> shutdownNow() {
    List<Runnable> tasks;
    final ReentrantLock mainLock = this.mainLock;
    mainLock.lock();
    try {
        checkShutdownAccess();
        advanceRunState(STOP);
        interruptWorkers();
        tasks = drainQueue();
    } finally {
        mainLock.unlock();
    }
    tryTerminate();
    return tasks;
}
可以发现和 shutdown 方法的主要不同就是多了这步骤: tasks = drainQueue(); ,去导出队列的任务
接下来我们来看看这个 Executors 啦
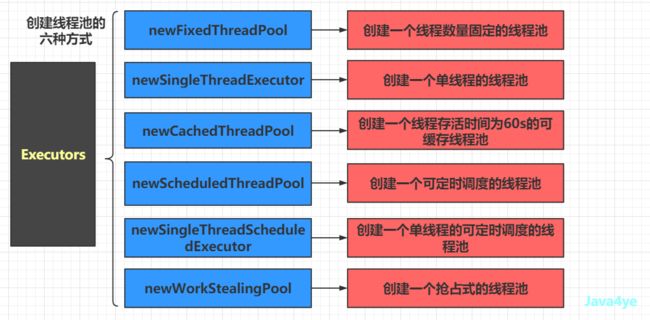
Executors 创建线程池的六种方式
在了解了 ThreadPoolExecutor 后,我们来看这几种方式就简单太多啦,因为他们的核心都是封装了这个 ThreadPoolExecutor 。
概览图
newFixedThreadPool
创建一个线程数量固定的线程池
源码如下
public static ExecutorService newFixedThreadPool(int nThreads) {
    return new ThreadPoolExecutor(nThreads, nThreads,
                                  0L, TimeUnit.MILLISECONDS,
                                  new LinkedBlockingQueue<Runnable>());
}
经历了上面 ThreadPoolExecutor 的洗礼,再来看这个源码,是不是一下子就知道的弊端啦~ 嘿嘿
解析
作用:创建一个固定线程数的线程池,
- 核心线程和最大线程数都是n
- 非核心线程的最大存活时间为0
- 使用无界阻塞队列
- 使用默认的拒绝策略
正如手册中提到的,由于使用到这个无界队列,没有限制这个任务队列长度,可能会堆积太多任务,从而导致 OOM
newSingleThreadExecutor
创建一个单线程的线程池
源码如下
public static ExecutorService newSingleThreadExecutor() {
    return new FinalizableDelegatedExecutorService
        (new ThreadPoolExecutor(1, 1,
                                0L, TimeUnit.MILLISECONDS,
                                new LinkedBlockingQueue<Runnable>()));
}
解析
作用:创建一个单线程的线程池,
- 核心线程和最大线程数都是1
- 非核心线程的最大存活时间为0
- 使用无界阻塞队列
- 使用默认的拒绝策略
正如手册中提到的,由于没有限制这个任务队列,可能会堆积太多任务,从而导致 OOM
newCachedThreadPool
创建一个线程存活时间为60s的可缓存线程池
源码如下
public static ExecutorService newCachedThreadPool() {
        return new ThreadPoolExecutor(0, Integer.MAX_VALUE,
                                      60L, TimeUnit.SECONDS,
                                      new SynchronousQueue<Runnable>());
    }
解析
作用:创建一个可缓存的线程池,
- 核心线程数 0
- 最大线程数
Integer.MAX_VALUE - 非核心线程的最大存活时间为 60s
- 使用无缓存同步队列
SynchronousQueue - 使用默认的拒绝策略
正如手册中提到的,由于没有限制这个线程数量(尽管会复用线程,但难免有极端条件~),可能会导致创建过多线程,从而导致 OOM。
为什么使用这个 SynchronousQueue 队列呢?
主要是因为它是一个大小为 0 的队列/栈,根据我们上面分析的 execute 执行原理 ,可以知道:
当队列长度为 0 时,相当于直接来到最大线程数的判断,这里会去判断这个当前线程数是否小于最大线程数,是的话会去创建这个非核心线程来执行任务!
为什么我这脑瓜子会想到这个问题呢,当然是因为搜资料时看到有人在提问 哈哈 如果 4ye 的这个答案不正确的话,还望不吝赐教!!
newScheduledThreadPool
创建一个可定时调度的线程池,比如延迟执行或者周期性执行任务
源码如下:
public static ScheduledExecutorService newScheduledThreadPool(int corePoolSize) {
    return new ScheduledThreadPoolExecutor(corePoolSize);
}

public ScheduledThreadPoolExecutor(int corePoolSize) {
        super(corePoolSize, Integer.MAX_VALUE, 0, NANOSECONDS,
              new DelayedWorkQueue());
}
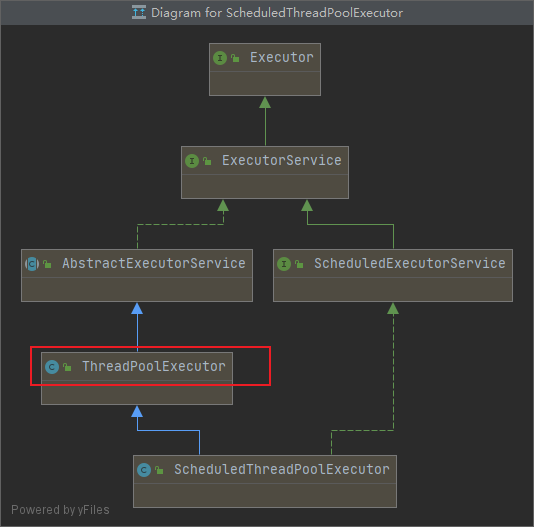
可以看到这里 ScheduledThreadPoolExecutor 去继承了 ThreadPoolExecutor,
通过 super 调用父类构造器,所以还是我们熟悉的那几个参数~
解析
作用:创建一个可定时调度的线程池
- 核心线程数: 指定数量
- 最大线程数
Integer.MAX_VALUE - 非核心线程的最大存活时间为 0
- 使用延迟队列
DelayedWorkQueue - 使用默认的拒绝策略
方法
主要是这里的方法和上面几个不一样,单独介绍下~
@Test
public void newScheduledThreadPoolTest() throws InterruptedException {
    ScheduledExecutorService executorService = Executors.newScheduledThreadPool(2);
    executorService.schedule(run1, 0, TimeUnit.SECONDS);
    executorService.scheduleAtFixedRate(run2, 1, 2, TimeUnit.SECONDS);
    Thread.sleep(1000 * 20);
    executorService.shutdown();
    executorService.awaitTermination(5, TimeUnit.SECONDS);
}
这里newScheduledThreadPool 返回的是 ScheduledExecutorService ,而非ExecutorService 。
schedule 方法只执行一次 。
scheduleAtFixedRate 以固定周期运行 。
newSingleThreadScheduledExecutor
创建一个单线程的可定时调度的线程池,比如延迟执行或者周期性执行任务
源码如下
public static ScheduledExecutorService newSingleThreadScheduledExecutor() {
    return new DelegatedScheduledExecutorService
        (new ScheduledThreadPoolExecutor(1));
}

public ScheduledThreadPoolExecutor(int corePoolSize) {
        super(corePoolSize, Integer.MAX_VALUE, 0, NANOSECONDS,
              new DelayedWorkQueue());
}
解析
作用:创建一个可定时调度的线程池
- 核心线程数: 1
- 最大线程数
Integer.MAX_VALUE - 非核心线程的最大存活时间为 0
- 使用延迟队列
DelayedWorkQueue - 使用默认的拒绝策略
newWorkStealingPool
这是最特殊的一个,它可以创建一个抢占式的线程池,默认线程数量为可用的逻辑处理器数量,也可手动指定
源码如下
public static ExecutorService newWorkStealingPool() {
    return new ForkJoinPool
        (Runtime.getRuntime().availableProcessors(),
         ForkJoinPool.defaultForkJoinWorkerThreadFactory,
         null, true);
}
public ForkJoinPool(int parallelism,
                    ForkJoinWorkerThreadFactory factory,
                    UncaughtExceptionHandler handler,
                    boolean asyncMode) {
    this(checkParallelism(parallelism),
         checkFactory(factory),
         handler,
         asyncMode ? FIFO_QUEUE : LIFO_QUEUE,
         "ForkJoinPool-" + nextPoolId() + "-worker-");
    checkPermission();
}


private ForkJoinPool(int parallelism,
                         ForkJoinWorkerThreadFactory factory,
                         UncaughtExceptionHandler handler,
                         int mode,
                         String workerNamePrefix) {
        this.workerNamePrefix = workerNamePrefix;
        this.factory = factory;
        this.ueh = handler;
        this.config = (parallelism & SMASK) | mode;
        long np = (long)(-parallelism); // offset ctl counts
        this.ctl = ((np << AC_SHIFT) & AC_MASK) | ((np << TC_SHIFT) & TC_MASK);
}
参数介绍
- 线程数:
int parallelism - 线程工厂:
ForkJoinWorkerThreadFactory factory - 未捕获到异常时的处理器:
UncaughtExceptionHandler handler - 异步模式:
int mode - 工作线程名称前缀:
workerNamePrefix
可以看到内部是封装了 ForkJoinPool 线程池 ,那么简单介绍下这个来自 jdk1.7 的大家伙叭
ForkJoinPool
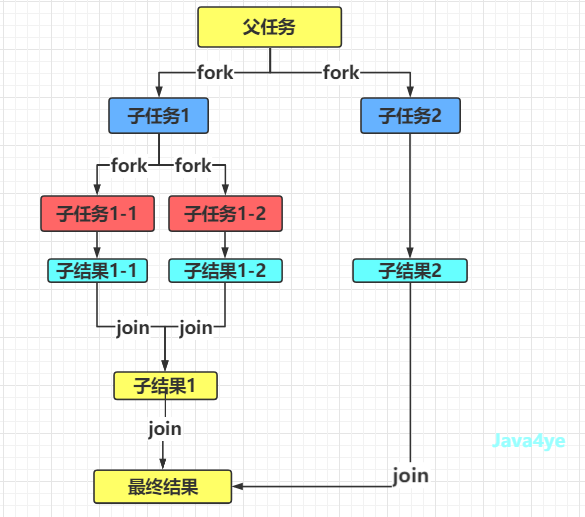
正如它的名字一样,它的作用就是 fork 和 join , 采用了分治思想 :
不断递归,将大任务拆分成很多小任务,然后将他们结合起来,最后就得到这个结果啦,类似于 MapReduce
fork/join图
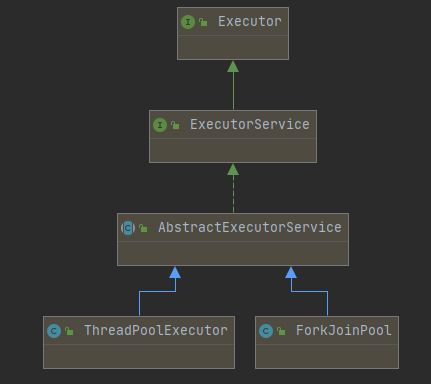
再来看一眼它的类图,可以发现它和 ThreadPoolExecutor 是兄dei~
那么很明显,Fork/Join 是它区别于这个 ThreadPoolExecutor 的最大特点,它可以拆分任务,
那么拆分任务后还有哪些小秘密呢? 嘿嘿 这里就不卖关子啦,让我们来看看这个 工作窃取 叭
类图如下:
work-stealing
工作窃取
正如它的名称一样,它会去偷走其他线程的工作(居然有这等好事! )哈哈哈
当他自己的任务队列空了的时候,他就会去看看别的线程的任务队列是否为空,不为空的话,就从该线程的任务队列中偷走任务,然后去执行。
那怎么偷呢?
先来瞄一眼它的源码叭~ 卖个关子先 嘿嘿~
偷窃源码如下:
/**
 * Steals and runs a task in the same CC computation as the
 * given task if one exists and can be taken without
 * contention. Otherwise returns a checksum/control value for
 * use by method helpComplete.
 *
 * @return 1 if successful, 2 if retryable (lost to another
 * stealer), -1 if non-empty but no matching task found, else
 * the base index, forced negative.
 */
final int pollAndExecCC(CountedCompleter<?> task) {
    int b, h; ForkJoinTask<?>[] a; Object o;
    if ((b = base) - top >= 0 || (a = array) == null)
        h = b | Integer.MIN_VALUE;  // to sense movement on re-poll
    else {
        long j = (((a.length - 1) & b) << ASHIFT) + ABASE;
        if ((o = U.getObjectVolatile(a, j)) == null)
            h = 2;                  // retryable
        else if (!(o instanceof CountedCompleter))
            h = -1;                 // unmatchable
        else {
            CountedCompleter<?> t = (CountedCompleter<?>)o;
            for (CountedCompleter<?> r = t;;) {
                if (r == task) {
                    if (base == b &&
                        U.compareAndSwapObject(a, j, t, null)) {
                        base = b + 1;
                        t.doExec();
                        h = 1;      // success
                    }
                    else
                        h = 2;      // lost CAS
                    break;
                }
                else if ((r = r.completer) == null) {
                    h = -1;         // unmatched
                    break;
                }
            }
        }
    }
    return h;
}
从源码中我们可以发现这里又涉及到 ForkJoin 的另一个要点,工作任务 ForkJoinTask 。
其中CountedCompleter 是该任务的实现类 。
主要通过执行代码中的 t.doExec(); 去执行任务的
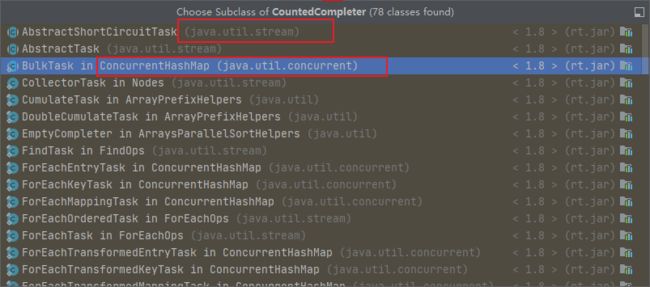
可以看到这个 CountedCompleter 的身影出现这个 JUC 和 JUS ,不过除了 ConcurrentHashMap 有点眼熟外, stream 包下的几乎不认识,平时用到的 Stream 却没用到它 (告辞~) 有兴趣的小伙伴们可以去研究下 哈哈~
WorkQueue 源码 (重点)
重点来啦!!
其实上面这段 偷窃源码 是位于 WorkQueue 工作队列中的!
源码图
这里主要介绍上面两个框框的内容,嘿嘿 (之前重新刷的数据结构知识又派上用场了)
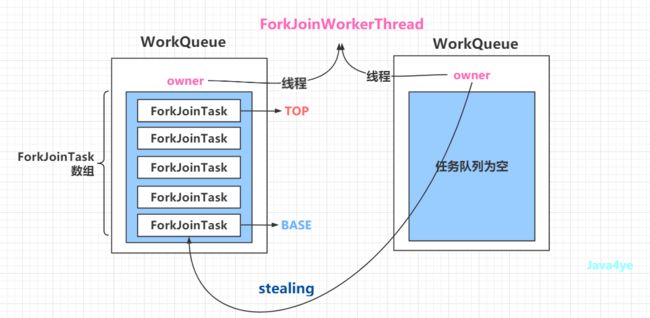
很容易看出它使用数组去实现了这个双端队列的,base 和 top 是它的两个指针。
而 ForkJoinTask 数组则是存放了我们的工作任务。
任务队列图
这时候,细心的小伙伴们应该已经嗅到问题的答案了!
在上面的偷窃源码中有这么一段逻辑 , base+1 。
而且在 WorkQueue 中 base 使用 volatile 修饰!!,这也保证了它的可见性,使得其他线程来偷的时候能获取到这个最新的值~
那么,到此怎么偷的问题也有了答案啦~
答: 从任务队列的头部开始偷的,也就是我们画出来的数组底部开始~
在 WorkQueue 的源码中,还有这么一段 final ForkJoinWorkerThread owner;
我们可以发现 ForkJoinPool 又一个和其他线程池(ThreadPoolExecutor)不同的点:
每个线程都有自己的工作队列
那么我们可以画出偷窃图如下:
工作偷窃图
知识小结
ForkJoinPool 也是一个线程池,线程数量默认由 Runtime.getRuntime().availableProcessors() 获取。
如果有线程没任务干了,它就会来尝试偷取其他线程的任务队列中的任务,采用 FIFO 的方式。
而线程从自己的任务队列中获取任务时
- 如果是异步模式,则采用
FIFO的方式 ,对应代码中的poll方法 - 非异步的话是
LIFO模式,对应代码中的pop方法。
说到这里,才发现这次的主角不是介绍它,哈哈 而是介绍 Executors 的方法,那到此小伙伴们是不是觉得这个 newWorkStealingPool 的名称取得挺贴切的 哈哈
有机会再好好聊聊这个 [[ForJoinPool]] ,初略统计了下面这些内容
毕竟这个 work-stealing 是其中的一大特色!(远没有 4ye 写得那么简单) 哈哈
不仅仅在这个框架中用到, 在 [[Netty]] 的事件轮询 EventLoopGroup 中也有它的影子~ (SingleThreadEventExecutor),嘿嘿 后面分享网络通信的内容时,再来分享下咱们的这个 netty
线程池的使用场景
Springboot异步接口
这里就举举实际应用中的场景叭~
不知道小伙伴们使用过 Springboot 的异步接口没有,比如在下面的场景
- 大文件的下载,这种比较慢的 ,特别是涉及到一些复杂的统计时(如 excel )
- 发邮件,短信 等
- 异步日志
而 Springboot 也提供了一个异步任务的线程池给我们使用,前提是得加上
@EnableAsync 注解,才能生效,有下面两种配置方式。
可以通过 yml 文件直接配置,也可以直接通过 @Bean 注入
yaml
spring:
    task:
        execution:
            pool:
                core-size: 2
                max-size: 4
                queue-capacity: 10
                allow-core-thread-timeout: false
                keep-alive: 15
@Bean注入
@Configuration
@EnableAsync
public class ThreadPoolConfig {

    @Bean("taskExecutor")
    public Executor asyncServiceExecutor() {
        ThreadPoolTaskExecutor executor = new ThreadPoolTaskExecutor();
        // 设置核心线程数
        executor.setCorePoolSize(5);
        // 设置最大线程数
        executor.setMaxPoolSize(20);
        //配置队列大小
        executor.setQueueCapacity(1000);
        // 设置线程活跃时间(秒)
        executor.setKeepAliveSeconds(60);
        // 设置默认线程名称
        executor.setThreadNamePrefix("[4ye]-task");
        // 等待所有任务结束后再关闭线程池
        executor.setWaitForTasksToCompleteOnShutdown(true);
        //执行初始化
        executor.initialize();
        return executor;
    }

}
在源码中发现它的底层也是我们的 ThreadPoolExecutor ,这里可以看到它使用的阻塞队列如下~
其他的小伙伴们可以自己发掘下啦 嘿嘿
Hystrix
线程隔离
在处理服务雪崩时,除了常听到的
服务熔断,服务降级 ,还有 请求缓存,请求合并,线程隔离 这几种办法
那显然,我们这里要介绍的就是 线程隔离 。 冲冲冲!
嘿嘿 这里就先不介绍这个信号量隔离啦 ,后面再写写[[Sentital]]的时候可以做个对比~
注解
@HystrixCommand(fallbackMethod = "errorFallback",
        threadPoolKey = "java4ye",
        commandProperties = {
                // 默认是线程隔离
                @HystrixProperty(name = "execution.isolation.strategy", value = "THREAD"),
                // 超时时间,默认 1000 ms
                @HystrixProperty(name = "execution.isolation.thread.timeoutInMilliseconds", value = "1000"),
                // 启动熔断器
                @HystrixProperty(name = "circuitBreaker.enabled", value = "true"),
                // 10s 内达到熔断要求的线程数
                @HystrixProperty(name = "circuitBreaker.requestVolumeThreshold", value = "2")},
        threadPoolProperties = {
                @HystrixProperty(name = "coreSize", value = "5"),
                @HystrixProperty(name = "maximumSize", value = "5"),
                @HystrixProperty(name = "maxQueueSize", value = "10")
        })
还有很多参数可以直接参考下面的
配置文档
也可以直接查看源码 HystrixCommandProperties
最后
疯狂暗示 哈哈哈
欢迎关注,交个朋友呀!! ( •̀ ω •́ )y
文章首发于公众号~
地址在这~
作者简介 :Java4ye , 你好呀!!
公众号: Java4ye 博主滴个人公众号~ ,嘿嘿 喜欢就支持下啦
让我们开始这一场意外的相遇吧!~
欢迎留言!谢谢支持!ヾ(≧▽≦*)o

