7、Spring_AOP
一、Spring AOP 简介
1.概述
-
对于spring来说,有三大组件,IOC,ID,AOP
-
aop概述:AOP(Aspect Oriented Programming)面向切面编程。
-
作用:不改变原有代码设计的基础上实现功能增强
-
例子
-
传统打印日志
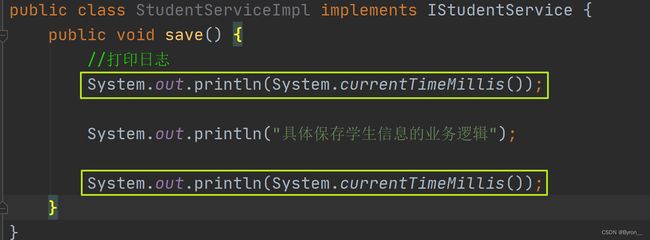
-
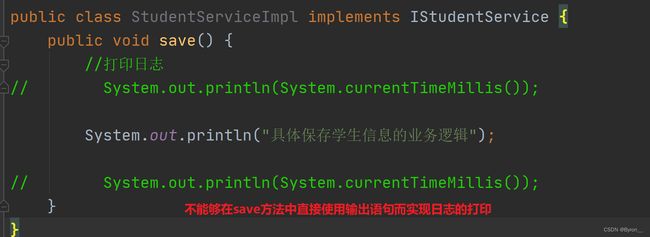
使用AOP增强之后
-
-
2.代理模式
- 如果没有听过代理模式,点击链接先学习代理模式 : https://www.bilibili.com/video/BV1tY411Z799/?share_source=copy_web&vd_source=fdccda7d1272a2e0f49cadca354a5073
- 静态代理
- 动态代理
- jdk 动态代理
- cglib 动态代理
二、AOP概念
1.案例分析
-
创建类提供增删改查方法,实现事务增强操作功能
public interface IStudentService { void save(Student student); int update(Student student); Student queryStudentById(Long id); } -
接口实现类
public class StudentServiceImpl implements IStudentService { public void save(Student student) { // System.out.println("开启事务"); System.out.println("保存操作"); // System.out.println("关闭事务"); } public int update(Student student) { // System.out.println("开启事务"); System.out.println("更新操作"); // System.out.println("关闭事务"); return 0; } public Student queryStudentById(Long id) { System.out.println("查询操作"); return null; } } -
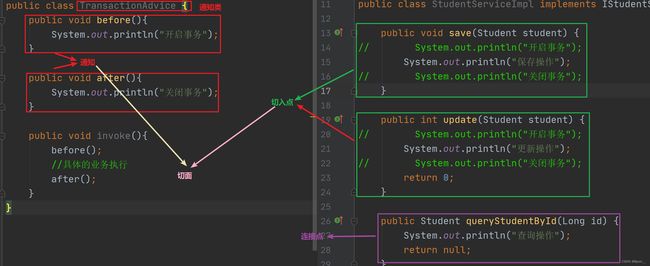
提供通知类
public class TransactionAdvice {
    public void before(){
        System.out.println("开启事务");
    }

    public void after(){
        System.out.println("关闭事务");
    }

    public void invoke(){
        before();
        //具体的业务执行
        after();
    }
}
2.核心概念
2.1概念
- 连接点(JoinPoint):对于需要增强的方法就是连接点
- 切入点(Pointcut):需要增强的方法是切入点,匹配连接点的式子
- 通知(Advice):存放需要增强功能的共性代码,就叫通知
- 切面(Aspect):通知是需要增强的功能存在多个,切入点是需要增强的方法也存在多个,需要去给切入点和通知做关联,知道哪个切入点对应哪个通知,这种描述关系就叫切面
- 通知类:存放通知(方法)的类
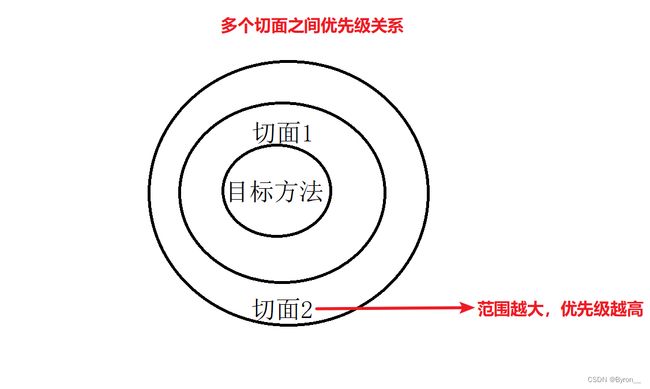
2.2图示
3.核心概念
- 目标对象 target
- 代理 proxy
三、通过注解实现AOP配置
1.导入依赖
-
导入aop依赖
<dependency> <groupId>org.springframework</groupId> <artifactId>spring-aspects</artifactId> <version>5.2.17.RELEASE</version> </dependency> -
导入Spring依赖
<dependency>
    <groupId>org.springframework</groupId>
    <artifactId>spring-context</artifactId>
    <version>5.2.17.RELEASE</version>
</dependency>
2.配置AOP支持
-
@EnableAspectJAutoProxy
-
说明
名称 @EnableAspectJAutoProxy 使用位置 配置类上 作用 开启注解的aop支持 -
代码
@Configuration
@EnableAspectJAutoProxy
@ComponentScan("cn.sycoder")
public class AppConfig {
}
3.创建切面类
-
@Aspect
-
说明
名称 @Aspect 作用 设置当前类为切面类 使用位置 类上 属性 String value() default “”;可以给切面指定名称 -
@Pointcut
-
说明
名称 @Pointcut 作用 设置切入点方法 使用位置 方法上 属性 String value() default “”;切入点表达式 -
代码
@Component
@Aspect
public class TransactionAdvice {
    //定义通知 绑定切点和通知的关系
    @Before("pc()")
    public void before(){
        System.out.println("开启事务");
    }
    @After("pc()")
    public void after(){
        System.out.println("关闭事务");
    }
    //定义切点
    @Pointcut("execution(void cn.sycoder.service.impl.StudentServiceImpl.save(..))")
    public void pc(){
    }
}
4.测试aop
-
测试代码
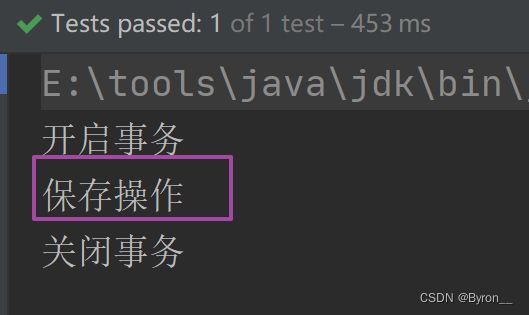
@Test public void testAop(){ AnnotationConfigApplicationContext applicationContext = new AnnotationConfigApplicationContext(AppConfig.class); IStudentService bean = applicationContext.getBean(IStudentService.class); bean.save(null); }-
打印输出
-
5.各种通知
5.1@Before
-
前置通知:被代理的目标方法执行前执行
-
说明
名称 @Before 使用位置 方法上 作用 前置通知,目标方法执行前执行 属性 String value(); 切入点表达式 可以提供的入参 JoinPoint joinPoint ,切点 -
使用
@Before("execution(void cn.sycoder.service.impl.StudentServiceImpl.save(..))")
public void before(JoinPoint joinPoint){
    System.out.println("开启事务");
}
5.2@After
-
后置通知:被代理的目标方法执行后执行
-
说明
名称 @After 使用位置 方法上 作用 后置通知:被代理的目标方法执行后执行 属性 String value(); 切入点表达式 可以提供的入参 JoinPoint joinPoint ,切点 -
使用
@After("execution(void cn.sycoder.service.impl.StudentServiceImpl.save(..))")
public void after(){
    System.out.println("关闭事务");
}
5.3@AfterReturning
-
返回通知:被代理的目标方法成功结束后执行
-
说明
名称 @AfterReturning 使用位置 方法上 作用 返回通知:被代理的目标方法成功结束后执行 属性 String value(); 切入点表达式,String returning();方法返回值 可以提供的入参 JoinPoint joinPoint ,切点,方法返回值 obj -
使用
- 如果想要得到返回值,需要在注解上添加参数returning名称,对应方法参数名称
- 切面表达式的返回值为*而不是void
@AfterReturning(returning = "obj",value = "execution(* cn.sycoder.service.impl.StudentServiceImpl.update(..))")
public void afterReturning(JoinPoint joinPoint,Object obj){
    System.out.println(obj);
    System.out.println("返回通知");
}
5.4@AfterThrowing
-
异常通知:被代理的目标方法出现异常后执行
-
说明
名称 @AfterThrowing 使用位置 方法上 作用 异常通知:被代理的目标方法出现异常后执行 属性 String value(); 切入点表达式String throwing();异常返回 可以提供的入参 JoinPoint joinPoint ,切点,异常返回值 th -
使用
@AfterThrowing(throwing = "th",value = "execution(void cn.sycoder.service.impl.StudentServiceImpl.save(..))")
public void afterThrowing(JoinPoint pointcut,Throwable th){
    System.out.println("异常通知");
}
5.5@Around
-
环绕通知:可以使用 try 代码块把被代理的目标方法围绕住,就可以做自己想做的操作,可以在里面做任何的操作
-
说明
名称 @Around 使用位置 方法上 作用 异常通知:被代理的目标方法出现异常后执行 属性 String value(); 切入点表达式 可以提供的入参 ProceedingJoinPoint joinPoint,可以通过该对象调用原始方法 -
使用
@Around("execution(void cn.sycoder.service.impl.StudentServiceImpl.save(..))")
    public void around(ProceedingJoinPoint joinPoint){
        try{
            System.out.println("前置通知");
            Object proceed = joinPoint.proceed();//执行目标方法
            System.out.println("返回通知");
        }catch (Exception e){
            e.printStackTrace();
        } catch (Throwable throwable) {
            System.out.println("异常通知");
            throwable.printStackTrace();

        } finally {

        }
    }
5.6各种通知执行顺序
- 环绕通知—前置通知—目标方法—返回通知或异常通知—后置通知
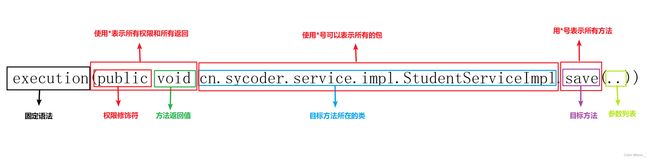
6.切入点表达式
-
概述:切入点表达式是用来寻找目标代理方法的
execution(public void cn.sycoder.service.impl.StudentServiceImpl.save(..)) -
图示
-
表达式实操
编号 名称 使用位置 作用 1 * 代替权限修饰符和返回值 表示任意权限和返回 2 * 使用到包位置 一个*表示当前一层的任意 3 *… 使用到包位置 任意包任意类 4 * 使用到类 表示任意类 5 *Service 使用到类 表示寻找以Service 结尾的任意接口或类 6 … 使用到参数 表示任意参数 -
案例:找到实现类中的任意save方法
execution(* cn.sycoder.service.impl.StudentServiceImpl.save(..)) -
案例:sycoder 包下面的类中的任意update 方法
execution(* cn.sycoder.*.update(..)) -
案例:找到sycoder 包下面及其任意子包中的任意update 方法
execution(* cn.sycoder.*..update(..)) -
案例:找到service 下面任意类的update 方法
execution(* cn.sycoder.service.*.update(..)) -
案例:找到以Service 结尾的接口或者类的update 方法
execution(* cn.sycoder.service.*Service.update(..)) -
案例:找到Service 结尾的接口或者类的update 方法,任意参数的
execution(* cn.sycoder.service.*Service.update(..))
-
-
注意:如果你切的越模糊,那性能就会越低,所以实际开发中,建议把范围切小一点
-
优先级
- 如果想手动指定优先级关系,可以使用@Order(1)注解
- 提供的值越小,优先级越高
- 如果想手动指定优先级关系,可以使用@Order(1)注解
-
重用切入点表达式
-
定义切点
@Component @Aspect public class TransactionAdvice { //定义切点 @Pointcut("execution(public void cn.sycoder.service.impl.StudentServiceImpl.save(..))") public void pc(){ System.out.println("----切点"); } } -
在其他切面类通知里面重用切点
@Component @Aspect public class LogAdvice { @Before("cn.sycoder.advice.TransactionAdvice.pc()") public void log(){ System.out.println("-0-----这里是打印日志"); } } -
切面内部自己重用
@Component
@Aspect
public class TransactionAdvice {
    //定义切点
    @Pointcut("execution(public void cn.sycoder.service.impl.StudentServiceImpl.save(..))")
    public void pc(){
        System.out.println("----切点");
    }
    //定义通知 绑定切点和通知的关系
    //前置通知
    @Before("pc()")
    public void before(JoinPoint joinPoint){
        String name = joinPoint.getSignature().getName();
        System.out.println(name);
        System.out.println("开启事务");
    }
-
7.获取通知相关信息
-
获取连接点信息,在通知方法中添加参数 JoinPoint 即可
@Before("pc()") public void before(JoinPoint joinPoint){ String name = joinPoint.getSignature().getName(); System.out.println(name); System.out.println("开启事务"); } -
获取目标方法返回值
- 使用AfterReturning 中的 returning 属性,这里指定的名称即是我们方法传入的名称
@AfterReturning(returning = "obj",value = "pc()") public void afterReturning(JoinPoint joinPoint,Object obj){ System.out.println(obj); System.out.println("返回通知"); } -
获取异常
- 使用AfterThrowing 中的 throwing 属性,这里指定的名称即是我们方法传入的参数名称
@AfterThrowing(throwing = "th",value = "execution(* cn.sycoder.service.impl.StudentServiceImpl.save(..))") public void afterThrowing(JoinPoint pointcut,Throwable th){ System.out.println("异常通知"); } -
如果使用环绕通知
- 使用ProceedingJoinPoint joinPoint
 @Around("execution(void cn.sycoder.service.*..save(..))")
    public void around(ProceedingJoinPoint joinPoint){
        try{
            System.out.println("环绕通知");
//            System.out.println("前置通知");
            Object proceed = joinPoint.proceed();//执行目标方法
//            System.out.println("返回通知");
        }catch (Exception e){
            e.printStackTrace();
        } catch (Throwable throwable) {
//            System.out.println("异常通知");
            throwable.printStackTrace();

        } finally {

        }
    }
四、XML配置AOP
1.导入依赖
<dependency>
        <groupId>org.springframework</groupId>
        <artifactId>spring-context</artifactId>
        <version>5.2.17.RELEASE</version>
    </dependency>

    <dependency>
        <groupId>org.springframework</groupId>
        <artifactId>spring-aspects</artifactId>
        <version>5.2.17.RELEASE</version>
    </dependency>

    <dependency>
        <groupId>junit</groupId>
        <artifactId>junit</artifactId>
        <version>4.12</version>
        <!--            <scope>test</scope>-->
    </dependency>
2.基本准备
-
创建 service 接口以及方法
public interface IStudentService {
    void save(Student student);
}
public class StudentServiceImpl implements IStudentService { public void save(Student student) { System.out.println("保存操作"); } } -
创建切面类
public class XmlAspect {
    public void before(){
        System.out.println("前置通知");
    }

    public void pointCut(){

    }

    public void after(JoinPoint joinPoint){
        System.out.println("后置通知");
    }

    public void afterReturning(Object obj){
        System.out.println("返回通知"+obj);
    }

    public void afterThrowing(Throwable t){
        System.out.println("异常通知");
    }
}
3.创建xml 配置文件
-
aop.xml
<?xml version="1.0" encoding="UTF-8"?>
<beans xmlns="http://www.springframework.org/schema/beans"
       xmlns:xsi="http://www.w3.org/2001/XMLSchema-instance" xmlns:aop="http://www.springframework.org/schema/aop"
       xsi:schemaLocation="http://www.springframework.org/schema/beans http://www.springframework.org/schema/beans/spring-beans.xsd http://www.springframework.org/schema/aop https://www.springframework.org/schema/aop/spring-aop.xsd">
    <bean id="service" class="cn.sycoder.service.impl.StudentServiceImpl"></bean>
    <bean id="xmlAspect" class="cn.sycoder.aspect.XmlAspect"></bean>
    <aop:aspectj-autoproxy/>
    <aop:config>
<!--        配置切面类-->
        <aop:aspect ref="xmlAspect">
<!--            配置切点-->
            <aop:pointcut id="pc" expression="execution(* cn.sycoder.service.*..*(..))"/>
<!--            配置前置通知-->
            <aop:before method="before" pointcut-ref="pc"></aop:before>
<!--            配置后置通知-->
            <aop:after method="after" pointcut-ref="pc"></aop:after>
<!--            配置返回通知-->
            <aop:after-returning method="afterReturning" returning="obj" pointcut-ref="pc"></aop:after-returning>
<!--            异常通知-->
            <aop:after-throwing method="afterThrowing" throwing="t" pointcut-ref="pc"></aop:after-throwing>

        </aop:aspect>
    </aop:config>
</beans>
4.总结
- 以后在公司使用注解的方式最流行,所以,xml 配置作为了解内容即可