Linux之基础IO文件系统讲解
基础IO文件系统讲解
- 回顾C语言读写文件
-
- 读文件操作
- 写文件操作
- 输出信息到显示器的方法
- stdin & stdout & stderr
- 总结
- 系统文件IO
-
- IO接口介绍
- 文件描述符fd
- 文件描述符的分配规则
- C标准库文件操作函数简易模拟实现
- 重定向
- dup2 系统调用
-
- 在minishell中添加重定向功能
- FILE
- 文件系统
-
- inode
- 软硬链接
- ACM时间
- 静态库和动态库
-
- 测试程序
- 生成静态库
- 生成动态库
回顾C语言读写文件
在C语言中,读文件和写文件是常见的操作,用于从磁盘读取数据到内存或将数据从内存写入磁盘文件中。这些操作需要使用标准库中的文件I/O函数。下面我将详细解释如何在C语言中进行读文件和写文件操作,并举例说明。
读文件操作
在C语言中,读取文件的过程涉及以下步骤:
- 打开文件:使用
fopen()函数打开一个文件,该函数需要指定文件名和打开模式("r"表示只读模式)。 - 读取数据:使用
fread()或fgets()函数从打开的文件中读取数据。 - 关闭文件:使用
fclose()函数关闭已经打开的文件。
下面是一个读取文件的简单示例:
#include 写文件操作
写文件的过程如下:
- 打开文件:使用
fopen()函数打开一个文件,需要指定文件名和打开模式("w"表示写入模式,如果文件不存在则创建,如果存在则清空原内容)。 - 写入数据:使用
fwrite()或fprintf()函数将数据写入已打开的文件。 - 关闭文件:使用
fclose()函数关闭已经打开的文件。
以下是一个写文件的简单示例:
#include 输出信息到显示器的方法
在C语言中,你可以使用多种方法将信息输出到显示器(终端或控制台)。以下是几种常见的方法:
-
printf函数:
printf是C语言标准库中的函数,用于格式化输出到标准输出(通常是终端或控制台)。它允许你使用格式字符串指定输出的样式和内容。示例:
#includeint main() { printf("Hello, world!\n"); int num = 42; printf("The number is: %d\n", num); return 0; } -
puts函数:
puts函数用于输出一个字符串,并自动添加换行符。它不支持格式化输出。示例:
#includeint main() { puts("Hello, world!"); return 0; } -
putc和putchar函数:
putc函数用于输出一个字符,而putchar函数用于输出一个字符并添加换行符。示例:
#includeint main() { putc('H', stdout); putc('i', stdout); putchar('!'); putchar('\n'); return 0; } -
fprintf函数:
fprintf函数允许你将格式化的输出写入到文件流中,包括标准输出流。示例:
#includeint main() { FILE *file = stdout; // 标准输出流 fprintf(file, "Hello, world!\n"); return 0; }
这些方法可以根据你的需求和偏好来选择。通常情况下,你会使用 printf 来输出信息到控制台,因为它提供了丰富的格式化选项,使输出更加灵活和易读。
stdin & stdout & stderr
在C语言中,stdin、stdout和stderr是三个标准的I/O流,用于处理标准输入、标准输出和标准错误输出。它们是在标准库中预定义的文件指针,在C/C++程序中是默认打开的。
-
stdin:
stdin是标准输入流,用于从用户(或其他来源)读取输入数据。通常情况下,stdin关联着键盘输入,但在重定向或管道等情况下,它可以来自其他来源。
示例:
#includeint main() { int num; printf("请输入一个数字:"); scanf("%d", &num); // 从标准输入读取一个数字 printf("你输入的数字是:%d\n", num); return 0; } -
stdout:
stdout是标准输出流,用于将程序的输出信息显示给用户。通常情况下,stdout关联着终端或控制台。
示例:
#includeint main() { printf("Hello, world!\n"); // 将信息输出到标准输出 return 0; } -
stderr:
stderr是标准错误输出流,用于输出错误信息或警告信息。通常情况下,stderr也关联着终端或控制台。与stdout不同的是,stderr通常不会被重定向,这样可以确保错误信息能够及时显示给用户。
示例:
#includeint main() { fprintf(stderr, "这是一个错误消息。\n"); // 将错误消息输出到标准错误输出 return 1; // 返回非零值表示程序出错 }
总之,stdin、stdout和stderr 是在C语言中处理输入和输出的标准流。通过使用它们,你可以实现用户输入的处理、程序输出的显示以及错误消息的输出。
总结
r Open text file for reading.
	The stream is positioned at the beginning of the file.
r+ Open for reading and writing.
	The stream is positioned at the beginning of the file.
w Truncate(缩短) file to zero length or create text file for writing.
	The stream is positioned at the beginning of the file.
w+ Open for reading and writing.
	The file is created if it does not exist, otherwise it is truncated.
	The stream is positioned at the beginning of the file.
a Open for appending (writing at end of file).
	The file is created if it does not exist.
	The stream is positioned at the end of the file.
a+ Open for reading and appending (writing at end of file).
	The file is created if it does not exist. The initial file position
	for reading is at the beginning of the file,
	but output is always appended to the end of the file.
系统文件IO
在Linux中,可以通过调用系统提供的系统调用接口来进行文件的读写操作。系统调用是用户程序与操作系统之间的接口,允许用户程序直接与操作系统内核进行通信。下面是使用系统调用进行文件读写的简单示例,其中主要涉及到的系统调用包括 open、read、write 和 close。其实,大多数编程语言的标准库中的 I/O 函数实际上会在底层调用操作系统提供的系统 I/O 接口。这是因为底层的文件操作、网络通信等需要与操作系统内核交互,而不同的操作系统可能在 I/O 处理方面有不同的实现方式。因此,编程语言的标准库提供了一种抽象层,使开发人员无需关注不同操作系统的细节,而可以使用统一的 API 进行文件和数据的读写。
这种抽象层的使用使得跨平台开发变得更加容易,因为开发人员可以在不同的操作系统上使用相同的函数调用,而不必关心操作系统的差异。
文件读取的示例:
#include 文件写入的示例:
#include 这两个示例中,我们使用了 open 函数打开文件,分别用 read 和 write 函数进行读取和写入操作,最后使用 close 函数关闭文件。需要注意的是,系统调用返回的错误码通常为负值,因此检查返回值是否小于0 来判断是否发生了错误。另外,perror 函数可以打印出对应的错误信息。
IO接口介绍
open 是一个在 Unix/Linux 系统中用于打开文件的系统调用接口。它是进行文件操作的重要接口之一,用于打开文件以进行读取、写入或其他操作。下面是关于 open 函数的详细介绍:
函数原型:
int open(const char *pathname, int flags, mode_t mode);
参数说明:
pathname:要打开的文件路径。flags:打开文件的标志,用于指定打开模式和行为。这些标志可以使用按位或运算组合起来。mode:当使用O_CREAT标志时,指定新文件的权限。这个参数通常需要八进制形式的权限值,如0644。
返回值:
- 成功时,返回文件描述符(一个非负整数),用于以后的文件操作。
- 失败时,返回 -1,并设置全局变量
errno表示错误类型。
常用的 flags 参数:
O_RDONLY:只读模式打开文件。O_WRONLY:只写模式打开文件。O_RDWR:读写模式打开文件。O_CREAT:如果文件不存在,则创建文件。O_TRUNC:如果文件已存在,在打开时清空文件内容。O_APPEND:在写入时追加到文件末尾。O_EXCL:与O_CREAT一起使用,如果文件已存在,返回错误。O_NONBLOCK:以非阻塞模式打开文件,读取和写入不会阻塞进程。O_SYNC或O_DSYNC:在每次写入操作后进行物理磁盘同步。
示例:
#include 在这个示例中,open 函数以写入模式打开一个文件,并在文件不存在时创建它。如果文件打开成功,返回的文件描述符 fd 可以用于后续的文件操作,最后通过 close 函数关闭文件。
(write、read、close 和 lseek)是在Unix/Linux系统中用于文件操作的常用系统调用。
- write:
- 函数原型:
ssize_t write(int fd, const void *buf, size_t count); - 作用:用于将数据从缓冲区写入文件。
- 参数:
fd:文件描述符,指示要写入的文件。buf:要写入的数据的缓冲区。count:要写入的字节数。
- 返回值:返回实际写入的字节数,如果返回值为 -1,则表示出错。
- 函数原型:
- read:
- 函数原型:
ssize_t read(int fd, void *buf, size_t count); - 作用:从文件中读取数据到缓冲区。
- 参数:
fd:文件描述符,指示要读取的文件。buf:存储读取数据的缓冲区。count:要读取的字节数。
- 返回值:返回实际读取的字节数,如果返回值为 0,则表示已到达文件末尾;如果为 -1,则表示出错。
- 函数原型:
- close:
- 函数原型:
int close(int fd); - 作用:关闭打开的文件。
- 参数:
fd:文件描述符。 - 返回值:成功返回 0,出错返回 -1。
- 函数原型:
- lseek:
- 函数原型:
off_t lseek(int fd, off_t offset, int whence); - 作用:改变文件的当前偏移量,通常用于文件随机访问。
- 参数:
fd:文件描述符。offset:偏移量的值。whence:基准位置,可以是SEEK_SET(文件开头)、SEEK_CUR(当前位置)或SEEK_END(文件末尾)。
- 返回值:返回新的文件偏移量,出错返回 -1。
- 函数原型:
这些接口是在Unix/Linux环境中进行文件操作的基本系统调用。它们提供了对文件的基本读写和定位操作,是文件处理的核心操作之一。需要注意的是,在实际使用中应该进行错误检查以确保操作的正确性和可靠性。
系统调用接口和库函数的关系,一目了然
所以,可以认为,f*系列的函数,都是对系统调用的封装,方便二次开发
文件描述符fd
在Unix/Linux系统中,文件描述符(File Descriptor,通常缩写为 fd)是一个用于标识打开文件或其他I/O资源的整数。它是操作系统内核用来跟踪文件和I/O流的一种方式。文件描述符在C语言中通常用于标识和操作文件、套接字、管道等。
以下是关于文件描述符的一些重要概念:
- 标准文件描述符:
- 在Unix/Linux系统中,有三个标准的文件描述符,分别为 0(标准输入)、1(标准输出)和 2(标准错误输出)。
- 这些标准文件描述符通常与终端或控制台相关联,用于用户输入和程序输出。
- 非标准文件描述符:
- 除了标准文件描述符外,系统还为每个打开的文件、套接字等分配一个唯一的文件描述符。
- 非标准文件描述符是非负整数,可以用于标识和操作特定的I/O资源。
- 文件描述符的范围:
- 通常情况下,文件描述符从0开始递增,但并不是所有的非负整数都是合法的文件描述符。
- 每个进程都有一定的最大文件描述符限制,可以通过
ulimit命令查看。
在C语言中,当使用系统调用如 open、read、write 等打开或操作文件时,返回的文件描述符用于后续的文件操作。例如:
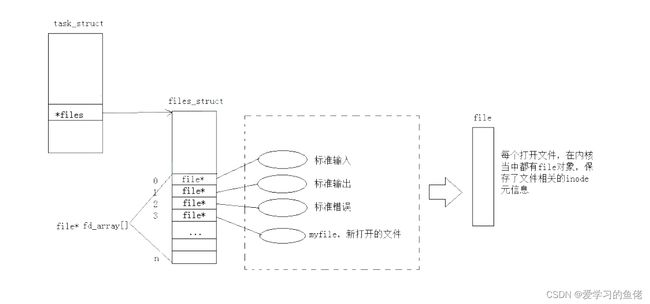
#include 文件描述符就是从0开始的小整数。当我们打开文件时,操作系统在内存中要创建相应的数据结构来描述目标文件。于是就有了file结构体。表示一个已经打开的文件对象。而进程执行open系统调用,所以必须让进程和文件关联起来。每个进程都有一个指针*files, 指向一张表files_struct,该表最重要的部分就是包涵一个指针数组,每个元素都是一个指向打开文件的指针!所以,本质上,文件描述符就是该数组的下标。所以,只要拿着文件描述符,就可以找到对应的文件
文件描述符的分配规则
看下面代码
#include 输出发现是 fd: 3
关闭0或者2,再看
#include 发现是结果是: fd: 0 或者 fd: 2 可见,文件描述符的分配规则:在files_struct数组当中,找到当前没有被使用的
最小的一个下标,作为新的文件描述符
C标准库文件操作函数简易模拟实现
#include fopen_:- 这个函数模拟了 C 标准库中的
fopen函数。根据给定的文件路径和打开模式,创建并返回一个MyFILE结构体指针。根据模式不同,可以选择以只写、只读等方式打开文件。 MyFILE结构体包含了一个文件描述符fd,一个缓冲区buffer,以及end表示当前缓冲区的结尾位置。- 当以写入模式打开文件时,会调用系统的
open函数,分配并初始化一个MyFILE结构体,用于后续的文件写入。
- 这个函数模拟了 C 标准库中的
fputs_:- 这个函数模拟了 C 标准库中的
fputs函数。它将给定的字符串写入到MyFILE结构体的缓冲区中,然后根据文件描述符的不同,选择是否将缓冲区中的数据写入文件。 - 在写入标准输出时,会检查缓冲区的内容,如果末尾是换行符,则执行实际的写入操作,并清空缓冲区。
- 这个函数模拟了 C 标准库中的
fflush_:- 这个函数模拟了 C 标准库中的
fflush函数。它将MyFILE结构体缓冲区中的数据写入文件,并使用syncfs函数将数据同步到磁盘。
- 这个函数模拟了 C 标准库中的
fclose_:- 这个函数模拟了 C 标准库中的
fclose函数。它首先调用fflush_函数,确保缓冲区数据写入文件,然后关闭文件描述符,并释放分配的MyFILE结构体内存。
- 这个函数模拟了 C 标准库中的
需要注意的是,这段代码是一个简化版本的模拟,实际的 C 标准库文件操作更加复杂,并且在实际应用中会涉及更多的细节和错误处理。此代码示例提供了一个简单的思路,用于理解文件操作的基本原理。
重定向
看下面的代码
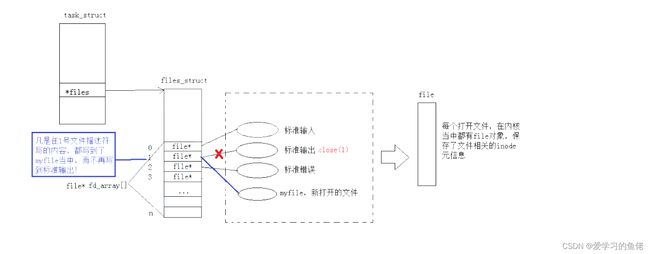
#include 此时,我们发现,本来应该输出到显示器上的内容,输出到了文件 myfile 当中,其中,fd=1。这种现象叫做输出重定向。常见的重定向有:>, >>, <
那重定向的本质是什么呢?
dup2 系统调用
在 Linux 中,dup2 是一个系统调用,用于创建一个文件描述符的副本,并将副本连接到另一个文件描述符。它的原型如下:
int dup2(int oldfd, int newfd);
其中,oldfd 是现有的文件描述符,而 newfd 是你想要创建的新文件描述符。调用 dup2(oldfd, newfd) 会将 newfd 关联到 oldfd 所指向的文件,就像 newfd 是通过 open 或其他方式创建的一样。
具体来说,dup2 调用的作用是将文件描述符 newfd 关闭(如果 newfd 已经打开),然后复制 oldfd 的所有属性(包括文件状态标志、文件偏移量等),最终将 newfd 与 oldfd 指向的文件相连接。这意味着对于 newfd 的任何读取或写入操作都会影响到与 oldfd 相关联的文件。
dup2 的典型用途之一是重定向标准输入、标准输出或标准错误流。通过将某个文件描述符与标准输入、标准输出或标准错误的文件描述符(0、1、2)连接,可以实现输入输出的重定向。
例如,以下代码片段将标准输出重定向到一个文件:
#include 这段代码中,dup2(fd, 1) 将文件描述符 1(标准输出)重定向到 fd,使得后续的标准输出都会写入到 “output.txt” 文件中。
在minishell中添加重定向功能
#include 这段代码实现了一个基本的交互式命令行解释器(shell)。它允许用户输入命令,并在子进程中执行这些命令。以下是各个函数的功能解释:
do_face()函数:- 该函数用于显示命令提示符,读取用户输入的命令。
- 使用
scanf函数读取用户输入的一行命令,并将其存储在command缓冲区中。
do_parse()函数:- 该函数用于解析命令行输入,将输入命令分解成参数列表。
- 通过遍历输入的字符,将非空白字符作为参数的起始位置,并将参数分割为单独的字符串。
- 参数列表会存储在
argv数组中,每个元素都指向一个参数字符串,最后一个元素为NULL。
do_redirect()函数:- 该函数用于处理重定向操作,将标准输出重定向到指定文件。
- 在命令字符串中寻找
>符号,根据符号后的内容判断重定向的类型和目标文件名,然后使用文件操作函数打开该文件并将标准输出重定向到该文件。
do_exec()函数:- 该函数用于执行解析后的命令。
- 使用
fork创建子进程,子进程中调用do_redirect()进行重定向,然后使用execvp()函数执行命令。
main()函数:- 主函数使用一个无限循环,等待用户输入命令并执行。
- 调用
do_face()获取用户输入,并在do_exec()中执行命令。
这个简化的 minishell 支持基本的命令执行和标准输出重定向。它通过 fork 和 execvp 实现命令的执行,同时通过重定向实现标准输出的重定向。
FILE
因为IO相关函数与系统调用接口对应,并且库函数封装系统调用,所以本质上,访问文件都是通过fd访问的。所以C库当中的FILE结构体内部,必定封装了fd
我们看下面的代码
#include 运行出结果
hello printf
hello fwrite
hello write
但如果对进程实现输出重定向呢? ./hello > file , 我们发现结果变成了:
hello write
hello printf
hello fwrite
hello printf
hello fwrite
我们发现 printf 和 fwrite (库函数)都输出了2次,而 write 只输出了一次(系统调用)。为什么呢?肯定和fork有关!
一般C库函数写入文件时是全缓冲的,而写入显示器是行缓冲。
printf fwrite库函数会自带缓冲区(进度条例子就可以说明),当发生重定向到普通文件时,数据的缓冲方式由行缓冲变成了全缓冲。
而我们放在缓冲区中的数据,就不会被立即刷新,甚至fork之后
但是进程退出之后,会统一刷新,写入文件当中。
但是fork的时候,父子数据会发生写时拷贝,所以当你父进程准备刷新的时候,子进程也就有了同样的一份数据,随即产生两份数据。
write没有变化,说明没有所谓的缓冲。
综上: printf fwrite 库函数会自带缓冲区,而 write 系统调用没有带缓冲区。另外,我们这里所说的缓冲区,都是用户级缓冲区。其实为了提升整机性能,OS也会提供相关内核级缓冲区,不过不再我们讨论范围之内。那这个缓冲区谁提供呢? printf fwrite 是库函数, write 是系统调用,库函数在系统调用的“上层”, 是对系统调用的“封装”,但是 write 没有缓冲区,而 printf fwrite 有,足以说明,该缓冲区是二次加上的,又因为是C,所以由C标准库提供。
如果有兴趣,可以看看FILE结构体:
typedef struct _IO_FILE FILE; 在/usr/include/stdio.h
在/usr/include/libio.h
	struct _IO_FILE {
		int _flags; /* High-order word is _IO_MAGIC; rest is flags. */
#define _IO_file_flags _flags
//缓冲区相关
/* The following pointers correspond to the C++ streambuf protocol. */
/* Note: Tk uses the _IO_read_ptr and _IO_read_end fields directly. */
char* _IO_read_ptr; /* Current read pointer */
char* _IO_read_end; /* End of get area. */
char* _IO_read_base; /* Start of putback+get area. */
char* _IO_write_base; /* Start of put area. */
char* _IO_write_ptr; /* Current put pointer. */
char* _IO_write_end; /* End of put area. */
char* _IO_buf_base; /* Start of reserve area. */
char* _IO_buf_end; /* End of reserve area. */
/* The following fields are used to support backing up and undo. */
char *_IO_save_base; /* Pointer to start of non-current get area. */
char *_IO_backup_base; /* Pointer to first valid character of backup area */
char *_IO_save_end; /* Pointer to end of non-current get area. */

struct _IO_marker *_markers;

struct _IO_FILE *_chain;

int _fileno; //封装的文件描述符
#if 0
	int _blksize;
#else
	int _flags2;
#endif
	_IO_off_t _old_offset; /* This used to be _offset but it's too small. */

#define __HAVE_COLUMN /* temporary */
	/* 1+column number of pbase(); 0 is unknown. */
	unsigned short _cur_column;
	signed char _vtable_offset;
	char _shortbuf[1];

	/* char* _save_gptr; char* _save_egptr; */
		_IO_lock_t *_lock;
#ifdef _IO_USE_OLD_IO_FILE
};
文件系统
我们输入ls -l
显示下面的文件信息
-rw-rw-r--. 1 kingxzq kingxzq   172 Aug  9 08:30 Makefile
-rwxrwxr-x. 1 kingxzq kingxzq  8560 Aug 24 10:00 mycmd
-rw-rw-r--. 1 kingxzq kingxzq   472 Aug  8 20:21 mycmd.c
-rwxrwxr-x. 1 kingxzq kingxzq 13416 Aug 24 10:00 myshell
-rw-rw-r--. 1 kingxzq kingxzq  3110 Aug  9 09:41 myshell.c
-rw-r--r--. 1 kingxzq kingxzq    35 Aug 24 10:32 output.txt
-rwxrwxr-x. 1 kingxzq kingxzq  8560 Aug 24 10:00 test
-rw-rw-r--. 1 kingxzq kingxzq   498 Aug 24 10:00 test.c
我们看第一行文件信息
-rw-rw-r--. 1 kingxzq kingxzq 172 Aug 9 08:30 Makefile
共有 7 列信息,每列代表了不同的属性。以下是每列信息所代表的含义:
-rw-rw-r--.: 文件权限和类型。这列显示了文件的权限和类型。在这个例子中,-表示这是一个普通文件。后面的rw-rw-r--.表示文件的权限,分为三组(所有者、群组、其他用户),每组的权限有读取(r)、写入(w)和执行(x)。1: 硬链接计数。这列显示了文件的硬链接计数,即有多少个目录项指向这个文件。在这里,值为1表示只有一个目录项指向这个文件。kingxzq: 所有者。这列显示了文件的所有者用户名。kingxzq: 所属群组。这列显示了文件所属的用户组。172: 文件大小。这列显示了文件的大小,以字节为单位。Aug 9 08:30: 最后修改时间。这列显示了文件的最后修改时间,格式为月份(Aug)、日期(9)和时间(08:30)。Makefile: 文件名。这列显示了文件的名称。
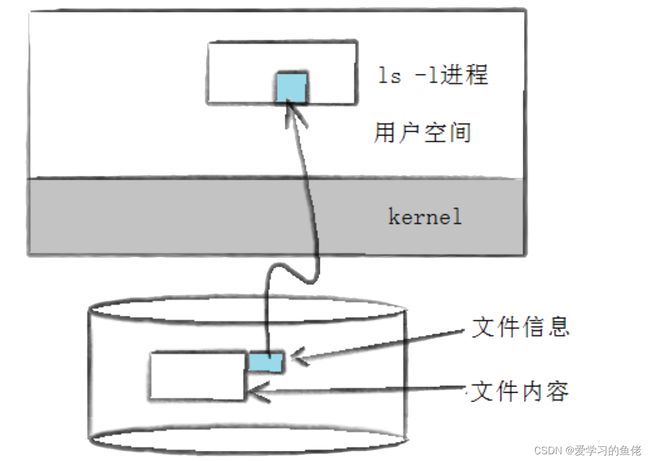
ls -l读取存储在磁盘上的文件信息,然后显示出来
除了ls -l命令,stat命令也能看到更多信息
[kingxzq@localhost Documents]$ stat Makefile
  File: ‘Makefile’
  Size: 172       	Blocks: 8          IO Block: 4096   regular file
Device: 803h/2051d	Inode: 34241206    Links: 1
Access: (0664/-rw-rw-r--)  Uid: ( 1000/ kingxzq)   Gid: ( 1000/ kingxzq)
Context: unconfined_u:object_r:user_home_t:s0
Access: 2023-08-24 09:56:39.445610701 +0800
Modify: 2023-08-09 08:30:42.044878543 +0800
Change: 2023-08-09 08:30:42.044878543 +0800
 Birth: -
inode
为了能解释清楚inode我们先简单了解一下文件系统
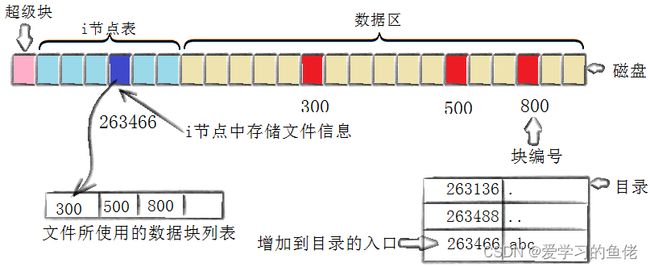
Linux ext2文件系统,上图为磁盘文件系统图(内核内存映像肯定有所不同),磁盘是典型的块设备,硬盘分区被划分为一个个的block。一个block的大小是由格式化的时候确定的,并且不可以更改。例如mke2fs的-b选项可以设定block大小为1024、2048或4096字节。而上图中启动块(Boot Block)的大小是确定的,
Block Group:
ext2文件系统会根据分区的大小划分为数个Block Group。而每个Block Group都有着相同的结构组成。政府管理各区的例子
超级块(Super Block):存放文件系统本身的结构信息。记录的信息主要有:bolck和inode的总量,未使用的block和inode的数量,一个block和inode的大小,最近一次挂载的时间,最近一次写入数据的时间,最近一次检验磁盘的时间等其他文件系统的相关信息。Super Block的信息被破坏,可以说整个文件系统结构就被破坏了
GDT,Group Descriptor Table:块组描述符,描述块组属性信息
块位图(Block Bitmap):Block Bitmap中记录着Data Block中哪个数据块已经被占用,哪个数据块没有被占用
inode位图(inode Bitmap):每个bit表示一个inode是否空闲可用。
i节点表:存放文件属性 如 文件大小,所有者,最近修改时间等
数据区:存放文件内容
将属性和数据分开存放的想法看起来很简单,但实际上是如何工作的呢?我们通过touch一个新文件来看看如何工作?
[kingxzq@localhost Documents]$ touch abc
[kingxzq@localhost Documents]$ ls -i abc
263466 abc
创建一个新文件主要有以下4个操作
- 存储属性
内核先找到一个空闲的i节点(这里是263466)。内核把文件信息记录到其中。
- 存储数据
该文件需要存储在三个磁盘块,内核找到了三个空闲块:300,500,800。将内核缓冲区的第一块数据复制到300,下一块复制到500,以此类推。
- 记录分配情况
文件内容按顺序300,500,800存放。内核在inode上的磁盘分布区记录了上述块列表。
- 添加文件名到目录
新的文件名abc,linux如何在当前的目录中记录这个文件?内核将入口(263466,abc)添加到目录文件。文件名和inode之间的对应关系将文件名和文件的内容及属性连接起来。
软硬链接
在 Linux 中,硬链接(Hard Link)和软连接(Symbolic Link,也称为软链接或符号链接)都是用于创建文件链接的概念,但它们有一些重要的区别。
硬链接(Hard Link):
硬链接是指在文件系统中创建一个文件的副本,这个副本与原始文件共享相同的 inode(索引节点)。因此,硬链接与原始文件在文件系统中的位置和属性是一样的,它们实际上指向同一个数据块。删除一个硬链接并不会影响其他硬链接或原始文件,只有所有的链接都被删除后,文件的内容才会真正被释放。
硬链接的特点:
- 硬链接没有独立的文件大小,因为它们共享相同的数据块。
- 硬链接不跨越文件系统边界,即不能链接到不同文件系统的文件。
- 硬链接不能链接到目录。
软连接(Symbolic Link,Symbolic Link,Symlink):
软连接是一个指向目标文件或目录的特殊文件,其中包含了目标文件的路径。它实际上是一个指向另一个文件的快捷方式,就像 Windows 系统中的快捷方式一样。软连接与硬链接不同,它有自己的 inode,并且可以跨越文件系统边界。
软连接的特点:
- 软连接有独立的文件大小,因为它包含了目标文件的路径信息。
- 软连接可以链接到不同文件系统的文件。
- 删除原始文件或目录不会影响软连接,但删除软连接不会影响原始文件。
假设你在 Linux 系统中有一个文件 original.txt 包含一些文本内容。我们将在同一目录下创建硬链接和软连接来演示它们的区别。
创建硬链接:
[kingxzq@localhost Documents]$ ln original.txt hardlink.txt
这将在同一目录下创建了一个名为 hardlink.txt 的硬链接。现在,original.txt 和 hardlink.txt 是硬链接,它们共享相同的 inode 和数据块,如下输出。
[kingxzq@localhost Documents]$ ll -i
total 0
37444362 -rw-rw-r--. 2 kingxzq kingxzq 0 Aug 24 15:22 hardlink.txt
37444362 -rw-rw-r--. 2 kingxzq kingxzq 0 Aug 24 15:22 original.txt
.和..
在我们的每个目录下,都隐藏着两个文件,.和..,.代表当前路径,..是上一级路径,它们的本质实际就是硬链接
我们可以看在Document目录下
[kingxzq@localhost Documents]$ ll -a -i
37444361 drwxrwxr-x.  2 kingxzq kingxzq   65 Aug 24 15:28 .
67145634 drwx------. 21 kingxzq kingxzq 4096 Aug 24 15:14 ..
回到上一级路径,我们不难发现他和上面的.的文件信息一模一样
37444361 drwxrwxr-x. 2 kingxzq kingxzq 65 Aug 24 15:28 Documents
再回到上一级路径,也不难发现他和上面的..的文件信息一模一样
67145634 drwx------. 21 kingxzq kingxzq 4096 Aug 24 15:14 kingxzq
创建软链接:
[kingxzq@localhost Documents]$ ln -s original.txt symlink.txt
软链接symlink.txt则拥有独立空间,所以inode与源文件并不相同,可以理解为快捷方式
[kingxzq@localhost Documents]$ ll -i
total 0
37444362 -rw-rw-r--. 2 kingxzq kingxzq  0 Aug 24 15:22 hardlink.txt
37444362 -rw-rw-r--. 2 kingxzq kingxzq  0 Aug 24 15:22 original.txt
37444368 lrwxrwxrwx. 1 kingxzq kingxzq 12 Aug 24 15:28 symlink.txt -> original.txt
这将在同一目录下创建了一个名为 symlink.txt 的软链接。现在,symlink.txt 是一个指向 original.txt 的符号链接。
现在,假设你编辑了 original.txt 中的内容。然后你可以观察到:
- 硬链接:
original.txt和hardlink.txt都会反映出内容的更改,因为它们实际上是同一个文件的两个名称。 - 软链接:
symlink.txt也会反映出内容的更改,因为它指向了original.txt的路径,而不是实际的数据块。
删除 original.txt 文件,然后观察:
- 硬链接:即使删除了
original.txt,hardlink.txt仍然存在,因为硬链接与原始文件共享相同的数据块。 - 软链接:删除了
original.txt后,symlink.txt将变为无效,因为它指向的目标不存在。
这个例子说明了硬链接和软链接的不同行为和特性。
总结:
- 硬链接是在文件系统中创建的原始文件的副本,它们共享相同的
inode和数据块。 - 软链接是一个指向目标文件的特殊文件,它包含了目标文件的路径信息。
在选择使用硬链接还是软链接时,需要根据具体情况考虑不同的需求和限制。
ACM时间
在 Linux 系统中,通常有三种主要的时间戳,如下所示:
- Access Time (atime): 这是文件的最后访问时间。当文件被读取时,系统会更新此时间戳。默认情况下,在读取文件时会更新此时间,但这可能会导致频繁的磁盘写入,因此在某些情况下可以通过挂载文件系统时的选项来禁用更新。在某些应用中,禁用
atime更新可以提高性能。 - Modify Time (mtime): 这是文件内容的最后修改时间。当文件内容被修改时,系统会更新此时间戳。这是指文件的实际数据内容上发生了变化的时间。
- Change Time (ctime): 这是文件属性的最后修改时间。当文件的元数据(例如文件权限、所有者、链接数等)发生变化时,系统会更新此时间戳。与
mtime不同,ctime不仅在文件内容修改时更新,还在文件元数据修改时更新。
需要注意的是,在 Linux 中,ctime 表示文件的元数据更改时间,而不仅仅是属性的修改。这可能包括文件的内容变化、文件所有者的变更、权限的更改、硬链接数的更改等。
这些时间戳对于文件的管理和跟踪非常有用,例如检测文件是否被修改过、备份文件时判断是否需要更新等。通过命令 ls -l 可以查看文件的这些时间戳。
比如下面的时间就是文件内容最后修改时间mtime
[kingxzq@localhost Documents]$ ls -l
total 0
-rw-rw-r--. 2 kingxzq kingxzq  0 Aug 24 15:22 hardlink.txt
-rw-rw-r--. 2 kingxzq kingxzq  0 Aug 24 15:22 original.txt
lrwxrwxrwx. 1 kingxzq kingxzq 12 Aug 24 15:28 symlink.txt -> original.txt
可以使用 stat 命令来查看完整的文件时间戳信息
[kingxzq@localhost Documents]$ stat hardlink.txt
  File: ‘hardlink.txt’
  Size: 0         	Blocks: 0          IO Block: 4096   regular empty file
Device: 803h/2051d	Inode: 37444362    Links: 2
Access: (0664/-rw-rw-r--)  Uid: ( 1000/ kingxzq)   Gid: ( 1000/ kingxzq)
Context: unconfined_u:object_r:user_home_t:s0
Access: 2023-08-24 15:22:19.891225541 +0800
Modify: 2023-08-24 15:22:00.971069512 +0800
Change: 2023-08-24 15:26:41.513394899 +0800
 Birth: -
静态库和动态库
在 Linux 中,静态库(.a)(Static Library)和动态库(.so)(Dynamic Library)是两种不同的库文件形式,用于在编程中共享和重用代码。它们有不同的特点和用途。
静态库(Static Library):
静态库是编译时链接到程序中的一组函数和数据的集合。当你使用静态库时,编译器将库中的代码复制到你的程序中,使你的程序可以独立运行,不需要依赖外部的库文件。每个使用了静态库的可执行文件都会包含库的一份拷贝。
主要特点:
- 静态库会被完整地嵌入到最终可执行文件中,使得可执行文件变得比较大。
- 每个可执行文件都包含了库的副本,因此可执行文件更为独立,无需在运行时依赖外部库。
- 静态库的更新需要重新编译和链接可执行文件。
动态库(Dynamic Library):
动态库是在程序运行时加载的库,它不会被复制到可执行文件中,而是在系统中以共享的形式存在。多个程序可以共享同一个动态库,从而节省内存和磁盘空间。动态库在系统中只有一份实例,被多个程序共享使用。
主要特点:
- 动态库在运行时被加载,程序只需要引用动态库的接口,而不会包含库的实际代码。
- 可执行文件比较小,因为不包含库的代码。
- 动态库的更新只需要替换库文件,不需要重新编译可执行文件。
使用静态库和动态库的选择取决于不同的因素,如代码的重用性、可执行文件大小、内存占用和依赖关系。静态库适合于简单的应用,而动态库适用于需要共享的功能和模块。
总之,静态库将代码嵌入到可执行文件中,动态库在运行时加载并共享,两者在性能、依赖和文件大小等方面有所不同。
测试程序
mymath.h
#pragma once
#includemyprint,h
#pragma once
#include mypath.c
#include "mymath.h"


int addToTarget(int from, int to)
{
    int sum = 0;
    for(int i = from; i <= to; i++)
    {
        sum += i;
    }

    return sum;
}
myprint.c
#include "myprint.h"

void Print(const char *str)
{
    printf("%s[%d]\n", str, (int)time(NULL));
}
main.c
#include "myprint.h"
#include "mymath.h"


int main()
{
    Print("hello world");
    int res = addToTarget(1,100);

    printf("res: %d\n", res);

    return 0;
}
生成静态库
我们先编写Makefile文件
libhello.a: mymath.o myprint.o
	ar -rc libhello.a mymath.o myprint.o  #生成静态库 ar是gnu归档工具,rc表示(replace and create)
mymath.o:mymath.c
	gcc -c mymath.c -o mymath.o
myprint.o:myprint.c
	gcc -c myprint.c -o myprint.o

.PHONY:hello
hello:
	mkdir -p hello/lib
	mkdir -p hello/include
	cp -rf *.h hello/include
	cp -rf *.a hello/lib

.PHONY:clean
clean:
	rm -rf *.o libhello.a hello
我们直接执行make libhello.a命令
[kingxzq@localhost Documents]$ make libhello.a
gcc -c mymath.c -o mymath.o
gcc -c myprint.c -o myprint.o
ar -rc libhello.a mymath.o myprint.o
生成libhello.a链接先执行生成.o文件,查看静态库中的目录列表
[kingxzq@localhost Documents]$ ar -tv libhello.a
rw-rw-r-- 1000/1000   1280 Aug 24 16:47 2023 mymath.o
rw-rw-r-- 1000/1000   1576 Aug 24 16:47 2023 myprint.o
t:列出静态库中的文件
v:verbose 详细信息
通过静态库编译程序
[kingxzq@localhost Documents]$ gcc main.c -I . -L . -lhello
[kingxzq@localhost Documents]$ ./a.out
hello world[1692867452]
res: 5050
-I 头文件搜索路径
-L 指定库路径
-l 指定库名
测试目标文件生成后,静态库删掉,程序照样可以运行
库搜索路径
从左到右搜索
-L指定的目录。
由环境变量指定的目录 (LIBRARY_PATH)
由系统指定的目录
/usr/lib
/usr/local/lib
生成动态库
首先同样编写Makefile文件
.PHONY:all
all:libhello.so libhello.a

libhello.so:mymath_d.o myprint_d.o
	gcc -shared mymath_d.o myprint_d.o -o libhello.so  #shared: 表示生成共享库格式
mymath_d.o:mymath.c
	gcc -c -fPIC mymath.c -o mymath_d.o   #fPIC:产生位置无关码(position independent code)
myprint_d.o:myprint.c
	gcc -c -fPIC myprint.c -o myprint_d.o

libhello.a: mymath.o myprint.o
	ar -rc libhello.a mymath.o myprint.o
mymath.o:mymath.c
	gcc -c mymath.c -o mymath.o
myprint.o:myprint.c
	gcc -c myprint.c -o myprint.o

.PHONY:hello
hello:
	mkdir -p hello/lib
	mkdir -p hello/include
	cp -rf *.h hello/include
	cp -rf *.a hello/lib
	cp -rf *.so hello/lib

.PHONY:clean
clean:
	rm -rf *.o *.a *.so hello
我们直接执行make libhello.so命令
[kingxzq@localhost Documents]$ make libhello.so
gcc -c -fPIC mymath.c -o mymath_d.o   #fPIC:产生位置无关码(position independent code)
gcc -c -fPIC myprint.c -o myprint_d.o
gcc -shared mymath_d.o myprint_d.o -o libhello.so  #shared: 表示生成共享库格式
再执行make hello
[kingxzq@localhost Documents]$ make hello
mkdir -p hello/lib
mkdir -p hello/include
cp -rf *.h hello/include
cp -rf *.a hello/lib
cp -rf *.so hello/lib
我们看看hello所包含文件
[kingxzq@localhost Documents]$ tree hello
hello
├── include
│   ├── mymath.h
│   └── myprint.h
└── lib
    ├── libhello.a
    └── libhello.so

2 directories, 4 files
使用动态库
如果这里的文件只有静态库文件我们可以直接输入命令
[kingxzq@localhost Documents]$ gcc main.c -I hello/include -L hello/lib -lhello
但是这里有动态库文件则不能这样,因为默认编译链接时,链接的是动态库(这种情况若要使用静态库,可在最后加上-static),而这里我们自建的动态库如果直接链接后运行,则会失败,如下(我们要把之前的.c和.h文件都删除,否则当然能成功)
./a.out: error while loading shared libraries: libhello.so: cannot open shared object file: No such file or directory
查看链接
[kingxzq@localhost Documents]$ ldd a.out
	linux-vdso.so.1 =>  (0x00007ffe61123000)
	libhello.so => not found
	libc.so.6 => /lib64/libc.so.6 (0x00007ff0ea658000)
	/lib64/ld-linux-x86-64.so.2 (0x00007ff0eaa26000)
那么我们该如何重新生成呢?
- 第一种方法
将你的.so动态库文件拷贝到/lib64路径下(不推荐)
- 第二种方法
添加环境变量路径LD_LIBRARY_PATH
输入命令
export LD_LIBRARY_PATH=$LD_LIBRARY_PATH:动态库绝对路径
比如我这里
kingxzq@localhost Documents]$ export LD_LIBRARY_PATH=$LD_LIBRARY_PATH:/home/kingxzq/hello/lib
查看环境变量
[kingxzq@localhost Documents]$ echo $LD_LIBRARY_PATH
:/home/kingxzq/.VimForCpp/vim/bundle/YCM.so/el7.x86_64:/home/kingxzq/hello/lib
这时就可以正常链接到动态库了
[kingxzq@localhost Documents]$ ./a.out
hello world[1692880468]
res: 5050
[kingxzq@localhost Documents]$ ldd a.out
	linux-vdso.so.1 =>  (0x00007ffd04e9f000)
	libhello.so => /home/kingxzq/hello/lib/libhello.so (0x00007fa8cce23000)
	libc.so.6 => /lib64/libc.so.6 (0x00007fa8cca55000)
	/lib64/ld-linux-x86-64.so.2 (0x00007fa8cd025000)
但是这种方法同样存在缺陷,在你下一次重新连接用户时,又会链接失败了,因为此环境变量属于内存级的环境变量
- 第三种方法
在/etc/ld.so.conf.d/ 路径添加配置文件,ldconfig更新
我们在该路径下随便建立一个.conf文件,将动态库路径拷贝到这个.conf文件中,保存关闭后,输入ldconfig更新配置文件(注意权限问题)
[kingxzq@localhost Documents]$ cd /etc/ld.so.conf.d/
[kingxzq@localhost ld.so.conf.d]$ sudo vim hello.conf
[sudo] password for kingxzq:
[kingxzq@localhost ld.so.conf.d]$ cd /home/kingxzq/Documents
[kingxzq@localhost Documents]$ sudo ldconfig
[kingxzq@localhost Documents]$ ./a.out
hello world[1692882239]
res: 5050
[kingxzq@localhost Documents]$ ldd a.out
	linux-vdso.so.1 =>  (0x00007ffe1f7f9000)
	libhello.so => /home/kingxzq/hello/lib/libhello.so (0x00007f88ce116000)
	libc.so.6 => /lib64/libc.so.6 (0x00007f88cdd48000)
	/lib64/ld-linux-x86-64.so.2 (0x00007f88ce318000)
这种方法是一劳永逸的
- 第四种方法
建立软链接
[kingxzq@localhost Documents]$ sudo ln -s ~/Documents/hello/lib/libhello.so /lib64/libhello.so
查看软链接建立成功执行程序
[kingxzq@localhost Documents]$ ll /lib64/libhello.so
lrwxrwxrwx. 1 root root 45 Aug 24 21:39 /lib64/libhello.so -> /home/kingxzq/Documents/hello/lib/libhello.so
[kingxzq@localhost Documents]$ ./a.out
hello world[1692884449]
res: 5050
使用外部库
在 Linux 中,要使用外部数学库(例如数学函数库),你需要通过编译器的链接选项来指定链接到这些库。常见的数学库是 libm,它包含了数学函数如 sin、cos、sqrt 等。
当你在编译源代码时需要使用数学库时,可以使用 -lm 选项来告诉编译器链接到数学库。以下是使用外部数学库的示例:
gcc -o my_program my_program.c -lm
其中:
-o my_program:指定输出的可执行文件名为my_program。my_program.c:源代码文件名。-lm:告诉编译器链接到数学库(libm)。
通过这个编译命令,编译器会自动查找并链接到数学库,使得你的程序可以使用数学函数。
配置文件,ldconfig更新
我们在该路径下随便建立一个.conf文件,将动态库路径拷贝到这个.conf文件中,保存关闭后,输入ldconfig更新配置文件(注意权限问题)
[kingxzq@localhost Documents]$ cd /etc/ld.so.conf.d/
[kingxzq@localhost ld.so.conf.d]$ sudo vim hello.conf
[sudo] password for kingxzq:
[kingxzq@localhost ld.so.conf.d]$ cd /home/kingxzq/Documents
[kingxzq@localhost Documents]$ sudo ldconfig
[kingxzq@localhost Documents]$ ./a.out
hello world[1692882239]
res: 5050
[kingxzq@localhost Documents]$ ldd a.out
	linux-vdso.so.1 =>  (0x00007ffe1f7f9000)
	libhello.so => /home/kingxzq/hello/lib/libhello.so (0x00007f88ce116000)
	libc.so.6 => /lib64/libc.so.6 (0x00007f88cdd48000)
	/lib64/ld-linux-x86-64.so.2 (0x00007f88ce318000)
这种方法是一劳永逸的
- 第四种方法
建立软链接
[kingxzq@localhost Documents]$ sudo ln -s ~/Documents/hello/lib/libhello.so /lib64/libhello.so
查看软链接建立成功执行程序
[kingxzq@localhost Documents]$ ll /lib64/libhello.so
lrwxrwxrwx. 1 root root 45 Aug 24 21:39 /lib64/libhello.so -> /home/kingxzq/Documents/hello/lib/libhello.so
[kingxzq@localhost Documents]$ ./a.out
hello world[1692884449]
res: 5050
使用外部库
在 Linux 中,要使用外部数学库(例如数学函数库),你需要通过编译器的链接选项来指定链接到这些库。常见的数学库是 libm,它包含了数学函数如 sin、cos、sqrt 等。
当你在编译源代码时需要使用数学库时,可以使用 -lm 选项来告诉编译器链接到数学库。以下是使用外部数学库的示例:
gcc -o my_program my_program.c -lm
其中:
-o my_program:指定输出的可执行文件名为my_program。my_program.c:源代码文件名。-lm:告诉编译器链接到数学库(libm)。
通过这个编译命令,编译器会自动查找并链接到数学库,使得你的程序可以使用数学函数。
需要注意的是,-lm 应该放在源代码文件名的后面,以便编译器在链接时正确地解析数学库的符号。如果你还需要链接到其他库,可以在同一命令中使用多个 -l 选项,如 -lm -l其他库名。


