【项目】瑞吉外卖 - 项目开发Day1:开发环境搭建
目录
1、搭建Maven项目
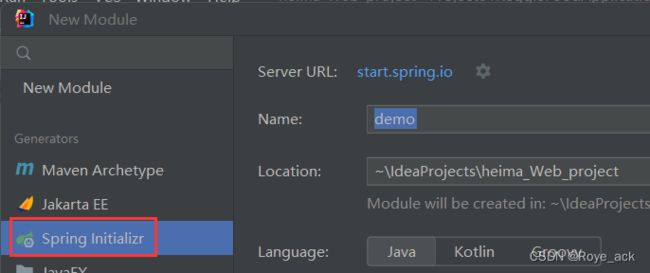
step1:右键New新建一个Module
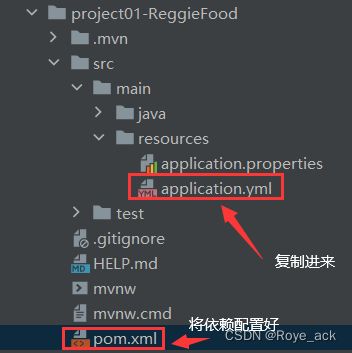
step2:导入SpringBoot配置文件application.yml,设置pom.xml文件中的依赖
(1)pom.xml代码
(2)application.yml代码
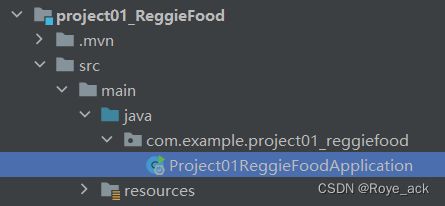
step3:编写启动类(springboot直接生成好了)
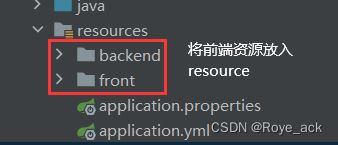
step4:将前端资源放入resource文件夹中
(3)WebMvcConfig.java 静态资源映射代码
2、后台登录功能开发
step1:导入员工实体类Employee
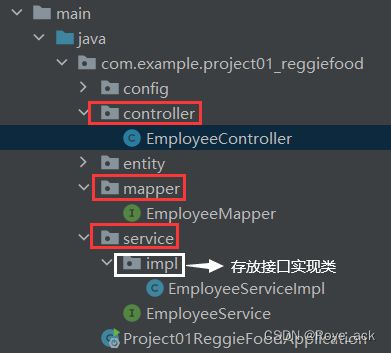
step2:创建三层结构
(1)EmployeeController大框架代码
① @RequestMapping详解
(2)EmployeeService大框架代码
(3)EmployeeMapping大框架代码
step3:导入返回结果类
(4)R类通用结果返回代码
step4:编写登录方法login
① @PostMapping
② @GetMapping
③ HttpServletRequest 公共接口类
(5)登录页面代码
3、后台退出页面开发
(6)退出页面代码
1、搭建Maven项目
step1:右键New新建一个Module
step2:导入SpringBoot配置文件application.yml,设置pom.xml文件中的依赖
(1)pom.xml代码
刚开始n个版本爆红,结果降低了下springboot版本号就都ok了
    4.0.0


        org.springframework.boot
        spring-boot-starter-parent
        2.4.5


    com.example
    project01_ReggieFood
    0.0.1-SNAPSHOT
    project01_ReggieFood
    project01_ReggieFood

        8


            org.springframework.boot
            spring-boot-starter


            org.springframework.boot
            spring-boot-starter-test
            test


            org.springframework.boot
            spring-boot-starter-web
            compile


            com.baomidou
            mybatis-plus-boot-starter
            3.4.2


            org.projectlombok
            lombok
            1.18.20


            com.alibaba
            fastjson
            1.2.76


            commons-lang
            commons-lang
            2.6


            mysql
            mysql-connector-java
            runtime


            com.alibaba
            druid-spring-boot-starter
            1.1.23


                org.springframework.boot
                spring-boot-maven-plugin
                2.7.14
(2)application.yml代码
server:
  port: 8080
spring:
  application:
    name: reggie_take_out
  datasource:
    druid:
      driver-class-name: com.mysql.cj.jdbc.Driver
      url: jdbc:mysql://localhost:3306/reggie?serverTimezone=Asia/Shanghai&useUnicode=true&characterEncoding=utf-8&zeroDateTimeBehavior=convertToNull&useSSL=false&allowPublicKeyRetrieval=true
      username: root
      password: 244537 #密码
mybatis-plus:
  configuration:
    #在映射实体或者属性时,将数据库中表名和字段名中的下划线去掉,按照驼峰命名法映射
    map-underscore-to-camel-case: true
    log-impl: org.apache.ibatis.logging.stdout.StdOutImpl
  global-config:
    db-config:
      id-type: ASSIGN_ID
step3:编写启动类(springboot直接生成好了)
package com.example.project01_reggiefood;

import lombok.extern.slf4j.Slf4j;
import org.springframework.boot.SpringApplication;
import org.springframework.boot.autoconfigure.SpringBootApplication;

@Slf4j
@SpringBootApplication
public class Project01ReggieFoodApplication {

    public static void main(String[] args) {
        SpringApplication.run(Project01ReggieFoodApplication.class, args);
        log.info("项目启动成功啦!");
    }
}
@Slf4j + log.info 可在运行日志显示,便于观察代码运行情况
step4:将前端资源放入resource文件夹中
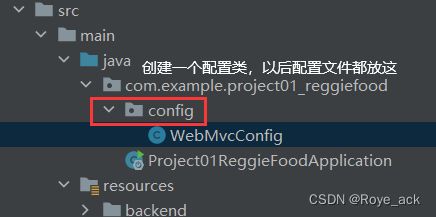
一般前端文件都放static中,但我们这次放resource文件夹中,因此需要设置静态资源映射
即:你访问xxx网页,映射会将网页映射到resource文件夹中,即可实现网页访问
(3)WebMvcConfig.java 静态资源映射代码
package com.example.project01_reggiefood.config;

import lombok.extern.slf4j.Slf4j;
import org.springframework.boot.autoconfigure.web.servlet.WebMvcAutoConfiguration;
import org.springframework.context.annotation.Configuration;
import org.springframework.web.servlet.config.annotation.ResourceHandlerRegistry;
import org.springframework.web.servlet.config.annotation.WebMvcConfigurationSupport;

@Slf4j
@Configuration
public class WebMvcConfig extends WebMvcConfigurationSupport{

    @Override
    protected void addResourceHandlers(ResourceHandlerRegistry registry) {
        log.info("开始进行静态资源映射!");
        registry.addResourceHandler("/backend/**").addResourceLocations("classpath:/backend/");
        registry.addResourceHandler("/front/**").addResourceLocations("classpath:/front/");
    }//设置静态资源映射
}
2、后台登录功能开发
step1:导入员工实体类Employee
step2:创建三层结构
mapper也就是类似于dao
(1)EmployeeController大框架代码
package com.example.project01_reggiefood.controller;

import com.example.project01_reggiefood.service.EmployeeService;
import lombok.extern.slf4j.Slf4j;
import org.springframework.beans.factory.annotation.Autowired;
import org.springframework.web.bind.annotation.RequestMapping;
import org.springframework.web.bind.annotation.RestController;

@Slf4j
@RestController
@RequestMapping("/employee")  //@RequestMapping注解是用来处理请求地址映射的注解,可用于映射一个请求或一个方法,可以用在类或方法上
public class EmployeeController {

    @Autowired
    private EmployeeService employeeService;
}
① @RequestMapping详解
在实际的开发当中,一个控制器中不一定只有一个方法,而这些方法都是用来处理请求的,那么怎样才能将请求与处理方法一一对应呢,当然是通过 RequestMapping 注解来处理这些映射请求,也就是通过它来指定控制器可以处理哪些URL请求
@RequestMapping("/employee")
public class EmployeeController {

    @Autowired
    private EmployeeService employeeService;
}
指定该控制器可以处理路径为/employee的请求
(2)EmployeeService大框架代码
package com.example.project01_reggiefood.mapper;

import com.baomidou.mybatisplus.core.mapper.BaseMapper;
import com.example.project01_reggiefood.entity.Employee;
import org.apache.ibatis.annotations.Mapper;

@Mapper
public interface EmployeeMapper extends BaseMapper
{

}
(3)EmployeeMapping大框架代码
① 接口实现类
package com.example.project01_reggiefood.service.impl;

import com.baomidou.mybatisplus.extension.service.impl.ServiceImpl;
import com.example.project01_reggiefood.entity.Employee;
import com.example.project01_reggiefood.mapper.EmployeeMapper;
import com.example.project01_reggiefood.service.EmployeeService;
import org.springframework.stereotype.Component;
import org.springframework.stereotype.Service;

@Service
public class EmployeeServiceImpl extends ServiceImplimplements EmployeeService {
}
② 接口
package com.example.project01_reggiefood.service;

import com.baomidou.mybatisplus.extension.service.IService;
import com.example.project01_reggiefood.entity.Employee;

public interface EmployeeService extends IService {
}
step3:导入返回结果类
以后会有很多Controller,为了方便,导入一个通用结果类,服务端响应的所有结果都会通过此类型返回给前端页面
(4)R类通用结果返回代码
package com.example.project01_reggiefood.common;

import lombok.Data;
import java.util.HashMap;
import java.util.Map;

//通用返回结果,服务端响应的数据都会封装成此结果
@Data
public class R { //T泛型 任意类型

    private Integer code; //编码:1成功,0和其它数字为失败

    private String msg; //错误信息

    private T data; //数据

    private Map map = new HashMap(); //动态数据

    public static  R success(T object) {
        R r = new R();
        r.data = object;
        r.code = 1;
        return r;
    }

    public static  R error(String msg) {
        R r = new R();
        r.msg = msg;
        r.code = 0;
        return r;
    }

    public R add(String key, Object value) {
        this.map.put(key, value);
        return this;
    }

}
step4:编写登录方法login
① @PostMapping
用于将 HTTP 的post 请求映射到特定处理程序的方法注解
② @GetMapping
用于将 HTTP 的get 请求映射到特定处理程序的方法注解
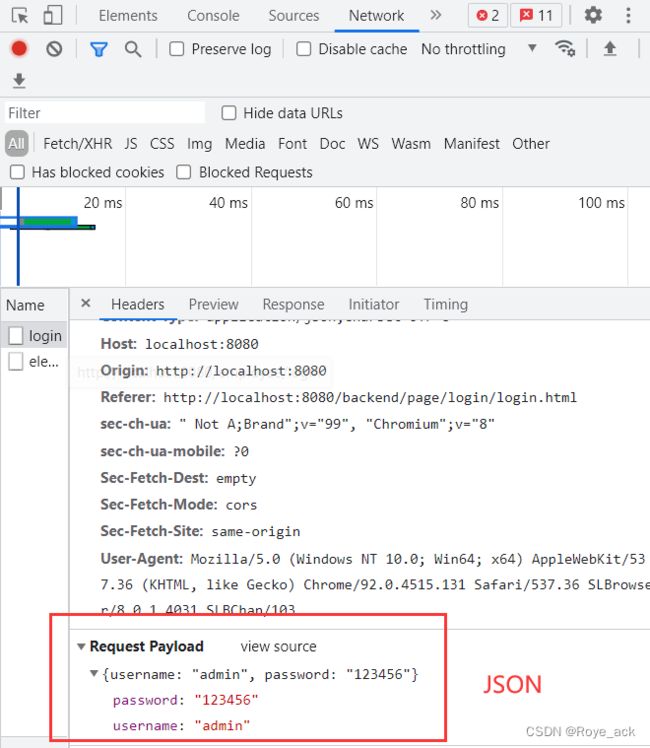
根据登录页面的html(按F12查看后台), 发现返回的是JSON文件,因此注解用@RequestBody
③ HttpServletRequest 公共接口类
客户端浏览器发出的请求被封装成为一个HttpServletRequest对象。对象包含了客户端请求信息包括请求的地址,请求的参数,提交的数据,上传的文件客户端的ip甚至客户端操作系统都包含在其内
(5)登录页面代码
    /* 员工登录*/
    @PostMapping("/login")
    public R login(HttpServletRequest request, @RequestBody Employee employee)
    {
        //1、将页面提交的密码password进行md5加密处理
        String password = employee.getPassword();
        password = DigestUtils.md5DigestAsHex(password.getBytes());

        //2、根据页面提交的用户名username查询数据库
        LambdaQueryWrapper queryWrapper = new LambdaQueryWrapper<>();
        queryWrapper.eq(Employee::getUsername,employee.getUsername());
        Employee emp = employeeService.getOne(queryWrapper);

        //3、如果没有查询到则返回登录失败结果
        if(emp == null)
            return R.error("登陆失败");

        //4、密码比对,如果不一致则返回登录失败结果
        if(!emp.getPassword().equals(password))
            return R.error("登陆失败");

        //5、查看员工状态,如果为已禁用状态,则返回员工已禁用结果
        if(emp.getStatus() == 0)
            return R.error("该账号已禁用");

        //6、登录成功,将员工id存入Session并返回登录成功结果
        request.getSession().setAttribute("employee",emp.getId());
        return R.success(emp);

    }
3、后台退出页面开发
(6)退出页面代码
    @PostMapping("/logout")
    public R logout(HttpServletRequest request)
    {
        //清理Session中保存的当前登录员工的id
        request.getSession().removeAttribute("employee"); //removeAttribute 删除元素某属性
        return R.success("退出成功");
} 
