fastdfs集群部署
环境介绍:
此次搭建使用两台服务器搭建,将Tracker Server和Storage Server各部署在一台集群上,
10.35.32.81 fastdfs
10.35.32.82 fastdfs
1,下载相关程序包
https://github.com/happyfish100/

下载
fastdfs libfastcommon fastdfs-nginx-module5.11 fastdfs-nginx-module 四个安装包

环境准备:
安装perl环境,后续编译fastdfs会用到
[root@localhost ~]# yum -y install perl*
[root@localhost ~]# yum -y install cpan
安装gcc编译器,fastdfs是用c语言开发而来的。
[root@localhost ~]# yum -y install gcc-c++
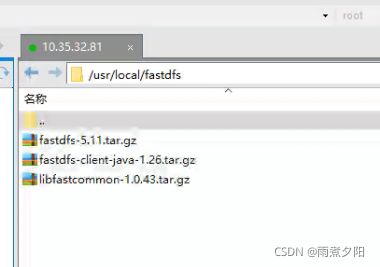
上传安装包
创建fastdfs文件,用于程序的安装目录
[root@localhost ~]# mkdir /usr/local/fastdfs
将安装包上传至此文件中
安装libfatscommon
解压libfatscommon的压缩包
[root@localhost fastdfs]# tar -zxvf libfastcommon-1.0.43.tar.gz
进入libfastcommon-1.0.43 目录

	[root@localhost fastdfs]# cd libfastcommon-1.0.43
编译安装
./make.sh
./make.sh install

安装Fastdfs
解压Fastdfs
[root@localhost fastdfs]# tar -zxvf fastdfs-5.11.tar.gz
进入安装目录
[root@localhost fastdfs]# cd fastdfs-5.11
编译安装
[root@localhost fastdfs-5.11]# ./make.sh
[root@localhost fastdfs-5.11]# ./make.sh install

编译完成后会再/etc/fdfs目录下生成四个文件

进行拷贝,以备用
[root@localhost fdfs]# cp client.conf.sample client.conf
[root@localhost fdfs]# cp storage.conf.sample storage.conf
[root@localhost fdfs]# cp storage_ids.conf.sample storage_ids.conf
[root@localhost fdfs]# cp tracker.conf.sample tracker.conf

再将/usr/local/fastdfs/fastdfs-5.11/conf文件夹中的http.conf和mime.types拷贝到 /etc/fdfs/中
[root@localhost conf]# cp -a http.conf /etc/fdfs/
[root@localhost conf]# cp -a mime.types /etc/fdfs/

至此,Fastdfs安装完成
配置Tracker
创建文件夹:即用于存储Tracker的数据文件和日志文件等。此路径在后续的Tracker文件配置中都用到
mkdir /opt/fastdfs_tracker
修改/etc/fdfs目录下的tracker.conf配置文件,打开文件后依次做如下修改:修改成刚创建的路径

配置完毕后,启动tracker服务器
service fdfs_trackerd start

启动成功后,可以在刚创建的文件夹中(/opt/fastdfs_tracker)找到两个新文件

至此,Tracker配置完成
配置Storage
同理,和Tracker配置流程一致。创建Storage服务器的文件目录fastdfs_storage,同时比Tracker多建了一个文件存储路径目录fastdfs_storage_data,用于存放接收的文件。
mkdir /opt/fastdfs_storage
mkdir /opt/fastdfs_storage_data
同理,修改storage的配置文件。目录/etc/fdfs/storage.conf
[root@localhost opt]# vim /etc/fdfs/storage.conf


修改完成后,保存并推出
启动
	[root@localhost opt]# service fdfs_storaged start
![]()
启动成功后,可以在fastdfs_storage_data中看到生成的data文件夹
 这样,Storage配置就成功了
看看进程是否正常

确定了storage服务器启动成功后,还有一项工作就是看看storage服务器是否已经登记到 tracker服务器(也可以理解为tracker与storage是否整合成功),运行以下命令:
/usr/bin/fdfs_monitor /etc/fdfs/storage.conf

配置客户端client
编辑/etc/fdfs/client.conf文件
vim /etc/fdfs/client.conf

配置完成后,进行初步测试:编写一个文件
[root@localhost data]# vim t.txt
执行客户端上传命令进行测试:
/usr/bin/fdfs_upload_file /etc/fdfs/client.conf t.txt

返回的路径就只文件的存储目录,在/opt/fastdfs_storage_data目录下
至此,测试成功
想在web段查看上次存储的文件,需要安装nginx和fastdfs-nginx-module
安装nginx和fastdfs-nginx-module
解压fastdfs-nginx-module 压缩包
[root@localhost fastdfs]# tar -zxvf fastdfs-nginx-module-1.20.tar.gz

复制fastdfs-nginx-module-1.20/src目录下mod_fastdfs.conf文件到/etc/fdfs/下并修改
[root@localhost src]# cp mod_fastdfs.conf /etc/fdfs/
[root@localhost fdfs]# vim /etc/fdfs/mod_fastdfs.conf


修改fastdfs-nginx-module-1.20/src/config文件,修改如下:(为了解决后面Nginx编译失败)
我这里nginx装在了另外的机器上,所以需要将fastdfs-nginx-module-1.20.tar.gz上传到nginx所在的服务器上修改,如,nginx和storage在一台机器的话就不用上传直接修改
ngx_module_incs="/usr/include/fastdfs /usr/include/fastcommon/"
CORE_INCS="$CORE_INCS /usr/include/fastdfs /usr/include/fastcommon/"
安装nginx 添加模块 (这里就不介绍nginx的安装了,可自行百度)
[root@localhost nginx]# ./configure --prefix=/usr/local/nginx --conf-path=/usr/local/nginx/conf/nginx.conf --user=nginx --group=nginx --error-log-path=/var/log/nginx/error.log --http-log-path=/var/log/nginx/access.log --pid-path=/var/run/nginx/nginx.pid --lock-path=/var/lock/nginx.lock --with-http_ssl_module --with-http_stub_status_module --http-client-body-temp-path=/var/tmp/nginx/client --http-proxy-temp-path=/var/tmp/nginx/proxy --add-module=/usr/local/fastdfs/fastdfs-nginx-module-1.20/src
	[root@localhost nginx]# mkdir -pv  /var/tmp/nginx/{client,proxy}
	[root@localhost nginx]# make && make install
配置nginx
编辑nginx/conf/nginx.conf 文件添加以下内容
#location放在server里面
location ~/group1/M00 {
  root /opt/fastdfs_storage_data/data;
  ngx_fastdfs_module;
}

启动nginx
/usr/local/nginx/sbin/nginx
那刚才上传的文件测试下
![]()

这样我们单节点就配置好了,若nginx有多个节点的话,可按照上述配置nginx的再装一个nginx
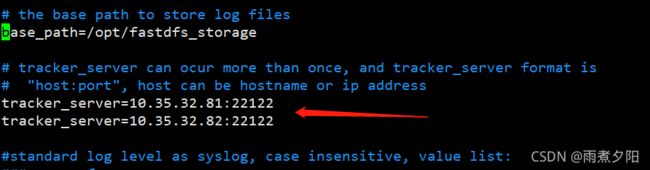
如是多节点集群部署,可在/etc/fdfs/storage.conf 和vim /etc/fdfs/client.conf 加上tracker的访问地址
如下:/etc/fdfs/storage.conf

/etc/fdfs/client.conf