
Day8 智慧商城
项目演示

项目收获

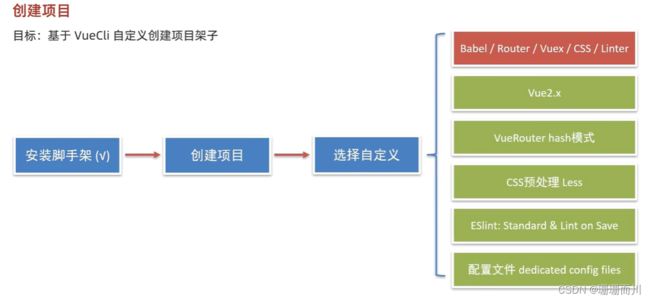
创建项目
调整初始化目录
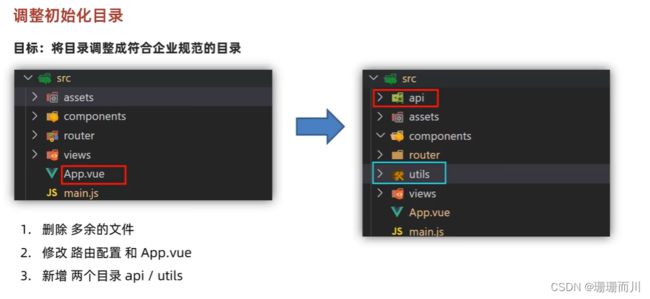

1.删components里的所有文件
2.删views里的所有文件
3.router/index.js 删路由 删规则
import Vue from 'vue'
import VueRouter from 'vue-router'

Vue.use(VueRouter)

const router = new VueRouter({
  routes: []
})

export default router
4.App.vue 删css 内容,只留路由出口
<template>
  <div id="app">
    <router-view/>
  </div>
</template>

<style lang="less">

</style>
学习vant组件库
基本介绍
 vant2 支持vue2
vant3和4 支持vue3
vant4官网
vant2官网

安装方式和基本使用姿势
# Vue 3 项目,安装最新版 Vant:
npm i vant -S

# Vue 2 项目,安装 Vant 2:
npm i vant@latest-v2 -S
全部导入和按需引入

全部导入
 main.js
import Vue from 'vue'
import App from './App.vue'
import router from './router'
import store from './store'

import Vant from 'vant'
import 'vant/lib/index.css'
Vue.use(Vant)

Vue.config.productionTip = false

new Vue({
  router,
  store,
  render: h => h(App)
}).$mount('#app')
App.vue
<template>
  <div id="app">
    <van-button type="primary">主要按钮</van-button>
    <van-button type="info">信息按钮</van-button>
    <van-button type="default">默认按钮</van-button>
    <router-view/>
  </div>
</template>

<style lang="less">

</style>
按需引入
 修改了babel.config.js要重启服务器,才能看到效果
main.js
import Vue from 'vue'
import App from './App.vue'
import router from './router'
import store from './store'

import '@/utils/vant-ui.js'

Vue.config.productionTip = false

new Vue({
  router,
  store,
  render: h => h(App)
}).$mount('#app')
utils/vant-ui.js
import Vue from 'vue'
import { Button } from 'vant'
Vue.use(Button)
babel.config.js
module.exports = {
  presets: [
    '@vue/cli-plugin-babel/preset'
  ]
}
module.exports = {
  plugins: [
    ['import', {
      libraryName: 'vant',
      libraryDirectory: 'es',
      style: true
    }, 'vant']
  ]
}
App.vue同上
# VM适配 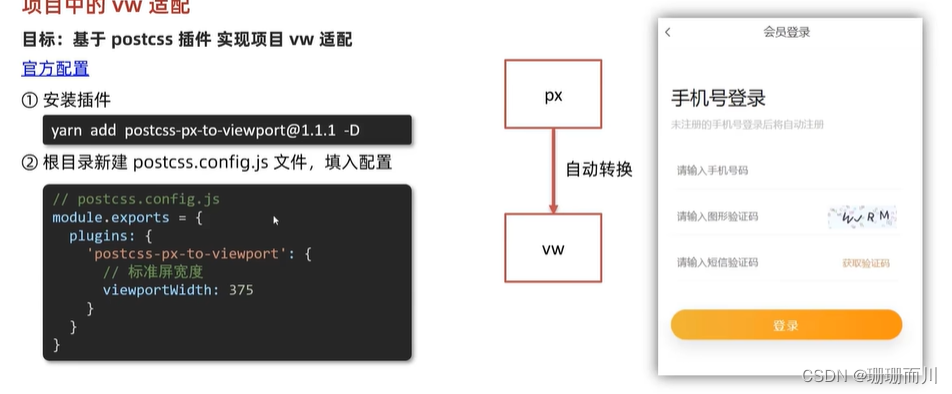vant官网中【进阶用法】中的浏览器适配 1.cnpm i [email protected] -D 2.根目录创建postcss.config.js
// postcss.config.js
module.exports = {
  plugins: {
    'postcss-px-to-viewport': {
      // vw适配的标准屏宽度
    //  设计图750,调成一倍  适配375标准屏幕
      viewportWidth: 375
    }
  }
}
App.vue
<template>
  <div id="app">
    <div class="box"></div>
    <van-button type="primary">主要按钮</van-button>
    <van-button type="info">信息按钮</van-button>
    <van-button type="default">默认按钮</van-button>
    <router-view/>
  </div>
</template>

<style lang="less">
.box{
    width: 300px;
    height: 300px;
    background-color: #ed8a8a;
}
</style>
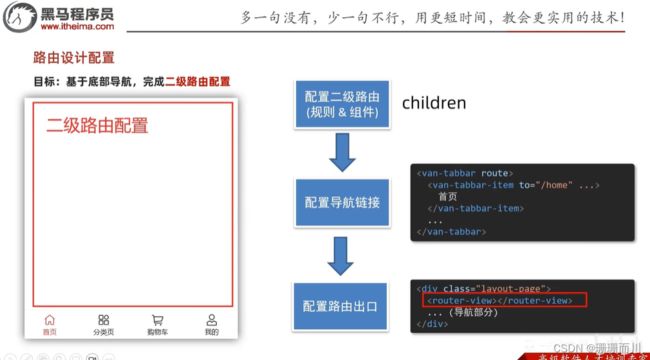
# 路由设计配置 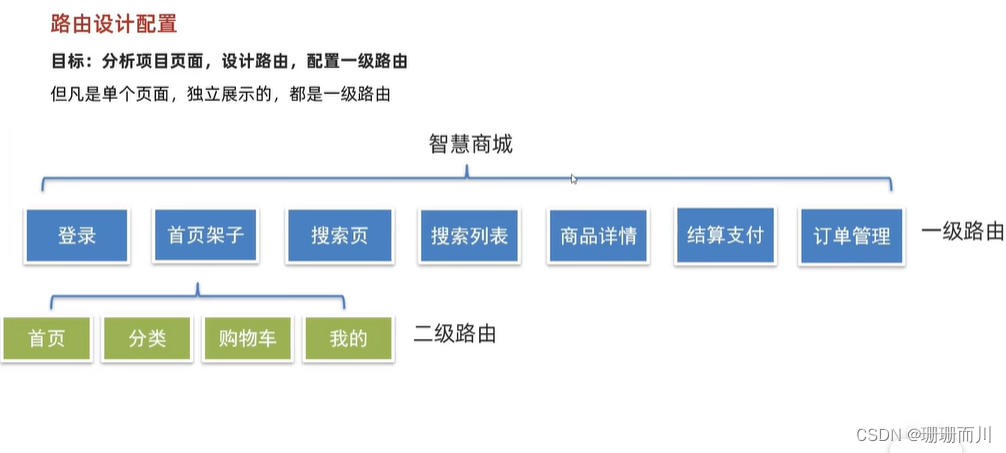
## 一级路由 这里和之前不同,是先在views建文件夹,再给每个建index.vue 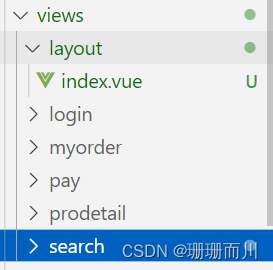例如:Layout/index.vue
<template>
  <div>layout</div>
</template>

<script>
export default {
  name: 'LayoutIndex'
}
</script>

<style>

</style>
router/index.js
import Vue from 'vue'
import VueRouter from 'vue-router'

import Login from '@/views/login'
import Layout from '@/views/layout'
import Myorder from '@/views/myorder'
import Pay from '@/views/pay'
import Prodetail from '@/views/prodetail'
import Search from '@/views/search'
import SearchList from '@/views/search/list.vue'

Vue.use(VueRouter)

const router = new VueRouter({
  routes: [
    { path: '/login', component: Login },
    { path: '/', component: Layout }, // 首页
    { path: '/myorder', component: Myorder },
    { path: '/pay', component: Pay },
    // 动态路由传参,路由参数携带id
    { path: '/prodetail/:id', component: Prodetail },
    { path: '/search', component: Search },
    { path: '/searchlist', component: SearchList }
  ]
})

export default router
二级路由

layout/index.vue
<template>
  <div>

  <van-tabbar active-color="blue" inactive-color="#000">
    <!-- 改标签内容,小图标icon也是从vant里找,直接填名字即可实现改变 -->
    <van-tabbar-item icon="wap-home-o">首页</van-tabbar-item>
    <van-tabbar-item icon="apps-o">分类页</van-tabbar-item>
    <van-tabbar-item icon="shopping-cart-o">购物车</van-tabbar-item>
    <van-tabbar-item icon="user-o">我的</van-tabbar-item>
 </van-tabbar>
</div>
</template>

<script>
export default {
  name: 'LayoutIndex'
}
</script>

<style>

</style>
建文件

配置路由页面
layout/cart.vue
<template>
  <div>cart</div>
</template>

<script>
export default {
  name: 'CartIndex'
}
</script>

<style>

</style>
配规则
router/index.js


layout/index.vue
<template>
  <div>
 <router-view></router-view>
  <van-tabbar router active-color="blue" inactive-color="#000">
    <!-- 改标签内容,小图标icon也是从vant里找,直接填名字即可实现改变 -->
    <van-tabbar-item to='/home' icon="wap-home-o">首页</van-tabbar-item>
    <van-tabbar-item to='/category' icon="apps-o">分类页</van-tabbar-item>
    <van-tabbar-item to='/cart' icon="shopping-cart-o">购物车</van-tabbar-item>
    <van-tabbar-item to='/user' icon="user-o">我的</van-tabbar-item>
 </van-tabbar>
</div>
</template>
登陆页面
登陆页静态布局


通用样式覆盖
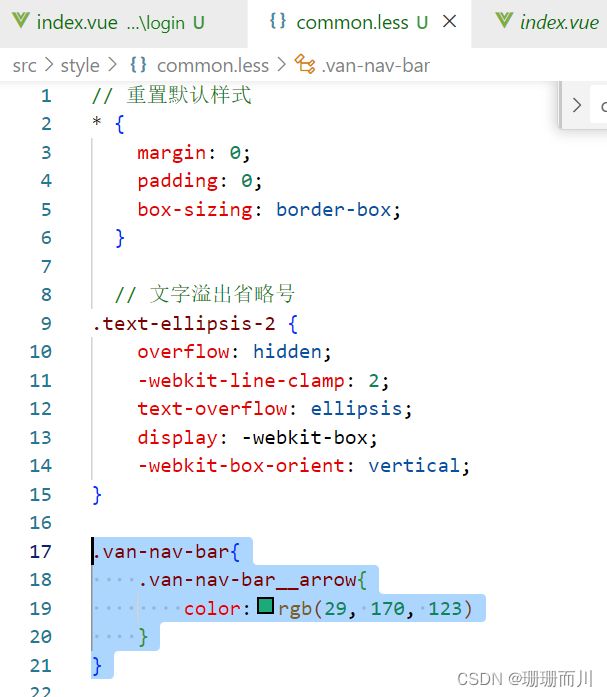
login/index.vue
<template>
  <div class="login">
    <van-nav-bar title="会员登录" left-arrow @click-left="$router.go(-1)" />
    <div class="container">
      <div class="title">
        <h3>手机号登录</h3>
        <p>未注册的手机号登录后将自动注册</p>
      </div>

      <div class="form">
        <div class="form-item">
          <input class="inp" maxlength="11" placeholder="请输入手机号码" type="text">
        </div>
        <div class="form-item">
          <input class="inp" maxlength="5" placeholder="请输入图形验证码" type="text">
          <img src="@/assets/code.png" alt="">
        </div>
        <div class="form-item">
          <input class="inp" placeholder="请输入短信验证码" type="text">
          <button>获取验证码</button>
        </div>
      </div>

      <div class="login-btn">登录</div>
    </div>
  </div>
</template>

<script>
export default {
  name: 'LoginPage'
}
</script>

<style lang="less" scoped>
.container {
  padding: 49px 29px;

  .title {
    margin-bottom: 20px;
    h3 {
      font-size: 26px;
      font-weight: normal;
    }
    p {
      line-height: 40px;
      font-size: 14px;
      color: #b8b8b8;
    }
  }

  .form-item {
    border-bottom: 1px solid #f3f1f2;
    padding: 8px;
    margin-bottom: 14px;
    display: flex;
    align-items: center;
    .inp {
      display: block;
      border: none;
      outline: none;
      height: 32px;
      font-size: 14px;
      flex: 1;
    }
    img {
      width: 94px;
      height: 31px;
    }
    button {
      height: 31px;
      border: none;
      font-size: 13px;
      color: #cea26a;
      background-color: transparent;
      padding-right: 9px;
    }
  }

  .login-btn {
    width: 100%;
    height: 42px;
    margin-top: 39px;
    background: linear-gradient(90deg,#ecb53c,#ff9211);
    color: #fff;
    border-radius: 39px;
    box-shadow: 0 10px 20px 0 rgba(0,0,0,.1);
    letter-spacing: 2px;
    display: flex;
    justify-content: center;
    align-items: center;
  }
}
</style>
request模块 - axios封装

 axios官网文档
去里面直接复制就行
utils/requests.js
import axios from 'axios'
// 创建axios实例,将来对创建出来的实例,进行自定义配置
// 好处 不会污染原始的axios实例
const instance = axios.create({
  baseURL: 'http://cba.itlike.com/public/index.php?s=/api/',
  timeout: 5000

})

// 自定义配置 请求/相应 拦截器
// 添加请求拦截器
// axios.xxxx更改为 instance.xxxx
instance.interceptors.request.use(function (config) {
  // 在发送请求之前做些什么
  return config
}, function (error) {
  // 对请求错误做些什么
  return Promise.reject(error)
})

// 添加响应拦截器
instance.interceptors.response.use(function (response) {
  // 2xx 范围内的状态码都会触发该函数。
  // 对响应数据做点什么(默认axios会多包装一层data,需要响应拦截器中处理一下)
  return response.data // 扒地一层
}, function (error) {
  // 超出 2xx 范围的状态码都会触发该函数。
  // 对响应错误做点什么
  return Promise.reject(error)
})

// 导出配置好的实例
export default instance
测试使用
login/index.vue
import request from '@/utils/requests'
export default {
  name: 'LoginPage',
  async created () {
    // 就直接把request当做axios,就和之前一样地用
    const res = await request.get('/captcha/image')
    console.log(res)
  }
}
图形验证码功能

login/index.vue
  <div class="form-item">
            <input v-model="picCode"   class="inp" maxlength="5" placeholder="请输入图形验证码" type="text">
            <!-- v-if防止默认Url没有值显示空渲染   点击刷新 -->
            <img v-if="picUrl"    :src="picUrl"  @click="getPicCode"          alt="">
          </div>


import request from '@/utils/requests'
export default {
  name: 'LoginPage',
  data () {
    return {
      picCode: '', // 用户输入的图形验证码
      picKey: '', // 将来请求传递的图形验证码唯一标识
      picUrl: '' // 存储图片地址
    }
  },
  async created () {
    this.getPicCode()
  },
  methods: {
    async getPicCode () {
      const { data: { base64, key } } = await request.get('/captcha/image')
      this.picUrl = base64
      this.picKey = key
    }
  }
}
api接口模块 - 封装图片验证码接口

在api文件下,建login.js
// 此处用于存放所有登陆相关的接口请求
// 1.获取图形验证码
import request from '@/utils/requests'
export const getPicCode = () => {
  // return 必须加
  return request.get('/captcha/image')
}
login/index.vue
// import request from '/@/utils/requests'
// 按需导入
import { getPicCode } from '@/api/login'

...

 methods: {
    async getPicCode () {
      const { data: { base64, key } } = await getPicCode()    //记得加()因为是函数啊 大哥
      this.picUrl = base64
      this.picKey = key
    }
  }
Toast 轻提示

短信验证倒计时

step1 点击按钮,实现倒计时按钮
1.准备data数据
2.给按钮注册点击事件
3.开启倒计时
4.离开页面销毁定时器,为了性能
login.index.vue
 <!-- !!!!! -->
            <button @click="getCode">
                {{second ===  totalSecond? '获取验证码' : second+'秒后重新发送'}}
            </button>


 data () {
    return {
      picCode: '', // 用户输入的图形验证码
      picKey: '', // 将来请求传递的图形验证码唯一标识
      picUrl: '', // 存储图片地址
      totalSecond: 60, // 总秒数
      second: 60, // 当前秒数,开定时器对second--
      timer: null // 定时器id
    }
  },


  // 或取短信验证码
    getCode () {
      // 目前没有定时器开启(防止用户多次点击开启好几个定时器乱套了
      // 且totalSecond和second一致(秒数归位
      if (!this.timer && this.second === this.totalSecond) {
        this.timer = setInterval(() => {
          this.second--
          if (this.second <= 0) {
            clearInterval(this.timer)
            this.timer = null // 重置定时器id
            this.second = this.totalSecond // 归位
          }
        }, 1000)
      }
    }
    // 为了性能,离开页面,就要清除定时器
    // 在destroyed () 清除
  },
  // 离开页面就清楚定时器
  destroyed () {
    clearInterval(this.timer)
  }

}
step2 倒计时之前 的校验处理(手机号、验证码
1.输入框v-model 绑定数据
 <input v-model="picCode"   class="inp" maxlength="5" placeholder="请输入图形验证码" type="text">

  <input class="inp" v-model="mobile"  maxlength="11" placeholder="请输入手机号码" type="text">

data () {
    return {

      picCode: '', // 用户输入的图形验证码
      mobile: '' // 手机号
    }
  },
2.methods封装校验方法
 // 校验手机号和图形验证码
    vailFn () {
      //   /^开头    $/结尾
      // 共11位
      if (/^1[3-9]\d{9}$/.test(this.mobile)) {
        // 校验符合,就图形验证码
        if (/^\w{4}$/.test(this.picCode)) {
          return true
        } else {
          this.$toast('请输入正确验证码')
          return false
        }
      } else {
        this.$toast('请输入正确的手机号')
        return false
      }
    },
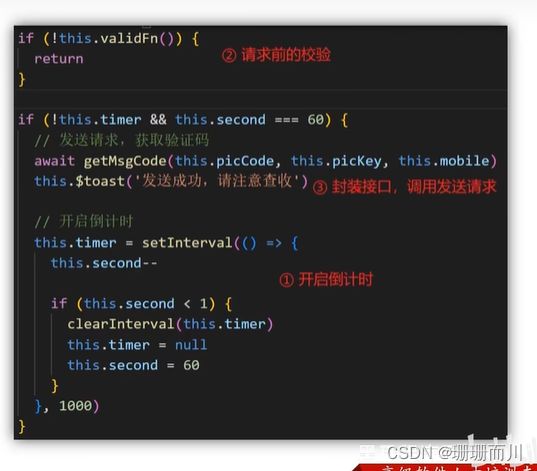
3.请求倒计时之前进行校验
 getCode () {
      // 记得加() 是函数啊大哥
      if (!this.vailFn()) {
        return
      }

      // 目前没有定时器开启(防止用户多次点击开启好几个定时器乱套了
      // 且totalSecond和second一致(秒数归位
      if (!this.timer && this.second === this.totalSecond) {
        ...
step3 封装短信验证请求接口,发送请求添加提示
1.封装api/login.js
// 2.获取短信验证码
export const getMsgCode = (captchaCode, captchaKey, mobile) => {
  return request.post('/captcha/sendSmsCaptcha', {
    form: {
      captchaCode, captchaKey, mobile
    // 图形验证码   图形验证码key
    }
  })
}
2.调用接口,添加提示
login/ index.vue
import { getPicCode, getMsgCode } from '@/api/login'

if (!this.timer && this.second === this.totalSecond) {
        // 发送请求
        //                       用户输入的验证码
        await getMsgCode(this.picCode, this.picKey, this.mobile)
        this.$toast('短信发送成功')

        this.timer = setInterval(() => {
          this.second--
          ...
登陆接口
 login/ index.vue
 <input v-model="smsCode"      class="inp" placeholder="请输入短信验证码" type="text">


 // 登陆
    async login () {
      if (!this.vailFn) {
        return
      }
      if (!/^\d{6}$/.test(this.smsCode)) {
        this.$toast('请输入正确的短信验证码')
        return
      }
      const res = await codeLogin(this.mobile, this.smsCode)
      console.log(res)
      this.$toast('登陆成功')
      this.$router.push('/')
    },
api/login.js
// 3.登陆接口
export const codeLogin = (mobile, smsCode) => {
  return request.post('/passport/login', {
    form: {
      smsCode,
      mobile,
      isParty: false,
      partyData: {}
    }

  })
}
## 响应拦截器统一处理错误提示 可以只考虑正逻辑,中间一旦有错误,就会被响应拦截器拦截,不会在走正逻辑


登陆权证信息存储

构建user模块
store / modules / user.js
export default {
  namespaced: true,
  state () {
    // 提供数据
    return {
      // 个人权证相关
      userInfo: {
        token: '',
        userId: ''
      }
    }
  },
  // 提供修改数据的方法
  mutations: {},

  // 提供异步操作
  actions: {},

  // 提供基于state所派生出的属性
  getters: {}
}
挂载到vuex
store/ /index.js
import Vue from 'vue'
import Vuex from 'vuex'

import user from './modules/user'
Vue.use(Vuex)

export default new Vuex.Store({
  state: {
  },
  getters: {
  },
  mutations: {
  },
  actions: {
  },
  modules: {
    user //! !!!!
  }
})
提供mutations
// 提供修改数据的方法
  mutations: {
    // 所有mutations的第一个参数,都是state
    setUserInfo (state, obj) {
      state.userInfo = obj
    }
  },
### 页面中commit调用 views/ login/ index.vue
    // 登陆
    async login () {
      if (!this.vailFn) {
        return
      }
      if (!/^\d{6}$/.test(this.smsCode)) {
        this.$toast('请输入正确的短信验证码')
        return
      }
      const res = await codeLogin(this.mobile, this.smsCode)

      this.$store.commit('user/setUserInfo', res.data)//!!!!!!!

      console.log(res)
      this.$toast('登陆成功')
      this.$router.push('/')
    },
storage存储模块 - vuex持久化
之前权证存储在vuex, 但是刷新丢失

utils/ storage.js
// 约定一个通用的键名
const INFO_KEY = 'hm_shopping_info'

// 获取个人信息
export const getInfo = () => {
  const defaultObj = { token: '', userId: '' }
  const result = localStorage.getItem(INFO_KEY)
  return result ? JSON.parse(result) : defaultObj
}

// 设置个人信息
export const setInfo = (obj) => {
  // 对象不能直接往本地存储,需要序列化
  // localStorage.setItem(INFO_KEY,obj)
  // 所以改成:
  localStorage.setItem(INFO_KEY, JSON.stringify(obj))
}

// 移除个人信息
export const removeInfo = () => {
  localStorage.removeItem(INFO_KEY)
}
store/ modules /user.js
import { getInfo, setInfo } from '@/utils/storage'

export default {
  namespaced: true,
  state () {
    // 提供数据
    return {
      // 个人权证相关
      userInfo: getInfo() //! !!!!
    }
  },
  // 提供修改数据的方法
  mutations: {
    // 所有mutations的第一个参数,都是state
    setUserInfo (state, obj) {
      state.userInfo = obj
      setInfo(obj) // !!!!!!!!
    }
  },

  // 提供异步操作
  actions: {},

  // 提供基于state所派生出的属性
  getters: {}
}
## 添加请求loading效果 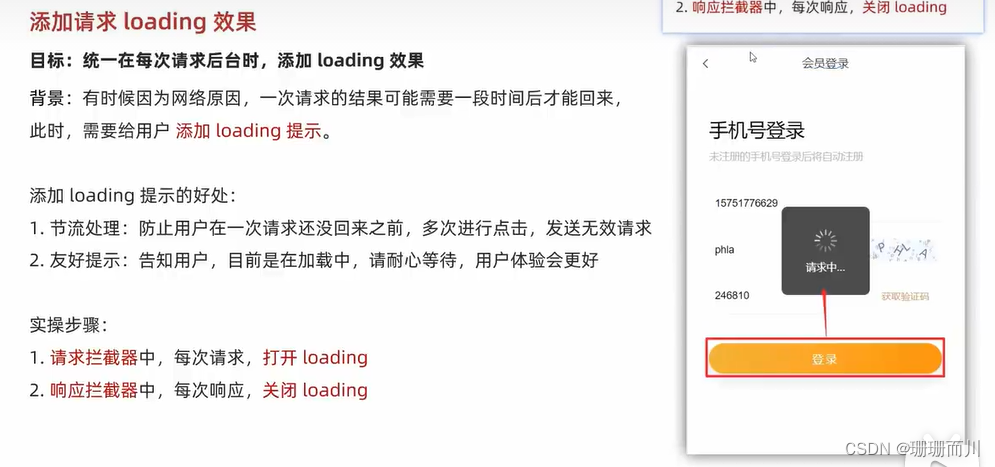utils / request.js
// 自定义配置 请求/相应 拦截器
// 添加请求拦截器
// axios.xxxx更改为 instance.xxxx
instance.interceptors.request.use(function (config) {
  // 在发送请求之前做些什么
//   开启loading,禁止背景点击(节流处理,防止多次无效触发
  Toast.loading({
    message: '加载中...',
    forbidClick: true,
    duration: 0 // 展示时长(ms),值为 0 时,toast 不会消失
  })

  return config
}, function (error) {
  // 对请求错误做些什么
  return Promise.reject(error)
})

// 添加响应拦截器
instance.interceptors.response.use(function (response) {
  // 2xx 范围内的状态码都会触发该函数。
  // 对响应数据做点什么(默认axios会多包装一层data,需要响应拦截器中处理一下)
  const res = response.data // 扒地一层
  if (res.status !== 200) {
    // 给提示

    // 给错误提示,Toast默认是单例模式,后面的Toast调用了,会将前一个Toast效果覆盖
    // 同时只能存在一个Toast
    Toast(res.message)
    // 抛出一个错误的promise
    return Promise.reject(res.message)
  } else { //! !!!!!!
    // 正确情况,直接走业务核心逻辑,清除loading效果
    Toast.clear()
  }

  return res
页面访问拦截


 router/index.js
// 所有的路由在真正被访问到之前(解析渲染对应组件页面前
// 都会先经过全局前置守卫
// 只有全局前置守卫放行,才会到达对应页面

// 定义一个数组,专门用户存放所有需要权限访问的页面
const authUrls = ['/pay', '/myorder']
router.beforeEach((to, from, next) => {
  // 看to.path是否在authUrls 中出现过 authUrls.includes(to.path)
  if (!authUrls.includes(to.path)) { // 没出现 非权限页面
    next()
    return
  } else {
    // 是权限页面。需要判断token
    const token = store.state.user.userInfo.token
    console.log(token)
  }
  next()
})
或者是简写
store / index.js
getters: {
    token (state) {
      return state.user.userInfo.token
    }
  },
首页
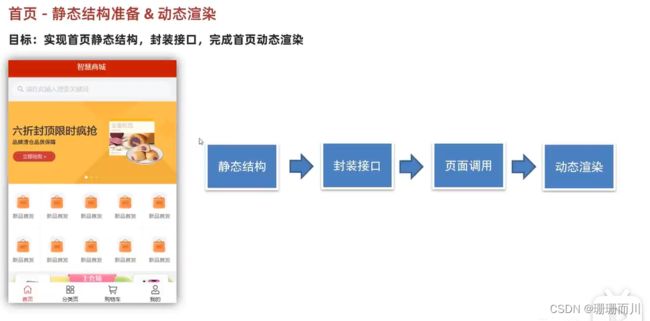
静态解构准备
- 静态结构和样式
layout/home.vue


—— 猜你喜欢 ——
- 新建
components/GoodsItem.vue

三星手机 SAMSUNG Galaxy S23 8GB+256GB 超视觉夜拍系统 超清夜景 悠雾紫
5G手机 游戏拍照旗舰机s23
已售104件
¥3999.00
¥6699.00
- 组件按需引入
import { Search, Swipe, SwipeItem, Grid, GridItem } from 'vant'

Vue.use(GridItem)
Vue.use(Search)
Vue.use(Swipe)
Vue.use(SwipeItem)
Vue.use(Grid)
封装接口
api/home.js
import requests from '@/utils/requests'

// 获取首页数据
export const getHomeData = () => {
  return requests.get('/page/detail', {
    params: {
      pageId: 0
    }
  })
}
页面调用
动态渲染

搜索 - 历史记录管理

前3步实现
views / search / index.vue
<template>
    <div class="search">
      <van-nav-bar title="商品搜索" left-arrow @click-left="$router.go(-1)" />

      <van-search v-model="search"  show-action placeholder="请输入搜索关键词" clearable>
        <template #action>
          <div @click="goSearch(search)"  >搜索</div>
        </template>
      </van-search>

      <!-- 搜索历史 -->
      <div class="search-history" v-if="history.length>0">
        <div class="title">
          <span>最近搜索</span>
          <van-icon @click="clear"  name="delete-o" size="16" />
        </div>
        <div class="list">
            <!-- 不是item.id 这里的item就是一个历史名字 -->
          <div  v-for="item in history" :key="item"   class="list-item"
          @click="goSearch(item)"
           >{{item}}</div>
          </div>
      </div>
    </div>
  </template>

<script>
export default {
  name: 'SearchIndex',
  data () {
    return {
      search: '', // 搜索框的值
      history: ['簪子', '毛笔', '字帖']
    }
  },
  methods: {
    goSearch (things) {
      const index = this.history.indexOf(things)
      if (index !== -1) {
        // 存在相同的项,将原有关键词移除
        // splice(从哪里开始,删几个,项1,项2)
        this.history.splice(index, 1)
      }
      this.history.unshift(things)
      // @click="$router.push(`/searchlist/${item}`)"
    },
    clear () {
      this.history = []
    }
  }
}
</script>

  <style lang="less" scoped>
  .search {
    .searchBtn {
      background-color: #fa2209;
      color: #fff;
    }
    ::v-deep .van-search__action {
      background-color: #c21401;
      color: #fff;
      padding: 0 20px;
      border-radius: 0 5px 5px 0;
      margin-right: 10px;
    }
    ::v-deep .van-icon-arrow-left {
      color: #333;
    }
    .title {
      height: 40px;
      line-height: 40px;
      font-size: 14px;
      display: flex;
      justify-content: space-between;
      align-items: center;
      padding: 0 15px;
    }
    .list {
      display: flex;
      justify-content: flex-start;
      flex-wrap: wrap;
      padding: 0 10px;
      gap: 5%;
    }
    .list-item {
      width: 30%;
      text-align: center;
      padding: 7px;
      line-height: 15px;
      border-radius: 50px;
      background: #fff;
      font-size: 13px;
      border: 1px solid #efefef;
      overflow: hidden;
      white-space: nowrap;
      text-overflow: ellipsis;
      margin-bottom: 10px;
    }
  }
  </style>
第4步 持久化
utils / storage.js
const HISTORY_KEY = 'hm_history_list'


// 获取搜索历史
export const getHistoryList = () => {
  const result = localStorage.getItem(HISTORY_KEY)
  return result ? JSON.parse(result) : []
}

// 设置搜素历史
export const setHistoryList = (arr) => {
  localStorage.setItem(HISTORY_KEY, JSON.stringify(arr))
}
views / search / index.vue
 methods: {
    goSearch (things) {
      const index = this.history.indexOf(things)
      if (index !== -1) {
        // 存在相同的项,将原有关键词移除
        // splice(从哪里开始,删几个,项1,项2)
        this.history.splice(index, 1)
      }
      this.history.unshift(things)
      setHistoryList(this.history)//! !!!!!!!!!!!!!!

      //   跳转到搜索列表叶
      this.$router.push(`/searchlist/${things}`) //! !!!!!!!!!!!!!!
    },
    clear () {
      this.history = []
      setHistoryList([])//! !!!!!!!!!!!!!!
    }
  }