Github地址为https://github.com/dibo-software/diboot-v2/,官网为https://www.diboot.com/
1.在https://start.spring.io/下载一个初始项目demo.zip并解压导入到IDEA。
2.访问https://mvnrepository.com/artifact/com.diboot/diboot-devtools-spring-boot-starter链接可以看到devtools的所有版本,点击一个最新版本进去,复制maven或者gradle的依赖配置,因为官方不建议打包到生产环境,所以maven中添加provide参数,gradle中也做相应处理即可。
3.因为其中关联绑定是使用了diboot-core-starter中的相关绑定类,所以还需要引入diboot-core-starter,访问https://mvnrepository.com/artifact/com.diboot/diboot-core-spring-boot-starter可以看到diboot-core-spring-boot-starter的所有版本,选择和devtools一致的版本即可。
com.diboot
diboot-devtools-spring-boot-starter
2.0.3-RC2
provide
com.diboot
diboot-core-spring-boot-starter
2.0.3-RC2
4.根据自己项目情况设置配置文件
server.port=8080
server.servlet.context-path=/example
#datasource config
spring.datasource.url=jdbc:mysql://localhost:3306/demo?characterEncoding=utf8&serverTimezone=GMT%2B8
spring.datasource.username=root
spring.datasource.password=xxxx
spring.datasource.hikari.driver-class-name=com.mysql.cj.jdbc.Driverspring.datasource.hikari.maximum-pool-size=5
spring.main.allow-bean-definition-overriding=true
# devtools config
diboot.devtools.codes-author=xxx
diboot.devtools.codes-copyright=xxxx.com
diboot.devtools.codes-version=1.0.0
diboot.devtools.output-path-entity=demo/src/main/java/com/example/demo/entity/
diboot.devtools.output-path-vo=demo/src/main/java/com/example/demo/vo/
diboot.devtools.output-path-service=demo/src/main/java/com/example/demo/service/
diboot.devtools.output-path-mapper=demo/src/main/java/com/example/demo/mapper/
diboot.devtools.output-path-controller=demo/src/main/java/com/example/demo/controller/
diboot.devtools.output-path-sql=demo/src/main/resources/
diboot.devtools.enable-lombok=false
diboot.devtools.enable-swagger=false
5‘’启动项目,项目启动后,会出现以下日志,点击打开这个链接即可访问到devtools对于项目的配置界面:
四、代码生成
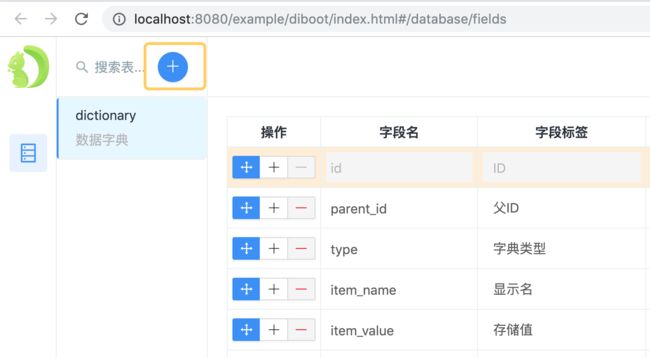
1.点击如下➕按钮,添加一张数据表:
image
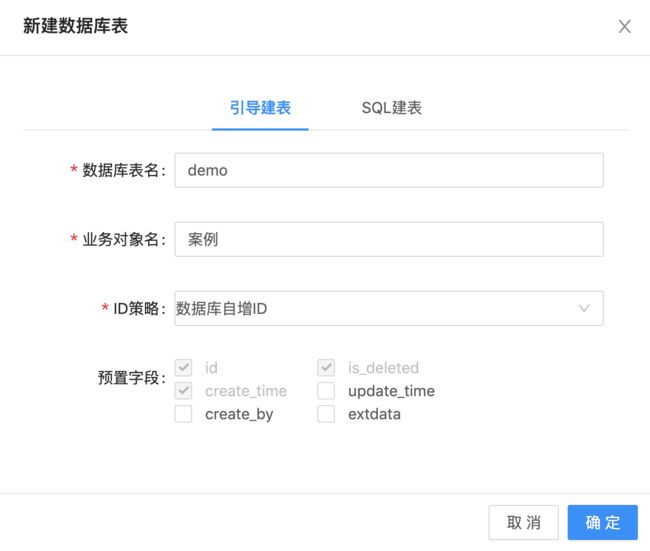
2.添加一张案例表, 其他先使用默认即可:
image
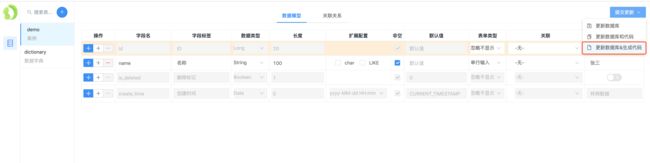
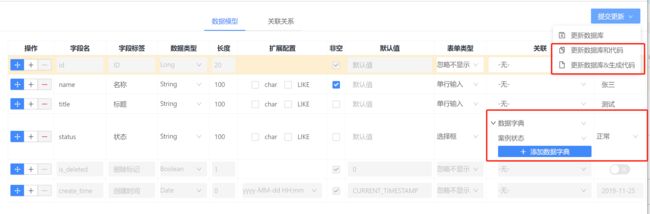
3.在数据表管理中添加一个字段name,设置样例数据,然后点击右上角的更新数据库并生成代码:
image
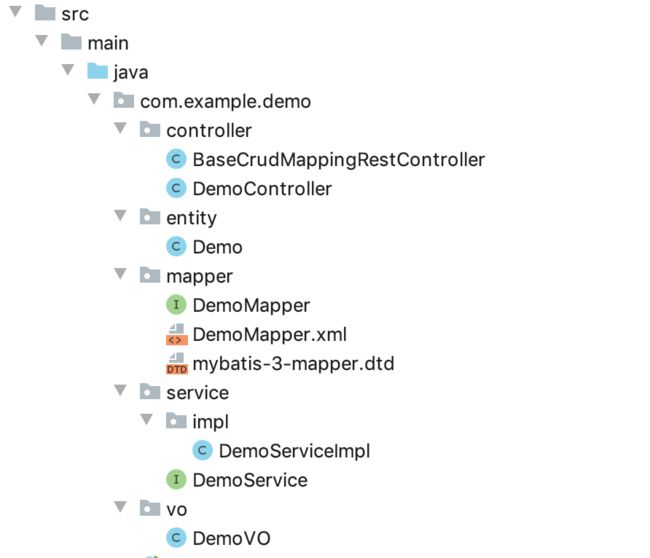
4.可以看到相关的代码文件已经生成了:
image
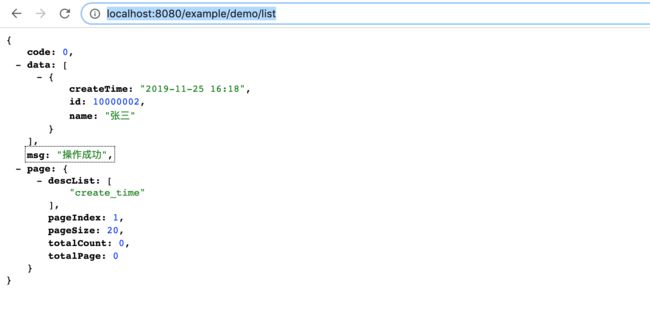
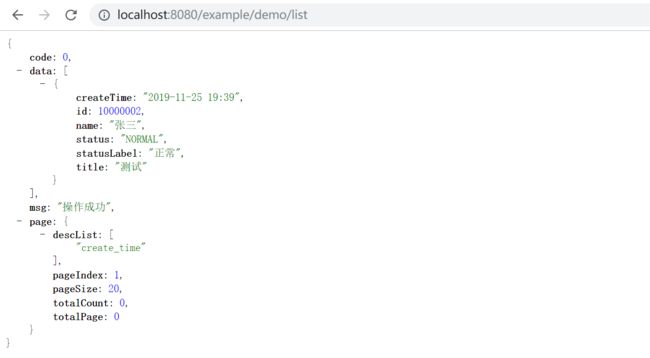
5.重启应用,访问接口地址http://localhost:8080/example/demo/list便可以获取到该表的列表数据:
image
五、代码更新
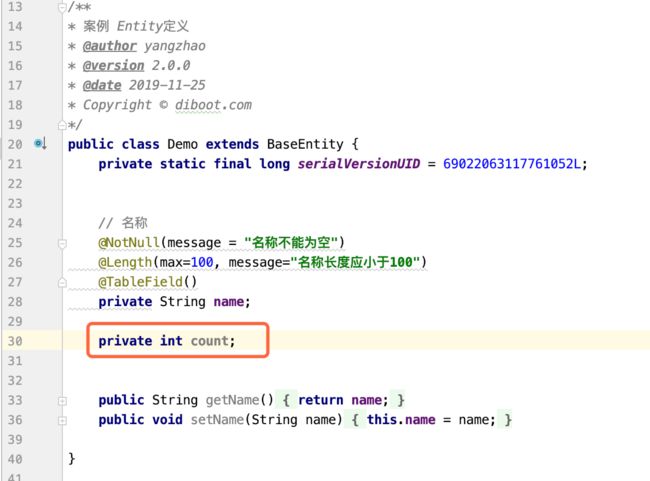
在demo.java的entity中增加一个count字段,测试更新代码功能:
image
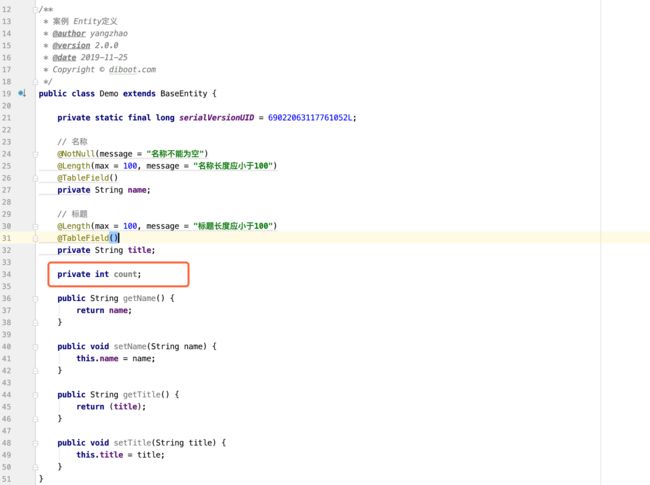
1.在数据库配置页面,在demo表中增加一个title字段,并点击右上角更新数据库和代码。

image
2.可以看到代码已经更新完成,并没有影响到自己添加的字段:
image
六、关联自动化
在他们之前发布的diboot-core中就已经支持了关联无SQL的注解绑定方式,可见https://github.com/dibo-software/diboot-v2/tree/master/diboot-core,省去了编写关联代码,以及性能调优的相关麻烦,这次的devtools又将这些关联做到了自动化,已经不再写关联代码就能轻松实现业务数据的多种关联关系了。
数据字典关联
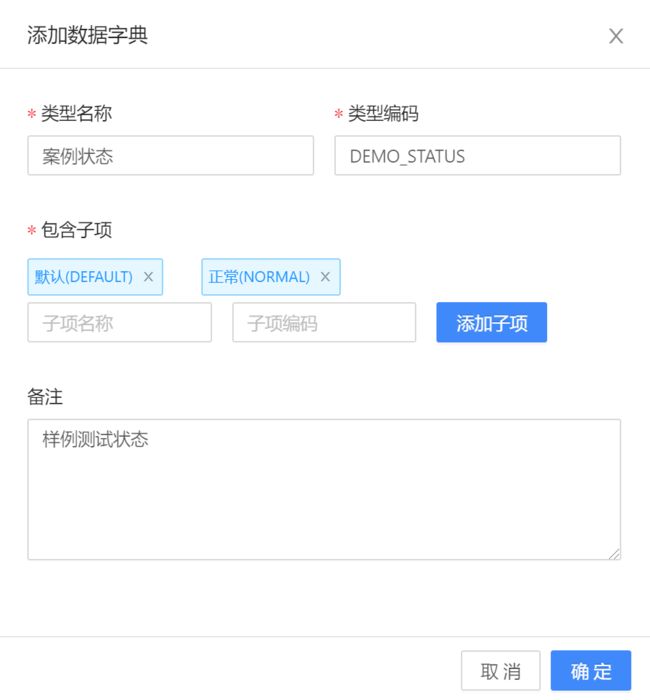
新建一个status字段,并设置关联为数据字典关联,先添加一个数据字典数据以供测试:

image
image
添加好数据字典数据后,选择该数据字典类型,以及该字段对应的数据字典样例数据,然后提交更新数据库生成代码(这里更新代码也是支持的)。
image
关联相关代码将会生成或更新到vo代码中,会自动完成status字段对数据字典的关联关系的绑定操作,如下:
publicclassDemoVOextendsDemo{privatestaticfinallongserialVersionUID=-4435060215996407737L;// status字段的关联数据字典publicstaticfinalStringDICT_DEMO_STATUS="DEMO_STATUS";// 关联数据字典:DEMO_STATUS@BindDict(type=DICT_DEMO_STATUS,field="status")privateStringstatusLabel;publicStringgetStatusLabel(){returnstatusLabel;}publicvoidsetStatusLabel(StringstatusLabel){this.statusLabel=statusLabel;}}
访问接口,验证关联关系绑定,可以看到下图中已经显示出了目标字段statusLabel的值:
image
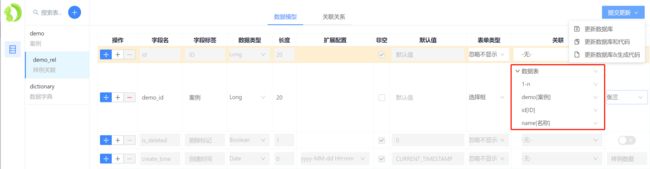
一对多关联
新建关联测试表demo_rel,并新建字段demo_id,设置与demo表的一对多关联关系:
image
点击右上角“更新数据库&生成代码”提交,开始生成该表的相关的代码,可以看到vo中也对这个一对多的关联关系进行了注解的自动绑定:
publicclassDemoRelVOextendsDemoRel{privatestaticfinallongserialVersionUID=943963213889204702L;// 字段关联:this.demo_id=id@BindField(entity=Demo.class,field="name",condition="this.demo_id=id")privateStringdemoName;publicStringgetDemoName(){returndemoName;}publicvoidsetDemoName(StringdemoName){this.demoName=demoName;}}
对该表的接口进行简单验证,可以看到已经关联了demo表,并显示了目标name字段的关联值:

image
多对多关联
多对多关联需要借助中间表来进行多对多的数据关联,但这一切devtools都帮我们想好了,自动生成中间表。
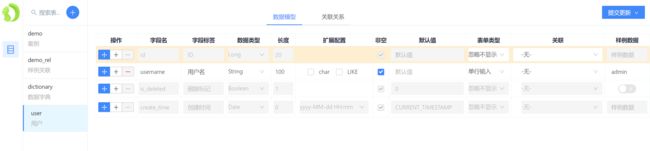
先创建两张表user和role表,以及相关字段如下所示:
image
image
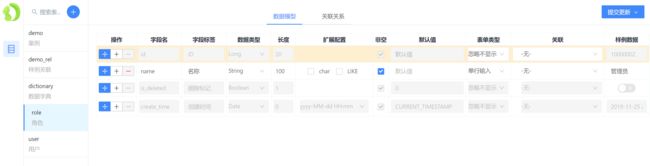
在user表中设置user和role表多对多关联,并生成代码:
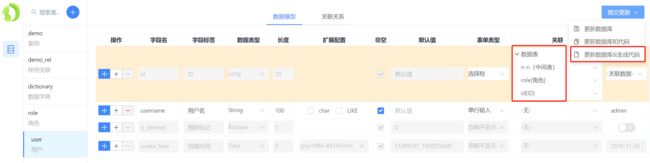
image
可以看到在vo中已经通过注解自动绑定了多对多的关联关系:
publicclassUserVOextendsUser{privatestaticfinallongserialVersionUID=-8863290616176144787L;// 通过中间表的多-多Entity实体关联@BindEntityList(entity=Role.class,condition="this.id=user_role.user_id AND user_role.role_id=id AND user_role.is_deleted=0")privateList
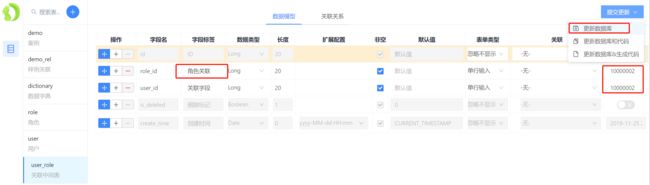
更新user_role表的样例数据(此处初始id为10000002,也需要手动改下role_id的字段标签),并更新数据库(此处不需要生成代码):
image
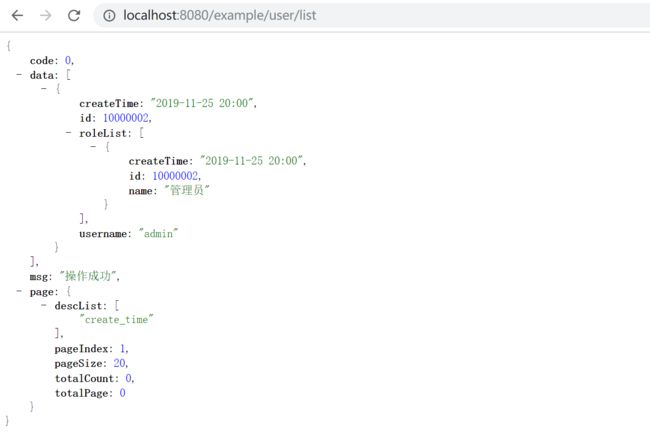
重启应用后,访问user的列表接口,即可看到关联数据的结果了:
作者:先生zeng
链接:https://www.jianshu.com/p/28acc40d7e2d
来源:
著作权归作者所有。商业转载请联系作者获得授权,非商业转载请注明出处。