Spring依赖注入
一、什么是依赖注入
DI (Dependency Injection):依赖注入是指在 Spring IOC 容器创建对象的过程中,将所依赖的对象通过配置进行注入。我们可以通过依赖注入的方式来降低对象间的耦合度。
在软件工程中,对象之间的耦合度就是对象之间的依赖性。对象之间的耦合越高,维护成本越高,因此对象的设计应使对象之间的耦合越小越好。
1 类的关系
继承、实现、依赖、关联、聚合、组合。
2 关系强度
继承 = 实现 > 组合 > 聚合 > 关联 > 依赖
二、为什么使用依赖注入
1 开闭原则
1.1 定义
OCP (Open Close Principle): 软件本身应该是可扩展的,而不可修改的。也就是,对扩展开放,对修改封闭的。
1.2 开闭原则优点
易扩展。开闭原则的定义就要求对扩展开放。
易维护。软件开发中,对现有代码的修改是一件很有风险的事情,符合开闭原则的设计在扩展时无需修改现有代码,规避了这个风险,大大提交了可维护性。
2 高内聚,低耦合
高内聚是指相关度比较高的部分尽可能的集中,不要分散。
低耦合就是说两个相关的模块尽可以能把依赖的部分降低到最小,不要产生强依赖。
三、依赖注入的方式
在使用依赖注入时,如果注入的是 Bean 对象,那么要求注入的 Bean 对象与被注入的Bean 对象都需要 Spring IOC 容器来实例化。
1 通过 Set 方法注入
需要为注入的成员变量提供 Set 方法。
1.1 POJO中添加属性、set方法和toString方法
public class GirlfriendOYY implements Girlfriend {
private double hight;
private String education;
@Override
public String toString() {
return "GirlfriendOYY{" +
"hight=" + hight +
", education='" + education + '\'' +
'}';
}
public double getHight() {
return hight;
}
public void setHight(double hight) {
this.hight = hight;
}
public String getEducation() {
return education;
}
public void setEducation(String education) {
this.education = education;
}
}1.2 Spring的xml配置文件
    <bean id="gf1" class="com.dyh.pojo.impl.GirlfriendOYY"
          scope="prototype" lazy-init="false">
        <property name="education" value="本科" />
        <property name="hight" >
            <value>1.65value>
        property>
    bean>
1.3 测试
public class TestGirlfriend {
    public static void main(String[] args) {
        ApplicationContext ac = new ClassPathXmlApplicationContext("application_context.xml");
        Girlfriend gf = (Girlfriend) ac.getBean("gf1");
        System.out.println(gf);
    }
}
运行结果
2 通过构造方法注入
Bean 对象中需要提供有参的构造方法
name:根据参数名称识别参数
index:根据参数的位置来识别参数
type:根据参数的类型识别参数
2.1 POJO中添加有参构造方法
public class GirlfriendOYY implements Girlfriend {
private double hight;
private String education;
public GirlfriendOYY(double hight, String education) {
this.hight = hight;
this.education = education;
}
}2.2 Spring的xml配置文件
    <bean id="gf4" class="com.dyh.pojo.impl.GirlfriendOYY">
        <constructor-arg name="education" value="专科"/>
        <constructor-arg name="hight" >
            <value>1.65value>
        constructor-arg>
    bean>
    <bean id="gf5" class="com.dyh.pojo.impl.GirlfriendOYY">
        <constructor-arg index="0" value="1.68" />
        <constructor-arg index="1" >
            <value>高中value>
        constructor-arg>
    bean>
    <bean id="gf6" class="com.dyh.pojo.impl.GirlfriendOYY">
        <constructor-arg type="double" value="1.73" />
        <constructor-arg type="java.lang.String" >
            <value>硕士value>
        constructor-arg>
    bean>
2.3 测试
public class TestGirlfriend {
    public static void main(String[] args) {
        ApplicationContext ac = new ClassPathXmlApplicationContext("application_context.xml");
        Girlfriend gf = (Girlfriend) ac.getBean("gf4");
        System.out.println(gf);
         gf = (Girlfriend) ac.getBean("gf5");
        System.out.println(gf);
         gf = (Girlfriend) ac.getBean("gf6");
        System.out.println(gf);
    }
}
运行结果:
3 自动注入
自动注入的方式有两种,一种是全局配置自动注入,另一种是局部配置自动注入。
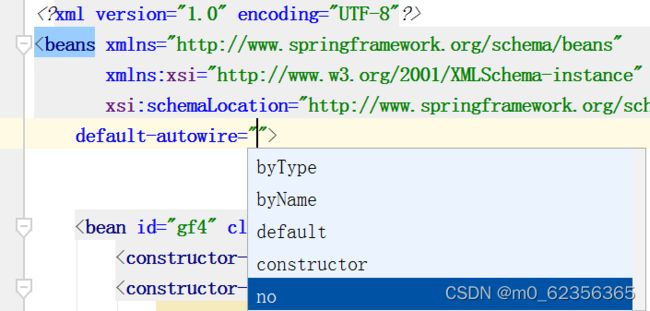
无论全局配置或局部单独配置,都有 5 个值可以选择:
no:当 autowire 设置为 no 的时候,Spring 就不会进行自动注入。
byName:在 Spring 容器中查找 id 与属性名相同的 bean,并进行注入。需要提供 set 方法。
byType:在 Spring 容器中查找类型与属性名的类型相同的 bean,并进行注入。需要提供 set 方法。
constructor:仍旧是使用 byName 方式,只不过注入的时候,使用构造方式进行注入。
default:全局配置的 default 相当于 no,局部的 default 表示使用全局配置设置。
3.1 局部自动注入
通过 bean 标签中的 autowire 属性配置自动注入。
有效范围:仅针对当前 bean 标签生效。
3.1.1 POJO
接口:
public interface GirlfriendProxyService {
    Girlfriend findGirlFriend();
}
实现类:
public class GirlfriendProxyServiceImpl implements GirlfriendProxyService {
Girlfriend girlfriend;
public GirlfriendProxyServiceImpl(){}
public GirlfriendProxyServiceImpl(Girlfriend girlfriend) {
this.girlfriend = girlfriend;
}
public Girlfriend getGirlfriend() {
return girlfriend;
}
public void setGirlfriend(Girlfriend girlfriend) {
this.girlfriend = girlfriend;
}
@Override
public Girlfriend findGirlFriend() {
return this.girlfriend;
}
}3.1.2 Spring的xml配置
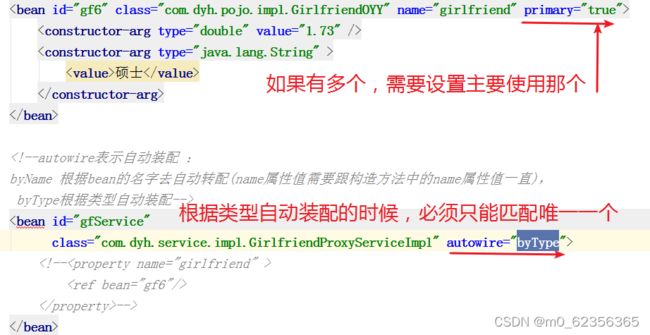
<bean id="gf6" class="com.dyh.pojo.impl.GirlfriendOYY" name="girlfriend">
<constructor-arg type="double" value="1.73" />
<constructor-arg type="java.lang.String" >
<value>硕士value>
constructor-arg>
bean>
<bean id="gfService"
class="com.dyh.service.impl.GirlfriendProxyServiceImpl" autowire="byName">
bean>3.1.3 测试
public class TestGFServiceByName {
    public static void main(String[] args) {
        ApplicationContext ac = new ClassPathXmlApplicationContext("application_context.xml");
        GirlfriendProxyServiceImpl gfService = (GirlfriendProxyServiceImpl) ac.getBean("gfService");
        Girlfriend girlfriend = gfService.getGirlfriend();
        System.out.println(girlfriend);
    }
}
运行结果:
如果将上述Spring的xml配置中的autowire属性值改成byType,表示根据类型自动装配,则会报如下错误!
3.2 全局自动注入
通过 beans 标签中的default-autowire 属性配置自动注入。
四、依赖注入的数据类型
1 注入 Bean 对象
    <bean id="gfService"
          class="com.dyh.service.impl.GirlfriendProxyServiceImpl" autowire="byType">
        <property name="girlfriend" >
            <ref bean="gf6"/>
        property>
    bean>
2 注入基本数据类型和字符串
   <bean id="gf1" class="com.dyh.pojo.impl.GirlfriendOYY"
          scope="prototype" lazy-init="false">
        <property name="education" value="本科" />
        <property name="hight" >
            <value>1.65value>
        property>
    bean>
3 注入 List
3.1 POJO
public class GirlfriendOYY implements Girlfriend {
    private double hight;
    private String education;
    private List<String> hobby;     // 兴趣爱好
    public List<String> getHobby() {
        return hobby;
    }
    public void setHobby(List<String> hobby) {
        this.hobby = hobby;
    }
    @Override
    public String toString() {
        return "GirlfriendOYY{" +
                "hight=" + hight +
                ", education='" + education + '\'' +
                ", hobby=" + hobby +
                '}';
    }
}
3.2 Spring的xml配置
   <bean id="gf1" class="com.dyh.pojo.impl.GirlfriendOYY"
          scope="prototype" lazy-init="false">
        <property name="education" value="本科" />
        <property name="hight" >
            <value>1.65value>
        property>
        <property name="hobby">
            <list>
                <value>看电影value>
                <value>旅游value>
            list>
        property>
    bean>
3.3 测试
public class TestGirlfriend {
    public static void main(String[] args) {
        ApplicationContext ac = new ClassPathXmlApplicationContext("application_context.xml");
        Girlfriend gf = (Girlfriend) ac.getBean("gf1");
        System.out.println(gf);
    }
}
运行结果:
![]()
4 注入 Set
同上。
5 注入 Map
5.1 POJO修改
public class GirlfriendOYY implements Girlfriend {
private double hight;
private String education;
private List<String> hobby;
private Map<String, String> parents; // 父母情况
public Map<String, String> getParents() {
return parents;
}
public void setParents(Map<String, String> parents) {
this.parents = parents;
}
@Override
public String toString() {
return "GirlfriendOYY{" +
"hight=" + hight +
", education='" + education + '\'' +
", hobby=" + hobby +
", parents=" + parents +
'}';
}
}5.2 Spring的xml配置修改
    <bean id="gf1" class="com.dyh.pojo.impl.GirlfriendOYY"
          scope="prototype" lazy-init="false">
        <property name="education" value="本科" />
        <property name="hight" >
            <value>1.65value>
        property>
        <property name="hobby">
            <list>
                <value>看电影value>
                <value>旅游value>
            list>
        property>
        <property name="parents" >
            <map>
                <entry key="father" value="zs" />
                <entry key="mother" value="ls" />
            map>
        property>
     bean>
测试类不用修改,运行结果:
![]()
6 注入Properties
略。


