Vue2向Vue3过度Vuex核心概念module模块
目录
-
- 1 核心概念 - module
-
- 1.目标
- 2.问题
- 3.模块定义 - 准备 state
- 2 获取模块内的state数据
-
- 1.目标:
- 2.使用模块中的数据
- 3.代码示例
- 3 获取模块内的getters数据
-
- 1.目标:
- 2.语法:
- 3.代码演示
- 4 获取模块内的mutations方法
-
- 1.目标:
- 2.注意:
- 3.调用方式:
- 4.代码实现
- 5 获取模块内的actions方法
-
- 1.目标:
- 2.注意:
- 3.调用语法:
- 4.代码实现
- 6 Vuex模块化的使用小结
-
- 1.直接使用
- 2.借助辅助方法使用
- 7 综合案例 - 创建项目
- 8 综合案例-构建vuex-cart模块
- 9 综合案例-准备后端接口服务环境
- 10 综合案例-请求动态渲染数据
-
- 1.目标
- 11 综合案例-修改数量
- 12 综合案例-底部总价展示
1 核心概念 - module
1.目标
掌握核心概念 module 模块的创建
2.问题
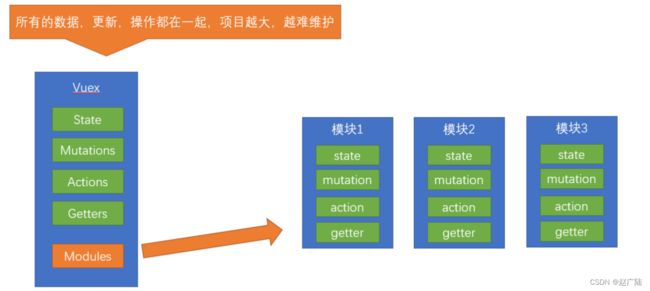
由于使用单一状态树,应用的所有状态会集中到一个比较大的对象。当应用变得非常复杂时,store 对象就有可能变得相当臃肿。
这句话的意思是,如果把所有的状态都放在state中,当项目变得越来越大的时候,Vuex会变得越来越难以维护
由此,又有了Vuex的模块化
3.模块定义 - 准备 state
定义两个模块 user 和 setting
user中管理用户的信息状态 userInfo modules/user.js
const state = {
  userInfo: {
    name: 'zs',
    age: 18
  }
}

const mutations = {}

const actions = {}

const getters = {}

export default {
  state,
  mutations,
  actions,
  getters
}
setting中管理项目应用的 主题色 theme,描述 desc, modules/setting.js
const state = {
  theme: 'dark'
  desc: '描述真呀真不错'
}

const mutations = {}

const actions = {}

const getters = {}

export default {
  state,
  mutations,
  actions,
  getters
}
在store/index.js文件中的modules配置项中,注册这两个模块
import user from './modules/user'
import setting from './modules/setting'

const store = new Vuex.Store({
    modules:{
        user,
        setting
    }
})
使用模块中的数据, 可以直接通过模块名访问 $store.state.模块名.xxx => $store.state.setting.desc
也可以通过 mapState 映射
2 获取模块内的state数据
1.目标:
掌握模块中 state 的访问语法
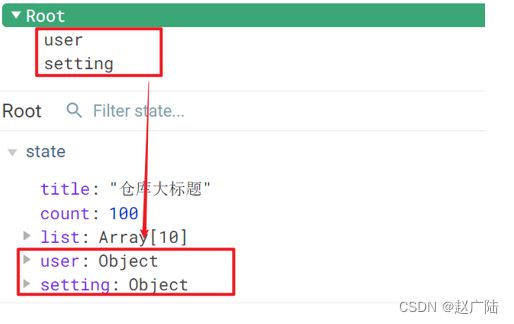
尽管已经分模块了,但其实子模块的状态,还是会挂到根级别的 state 中,属性名就是模块名
2.使用模块中的数据
- 直接通过模块名访问 $store.state.模块名.xxx
- 通过 mapState 映射:
- 默认根级别的映射 mapState([ ‘xxx’ ])
- 子模块的映射 :mapState(‘模块名’, [‘xxx’]) - 需要开启命名空间 namespaced:true
modules/user.js
const state = {
  userInfo: {
    name: 'zs',
    age: 18
  },
  myMsg: '我的数据'
}

const mutations = {
  updateMsg (state, msg) {
    state.myMsg = msg
  }
}

const actions = {}

const getters = {}

export default {
  namespaced: true,
  state,
  mutations,
  actions,
  getters
}
3.代码示例
$store直接访问
$store.state.user.userInfo.name
mapState辅助函数访问
...mapState('user', ['userInfo']),
...mapState('setting', ['theme', 'desc']),
3 获取模块内的getters数据
1.目标:
掌握模块中 getters 的访问语
2.语法:
使用模块中 getters 中的数据:
- 直接通过模块名访问
$store.getters['模块名/xxx '] - 通过 mapGetters 映射
- 默认根级别的映射
mapGetters([ 'xxx' ]) - 子模块的映射
mapGetters('模块名', ['xxx'])- 需要开启命名空间
- 默认根级别的映射
3.代码演示
modules/user.js
const getters = {
  // 分模块后,state指代子模块的state
  UpperCaseName (state) {
    return state.userInfo.name.toUpperCase()
  }
}
Son1.vue 直接访问getters
<div>{{ $store.getters['user/UpperCaseName'] }}div>
Son2.vue 通过命名空间访问
computed:{
  ...mapGetters('user', ['UpperCaseName'])
}
4 获取模块内的mutations方法
1.目标:
掌握模块中 mutation 的调用语法
2.注意:
默认模块中的 mutation 和 actions 会被挂载到全局,需要开启命名空间,才会挂载到子模块。
3.调用方式:
- 直接通过 store 调用 $store.commit('模块名/xxx ', 额外参数)
- 通过 mapMutations 映射
- 默认根级别的映射 mapMutations([ ‘xxx’ ])
- 子模块的映射 mapMutations(‘模块名’, [‘xxx’]) - 需要开启命名空间
4.代码实现
modules/user.js
const mutations = {
  setUser (state, newUserInfo) {
    state.userInfo = newUserInfo
  }
}
modules/setting.js
const mutations = {
  setTheme (state, newTheme) {
    state.theme = newTheme
  }
}
Son1.vue
export default {
methods: {
updateUser () {
// $store.commit('模块名/mutation名', 额外传参)
this.$store.commit('user/setUser', {
name: 'xiaowang',
age: 25
})
},
updateTheme () {
this.$store.commit('setting/setTheme', 'pink')
}
}
}
Son2.vue
methods:{
// 分模块的映射
...mapMutations('setting', ['setTheme']),
...mapMutations('user', ['setUser']),
}
5 获取模块内的actions方法
1.目标:
掌握模块中 action 的调用语法 (同理 - 直接类比 mutation 即可)
2.注意:
默认模块中的 mutation 和 actions 会被挂载到全局,需要开启命名空间,才会挂载到子模块。
3.调用语法:
- 直接通过 store 调用 $store.dispatch('模块名/xxx ', 额外参数)
- 通过 mapActions 映射
- 默认根级别的映射 mapActions([ ‘xxx’ ])
- 子模块的映射 mapActions(‘模块名’, [‘xxx’]) - 需要开启命名空间
4.代码实现
需求:
modules/user.js
const actions = {
  setUserSecond (context, newUserInfo) {
    // 将异步在action中进行封装
    setTimeout(() => {
      // 调用mutation   context上下文,默认提交的就是自己模块的action和mutation
      context.commit('setUser', newUserInfo)
    }, 1000)
  }
}
Son1.vue 直接通过store调用
methods:{
updateUser2 () {
// 调用action dispatch
this.$store.dispatch('user/setUserSecond', {
name: 'xiaohong',
age: 28
})
},
}
Son2.vue mapActions映射
<button @click="setUserSecond({ name: 'xiaoli', age: 80 })">一秒后更新信息</button>

methods:{
  ...mapActions('user', ['setUserSecond'])
}
6 Vuex模块化的使用小结
1.直接使用
- state --> $store.state.模块名.数据项名
- getters --> $store.getters[‘模块名/属性名’]
- mutations --> $store.commit(‘模块名/方法名’, 其他参数)
- actions --> $store.dispatch(‘模块名/方法名’, 其他参数)
2.借助辅助方法使用
1.import { mapXxxx, mapXxx } from ‘vuex’
computed、methods: {
// …mapState、…mapGetters放computed中;
// …mapMutations、…mapActions放methods中;
…mapXxxx(‘模块名’, [‘数据项|方法’]),
…mapXxxx(‘模块名’, { 新的名字: 原来的名字 }),
}
2.组件中直接使用 属性 {{ age }} 或 方法 @click="updateAge(2)"
7 综合案例 - 创建项目
-
脚手架新建项目 (注意:勾选vuex)
版本说明:
vue2 vue-router3 vuex3
vue3 vue-router4 vuex4/pinia
vue create vue-cart-demo
- 将原本src内容清空,替换成教学资料的《vuex-cart-准备代码》
需求:
- 发请求动态渲染购物车,数据存vuex (存cart模块, 将来还会有user模块,article模块…)
- 数字框可以修改数据
- 动态计算总价和总数量
8 综合案例-构建vuex-cart模块
- 新建
store/modules/cart.js
export default {
  namespaced: true,
  state () {
    return {
      list: []
    }
  },
}
- 挂载到 vuex 仓库上
store/cart.js
import Vuex from 'vuex'
import Vue from 'vue'

import cart from './modules/cart'

Vue.use(Vuex)

const store = new Vuex.Store({
  modules: {
    cart
  }
})

export default store
9 综合案例-准备后端接口服务环境
- 安装全局工具 json-server (全局工具仅需要安装一次)
yarn global add json-server 或 npm i json-server -g
- 代码根目录新建一个 db 目录
- 将资料 index.json 移入 db 目录
- 进入 db 目录,执行命令,启动后端接口服务 (使用–watch 参数 可以实时监听 json 文件的修改)
json-server --watch index.json
10 综合案例-请求动态渲染数据
1.目标
请求获取数据存入 vuex, 映射渲染
- 安装 axios
yarn add axios
- 准备actions 和 mutations
import axios from 'axios'

export default {
  namespaced: true,
  state () {
    return {
      list: []
    }
  },
  mutations: {
    updateList (state, payload) {
      state.list = payload
    }
  },
  actions: {
    async getList (ctx) {
      const res = await axios.get('http://localhost:3000/cart')
      ctx.commit('updateList', res.data)
    }
  }
}
App.vue页面中调用 action, 获取数据
import { mapState } from 'vuex'

export default {
  name: 'App',
  components: {
    CartHeader,
    CartFooter,
    CartItem
  },
  created () {
    this.$store.dispatch('cart/getList')
  },
  computed: {
    ...mapState('cart', ['list'])
  }
}
- 动态渲染
cart-item.vue
![]() {{item.name}}
¥{{item.price}}
{{item.count}}
{{item.name}}
¥{{item.price}}
{{item.count}}
11 综合案例-修改数量
- 注册点击事件
{{item.count}}
- 页面中dispatch action
onBtnClick (step) {
  const newCount = this.item.count + step
  if (newCount < 1) return

  // 发送修改数量请求
  this.$store.dispatch('cart/updateCount', {
    id: this.item.id,
    count: newCount
  })
}
- 提供action函数
async updateCount (ctx, payload) {
  await axios.patch('http://localhost:3000/cart/' + payload.id, {
    count: payload.count
  })
  ctx.commit('updateCount', payload)
}
- 提供mutation处理函数
mutations: {
  ...,
  updateCount (state, payload) {
    const goods = state.list.find((item) => item.id === payload.id)
    goods.count = payload.count
  }
},
12 综合案例-底部总价展示
- 提供getters
getters: {
  total(state) {
    return state.list.reduce((p, c) => p + c.count, 0);
  },
  totalPrice (state) {
    return state.list.reduce((p, c) => p + c.count * c.price, 0);
  },
},
- 动态渲染


