linux 安装protobuf,proto简单c++demo,使用g++、cmakelist和qmak编译
目录
-
- 1、根据protobuf GitHub的README.md安装protoBuf
-
- (1)安装依赖工具
- (2)下载源码
- (3)安装步骤
- 2、定义proto文件,基础语法
- 3、编译proto文件
- 4、c++使用protolbuff demo
-
- 4.1 proto文件
- 4.2 c++简单代码(重点!)
-
- 最主要的几个api
- 例子一:
- 例子二:
- 4.3 编译指令
-
- g++编译指令:
- cmakelist编译写法:
- qmake编译语法,可与ros一起用:
- 4.4 之前踩的坑
- 5、部分api接口
linux 安装protobuf,proto简单c++demo,使用g++、cmakelist和qmak编译
1、根据protobuf GitHub的README.md安装protoBuf
(1)安装依赖工具
sudo apt-get install autoconf automake libtool curl make g++ unzip
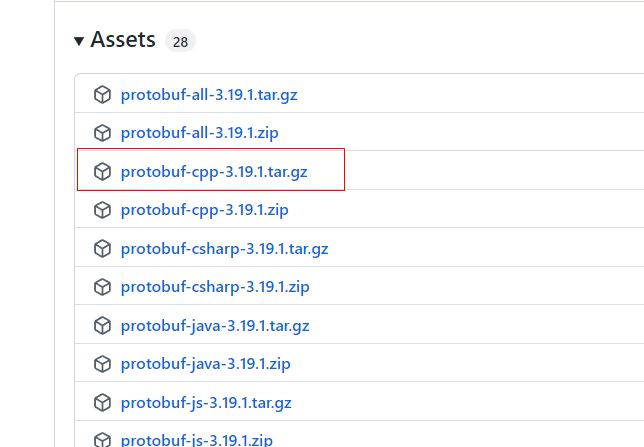
(2)下载源码
https://github.com/protocolbuffers/protobuf/releases
下载后解压
(3)安装步骤
安装比较慢,需要一些时间
cd protobuf
./autogen.sh
./configure
make
make check
sudo make install
sudo ldconfig
2、定义proto文件,基础语法
详细语法参考官方:
https://developers.google.com/protocol-buffers/docs/proto3
参考链接:
https://blog.csdn.net/tennysonsky/article/details/73921295
syntax = "proto3";  //指定编译版本,不指定则默认proto2
package agv_pro_message;  //对于C++,产生的类会被包装在C++的命名空间中

message SearchRequest {   //设置message名称
  string query = 1;       //消息定义的每个字段都有一个唯一的编号
  int32 page_number = 2;
  int32 result_per_page = 3;
  required uint64 id = 4;  //required必须提供内容
}

//可以在单个文件中定义多个消息类型(定义多个message) 可嵌套使用
message SearchResponse {
  repeated Result results = 1;    //repeated 字段用来定义重复使用的,相当于c++的vector
}

message Result {
  string url = 1;
  string title = 2;
  repeated string snippets = 3;
}
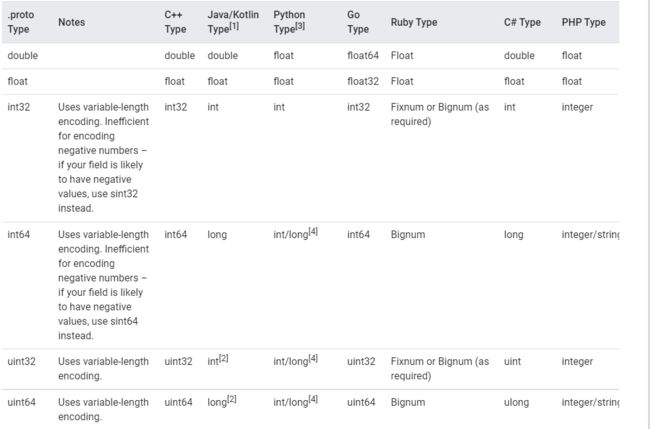
支持的数据类型:
注意其变量命名方式:
3、编译proto文件
protoc student.proto --cpp_out=./
protoc -I=$SRC_DIR --cpp_out=$DST_DIR $SRC_DIR/addressbook.proto
会生成两个文件 student.pb.cc 和 student.pb.h
将这两个文件引入工程中就可以了
4、c++使用protolbuff demo
4.1 proto文件
package tutorial;

message Student{
    required uint64 id = 1;
    required string name =2;
    optional string email = 3;

    enum PhoneType {
        MOBILE = 0;
        HOME = 1;
    }

    message PhoneNumber {
        required string number = 1;
        optional PhoneType type = 2 [default = HOME];
    }
    repeated PhoneNumber phone = 4;
}
4.2 c++简单代码(重点!)
最主要的几个api
has_xxxx:判断有没有值
clear_xxxx:清除值
set_xxxx 设置值
add_xxx:通常针对repeated字段,按顺序添加内容!
//对消息对象student序列化到string容器
string serializedStr;
student.SerializeToString(&serializedStr);
//反序列化
tutorial::Student deserializedStudent;
if(!deserializedStudent.ParseFromString(serializedStr)){
cerr << “Failed to parse student.” << endl;
return -1;
}
  inline bool has_id() const;
  inline void clear_id();
  static const int kIdFieldNumber = 1;
  inline ::google::protobuf::uint64 id() const;
  inline void set_id(::google::protobuf::uint64 value);

  inline ::std::string* mutable_name();
  inline ::std::string* release_name();

  // repeated .tutorial.Student.PhoneNumber phone = 4;
  inline int phone_size() const;
  inline void clear_phone();
  inline ::tutorial::Student_PhoneNumber* mutable_phone(int index);
  inline ::tutorial::Student_PhoneNumber* add_phone();
例子一:
详细参考:https://cloud.tencent.com/developer/article/1176660
//main.cpp

#include
#include
#include "student.pb.h"
using namespace std;

int main(int argc, char* argv[]){
    GOOGLE_PROTOBUF_VERIFY_VERSION;

    tutorial::Student student;  //proto消息对象

    //给消息类Student对象student赋值
    student.set_id(201421031059);
    *student.mutable_name()="dablelv";  //被mutable修饰的变量,将永远处于可变的状态
    student.set_email("dablelv@tencent.com");
    //增加一个号码对象
    tutorial::Student::PhoneNumber* phone_number = student.add_phone();
    phone_number->set_number("15813354925");
    phone_number->set_type(tutorial::Student::MOBILE);

    //再增加一个号码对象
    tutorial::Student::PhoneNumber* phone_number1 = student.add_phone();
    phone_number1->set_number("0564-4762652");
    phone_number1->set_type(tutorial::Student::HOME);

    //对消息对象student序列化到string容器
    string serializedStr;
    student.SerializeToString(&serializedStr);
    cout<<"serialization result:"<
  例子二:
  关于repeated
  protobuf中repeated类型变量与C++ vector类型变量的相互赋值方法
  将整个vector类型的变量整体赋值给repeated类型的变量:
  std::vector mission_points;  //vector
VehicleNavigationStage navigation_stage;  //proto对象

navigaion_stage.mutable_mission_points()->CopyFrom({mission_points.begin(), mission_points.end()});

  将mission_points赋值给vector型变量的方法如下:
  std::vector mission_points;
VehicleNavigationStage navigation_stage;

for (int i = 0; i < navigation_stage.mission_points_size(); i++) {
  mission_points.push_back(navigation_stage.mission_points(i));
  }

  4.3 编译指令
  g++编译指令:
  指令1:
  g++ main.cpp  student.pb.cc `pkg-config --cflags --libs protobuf` -lpthread -std=c++11

  指令2:
  生成动态连接库(无报错)
  g++ -c main.cpp & g++ -c student.pb.cc -std=c++11

g++ ./main.o student.pb.o -o main_test.out `pkg-config --cflags --libs protobuf`

  pkg-config --cflags --libs protobuf执行对应:
  -I/usr/local/include -L/usr/local/lib -lprotobuf
  cmakelist编译写法:
  cmake_minimum_required(VERSION 3.5)

project(agv_cmake LANGUAGES CXX)

set(CMAKE_CXX_STANDARD 11)
set(CMAKE_CXX_STANDARD_REQUIRED ON)

set(CMAKE_CXX_FLAGS "${CMAKE_CXX_FLAGS} -lprotobuf  -std=c++11  -lpthread ")
#设置编译带的参数

find_package(Protobuf REQUIRED)  #查找protobuf包

include_directories(${Protobuf_INCLUDE_DIRS})  #添加头文件
include_directories(${CMAKE_CURRENT_BINARY_DIR})  #添加头文件

include_directories(/usr/local/include)
link_directories(/usr/local/lib)    #链接库文件

# Depend on custom defined lib

add_executable(agv_cmake main.cpp
                         nebulalink.servercwaveii.pb.cc)
target_link_libraries(agv_cmake  ${PROTOBUF_LIBRARIES})  #一定要连接库文件!!!!

  qmake编译语法,可与ros一起用:
  TEMPLATE = app
CONFIG += console c++11
CONFIG -= app_bundle
CONFIG -= qt

INCLUDEPATH += \
    /opt/ros/kinetic/include \  #ros的头文件
    /usr/local/include \        #proto所在头文件
    /usr/include/google/protobuf \

LIBS += -L/opt/ros/kinetic/lib \
        -L/usr/lib \     #proto所在库
        -L/usr/local/lib \  #proto所在库
        -L/usr/lib/x86_64-linux-gnu \
        -lpthread \
        -lprotobuf \   #proto所在库
        -lroscpp -lrospack -lrosconsole -lroscpp_serialization \
        -lrostime -lroslib -lrosconsole_log4cxx -ltf -ltf2 -ltf2_ros -lactionlib \
        -ldynamic_reconfigure_config_init_mutex -limage_transport -lcv_bridge -lclass_loader \
        -lboost_system -lboost_filesystem -lboost_thread -lboost_timer -lboost_date_time \

SOURCES += \
        main.cpp \
        student.pb.cc \

  4.4 之前踩的坑
  如果只将protoc生成的代码头文件和代码文件加入工程,在链接阶段会报错,错误内容大致就是未定义的方法XXXXX云云,一看就是没有包含protobuf的静态库。
  protobuf是将lib安装到/usr/local/lib下了,而这个目录应该是默认包含目录之一(不一定是,取决于OS及版本),所以不需要设置链接路径,只需直接在Makefile/CMakeLists.txt中链接库“protobuf”即可编译通过。如果问题依旧,那可能是/usr/local/lib没有被加入到默认的包含环境
  可参考的连接:
  https://blog.csdn.net/cs_polebear/article/details/44057793
  5、部分api接口
   bool IsInitialized() const; //检查是否全部的required字段都被置(set)了值
 void CopyFrom(const Person& from); //用外部消息的值,覆写调用者消息内部的值
 void Clear();  //将所有项复位到空状态
 int ByteSize() const;  //消息字节大小
 string DebugString() const; //将消息内容以可读的方式输出
 string ShortDebugString() const; //输出时会有较少的空白
 bool SerializeToString(string* output) const; //将消息序列化并储存在指定的string中
 bool ParseFromString(const string& data); //从给定的string解析消息
 bool SerializeToArray(void * data, int size) const  //将消息序列化至数组
 bool ParseFromArray(const void * data, int size)    //从数组解析消息
 bool SerializeToOstream(ostream* output) const; //将消息写入到给定的C++ ostream中
 bool ParseFromIstream(istream* input); //从给定的C++ istream解析消息


