CentOS/RHEL 7/8 进入单用户模式的三种方法
Single user mode, also referred to as maintenance mode, allows a single super user to recover/repair the system problems.
Generally, these problems cannot be solved in a multi-user environment. The system can boot but will not function properly OR you won’t be able to log in.
Maintenance mode uses runlevel1.target or rescue.target on Red Hat (RHEL) 7/8 based systems.
In this mode, the system mounts all local file systems, but does not activate network interfaces. It only enables certain services and minimal functionality to repair the system.
This method is mostly useful when you want to run ‘fsck’ to ‘fix corrupted file systems’, or to reset a forgotten root password, or to fix a mount point issue on the system.
You can boot CentOS/RHEL 7/8 systems in single user mode using the below three methods:
- Method-1: Boot CentOS/RHEL 7/8 systems in single user mode by adding the “rd.break” parameter to the kernel
- Method-2: Boot CentOS/RHEL 7/8 systems in single user mode by replacing the “rhgb quiet” word with the “init=/bin/bash or init=/bin/sh” parameter in the kernel
- Method-3: Boot CentOS/RHEL 7/8 systems in single user mode by replacing the “ro” word with the “rw init=/sysroot/bin/sh” parameter in the kernel
Method-1: Booting CentOS/RHEL 7/8 in single user mode
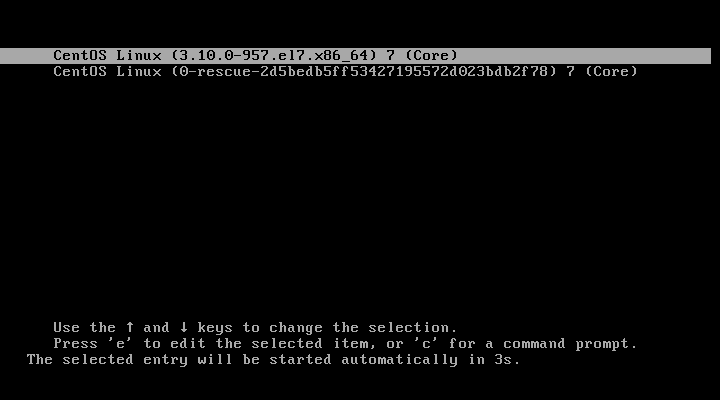
Reboot your system. On the GRUB2 boot screen, press the "e" key to edit the selected kernel. You need to select the first line, the first one is the latest kernel whereas you can select the other if you would like to boot your system with the older kernel.
Depending on your RHEL/CentOS version, find the word “linux16” or “linux”, and press the “End” button on the keyboard to go to the end of the line, and add the keyword “rd.break” as shown in the screenshot below, then press “Ctrl+x” or “F10” to boot into single-user mode.
Note: You need to find the word linux16 for RHEL/CentOS 7 systems, while linux for RHEL/CentOS 8 systems.
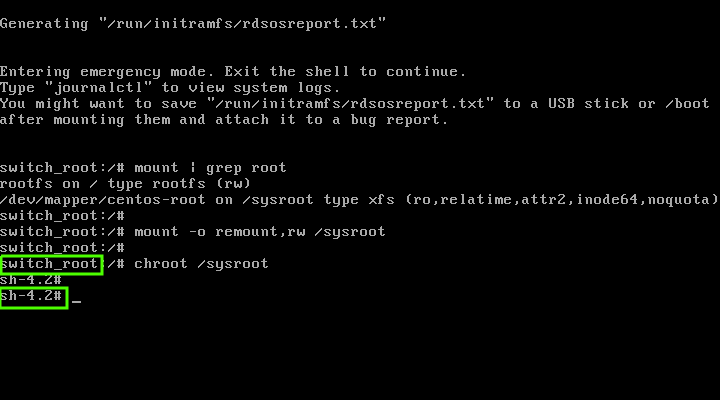
This change, mounts your root file system into “read only (RO)” mode. You can check this by running the command below. Also, the output below clearly shows that you are in “Emergency Mode”.
# mount | grep root
To make changes to the “sysroot” file system you need to remount it with READ and WRITE (RW) mode:
# mount -o remount,rw /sysroot
Run the below command to change the environment, commonly known as “jailed directory” or “chroot jail” :
# chroot /sysroot
Now, the single-user mode is ready to use. Once you have fixed your problem, and to exit the single user mode, perform the following steps.
CentOS/RHEL 7/8 uses SELinux by default, so create the following hidden file, which will automatically perform a relabel of all files on next boot:
# touch /.autorelabel
Finally, run the below command to restart the system. Alternatively, type “exit” command twice to restart your system:
# reboot -f
Method-2: How to Boot into single user mode in CentOS/RHEL 7/8
Reboot your system. On the GRUB2 boot screen, press the "e" key to edit the selected kernel parameters.
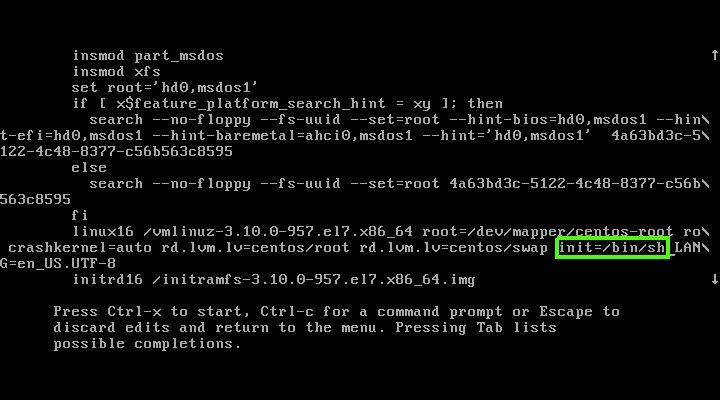
Find the word “rhgb quiet” and replace it with “init=/bin/bash” or “init=/bin/sh”, then press “Ctrl+x” or “F10” to boot in the single user mode.
Screenshot for init=/bin/bash :
Screenshot for init=/bin/sh :
By default, this will mount your “/” partition in read-only (RO) mode, so you will need to remount the “/” file system with READ and WRITE (RW) mode to make changes:
# mount -o remount,rw /
You can now perform any task that you want. When you are done, run the following command to enable SELinux relabeling on reboot:
# touch /.autorelabel
Finally reboot the system:
# exec /sbin/init 6
Method-3: How to Boot into emergency mode in RHEL/CentOS 7/8
To interrupt the automatic boot, reboot your system and press any key on the GRUB2 splash screen.
This will display the list of kernels available on your system. Select the latest kernel and press the "e" key to edit the selected kernel parameters.
Find the line that starts with the word “linux” or “linux16” and replace “ro” with “rw init=/sysroot/bin/sh”. When finished, press “Ctrl+x” or “F10” to boot in single user mode.
Change the environment to “chroot jail” by running the below command:
# chroot /sysroot
Make any necessary changes to the system. Once done, run the below command to enable SELinux relabeling on reboot:
# touch /.autorelabel
Finally reboot the system:
# reboot -f
Closing Notes
In this tutorial we’ve shown you three methods to boot RHEL/CentOS 7/8 system in emergency mode. We hope you can boot your Linux system in single user mode to recover/repair the system problems.


