RaspberryPi 4B 使用 libgpiod 操作 gpio

RaspberryPi OS 是 Linux 的一个发行版,基于 Debian 制作。因此我们熟悉的基于 sysfs 方式控制 GPIO(/sys/class/gpio)都是可以使用的。但是嵌入式 Linux 系统下之前被广泛应用的 GPIO 工具 sysfs GPIO 接口,目前这个项目已经处于 deprecated 状态,经 Linux Kernel Community 确定其替代者就是 GPIO 字符设备 API Libgpiod。

libgpiod —— 与Linux GPIO 交互的 C 库和工具,字符设备(gpiod 代表 GPIO 设备)

从 Linux 4.8 开始,GPIO sysfs 接口已被弃用。用户空间应该使用取而代之的是字符设备。这个库简单的 API 实现封装了 ioctl 调用和数据结构。

一、硬件接线

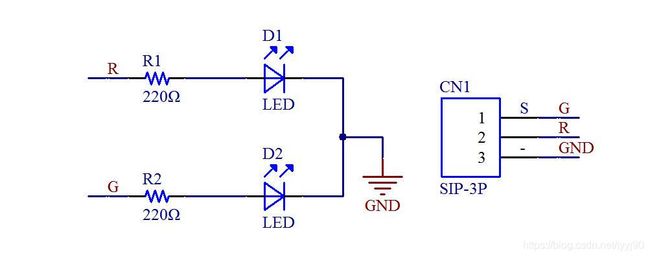
通过控制 gpio 引脚输出高电平就可以控制 LED 灯的点亮。使用树莓派传感器套件里的双色 LED 灯模块。原理图如下:

RaspberryPi 4B 使用 libgpiod 操作 gpio_第1张图片

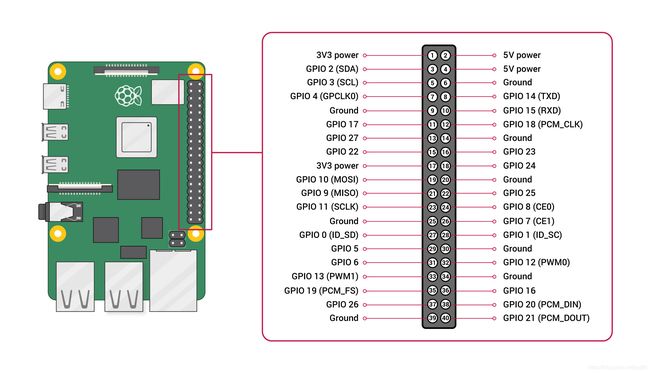
现在再来看树莓派的 gpio 引脚图:

RaspberryPi 4B 使用 libgpiod 操作 gpio_第2张图片

我这里使用 GPIO 17 和 GPIO 18 引脚去控制双色 LED 灯模块的红灯(R)或绿灯(G)点亮。

接线如下:

树莓派引脚 双色 LED 灯模块引脚
GPIO 17 R
GPIO 18 S(G)
GND GND

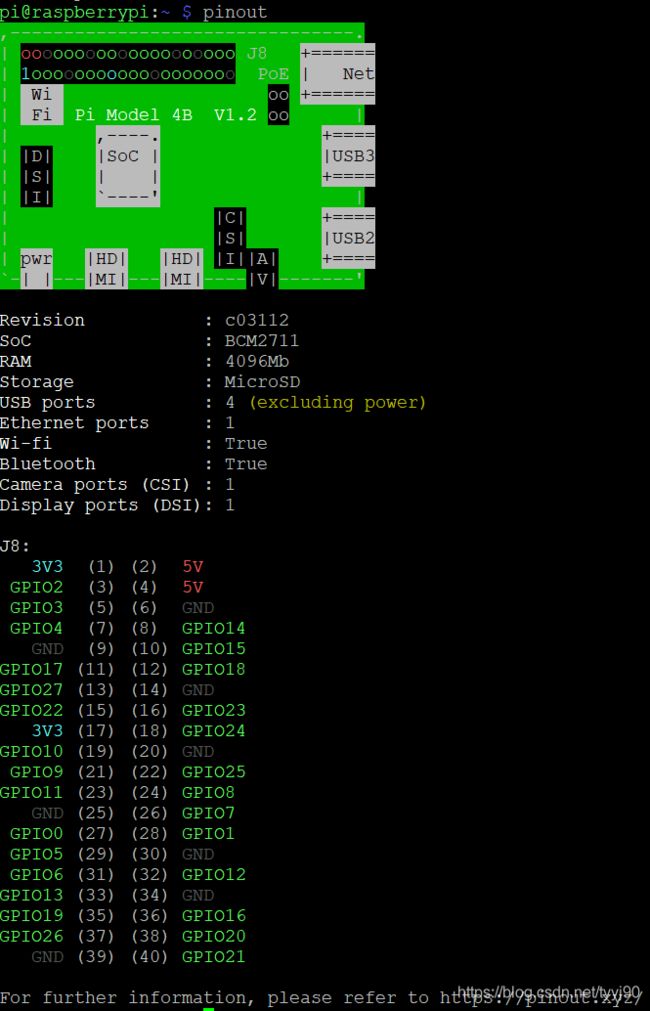
查看树莓派的 gpio 引脚图还有一个快捷方式,在树莓派命令行窗口直接输入命令:

pinout

显示如下:

RaspberryPi 4B 使用 libgpiod 操作 gpio_第3张图片

二、使用 GPIO sysfs 接口

  1. sysfs 导出 GPIO 17 和 GPIO 18
echo 17 > /sys/class/gpio/export
echo 18 > /sys/class/gpio/export

现在再去 ls /sys/class/gpio/ 目录,就会多出来 gpio17 和 gpio18 目录。

  1. 设置 gpio 模式为输出
echo out > /sys/class/gpio/gpio17/direction
echo out > /sys/class/gpio/gpio18/direction
  1. 设置 gpio 高电平点亮 LED,点亮绿色(G)灯。
echo 1 > /sys/class/gpio/gpio18/value

熄灭写 0 即可。

echo 0 > /sys/class/gpio/gpio18/value

三、使用 libgpiod

3.1 安装

首先安装 libgpiod,先查找一下。

pi@raspberrypi:~/Package $ sudo apt-cache search libgpiod
gpiod - Tools for interacting with Linux GPIO character device - binary
libgpiod-dev - C library for interacting with Linux GPIO device - static libraries and headers
libgpiod-doc - C library for interacting with Linux GPIO device - library documentation
libgpiod2 - C library for interacting with Linux GPIO device - shared libraries
python3-libgpiod - Python bindings for libgpiod (Python 3)

gpiod —— 与 Linux GPIO 字符设备交互的工具 - bin 二进制

libgpiod-dev —— 用于与 Linux GPIO 设备交互的 C 库 - 静态库和头文件

libgpiod-doc —— 库文档

libgpiod2 —— 用于与 Linux GPIO 设备交互的 C 库 - 共享库

python3-libgpiod —— libgpiod 的 Python 绑定(Python 3)

直接 install libgpiod-dev

sudo apt-get install libgpiod-dev

RaspberryPi 4B 使用 libgpiod 操作 gpio_第4张图片

可以看到实际上安装了 libgpiod-dev 的同时也安装了 libgpiod2,也就是其静态库和动态库都安装了。

3.2 使用

写一个程序验证一下,红绿灯交替闪烁一共 20 次。

下面的程序用到了 libgpiod 以下 API:

  1. gpiod_chip 结构体

它代表支持 gpio 的芯片。包括每个 gpio 口 gpiod_line 数组 lines,数组的个数用 num_lines 指出。还包含了 fd 设备句柄,以及名称和标签。

struct gpiod_chip {
	struct gpiod_line **lines;
	unsigned int num_lines;

	int fd;

	char name[32];
	char label[32];
};
  1. gpiod_line 结构体

direction —— GPIO 的方向

active_state —— 活动状态配置

output_value —— 最后写入 GPIO 的逻辑值

info_flags —— GPIO_GET_LINEINFO_IOCTL 返回的 GPIOLINE_FLAGs

req_flags —— 提供 GPIOD_LINE_REQUEST_FLAGs 来请求 GPIO

state —— LINE_FREE,LINE_REQUESTED_VALUES 或 LINE_REQUESTED_EVENTS

struct line_fd_handle {
	int fd;
	int refcount;
};

struct gpiod_line {
	unsigned int offset;

	/* The direction of the GPIO line. */
	int direction;

	/* The active-state configuration. */
	int active_state;

	/* The logical value last written to the line. */
	int output_value;

	/* The GPIOLINE_FLAGs returned by GPIO_GET_LINEINFO_IOCTL. */
	__u32 info_flags;

	/* The GPIOD_LINE_REQUEST_FLAGs provided to request the line. */
	__u32 req_flags;

	/*
	 * Indicator of LINE_FREE, LINE_REQUESTED_VALUES or
	 * LINE_REQUESTED_EVENTS.
	 */
	int state;

	struct gpiod_chip *chip;
	struct line_fd_handle *fd_handle;

	char name[32];
	char consumer[32];
};
  1. gpiod_chip_open_by_name

按名称打开 gpiochip。

  1. gpiod_chip_get_line

在给定的偏移量处获取 GPIO 的句柄。

offset —— GPIO偏移量

  1. gpiod_line_request_output

设置输出方向。

consumer —— 使用者的名称

default_val —— 初始值

  1. gpiod_line_set_value

设置单个 GPIO 的值。

例程代码

#include 
#include 
#include 

#ifndef	CONSUMER
#define	CONSUMER	"Consumer"
#endif

int main(int argc, char **argv)
{
	char *chipname = "gpiochip0";
	unsigned int line_num_17 = 17;	// GPIO 17
	unsigned int line_num_18 = 18;	// GPIO 18
	unsigned int val;
	struct gpiod_chip *chip;
	struct gpiod_line *line17, *line18;
	int i, ret;

	chip = gpiod_chip_open_by_name(chipname);
	if (!chip) {
		printf("Open chip by name failed. name: %s\n", chipname);
		goto end;
	}

	line17 = gpiod_chip_get_line(chip, line_num_17);
	if (!line17) {
		printf("Get line failed. line_num: %u\n", line_num_17);
		goto close_chip;
	}

	line18 = gpiod_chip_get_line(chip, line_num_18);
	if (!line18) {
		printf("Get line failed. line_num: %u\n", line_num_18);
		goto release_line17;
	}

	ret = gpiod_line_request_output(line17, CONSUMER, 0);
	if (ret < 0) {
		printf("Request line17 as output failed\n");
		goto release_line18;
	}

	ret = gpiod_line_request_output(line18, CONSUMER, 0);
	if (ret < 0) {
		printf("Request line18 as output failed\n");
		goto release_line18;
	}

	/* Blink 20 times */
	val = 0;
	for (i = 20; i > 0; i--) {
		ret = gpiod_line_set_value(line17, val);
		if (ret < 0) {
			printf("Set line17 output failed. val: %u\n", val);
			goto release_line18;
		}
		ret = gpiod_line_set_value(line18, !val);
		if (ret < 0) {
			printf("Set line18 output failed. val: %u\n", !val);
			goto release_line18;
		}
		printf("Times %d\n", i);
		sleep(1);
		val = !val;
	}

release_line18:
	gpiod_line_release(line18);
release_line17:
	gpiod_line_release(line17);
close_chip:
	gpiod_chip_close(chip);
end:
	return 0;
}

编译程序

gcc RG_LED.c -o RG_LED -lgpiod

运行

./RG_LED

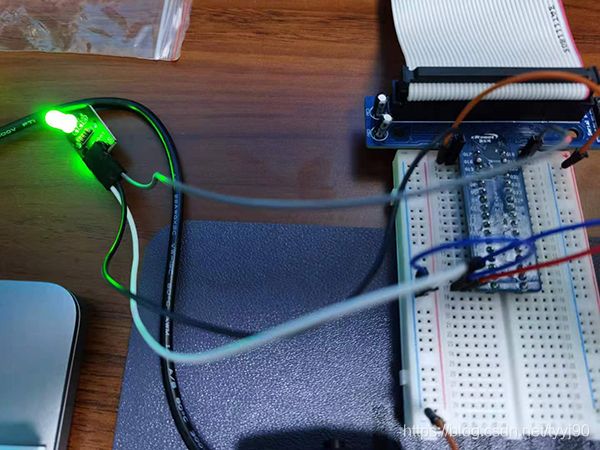
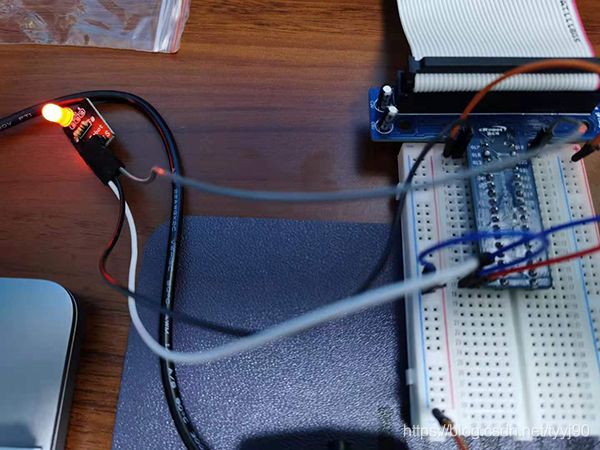
效果图如下,实际情况是红绿交替闪烁。

RaspberryPi 4B 使用 libgpiod 操作 gpio_第5张图片
RaspberryPi 4B 使用 libgpiod 操作 gpio_第6张图片

3.3 点亮 RGB 三色 LED

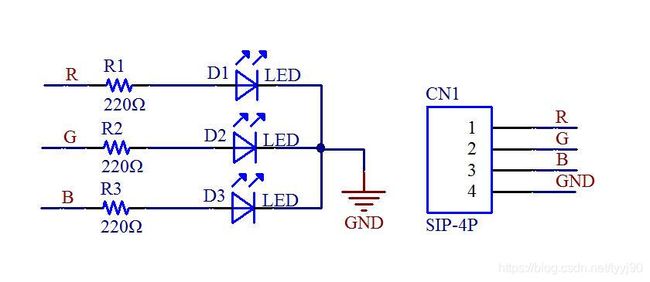
三色 LED 模块原理图如下,可以控制三原色混合。

RaspberryPi 4B 使用 libgpiod 操作 gpio_第7张图片
下面是接线图:

树莓派引脚 RGB 三色 LED 灯模块引脚
GPIO 16 R
GPIO 17 B
GPIO 18 G
GND GND

例程代码如下,在上面的代码的基础上抽离出公共方法 blend_led 。

#include 
#include 
#include 

#ifndef	CONSUMER
#define	CONSUMER	"Consumer"
#endif

int blend_led(struct gpiod_line *r, int r_val, struct gpiod_line *g, int g_val, struct gpiod_line *b, int b_val);

/**
* GPIO 16 <-> R
* GPIO 17 <-> B
* GPIO 18 <-> G
*/
int main(int argc, char **argv)
{
	char *chipname = "gpiochip0";
	unsigned int line_num_16 = 16;	// GPIO 16
	unsigned int line_num_17 = 17;	// GPIO 17
	unsigned int line_num_18 = 18;	// GPIO 18
	
	struct gpiod_chip *chip;
	struct gpiod_line *line16, *line17, *line18;
	int ret;

	chip = gpiod_chip_open_by_name(chipname);
	if (!chip) {
		printf("Open chip by name failed. name: %s\n", chipname);
		goto end;
	}
	
	line16 = gpiod_chip_get_line(chip, line_num_16);
	if (!line16) {
		printf("Get line failed. line_num: %u\n", line_num_16);
		goto close_chip;
	}

	line17 = gpiod_chip_get_line(chip, line_num_17);
	if (!line17) {
		printf("Get line failed. line_num: %u\n", line_num_17);
		goto release_line16;
	}

	line18 = gpiod_chip_get_line(chip, line_num_18);
	if (!line18) {
		printf("Get line failed. line_num: %u\n", line_num_18);
		goto release_line17;
	}
	
	ret = gpiod_line_request_output(line16, CONSUMER, 0);
	if (ret < 0) {
		printf("Request line16 as output failed\n");
		goto release_line18;
	}

	ret = gpiod_line_request_output(line17, CONSUMER, 0);
	if (ret < 0) {
		printf("Request line17 as output failed\n");
		goto release_line18;
	}

	ret = gpiod_line_request_output(line18, CONSUMER, 0);
	if (ret < 0) {
		printf("Request line18 as output failed\n");
		goto release_line18;
	}
	
	//R
	ret = blend_led(line16, 1, line17, 0, line18, 0);
	if (ret < 0) {
		printf("Set output failed.\n");
		goto release_line18;
	}
	
	sleep(1);
	//G
	ret = blend_led(line16, 0, line17, 0, line18, 1);
	if (ret < 0) {
		printf("Set output failed.\n");
		goto release_line18;
	}
	sleep(1);
	
	//B
	ret = blend_led(line16, 0, line17, 1, line18, 0);
	if (ret < 0) {
		printf("Set output failed.\n");
		goto release_line18;
	}
	sleep(1);
	
	//yellow
	ret = blend_led(line16, 1, line17, 0, line18, 1);
	if (ret < 0) {
		printf("Set output failed.\n");
		goto release_line18;
	}
	sleep(1);
	
	ret = blend_led(line16, 1, line17, 1, line18, 0);
	if (ret < 0) {
		printf("Set output failed.\n");
		goto release_line18;
	}
	sleep(1);
	
	ret = blend_led(line16, 0, line17, 1, line18, 1);
	if (ret < 0) {
		printf("Set output failed.\n");
		goto release_line18;
	}
	sleep(1);
	
	ret = blend_led(line16, 1, line17, 1, line18, 1);
	if (ret < 0) {
		printf("Set output failed.\n");
		goto release_line18;
	}

release_line18:
	gpiod_line_release(line18);
release_line17:
	gpiod_line_release(line17);
release_line16:
	gpiod_line_release(line16);
close_chip:
	gpiod_chip_close(chip);
end:
	return 0;
}

int blend_led(struct gpiod_line *r, int r_val, struct gpiod_line *g, int g_val, struct gpiod_line *b, int b_val){
	int ret = 0;
	ret = gpiod_line_set_value(r, r_val);
	if (ret < 0) {
		printf("Set r output failed. val: %u\n", r_val);
		return ret;
	}
	
	ret = gpiod_line_set_value(g, g_val);
	if (ret < 0) {
		printf("Set g output failed. val: %u\n", g_val);
		return ret;
	}
	
	ret = gpiod_line_set_value(b, b_val);
	if (ret < 0) {
		printf("Set b output failed. val: %u\n", b_val);
		return ret;
	}
	
	return 0;
}

编译运行即可看到结果,R、G、B…的颜色顺序闪烁,间隔一秒。

gcc rgb_led.c -o rgb_led -lgpiod
./rgb_led
你可能感兴趣的:(RaspberryPi,树莓派,libgpiod,raspberry,pi)