Nginx 学习
文章目录
-
- Nginx 学习
-
- 1、Nginx概述
-
- 1.1 概述
- 1.2 Nginx 优势特点
- 1.3 Nginx应用场景
- 1.4 正向代理
- 1.5 反向代理
- 1.6 负载均衡
- 1.7 动静分离
- 2、Nginx安装
-
- 2.1 安装所需环境
-
- 2.1.1 gcc 安装
- 2.1.2 PCRE pcre-devel 安装
- 2.1.3 zlib 安装
- 2.1.4 OpenSSL 安装
- 2.2.下载安装
-
- 2.2.1 nginx官网下载
- 2.2.2 淘宝网 nginx
- 2.2.3 使 用 命令下载(推荐)
- 2.2.4 解压
- 2.3 编译安装
-
- 2.3.1 使用默认配置
- 2.3.2 自定义配置
- 2.4 查找安装路径
- 2.5启动停止 Nginx
-
- 2.5.1查询 nginx 进程:
- 2.5.2重启 nginx
- 2.5.3重新加载配置文件:
- 2.6 配置环境变量
- 2.7 配置开机自启动
- 3、nginx常用命令和配置文件
-
- 3.1 常用命令
- 3.2 配置文件详细讲解
- 3.3 配置多个 .conf 文件
- 3.4 nginx.conf 重要的指令块
- 3.5 nginx-master 信号传递
- 3.6 nginx 信号集
- 4. Nginx 热部署
-
- 4.1.检查当前所用的nginx版本
- 4.2 检查旧的二进制命令编译参数
- 4.3 备份当前 nginx 二进制命令
- 4.4 下载一个新版本
- 4.5 编译安装
- 4.6 检查新安装的 nginx
- 4.7 检查当前 nginx 运行状态
- 4.8 停止旧版本
- 4.9 再次查看新的 nginx 状态
- 4.10 退出旧版本 master
- 4.11 再次查看 nginx 状态
- 4.12 删除旧进程
- 5. Nginx 日志切割
- 6. Nginx虚拟主机
-
- 6.1 nginx 单虚拟主机配置
-
- 6.1.1 静态网站的搭建
- 6.2 案例1:多网卡多IP配置虚拟主机
-
- 6.2.1 增加一块网卡
- 6.2.2 编辑配置文件,基于每个IP创建一个虚拟主机
- 6.3 案例2:单网卡多端口配置虚拟主机
- 6.4 案例3:基于域名配置虚拟主机
- 6.5 Nginx 虚拟主机日志定义
- 7. Nginx gzip 静态资源压缩
- 8. Nginx 访客日志
- 9. Nginx 目录浏览功能(文件服务器)
- 10. Nginx 状态页
-
- 10.1 stub_status 作用说明
- 10.2 查看现有 nginx 编译参数
- 10.3 使用参数重新配置configure,在原有基础上添加上 --with-http_stub_status_module
- 10.4 将原来的 nginx 文件备份
- 10.5 编译
- 10.6 替换nginx二进制文件
- 10.7 重新启动nginx,查看编译参数
- 10.8 参考官网
-
- 10.8.1 修改配置文件
- 10.8.2 浏览器访问
- 11. Nginx Location 匹配规则
-
- 11.1 案例:location 匹配测试
- 12. Nginx url 地址重写功能
-
- 12.1 rewirte 语法
- 12.2 Rewrite 跳转实现
- 12.3 Rewrite 执行顺序
- 12.4 案例
-
- 12.4.1 案例:实现一个 301 URL 跳转
- 12.4.2 案例:基于域名的跳转
- 13. Nginx 访问认证
- 14. 反向代理
-
- 14.1 单端口反向代理
-
- 14.1.1 安装 tomcat
- 14.1.2 修改 nginx 配置文件
- 14.2 多端口反向代理
-
- 14.2.1 实现效果:
- 14.2.2 修改 tomcat 配置文件
- 14.2.3 拷贝一个 webapps 并修改为 webapps
- 14.2.4 修改 nginx配置文件
- 14.2.5 测试
- 15. 负载均衡
-
- 15.1 准备两台 tomcat 服务器
- 15.2 创建测试文件
- 15.3 配置nginx配置文件
- 15.4 测试
- 15.4 nginx 提供了几种分配方式(策略)
- 16. 动静分离
-
- 16.1 什么是动静分离
- 16.2 准备测试资源
- 16.3 修改 nginx 配置文件
- 16.4 测试
- 17. Nginx 高可用
-
- 17.1 Keeplived+Nginx高可用集群(主从模式)
-
- 17.1.1 准备测试机器
- 17.1.2 安装 keepalived
- 17.1.3 修改主机(master)配置文件
- 17.1.4 修改备机(backup)配置文件
- 17.1.5 启动 keepalived
- 17.1.6 修改 nginx 配置文件
- 17.1.7 测试
- 17.2 Keeplived+Nginx 高可用集群(双主模式)
Nginx 学习
1、Nginx概述
1.1 概述
Nginx(“engine x”)是一个高性能的 HTTP /反向代理的服务器及电子邮件(IMAP/POP3)代理服务器。官方测试nginx能够支撑5万并发,并且cpu,内存等资源消耗却非常低,运行非常稳定。最重要的是开源,免费,可商用的。
Nginx还支持热部署,几乎可以做到7 * 24 小时不间断运行,即时运行数个月也不需要重启,还能够在不间断服务的情况下对软件进行升级维护。
1.2 Nginx 优势特点
-
资源消耗低,性能强
官方测试nginx能够支撑5万并发,实际生产环境测试也可支撑2~4W左右的并发连接
-
成本低
nginx的反向代理功能,使用软件技术进行负载均衡,相比硬件(F5等)有明显的成本优势
-
nginx配置文件相对更加易懂
-
nginx支持url地址重写
例如修改网站域名之后,访问之前域名可以直接跳转到新域名,还可以根据url请求特点进行请求转发(例如判断来自移动端的请求或者PC端的请求,转发到相应的服务器)
-
nginx支持高可用
防止单点故障,服务崩溃,例如可以使用 keepalived 实现 nginx 高可用
-
nginx节省网络带宽
支持静态文件压缩传输,支持 gzip 压缩功能
-
nginx支持热部署,可以在不停止服务的情况下更新部署
1.3 Nginx应用场景
-
虚拟主机:一台服务器虚拟出多个网站。
-
静态资源服务:提供http资源访问服务。
-
反向代理,负载均衡。当网站的访问量达到一定程度后,单台服务器不能满足用户的请求时,需要yo哪个多台服务器集群可以使用nginx做反向代理。并且多台服务器可以平均分担负载,不会因为某台服务器负载高宕机而某台服务器闲置的情况。
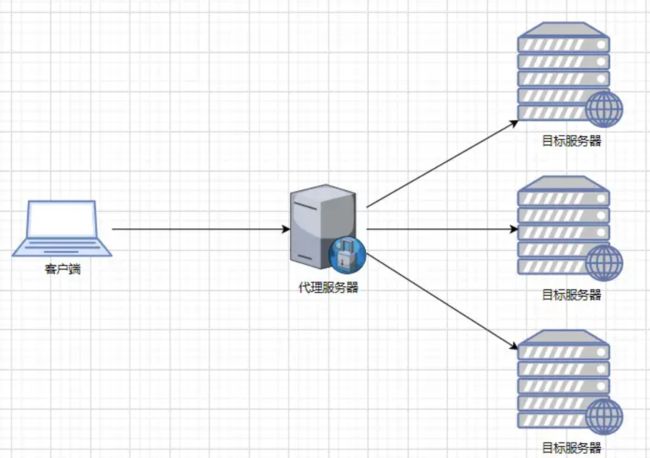
1.4 正向代理
正向代理:一般的访问流程是客户端直接向目标服务器发送请求并获取内容,使用正向代理后,客户端通过配置或其他方式改为向代理服务器发送请求,并指定目标服务器(原始服务器),然后由代理服务器和原始服务器通信,转交请求并获得的内容,再返回给客户端。正向代理隐藏了真实的客户端,为客户端收发请求,使真实客户端对服务器不可见;
疑问:是否可以认为在正向代理时,客户端将请求发送给代理服务器,代理服务器判断多个客户端请求如果是一样的,那么将所有相同的请求只发送一次给目标服务器,目标服务器返回数据后在通过代理服务器返回给客户端,这样是否可以做到减少服务器端的访问请求的压力?

1.5 反向代理
**反向代理:**正好相反。对于客户端来说,反向代理就好像目标服务器。并且客户端不需要进行任何设置。客户端向反向代理发送请求,接着反向代理判断请求走向何处,并将请求转交给客户端,使得这些内容就好像它自己的一样,一次客户端并会并会不感知到反向代理后面的服务,因此不需要客户端做任何设置,只需要把反向代理服务器当成真正的服务器就好了。
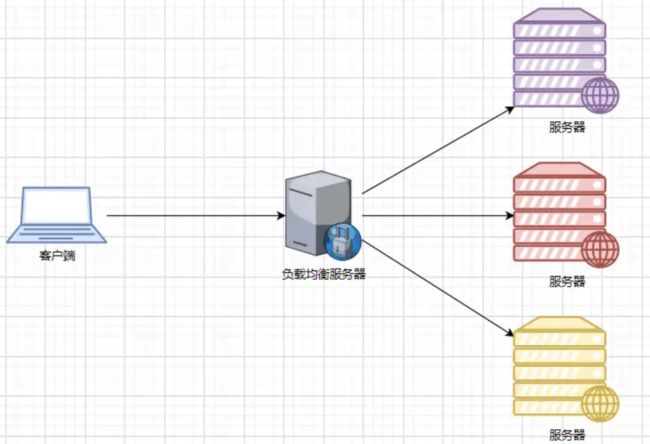
1.6 负载均衡
负载均衡建立在现有网络结构之上,它提供一种链家有效透明的方法扩展网络设备和服务器的宽带、增加吞吐量,加强网络数据处理能力,提高网络的灵活性和可用性。
1.7 动静分离
为了加快网站的解析速度,可以把动态页面和静态页面由不同的服务器来解析,加快解析速度,降低原来单个服务器的压力。一般来说,都需要将动态资源和静态资源分开,由于Nginx的高并发和静态资源缓存等特性,经常将静态资源部署在Nginx上。如果请求的是静态资源,直接到静态资源目录获取资源,如果是童泰资源的请求,则利用反向代理的原理,把请求转发给对应后台应用去处理,从而实现动静分离。
2、Nginx安装
2.1 安装所需环境
2.1.1 gcc 安装
安装 nginx 需要先将官网下载的源码进行编译,编译依赖 gcc 环境,如果没有 gcc 环境,则需要
安装:
yum install gcc-c++ -y

2.1.2 PCRE pcre-devel 安装
PCRE(Perl Compatible Regular Expressions) 是一个 Perl 库,包括 perl 兼容的正则表达式库。nginx
的 http 模块使用 pcre 来解析正则表达式,所以需要在 linux 上安装 pcre 库,pcre-devel 是使用
pcre 开发的一个二次开发库。nginx 也需要此库。
命令:
yum install -y pcre pcre-devel

2.1.3 zlib 安装
zlib 库提供了很多种压缩和解压缩的方式, nginx 使用 zlib 对 http 包的内容进行 gzip ,所以需要在 Centos 上安装 zlib 库。

yum install -y zlib zlib-devel

2.1.4 OpenSSL 安装
OpenSSL 是一个强大的安全套接字层密码库,囊括主要的密码算法、常用的密钥和证书封装管理功能及 SSL 协议,并提供丰富的应用程序供测试或其它目的使用。
nginx 不仅支持 http 协议,还支持 https(即在 ssl 协议上传输 http),所以需要在 Centos 安装OpenSSL 库。

yum install -y openssl openssl-devel

2.2.下载安装
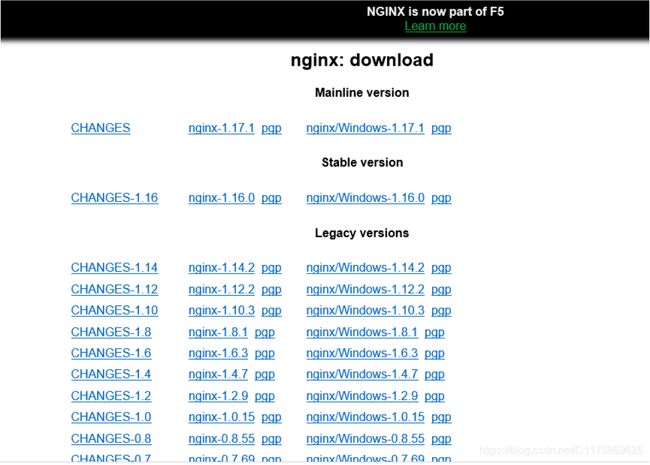
2.2.1 nginx官网下载
官网地址:http://nginx.org/en/download.html
直接下载 .tar.gz 安装包,地址:
2.2.2 淘宝网 nginx
也可以尝试使用 淘宝版本的 nginx ,Tengine 是淘宝在 nginx 基础上二次开发的产品,对于我们平时使用区别不大
地址:https://tengine.taobao.org/download_cn.html
2.2.3 使 用 命令下载(推荐)
# 版本按需求选择,复制安装包地址后直接下载即可
wget -c https://nginx.org/download/nginx-1.10.1.tar.gz

2.2.4 解压
tar -zxvf nginx-1.10.1.tar.gz
cd nginx-1.10.1

# nginx 解压后各文件目录作用,版本不同,是因为后期有修改
[root@master ~]# cd nginx-1.20.2
[root@master nginx-1.20.2]# ll
总用量 792
drwxr-xr-x 6 1001 1001    326 6月   5 22:19 auto			# 检测系统模块依赖信息
-rw-r--r-- 1 1001 1001 312251 11月 16 2021 CHANGES		# 存放nginx的变化记录日志
-rw-r--r-- 1 1001 1001 476577 11月 16 2021 CHANGES.ru
drwxr-xr-x 2 1001 1001    168 6月   5 22:19 conf			# nginx 主配置文件目录
-rwxr-xr-x 1 1001 1001   2590 11月 16 2021 configure		# 可执行脚本,用于释放编译文件的定制脚本
drwxr-xr-x 4 1001 1001     72 6月   5 22:19 contrib		# 提供vim等插件,让配置文件颜色区分,更友好
drwxr-xr-x 2 1001 1001     40 6月   5 22:19 html			# 存放了标准的HTML页面文件
-rw-r--r-- 1 1001 1001   1397 11月 16 2021 LICENSE
-rw-r--r-- 1 root root    438 6月   5 22:22 Makefile
drwxr-xr-x 2 1001 1001     21 6月   5 22:19 man
drwxr-xr-x 3 root root    174 6月   5 22:23 objs
-rw-r--r-- 1 1001 1001     49 11月 16 2021 README
drwxr-xr-x 9 1001 1001     91 6月   5 22:19 src			# 存放了 nginx 源代码的目录
2.3 编译安装
2.3.1 使用默认配置
./configure

make
make install
2.3.2 自定义配置
如果需要自定义配置信息,可以使用
./configure --help
查看各参数含义
# 参考(根据自己需求配置)
./configure \
--prefix= /usr/local/nginx \		# 指定安装目录
--conf-path=/usr/local/nginx/conf/nginx.conf \
--pid-path=/usr/local/nginx/conf/nginx.pid \
--lock-path=/var/lock/nginx.lock \
--error-log-path=/var/log/nginx/error.log \
--http-log-path=/var/log/nginx/access.log \
--with-http_gzip_static_module \	# 开启 gzip 功能模块
--http-client-body-temp-path=/var/temp/nginx/client \
--http-proxy-temp-path=/var/temp/nginx/proxy \
--http-fastcgi-temp-path=/var/temp/nginx/fastcgi \
--http-uwsgi-temp-path=/var/temp/nginx/uwsgi \
--http-scgi-temp-path=/var/temp/nginx/scgi
# 注:将临时文件目录指定为/var/temp/nginx,需要在/var 下创建 temp 及 nginx 目录
[root@master nginx-1.20.2]# ./configure --help

  --help                             print this message

  --prefix=PATH                      set installation prefix
  --sbin-path=PATH                   set nginx binary pathname
  --modules-path=PATH                set modules path
  --conf-path=PATH                   set nginx.conf pathname
  --error-log-path=PATH              set error log pathname
  --pid-path=PATH                    set nginx.pid pathname
  --lock-path=PATH                   set nginx.lock pathname

  --user=USER                        set non-privileged user for
                                     worker processes
  --group=GROUP                      set non-privileged group for
                                     worker processes

  --build=NAME                       set build name
  --builddir=DIR                     set build directory

  --with-select_module               enable select module
  --without-select_module            disable select module
  --with-poll_module                 enable poll module
  --without-poll_module              disable poll module

  --with-threads                     enable thread pool support

  --with-file-aio                    enable file AIO support

  --with-http_ssl_module             enable ngx_http_ssl_module
  --with-http_v2_module              enable ngx_http_v2_module
  --with-http_realip_module          enable ngx_http_realip_module
  --with-http_addition_module        enable ngx_http_addition_module
  --with-http_xslt_module            enable ngx_http_xslt_module
  --with-http_xslt_module=dynamic    enable dynamic ngx_http_xslt_module
  --with-http_image_filter_module    enable ngx_http_image_filter_module
  --with-http_image_filter_module=dynamic
                                     enable dynamic ngx_http_image_filter_module
  --with-http_geoip_module           enable ngx_http_geoip_module
  --with-http_geoip_module=dynamic   enable dynamic ngx_http_geoip_module
  --with-http_sub_module             enable ngx_http_sub_module
  --with-http_dav_module             enable ngx_http_dav_module
  --with-http_flv_module             enable ngx_http_flv_module
  --with-http_mp4_module             enable ngx_http_mp4_module
  --with-http_gunzip_module          enable ngx_http_gunzip_module
  --with-http_gzip_static_module     enable ngx_http_gzip_static_module
  --with-http_auth_request_module    enable ngx_http_auth_request_module
  --with-http_random_index_module    enable ngx_http_random_index_module
  --with-http_secure_link_module     enable ngx_http_secure_link_module
  --with-http_degradation_module     enable ngx_http_degradation_module
  --with-http_slice_module           enable ngx_http_slice_module
  --with-http_stub_status_module     enable ngx_http_stub_status_module

  --without-http_charset_module      disable ngx_http_charset_module
  --without-http_gzip_module         disable ngx_http_gzip_module
  --without-http_ssi_module          disable ngx_http_ssi_module
  --without-http_userid_module       disable ngx_http_userid_module
  --without-http_access_module       disable ngx_http_access_module
  --without-http_auth_basic_module   disable ngx_http_auth_basic_module
  --without-http_mirror_module       disable ngx_http_mirror_module
  --without-http_autoindex_module    disable ngx_http_autoindex_module
  --without-http_geo_module          disable ngx_http_geo_module
  --without-http_map_module          disable ngx_http_map_module
  --without-http_split_clients_module disable ngx_http_split_clients_module
  --without-http_referer_module      disable ngx_http_referer_module
  --without-http_rewrite_module      disable ngx_http_rewrite_module
  --without-http_proxy_module        disable ngx_http_proxy_module
  --without-http_fastcgi_module      disable ngx_http_fastcgi_module
  --without-http_uwsgi_module        disable ngx_http_uwsgi_module
  --without-http_scgi_module         disable ngx_http_scgi_module
  --without-http_grpc_module         disable ngx_http_grpc_module
  --without-http_memcached_module    disable ngx_http_memcached_module
  --without-http_limit_conn_module   disable ngx_http_limit_conn_module
  --without-http_limit_req_module    disable ngx_http_limit_req_module
  --without-http_empty_gif_module    disable ngx_http_empty_gif_module
  --without-http_browser_module      disable ngx_http_browser_module
  --without-http_upstream_hash_module
                                     disable ngx_http_upstream_hash_module
  --without-http_upstream_ip_hash_module
                                     disable ngx_http_upstream_ip_hash_module
  --without-http_upstream_least_conn_module
                                     disable ngx_http_upstream_least_conn_module
  --without-http_upstream_random_module
                                     disable ngx_http_upstream_random_module
  --without-http_upstream_keepalive_module
                                     disable ngx_http_upstream_keepalive_module
  --without-http_upstream_zone_module
                                     disable ngx_http_upstream_zone_module

  --with-http_perl_module            enable ngx_http_perl_module
  --with-http_perl_module=dynamic    enable dynamic ngx_http_perl_module
  --with-perl_modules_path=PATH      set Perl modules path
  --with-perl=PATH                   set perl binary pathname

  --http-log-path=PATH               set http access log pathname
  --http-client-body-temp-path=PATH  set path to store
                                     http client request body temporary files
  --http-proxy-temp-path=PATH        set path to store
                                     http proxy temporary files
  --http-fastcgi-temp-path=PATH      set path to store
                                     http fastcgi temporary files
  --http-uwsgi-temp-path=PATH        set path to store
                                     http uwsgi temporary files
  --http-scgi-temp-path=PATH         set path to store
                                     http scgi temporary files

  --without-http                     disable HTTP server
  --without-http-cache               disable HTTP cache

  --with-mail                        enable POP3/IMAP4/SMTP proxy module
  --with-mail=dynamic                enable dynamic POP3/IMAP4/SMTP proxy module
  --with-mail_ssl_module             enable ngx_mail_ssl_module
  --without-mail_pop3_module         disable ngx_mail_pop3_module
  --without-mail_imap_module         disable ngx_mail_imap_module
  --without-mail_smtp_module         disable ngx_mail_smtp_module

  --with-stream                      enable TCP/UDP proxy module
  --with-stream=dynamic              enable dynamic TCP/UDP proxy module
  --with-stream_ssl_module           enable ngx_stream_ssl_module
  --with-stream_realip_module        enable ngx_stream_realip_module
  --with-stream_geoip_module         enable ngx_stream_geoip_module
  --with-stream_geoip_module=dynamic enable dynamic ngx_stream_geoip_module
  --with-stream_ssl_preread_module   enable ngx_stream_ssl_preread_module
  --without-stream_limit_conn_module disable ngx_stream_limit_conn_module
  --without-stream_access_module     disable ngx_stream_access_module
  --without-stream_geo_module        disable ngx_stream_geo_module
  --without-stream_map_module        disable ngx_stream_map_module
  --without-stream_split_clients_module
                                     disable ngx_stream_split_clients_module
  --without-stream_return_module     disable ngx_stream_return_module
  --without-stream_set_module        disable ngx_stream_set_module
  --without-stream_upstream_hash_module
                                     disable ngx_stream_upstream_hash_module
  --without-stream_upstream_least_conn_module
                                     disable ngx_stream_upstream_least_conn_module
  --without-stream_upstream_random_module
                                     disable ngx_stream_upstream_random_module
  --without-stream_upstream_zone_module
                                     disable ngx_stream_upstream_zone_module

  --with-google_perftools_module     enable ngx_google_perftools_module
  --with-cpp_test_module             enable ngx_cpp_test_module

  --add-module=PATH                  enable external module
  --add-dynamic-module=PATH          enable dynamic external module

  --with-compat                      dynamic modules compatibility

  --with-cc=PATH                     set C compiler pathname
  --with-cpp=PATH                    set C preprocessor pathname
  --with-cc-opt=OPTIONS              set additional C compiler options
  --with-ld-opt=OPTIONS              set additional linker options
  --with-cpu-opt=CPU                 build for the specified CPU, valid values:
                                     pentium, pentiumpro, pentium3, pentium4,
                                     athlon, opteron, sparc32, sparc64, ppc64

  --without-pcre                     disable PCRE library usage
  --with-pcre                        force PCRE library usage
  --with-pcre=DIR                    set path to PCRE library sources
  --with-pcre-opt=OPTIONS            set additional build options for PCRE
  --with-pcre-jit                    build PCRE with JIT compilation support

  --with-zlib=DIR                    set path to zlib library sources
  --with-zlib-opt=OPTIONS            set additional build options for zlib
  --with-zlib-asm=CPU                use zlib assembler sources optimized
                                     for the specified CPU, valid values:
                                     pentium, pentiumpro

  --with-libatomic                   force libatomic_ops library usage
  --with-libatomic=DIR               set path to libatomic_ops library sources

  --with-openssl=DIR                 set path to OpenSSL library sources
  --with-openssl-opt=OPTIONS         set additional build options for OpenSSL

  --with-debug                       enable debug logging
2.4 查找安装路径
whereis nginx

2.5启动停止 Nginx
cd /usr/local/nginx/sbin/
./nginx
./nginx -s stop
./nginx -s quit
./nginx -s reload
# 注: ./nginx -s quit :此方式停止步骤是待 nginx 进程处理任务完毕进行停止。
# ./nginx -s stop :此方式相当于先查出 nginx 进程 id 再使用 kill 命令强制杀掉进程。
2.5.1查询 nginx 进程:
ps aux| grep nginx
2.5.2重启 nginx
先停止再启动(推荐) :
对 nginx 进行重启相当于先停止再启动,即先执行停止命令再执行启动命令。如下:
./nginx -s quit
./nginx
2.5.3重新加载配置文件:
#当 ngin x 的配置文件 nginx.conf 修改后,要想让配置生效需要重启 nginx,使用 -s reload 不用先停止 ngin x 再启动 nginx 即可将配置信息在 nginx 中生效
如下:
./nginx -s reload
2.6 配置环境变量
# 配置环境变量
vim /etc/profile
export PATH=$PATH:/usr/local/nginx/sbin/

# 或者在 /etc/profile.d 目录下增加 nginx.sh 文件
vim /etc/profile.d/nginx.sh
# 同样将环境变量加入进去
export PATH=$PATH:/usr/local/nginx/sbin/

# 使配置文件生效
source /etc/profile
# 这样就可以直接使用命令 nginx启动

# 启动nginx
nginx
# 关闭nginx
nginx -s stop

# 使用systemctl管理nginx,vim /usr/lib/systemd/system/nginx.service
[Unit]
Description=nginx
After=network.target
[Service]
Type=forking
ExecStart=/usr/local/nginx/sbin/nginx
[Install]
WantedBy=multi-user.target

# 重载systemd配置文件
systemctl daemon-reload
2.7 配置开机自启动
# 即在 rc.local 增加启动代码就可以了。
vi /etc/rc. local
# 增加一行 /usr/local/nginx/sbin/nginx
# 设置执行权限:
chmod 755 rc.local
3、nginx常用命令和配置文件
3.1 常用命令
#查看版本
在/usr/local/nginx/sbin 目录下执行 ./nginx -v

#启动nginx
在/usr/local/nginx/sbin 目录下执行 ./nginx

#关闭nginx
在/usr/local/nginx/sbin 目录下执行 ./nginx -s stop

#重加载nginx
在/usr/local/nginx/sbin 目录下执行 ./nginx -s reload


[root@master profile.d]# nginx -h
nginx version: nginx/1.20.2
Usage: nginx [-?hvVtTq] [-s signal] [-p prefix]
             [-e filename] [-c filename] [-g directives]

Options:
  -?,-h         : this help											# 输出 nginx 帮助信息
  -v            : show version and exit								# 列出 nginx 版本号
  -V            : show version and configure options then exit		# 列出 nginx 版本信息和编译参数信息(如果是默认配置可能是没有编译参数信息,自定义的会显示出来)
  -t            : test configuration and exit						# 检查 nginx 配置文件,修改完成后的语法是否正确
  -T            : test configuration, dump it and exit				# 检查 nginx 配置文件,输出配置信息
  -q            : suppress non-error messages during configuration testing		# 检测配置文件期间屏蔽非错误信息
  -s signal     : send signal to a master process: stop, quit, reopen, reload	# 给 nginx 主进程发送信号(stop 停止运行;quit 优雅的停止;reopen 重新记录 nginx 日志;reload 重载nginx服务)
  -p prefix     : set prefix path (default: /usr/local/nginx/)		# 设置 nginx 目录前缀
  -e filename   : set error log file (default: logs/error.log)		# 设置错误日志文件
  -c filename   : set configuration file (default: conf/nginx.conf)	# 指定配置文件启动(例:nginx -c /opt/www.conf)
  -g directives : set global directives out of configuration file	# 覆盖设置一些默认参数
3.2 配置文件详细讲解
#配置文件位置
位置:/usr/local/nginx/conf/nginx.conf

# 使用小技巧,一般在使用 vim 查看 nginx.conf 文件时,文件内容显示颜色不是特别明显,这里可以进行如下操作
mkdir ~/.vim	# 在根目录下创建一个 .vim 文件
cp -r nginx-1.20.2/contrib/vim/* ~/.vim		# 将 nginx 解压文件中的 contrib/vim/* 文件全部 copy 到我们创建的 .vim 文件中,这时再去查看 nginx.conf 文件颜色则会有更多的高亮显示
######Nginx配置文件nginx.conf中文详解#####
# 定义Nginx运行的用户和用户组
user www www;
# nginx进程数,建议设置为等于CPU总核心数。
worker_processes 8;
# 全局错误日志定义类型,[ debug | info | notice | warn | error | crit ]
# 默认是 error 级别
error_log /usr/local/nginx/logs/error.log info;
# 进程pid文件
pid /usr/local/nginx/logs/nginx.pid;
# 指定进程可以打开的最大描述符:数目
# 工作模式与连接数上限
# 这个指令是指当一个nginx进程打开的最多文件描述符数目,理论值应该是最多打开文件数(ulimit -n)与nginx进程数相除,但是nginx分配请求并不是那么均匀,所以最好与ulimit -n 的值保持一致。
# 现在在linux 2.6内核下开启文件打开数为65535,worker_rlimit_nofile就相应应该填写65535。
# 这是因为nginx调度时分配请求到进程并不是那么的均衡,所以假如填写10240,总并发量达到3-4万时就有进程可能超过10240了,这时会返回502错误。
worker_rlimit_nofile 65535;
events
{
# 参考事件模型,use [ kqueue | rtsig | epoll | /dev/poll | select | poll ]; epoll模型
# 是Linux 2.6以上版本内核中的高性能网络I/O模型,linux建议epoll,如果跑在FreeBSD上面,就用kqueue模型。
# 补充说明:
# 与apache相类,nginx针对不同的操作系统,有不同的事件模型
# A)标准事件模型
# Select、poll属于标准事件模型,如果当前系统不存在更有效的方法,nginx会选择select或poll
# B)高效事件模型
# Kqueue:使用于FreeBSD 4.1+, OpenBSD 2.9+, NetBSD 2.0 和 MacOS X.使用双处理器的MacOS X系统使用kqueue可能会造成内核崩溃。
# Epoll:使用于Linux内核2.6版本及以后的系统。
# /dev/poll:使用于Solaris 7 11/99+,HP/UX 11.22+ (eventport),IRIX 6.5.15+ 和 Tru64 UNIX 5.1A+。
# Eventport:使用于Solaris 10。 为了防止出现内核崩溃的问题, 有必要安装安全补丁。
use epoll;
# 单个进程最大连接数(最大连接数=连接数*进程数)
# 根据硬件调整,和前面工作进程配合起来用,尽量大,但是别把cpu跑到100%就行。每个进程允许的最多连接数,理论上每台nginx服务器的最大连接数为。
worker_connections 65535;
# keepalive超时时间。
keepalive_timeout 60;
# 客户端请求头部的缓冲区大小。这个可以根据你的系统分页大小来设置,一般一个请求头的大小不会超过1k,不过由于一般系统分页都要大于1k,所以这里设置为分页大小。
# 分页大小可以用命令getconf PAGESIZE 取得。
# [root@web001 ~]# getconf PAGESIZE
# 4096
# 但也有client_header_buffer_size超过4k的情况,但是client_header_buffer_size该值必须设置为“系统分页大小”的整倍数。
client_header_buffer_size 4k;
# 这个将为打开文件指定缓存,默认是没有启用的,max指定缓存数量,建议和打开文件数一致,inactive是指经过多长时间文件没被请求后删除缓存。
open_file_cache max=65535 inactive=60s;
# 这个是指多长时间检查一次缓存的有效信息。
# 语法:open_file_cache_valid time 默认值:open_file_cache_valid 60 使用字段:http, server, location 这个指令指定了何时需要检查open_file_cache中缓存项目的有效信息.
open_file_cache_valid 80s;
# open_file_cache指令中的inactive参数时间内文件的最少使用次数,如果超过这个数字,文件描述符一直是在缓存中打开的,如上例,如果有一个文件在inactive时间内一次没被使用,它将被移除。
# 语法:open_file_cache_min_uses number 默认值:open_file_cache_min_uses 1 使用字段:http, server, location 这个指令指定了在open_file_cache指令无效的参数中一定的时间范围内可以使用的最小文件数,如果使用更大的值,文件描述符在cache中总是打开状态.
open_file_cache_min_uses 1;
# 语法:open_file_cache_errors on | off 默认值:open_file_cache_errors off 使用字段:http, server, location 这个指令指定是否在搜索一个文件是记录cache错误.
open_file_cache_errors on;
}
# 设定http服务器,利用它的反向代理功能提供负载均衡支持
http
{
# 文件扩展名与文件类型映射表
include mime.types;
# 默认文件类型
default_type application/octet-stream;
# 默认编码
#charset utf-8;
# 服务器名字的hash表大小
# 保存服务器名字的hash表是由指令 server_names_hash_max_size 和 server_names_hash_bucket_size 所控制的。
# 参数 hash bucket size 总是等于 hash 表的大小,并且是一路处理器缓存大小的倍数。在减少了在内存中的存取次数后,使在处理器中加速查找 hash 表键值成为可能。
# 如果 hash bucket size 等于一路处理器缓存的大小,那么在查找键的时候,最坏的情况下在内存中查找的次数为2。第一次是确定存储单元的地址,第二次是在存储单元中查找键值。
# 因此,如果 Nginx 给出需要增大 hash max size 或 hash bucket size 的提示,那么首要的是增大前一个参数的大小.
server_names_hash_bucket_size 128;
# 客户端请求头部的缓冲区大小。这个可以根据你的系统分页大小来设置,一般一个请求的头部大小不会超过1k,不过由于一般系统分页都要大于1k,所以这里设置为分页大小。分页大小可以用命令getconf PAGESIZE取得。
client_header_buffer_size 32k;
# 客户请求头缓冲大小。nginx 默认会用 client_header_buffer_size 这个 buffer 来读取 header值,如果 header 过大,它会使用 large_client_header_buffers 来读取。
large_client_header_buffers 4 64k;
# 设定通过 nginx 上传文件的大小
client_max_body_size 8m;
# 开启高效文件传输模式
# sendfile 指令指定 nginx 是否调用 sendfile 函数来输出文件,对于普通应用设为 on,如果用来进行下载等应用磁盘IO重负载应用,可设置为off,以平衡磁盘与网络I/O处理速度,降低系统的负载。
# 注意:如果图片显示不正常把这个改成off。
#sendfile指令指定 nginx 是否调用sendfile 函数(zero copy 方式)来输出文件,对于普通应用,必须设为on。如果用来进行下载等应用磁盘IO重负载应用,可设置为off,以平衡磁盘与网络IO处理速度,降低系统uptime。
sendfile on;
# 开启目录列表访问,合适下载服务器,默认关闭。
autoindex on;
# 此选项允许或禁止使用 socke 的 TCP_CORK 的选项,此选项仅在使用 sendfile 的时候使用
tcp_nopush on;
tcp_nodelay on;
# 长连接超时时间,单位是秒
keepalive_timeout 120;
# FastCGI相关参数是为了改善网站的性能:减少资源占用,提高访问速度。下面参数看字面意思都能理解。
fastcgi_connect_timeout 300;
fastcgi_send_timeout 300;
fastcgi_read_timeout 300;
fastcgi_buffer_size 64k;
fastcgi_buffers 4 64k;
fastcgi_busy_buffers_size 128k;
fastcgi_temp_file_write_size 128k;
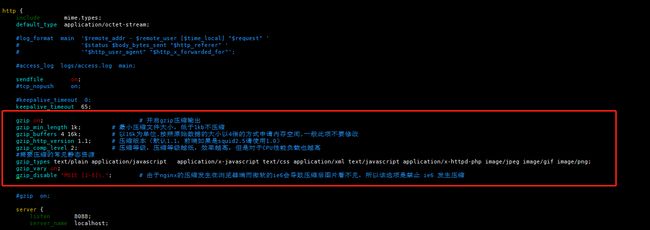
# gzip模块设置
gzip on; # 开启gzip压缩输出
gzip_min_length 1k; # 最小压缩文件大小,低于1kb不压缩
gzip_buffers 4 16k; # 以16k为单位,按照原始数据的大小以4倍的方式申请内存空间,一般此项不要修改
gzip_http_version 1.1; # 压缩版本(默认1.1,前端如果是squid2.5请使用1.0)
gzip_comp_level 2; # 压缩等级,压缩等级越低,效率越高,但是对于CPU性能负载也越高
# 需要压缩的常见静态资源
gzip_types text/plain application/javascript application/x-javascript text/css application/xml text/javascript application/x-httpd-php image/jpeg image/gif image/png;
gzip_vary on;
gzip_disable "MSIE [1-6]\."; # 由于nginx的压缩发生在浏览器端而微软的ie6会导致压缩后图片看不见,所以该选项是禁止 ie6 发生压缩
# 开启限制IP连接数的时候需要使用
#limit_zone crawler $binary_remote_addr 10m;
# 负载均衡配置
upstream jh.w3cschool.cn {
# upstream 的负载均衡,weight 是权重,可以根据机器配置定义权重。weigth 参数表示权值,权值越高被分配到的几率越大。
server 192.168.80.121:80 weight=3;
server 192.168.80.122:80 weight=2;
server 192.168.80.123:80 weight=3;
# nginx 的 upstream 目前支持4种方式的分配
# 1、轮询(默认)
# 每个请求按时间顺序逐一分配到不同的后端服务器,如果后端服务器 down 掉,能自动剔除。
# 2、weight
# 指定轮询几率,weight 和访问比率成正比,用于后端服务器性能不均的情况。
# 例如:
# upstream bakend {
# server 192.168.0.14 weight=10;
# server 192.168.0.15 weight=10;
# }
# 2、ip_hash
# 每个请求按访问 ip 的 hash 结果分配,这样每个访客固定访问一个后端服务器,可以解决 session 的问题。
# 例如:
# upstream bakend {
# ip_hash;
# server 192.168.0.14:88;
# server 192.168.0.15:80;
# }
# 3、fair(第三方)
# 按后端服务器的响应时间来分配请求,响应时间短的优先分配。
# upstream backend {
# server server1;
# server server2;
# fair;
# }
# 4、url_hash(第三方)
# 按访问 url 的 hash 结果来分配请求,使每个 url 定向到同一个后端服务器,后端服务器为缓存时比较有效。
# 例:在 upstream 中加入 hash 语句,server 语句中不能写入 weight 等其他的参数,hash_method 是使用的 hash 算法
# upstream backend {
# server squid1:3128;
# server squid2:3128;
# hash $request_uri;
# hash_method crc32;
#}
# tips:
# upstream bakend {#定义负载均衡设备的Ip及设备状态}{
# ip_hash;
# server 127.0.0.1:9090 down;
# server 127.0.0.1:8080 weight=2;
# server 127.0.0.1:6060;
# server 127.0.0.1:7070 backup;
# }
# 在需要使用负载均衡的server中增加 proxy_pass http://bakend/;
# 每个设备的状态设置为:
# 1.down 表示单前的 server 暂时不参与负载
# 2.weight 为 weight 越大,负载的权重就越大。
# 3.max_fails:允许请求失败的次数默认为1.当超过最大次数时,返回 proxy_next_upstream 模块定义的错误
# 4.fail_timeout:max_fails次失败后,暂停的时间。
# 5.backup:其它所有的非 backup 机器 down 或者忙的时候,请求 backup 机器。所以这台机器压力会最轻。
# nginx支持同时设置多组的负载均衡,用来给不用的 server 来使用。
# client_body_in_file_on ly设置为 On 可以讲 client post 过来的数据记录到文件中用来做 debug
# client_body_temp_path 设置记录文件的目录 可以设置最多3层目录
# location 对 URL 进行匹配.可以进行重定向或者进行新的代理 负载均衡
}
# 虚拟主机的配置
server
{
# 监听端口,也是用户访问网站的入口
listen 80;
# 域名可以有多个,用空格隔开
server_name www.mondaygarden.cn mondaygarden.cn;
index index.html index.htm index.php;
root /data/www/w3cschool;
# 对******进行负载均衡
location ~ .*.(php|php5)?$
{
fastcgi_pass 127.0.0.1:9000;
fastcgi_index index.php;
include fastcgi.conf;
}
# 图片缓存时间设置
location ~ .*.(gif|jpg|jpeg|png|bmp|swf)$
{
expires 10d;
}
# JS 和 CSS 缓存时间设置
location ~ .*.(js|css)?$
{
expires 1h;
}
log_format access # 定义日志内容格式(记录内容详细程度)
$remote_addr # 用以记录客户端的 ip 地址; 192.168.169.1
$http_x_forwarded_for # 当用户使用代理 ip 访问时,使用这个参数可以获取代理 ip 后面的真实 ip地址
$remote_user # 用来记录客户端用户名称; -
$time_local # 用来记录访问时间与时区; [07/Jun/2022:11:42:40 +0800]
$request # 用来记录请求的 url 与 http 协议; "GET / HTTP/1.1"
$status # 用来记录请求状态;成功是200, 304
$body_bytes_sent # 记录发送给客户端的响应体数据字节的大小; 0
$http_referer # 用来记录从那个页面链接访问过来的; -
$http_user_agent # 记录客户端访问信息,如浏览器的相关信息,手机浏览器相关信息;
# 通常web服务器放在反向代理的后面,这样就不能获取到客户的IP地址了,通过 $remote_add 拿到的 IP 地址是反向代理服务器的 iP 地址。
# 反向代理服务器在转发请求的 http 头信息中,可以增加 x_forwarded_for 信息,用以记录原有客户端的 IP 地址和原来客户端的请求的服务器地址。
log_format access '$remote_addr - $remote_user [$time_local] "$request" '
'$status $body_bytes_sent "$http_referer" '
'"$http_user_agent" $http_x_forwarded_for';
示例:
192.168.169.1 - - [07/Jun/2022:11:42:40 +0800] "GET / HTTP/1.1" 304 0 "-" "Mozilla/5.0 (Windows NT 10.0; Win64; x64) AppleWebKit/537.36 (KHTML, like Gecko) Chrome/101.0.4951.54 Safari/537.36"
# 定义本虚拟主机的访问日志
access_log /usr/local/nginx/logs/host.access.log main;
access_log /usr/local/nginx/logs/host.access.404.log log404;
# 对 "/" 启用反向代理
location / {
proxy_pass http://127.0.0.1:88;
proxy_redirect off;
proxy_set_header X-Real-IP $remote_addr;
# 后端的 Web 服务器可以通过 X-Forwarded-For 获取用户真实 IP
proxy_set_header X-Forwarded-For $proxy_add_x_forwarded_for;
# 以下是一些反向代理的配置,可选。
proxy_set_header Host $host;
# 允许客户端请求的最大单文件字节数
client_max_body_size 10m;
# 缓冲区代理缓冲用户端请求的最大字节数,
# 如果把它设置为比较大的数值,例如256k,那么,无论使用 firefox 还是 IE浏览器,来提交任意小于256k的图片,都很正常。
# 如果注释该指令,使用默认的 client_body_buffer_size 设置,也就是操作系统页面大小的两倍,8k或者16k,问题就出现了。
# 无论使用 firefox4.0 还是 IE8.0,提交一个比较大,200k左右的图片,都返回500 Internal Server Error错误
client_body_buffer_size 128k;
# 表示使 nginx 阻止 HTTP 应答代码为400或者更高的应答。
proxy_intercept_errors on;
# 后端服务器连接的超时时间_发起握手等候响应超时时间
# nginx跟后端服务器连接超时时间(代理连接超时)
proxy_connect_timeout 90;
# 后端服务器数据回传时间(代理发送超时)
# 后端服务器数据回传时间_就是在规定时间之内后端服务器必须传完所有的数据
proxy_send_timeout 90;
# 连接成功后,后端服务器响应时间(代理接收超时)
# 连接成功后_等候后端服务器响应时间_其实已经进入后端的排队之中等候处理(也可以说是后端服务器处理请求的时间)
proxy_read_timeout 90;
# 设置代理服务器(nginx)保存用户头信息的缓冲区大小
# 设置从被代理服务器读取的第一部分应答的缓冲区大小,通常情况下这部分应答中包含一个小的应答头,
# 默认情况下这个值的大小为指令proxy_buffers中指定的一个缓冲区的大小,不过可以将其设置为更小
proxy_buffer_size 4k;
# proxy_buffers 缓冲区,网页平均在32k以下的设置
# 设置用于读取应答(来自被代理服务器)的缓冲区数目和大小,默认情况也为分页大小,根据操作系统的不同可能是4k或者8k
proxy_buffers 4 32k;
# 高负荷下缓冲大小(proxy_buffers*2)
proxy_busy_buffers_size 64k;
# 设置在写入 proxy_temp_path 时数据的大小,预防一个工作进程在传递文件时阻塞太长
# 设定缓存文件夹大小,大于这个值,将从 upstream 服务器传
proxy_temp_file_write_size 64k;
}
# 设定查看Nginx状态的地址
location /NginxStatus {
stub_status on;
access_log on;
auth_basic "NginxStatus"; # 开启 nginx 认证
auth_basic_user_file confpasswd; # 配置认证账号密码文件
# htpasswd文件的内容可以用apache提供的htpasswd工具来产生。
}
# 本地动静分离反向代理配置
# 所有 jsp 的页面均交由 tomcat 或 resin 处理
location ~ .(jsp|jspx|do)?$ {
proxy_set_header Host $host;
proxy_set_header X-Real-IP $remote_addr;
proxy_set_header X-Forwarded-For $proxy_add_x_forwarded_for;
proxy_pass http://127.0.0.1:8080;
}
# 所有静态文件由 nginx 直接读取不经过 tomcat 或 resin
location ~ .*.(htm|html|gif|jpg|jpeg|png|bmp|swf|ioc|rar|zip|txt|flv|mid|doc|ppt|
pdf|xls|mp3|wma)$
{
expires 15d;
}
location ~ .*.(js|css)?$
{
expires 1h;
}
}
}
3.3 配置多个 .conf 文件
# nginx 配置多个 .conf 文件
# 可以在 nginx.conf 同级文件中创建一个 conf_file 文件夹,然后在 conf_file 这个目录下添加各种 .conf 配置文件
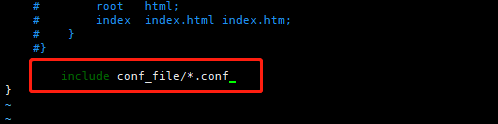
# 在 nginx.conf 配置文件最后使用 include 命令将 conf_file 文件中的 .conf 文件引用进来
mkdir /usr/local/nginx/conf/conf_file
cd /usr/local/nginx/conf/conf_file
touch www.conf
touch abc.conf
vim //usr/local/nginx/conf/nginx.conf
include conf_file/*.conf
3.4 nginx.conf 重要的指令块
- server{} 指令块,对应一个站点配置,反向代理,静态资源站点
- localhost{} 对应一个 url 地址
- upstream{} 定义上游服务,负载均衡
3.5 nginx-master 信号传递
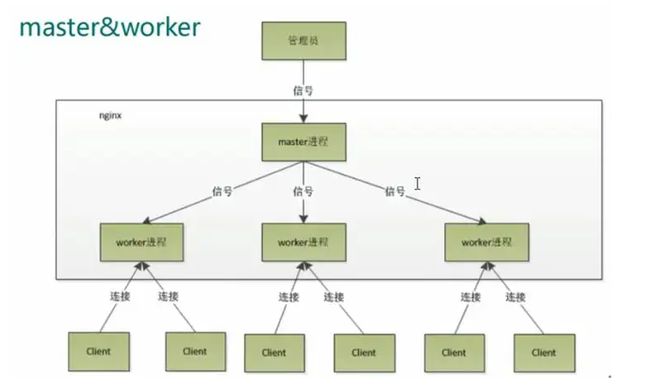
1.master 主进程是不处理请求的,而是分配请求给 worker 进程,主进程负责重启,热加载,热部署等
2.master 是根据 nginx.conf 配置文件中 worker_process 定义启动时创建的 worker 进程数
3.当 worker 进程运行后,master 就处于一个等待状态,等待用户的请求,或者系统信号
3.6 nginx 信号集
nginx -s 对应的信号功能如下:

参数		信号		含义
stop	 TERM	   强制关闭 nginx 服务
null	 INT	   强制关闭整个 nginx 服务
quit	 QUIT	   优雅的关闭整个服务
reopen	 USR1	   重新打开日志记录
reload	 HUB	   重新读取配置文件,并且优雅的退出旧的 worker
4. Nginx 热部署
特点:
	1)在不重启或者关闭进程的情况下,使用新的应用直接替换旧的应用
	   例如:更换 nginx 的二进制命令版本(即升级或者降级 nginx 版本)
	2)在不影响用户体验的情况下,进行版本升级或者降级,不主动 kill worker,就能够更换软件的二进制命令
4.1.检查当前所用的nginx版本
# 热部署流程
[root@nginx ~]# nginx -v
nginx version: nginx/1.20.2
4.2 检查旧的二进制命令编译参数
# 要保证新的二进制命令模块和旧的一样,不然更换版本之后如果不一致则很多模块不能使用
[root@nginx ~]# nginx -V	# 这里是 大写的 V
nginx version: nginx/1.20.2
built by gcc 4.8.5 20150623 (Red Hat 4.8.5-44) (GCC)
configure arguments:
4.3 备份当前 nginx 二进制命令
mv /usr/local/nginx/sbin/nginx /usr/local/nginx/sbin/nginx-1202
4.4 下载一个新版本
wget http://nginx.org/download/nginx-1.18.0.tar.gz
# 解压缩
tar -zxvf nginx-1.18.0.tar.gz
4.5 编译安装
cd nginx-1.18.0

./configure		# 注意这里要和之前版本编译的命令参数一致,默认安装则不用参数
make
make install
4.6 检查新安装的 nginx
# 这时就有两个版本的 nginx 命令
[root@nginx nginx-1.18.0]# ls /usr/local/nginx/sbin/
nginx  nginx-1202

[root@nginx sbin]# nginx -v
nginx version: nginx/1.18.0
[root@nginx sbin]# nginx-1202 -v
nginx version: nginx/1.20.2
4.7 检查当前 nginx 运行状态
[root@nginx sbin]# ps -ef | grep nginx
root       5447      1  0 08:49 ?        00:00:00 nginx: master process ./nginx
nobody     8687   5447  0 12:25 ?        00:00:00 nginx: worker process
root      11447   8833  0 15:26 pts/0    00:00:00 grep --color=auto nginx
4.8 停止旧版本
# 此时发送一个 USR2 信号给旧的 master process,作用是使得 nginx 旧的版本停止接受用户请求,并且切换成新的 nginx 版本
kill -USR2 `cat /usr/local/nginx/logs/nginx.pid `

# 当执行完毕上述命令,旧的 master process,首先会重命名它的 pid 文件,添加上.oldbin后缀;
[root@nginx ~]# ls /usr/local/nginx/logs/
access.log  error.log  nginx.pid  nginx.pid.oldbin
# 然后再自动启动一个新的 master 主进程,以及 worker,使用的是新版本的 nginx 二进制文件
# 此时新的 nginx 就能够自动接受用户发来的请求,过度到新的 nginx-worker 进程上
4.9 再次查看新的 nginx 状态
[root@nginx ~]# ps -ef | grep nginx
root       5447      1  0 08:49 ?        00:00:00 nginx: master process ./nginx
nobody     8687   5447  0 12:25 ?        00:00:00 nginx: worker process
root      11455   5447  0 15:31 ?        00:00:00 nginx: master process ./nginx	# 这里新的 nginx 进程,它的父进程 id 就是之前旧的 nginx 的进程 id
nobody    11456  11455  0 15:31 ?        00:00:00 nginx: worker process
root      11458   8833  0 15:31 pts/0    00:00:00 grep --color=auto nginx
4.10 退出旧版本 master
# 发送 WINCH 信号给旧的 master 进程,让旧的 master 进程优雅的退出
kill -WINCH `cat /usr/local/nginx/logs/nginx.pid.oldbin `
4.11 再次查看 nginx 状态
[root@nginx ~]# ps -ef | grep nginx
# 这时候旧的 nginx 下就没有 worker 进程了,旧的 master 不会自己退出,当新的 master 有问题时,可以直接回滚到旧的 master 上使用
root       5447      1  0 08:49 ?        00:00:00 nginx: master process ./nginx
root      11455   5447  0 15:31 ?        00:00:00 nginx: master process ./nginx
nobody    11456  11455  0 15:31 ?        00:00:00 nginx: worker process
root      11465   8833  0 15:41 pts/0    00:00:00 grep --color=auto nginx
如果出现发送kill -USR2信号后,未出现新的master进程
是因为:旧的nginx必须用绝对路径启动,然后再发送USR2信号
4.12 删除旧进程
# 使用一段时间之后如果觉得 nginx 服务一切正常,就可以 kill 旧的 master主进程了
kill -9 `cat /usr/local/nginx/logs/nginx.pid.oldbin `
[root@nginx ~]# ps -ef | grep nginx
root      11455      1  0 15:31 ?        00:00:00 nginx: master process ./nginx
nobody    11456  11455  0 15:31 ?        00:00:00 nginx: worker process
root      11471   8833  0 15:44 pts/0    00:00:00 grep --color=auto nginx
5. Nginx 日志切割
切割 Nginx 日志文件(防止单个文件过大,后期处理很困难)
切割日志也方便对日志进行分析
# 查看当前日志信息
[root@nginx ~]# ll -h /usr/local/nginx/logs/
总用量 23M
-rw-r--r-- 1 root root  20M 6月   6 16:35 access.log		# 访问信息都在这里
-rw-r--r-- 1 root root 2.1M 6月   6 16:33 error.log
-rw-r--r-- 1 root root    6 6月   6 15:31 nginx.pid
-rw-r--r-- 1 root root    5 6月   5 22:24 nginx.pid.oldbin
# 可以使用 ab 命令测试访问
ab -kc 1000 -n 100000 http://127.0.0.1:8088/
说明:
	-n [num]    总的执行次数
	-c [num]    每次执行次数
	-k 启用HTTP KeepAlive功能,即, 在一个HTTP会话中执行多个请求。 默认时,不启用KeepAlive功能.
	http://127.0.0.1:8088/	访问对象,注意最后的 / 要加上,不然它不知道访问地址是什么
# 新建一个存放脚本的目录
mkdir /usr/local/nginx/logs/scripts
# 编写脚本
vim /usr/local/nginx/logs/scripts/cut_nginx_log.sh

# 使用脚本进行切割
#!/bin/bash
logs_path="/usr/local/nginx/logs/"
# 将旧文件备份
mv ${logs_path}access.log ${logs_path}access_$(date -d "yesterday" +"%Y%m%d").log
# 发送信号给 nginx 主进程,给他发送一个重新打开的信号,让 nginx 重新生成日志文件
# nginx -s reopen	这个命令和下面 kill -USR1 pid
kill -USR1  `cat /usr/local/nginx/logs/nginx.pid`
# 修改脚本权限
chmod +x  /usr/local/nginx/logs/scripts/cut_nginx_log.sh
# crontab -e	脚本写完后,将脚本放入计划任务每天执行一次脚本,每天凌晨一点执行
0  1  *  *   *   /bin/bash /usr/local/nginx/logs/scripts/cut_nginx_log.sh
# 手动执行脚本测试
sh cut_nginx_log.sh
[root@nginx logs]# ll -h
总用量 23M
-rw-r--r-- 1 root   root  20M 6月   6 16:35 access_20220605.log
-rw-r--r-- 1 nobody root    0 6月   6 17:01 access.log
-rw-r--r-- 1 nobody root 2.1M 6月   6 16:33 error.log
-rw-r--r-- 1 root   root    6 6月   6 15:31 nginx.pid
-rw-r--r-- 1 root   root    5 6月   5 22:24 nginx.pid.oldbin
drwxr-xr-x 2 root   root   30 6月   6 17:00 script
6. Nginx虚拟主机
虚拟主机使用的是特殊的软硬件技术,它把一台运行在因特网上的服务器主机分成一台台“虚拟”的主机,每台虚拟主机都可以是一个独立的网站,可以具有独立的域名,
具有完整的Intemet服务器功能(WWW、FTP、Email等),同一台主机上的虚拟主机之间是完全独立的。从网站访问者来看,每一台虚拟主机和一台独立的主机完全一样。
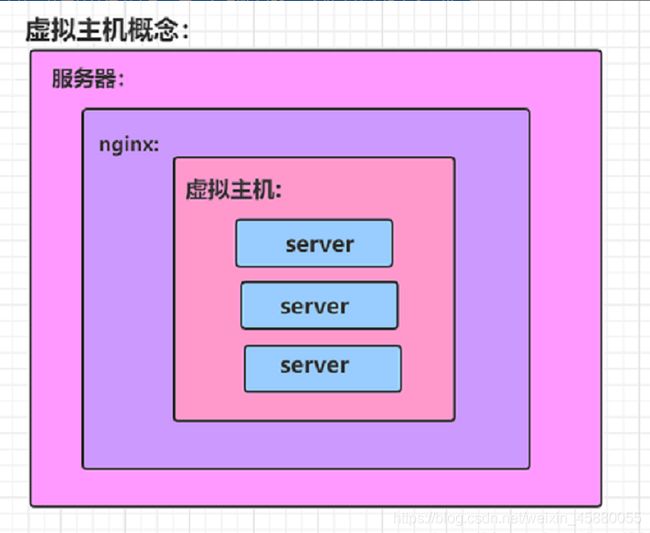
nginx 支持多虚拟机,可以在一台机器上同时运行多个网站个功能
nginx 的多虚拟机,可以基于:
基于域名的虚拟主机 : 不同的域名、相同的IP(此方式应用最广泛)
基于端口的虚拟主机 : 不使用域名、IP来区分不同站点的内容,而是用不同的TCP端口号
基于IP地址的虚拟主机 : 不同的域名、不同的IP ( 需要加网络接口 ,应用的不广泛) 基于IP地址
6.1 nginx 单虚拟主机配置
6.1.1 静态网站的搭建
# 在 nginx.conf 配置文件中定义虚拟主机
http{
	# 配置一个 server{} 标签就可以理解是一个虚拟机站点,配置 N 个就代表有 N 个站点
	# server{} 默认加载顺序是自上而下的匹配规则(前提是如果没有其他定义的情况下,如基于域名的匹配,基于端口的匹配)
	server{

	}
	# 编写第二个
	server{

	}
}


server {
		# 定义虚拟主机站点端口号,也是用户访问网站的入口
        listen       8088;
        # 域名配置,没有域名可以写 localhost 或者 _
     	# 过个域名之间使用空格隔开
     	# server_name www.mondaygarden.com www.baidu.com
        server_name  localhost;

		# 定义网站编码
        charset utf-8;

        #access_log  logs/host.access.log  main;

		# nginx 的路径匹配规则
		# 如下的规则是最低级匹配,任何 nginx 请求都会进入如下 localhost 的配置,去他所定义的路径下查找内容
        location / {
        	# 这个 root 是定义网页根目录的,这个 html 是以 nginx 安装的路径相对的
            root   html;
            # index关键词,定义 nginx 的首页文件名,默认在访问 nginx 根目录下时去访问这个文件
            index  index.html index.htm;
        }

        #error_page  404              /404.html;

        # redirect server error pages to the static page /50x.html
        #
        error_page   500 502 503 504  /50x.html;
        location = /50x.html {
            root   html;
        }

        # proxy the PHP scripts to Apache listening on 127.0.0.1:80
        #
        #location ~ \.php$ {
        #    proxy_pass   http://127.0.0.1;
        #}

        # pass the PHP scripts to FastCGI server listening on 127.0.0.1:9000
        #
        #location ~ \.php$ {
        #    root           html;
        #    fastcgi_pass   127.0.0.1:9000;
        #    fastcgi_index  index.php;
        #    fastcgi_param  SCRIPT_FILENAME  /scripts$fastcgi_script_name;
        #    include        fastcgi_params;
        #}

        # deny access to .htaccess files, if Apache's document root
        # concurs with nginx's one
        #
        #location ~ /\.ht {
        #    deny  all;
        #}
    }
6.2 案例1:多网卡多IP配置虚拟主机
6.2.1 增加一块网卡
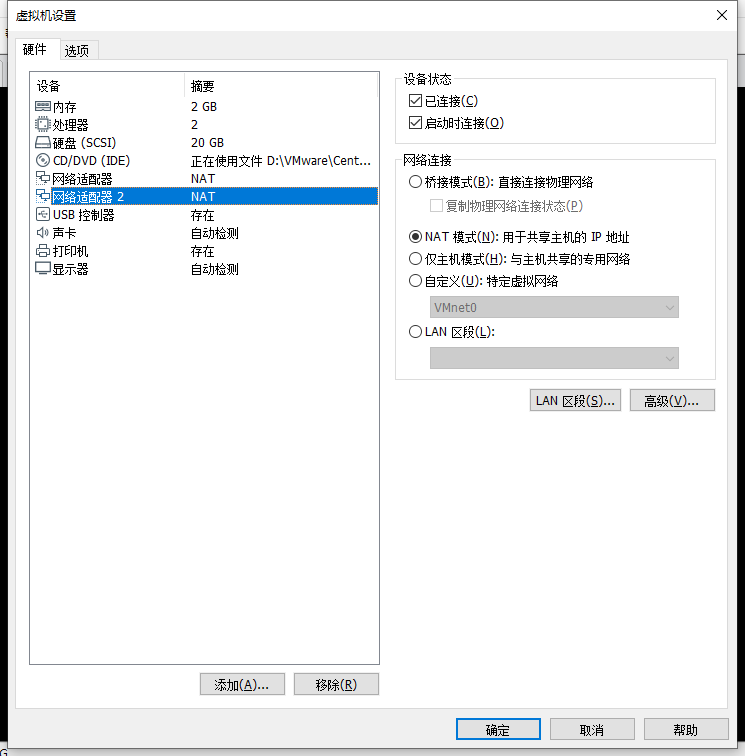
# 查看 ip 地址
[root@nginx ~]# ifconfig
ens33: flags=4163<UP,BROADCAST,RUNNING,MULTICAST>  mtu 1500
        inet 192.168.169.152  netmask 255.255.255.0  broadcast 192.168.169.255
        inet6 fe80::b824:f1be:b7d:9555  prefixlen 64  scopeid 0x20<link>
        ether 00:0c:29:b1:2e:fe  txqueuelen 1000  (Ethernet)
        RX packets 91871  bytes 92509486 (88.2 MiB)
        RX errors 0  dropped 0  overruns 0  frame 0
        TX packets 34112  bytes 39677157 (37.8 MiB)
        TX errors 0  dropped 0 overruns 0  carrier 0  collisions 0

ens37: flags=4163<UP,BROADCAST,RUNNING,MULTICAST>  mtu 1500
        inet 192.168.169.137  netmask 255.255.255.0  broadcast 192.168.169.255
        inet6 fe80::6225:5b3c:6a17:dc90  prefixlen 64  scopeid 0x20<link>
        ether 00:0c:29:b1:2e:08  txqueuelen 1000  (Ethernet)
        RX packets 7  bytes 986 (986.0 B)
        RX errors 0  dropped 0  overruns 0  frame 0
        TX packets 11  bytes 1434 (1.4 KiB)
        TX errors 0  dropped 0 overruns 0  carrier 0  collisions 0

lo: flags=73<UP,LOOPBACK,RUNNING>  mtu 65536
        inet 127.0.0.1  netmask 255.0.0.0
        inet6 ::1  prefixlen 128  scopeid 0x10<host>
        loop  txqueuelen 1000  (Local Loopback)
        RX packets 1116266  bytes 280663165 (267.6 MiB)
        RX errors 0  dropped 0  overruns 0  frame 0
        TX packets 1116266  bytes 280663165 (267.6 MiB)
        TX errors 0  dropped 0 overruns 0  carrier 0  collisions 0
6.2.2 编辑配置文件,基于每个IP创建一个虚拟主机
# 因为在主配置文件中使用 include 添加的配置文件信息,所以这里可以在指定目录下新建 .conf 文件
vim /usr/local/nginx/conf/conf_file/ip.conf
server {
    listen       192.168.169.152:8080;
    server_name  localhost;
    charset utf-8;
    location / {
		root	html/ip_ens33;
        index   index.html;
    }
}

server {
    listen       192.168.169.137:8080;
    server_name  localhost;
    charset utf-8;

    location / {
        root    html/ip_ens37;
        index   index.html;
    }
}
mkdir -p /usr/local/nginx/html/ip_ens33
mkdir -p /usr/local/nginx/html/ip_ens37

echo "ens33" >> ip_ens33/index.html
echo "ens37" >> ip_ens37/index.html
# 检查配置文件是否正确
nginx -t

# 重新加载
nginx -s reload
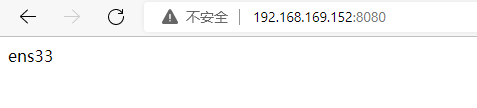
测试
192.168.169.137:8080

测试
192.168.169.152:8080
6.3 案例2:单网卡多端口配置虚拟主机
# 修改配置文件
# 因为在主配置文件中使用 include 添加的配置文件信息,所以这里可以在指定目录下新建 .conf 文件
vim /usr/local/nginx/conf/conf_file/port.conf
server {
  listen 81;

  location / {
    root server {
    listen       81;
    server_name  localhost;
    charset utf-8;
    location / {
		root	html/port_81;
        index   index.html;
    }

}


server {
    listen       82;
    server_name  localhost;
    charset utf-8;

    location / {
        root    html/port_82;
        index   index.html;
    }

}
mkdir -p /usr/local/nginx/html/port_81
mkdir -p /usr/local/nginx/html/port_82

echo "port81" >> /usr/local/nginx/html/port_81/index.html
echo "port82" >> /usr/local/nginx/html/port_82/index.html
# 检查配置文件是否正确
nginx -t

# 重新加载
nginx -s reload
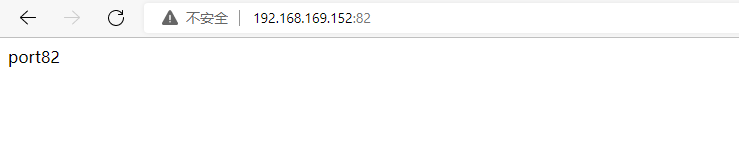
测试:
192.168.169.152:81

测试:
192.168.169.152:82
6.4 案例3:基于域名配置虚拟主机
# 修改配置文件
vim /usr/local/nginx/conf/conf_file/test1.conf
server {
  listen 8080;
  server_name test1.nginx.com;

  location / {
    root        html/test1;
    index       index.html;
  }
}


vim /usr/local/nginx/conf/conf_file/test2.conf
server {
  listen 8081;
  server_name test2.nginx.com;

  location / {
    root        html/test1;
    index       index.html;
  }
}
mkdir -p /usr/local/nginx/html/test1
mkdir -p /usr/local/nginx/html/test2

echo "test1" >> /usr/local/nginx/html/test1/index.html
echo "test2" >> /usr/local/nginx/html/test2/index.html
# 配置域名解析
[root@nginx ]# cat /etc/hosts
127.0.0.1   localhost localhost.localdomain localhost4 localhost4.localdomain4
::1         localhost localhost.localdomain localhost6 localhost6.localdomain6

192.168.169.152	test1.nginx.com
192.168.169.152 test2.nginx.com
# 配置 Windows 域名解析,本次测试使用
C:\Windows\System32\drivers\etc\hosts
192.168.169.152    test1.nginx.com
192.168.169.152    test2.nginx.com
测试:
test1.nginx.com:8080

测试:
test1.nginx.com:8081

6.5 Nginx 虚拟主机日志定义
问题:
	因为每配置一个 server{} 站点,在访问时就会产生一个相对应的访问日志,如果访问不同站点的日志都存在一个 access.log 日志中不方便查看各个站点的访问信息
解决:
	在对应的 server{} 中添加 access_log		logs/test1.log
	server {
  		listen 80;
  		server_name		test1.nginx.com;
  		access_log		logs/test1.log;

  		location / {
    		root        html/test1;
    		index       index.html;
  		}
	}
7. Nginx gzip 静态资源压缩
注意:
	Nginx的Gzip压缩功能虽然好用,但是下面两类文件资源不太建议启用此压缩功能。

	1) 图片类型资源 (还有视频文件)

	原因:图片如jpg、png文件本身就会有压缩,所以就算开启gzip后,压缩前和压缩后大小没有多大区别,所以开启了反而会白白的浪费资源。
		(可以试试将一张jpg图片压缩为zip,观察大小并没有多大的变化。虽然zip和gzip算法不一样,但是可以看出压缩图片的价值并不大)

	2) 大文件资源

	原因:会消耗大量的cpu资源,且不一定有明显的效果。
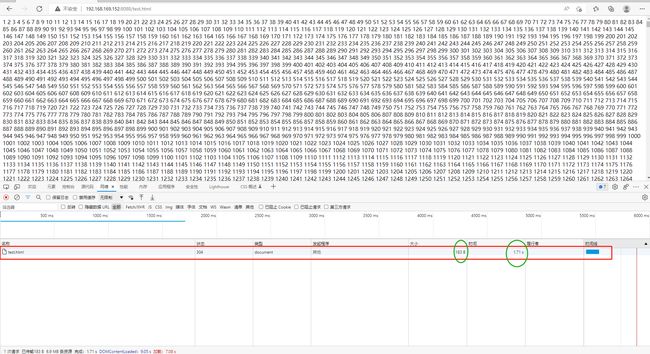
# 在 HTML 目录下创建一个测试文件,并写入测试内容
touch test.html
echo {1..999999} >> test.html
测试:
在未配置 gzip 压缩模块时,使用浏览器访问测试,访问数据就是实际文件大小

# 修改 nginx.conf 配置文件,在 http{} 模块中增加 gzip 功能
#gzip模块设置
    gzip on; 				# 开启gzip压缩输出
    gzip_min_length 1k;		# 最小压缩文件大小,低于1kb不压缩
    gzip_buffers 4 16k;    	# 以16k为单位,按照原始数据的大小以4倍的方式申请内存空间,一般此项不要修改
    gzip_http_version 1.1;	# 压缩版本(默认1.1,前端如果是squid2.5请使用1.0)
    gzip_comp_level 2;    	# 压缩等级,压缩等级越低,效率越高,但是对于CPU性能负载也越高
    #需要压缩的常见静态资源
	gzip_types text/plain application/javascript   application/x-javascript text/css application/xml text/javascript application/x-httpd-php image/jpeg image/gif image/png;
    gzip_vary on;
	gzip_disable "MSIE [1-6]\.";	# 由于nginx的压缩发生在浏览器端而微软的ie6会导致压缩后图片看不见,所以该选项是禁止 ie6 发生压缩


# 重新加载
nginx -s reload
测试:
	配置 gzip 模块后再次访问测试
	访问时间和文件大小都有比较明显的变化
8. Nginx 访客日志
示例:
192.168.169.1 - - [07/Jun/2022:11:42:40 +0800] "GET / HTTP/1.1" 304 0 "-" "Mozilla/5.0 (Windows NT 10.0; Win64; x64) AppleWebKit/537.36 (KHTML, like Gecko) Chrome/101.0.4951.54 Safari/537.36"

log_format access		# 定义日志内容格式(记录内容详细程度)
$remote_addr			# 用以记录客户端的 ip 地址;			192.168.169.1
$http_x_forwarded_for	# 当用户使用代理 ip 访问时,使用这个参数可以获取代理 ip 后面的真实 ip地址
$remote_user			# 用来记录客户端用户名称;				-
$time_local				# 用来记录访问时间与时区;				[07/Jun/2022:11:42:40 +0800]
$request				# 用来记录请求的 url 与 http 协议;	 "GET / HTTP/1.1"
$status					# 用来记录请求状态;成功是200,			304
$body_bytes_sent		# 记录发送给客户端的响应体数据字节的大小;	0
$http_referer			# 用来记录从那个页面链接访问过来的;		  -
$http_user_agent		# 记录客户端访问信息,如浏览器的相关信息,手机浏览器相关信息;
# 通常web服务器放在反向代理的后面,这样就不能获取到客户的IP地址了,通过 $remote_add 拿到的 IP 地址是反向代理服务器的 iP 地址。
# 反向代理服务器在转发请求的 http 头信息中,可以增加 x_forwarded_for 信息,用以记录原有客户端的 IP 地址和原来客户端的请求的服务器地址。
log_format access	'$remote_addr - $remote_user [$time_local] "$request" '
    				'$status $body_bytes_sent "$http_referer" '
        			'"$http_user_agent" $http_x_forwarded_for';
9. Nginx 目录浏览功能(文件服务器)
server {
listen 80;
server_name localhost;
charset utf-8;
#access_log logs/host.access.log main;
location / {
root html;
#index index.html index.htm; 将 index 注释
autoindex on; # 增加这行
}
.......
}
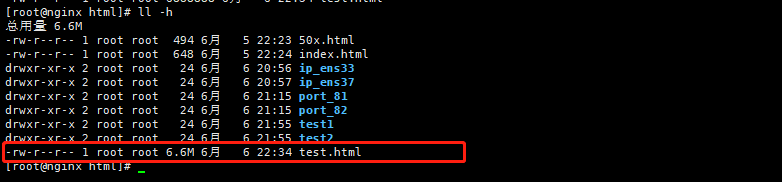
# 注意:修改完成后也需要将 html 目录下的 index.html 文件修改一个其他的名称,因为 nginx 默认访问 index.html
[root@nginx html]# ll -h
总用量 6.6M
-rw-r--r-- 1 root root 494 6月 5 22:23 50x.html
drwxr-xr-x 2 root root 20 6月 7 12:06 demo
-rw-r--r-- 1 root root 612 6月 7 11:42 index.html.bak
drwxr-xr-x 2 root root 24 6月 6 20:56 ip_ens33
drwxr-xr-x 2 root root 24 6月 6 20:57 ip_ens37
drwxr-xr-x 2 root root 24 6月 6 21:15 port_81
drwxr-xr-x 2 root root 24 6月 6 21:15 port_82
drwxr-xr-x 2 root root 24 6月 6 21:55 test1
drwxr-xr-x 2 root root 24 6月 6 21:55 test2
-rw-r--r-- 1 root root 6.6M 6月 6 22:34 test.html


10. Nginx 状态页
- nginx 添加 http_stub_status_module 模块
10.1 stub_status 作用说明
| 编译选项 | 作用 |
|---|---|
| –with-http_stub_status_module | Nginx的客户端状态 |
10.2 查看现有 nginx 编译参数
./nginx -V
# 如果没有我们需要的模块,例如本次试验添加的 –with-http_stub_status_module ,那么则需要重新编译安装一下

10.3 使用参数重新配置configure,在原有基础上添加上 --with-http_stub_status_module
configure 文件是在安装包目录下的文件,具体可参考 centos 7 安装 nginx
./configure --prefix=/usr/local/nginx --with-http_realip_module --with-http_ssl_module --with-pcre --with-stream --with-http_stub_status_module
10.4 将原来的 nginx 文件备份
cp /usr/local/nginx/sbin/nginx /usr/local/nginx/sbin/nginx.bak
10.5 编译
make
# 这里是需要 make 编译,不用 make install
10.6 替换nginx二进制文件
# 找到 nginx 安装包目录 /root/nginx-1.10.1/objs ,将 nginx 文件复制到原本的 /usr/local/nginx/sbin/nginx

cp /root/nginx-1.10.1/objs/nginx /usr/local/nginx/sbin/

10.7 重新启动nginx,查看编译参数
./nginx -s reload
./nginx -V
10.8 参考官网
地址:https://nginx.org/libxslt/en/docs/http/ngx_http_stub_status_module.html
10.8.1 修改配置文件
新增文件目录:/usr/local/nginx/conf/conf_file
vim stub.conf
server {
    listen       88;
    location / {
        stub_status    on;
        access_log      off;
    }

}
# 解释说明:
	stub_status		on;		# 开启状态页功能
	access_log      off;	# 关闭访客日志,因为这里一般自己是监控使用,查看访问状态

# 或者也可以直接在 nginx.conf 文件中修改,是一样的,这里只是将一些配置文件单独放在一个目录里,便于管理


nginx -t
nginx -s reload
10.8.2 浏览器访问
http://192.168.169.152:88
# 访问内容结果如下图

# 解释说明:
1)Active connections-活跃连接数
        The current number of active client connections including Waiting connections.

(2)accepts-已接受的客户端连接总数
        The total number of accepted client connections.

(3)handled-已处理的连接总数
        The total number of handled connections. Generally, the parameter value is the same as acceptsunless some resource limits have been reached (for example, the worker_connections limit).

(4)requests-客户端连接总数
        The total number of client requests.

(5)Reading-读取请求头的当前连接数
        The current number of connections where nginx is reading the request header.

(6)Writing-将响应写回客户端的当前连接数
        The current number of connections where nginx is writing the response back to the client.

(7)Waiting-等待请求的当前空闲客户端连接数
        The current number of idle client connections waiting for a request.
参考官网地址:https://nginx.org/libxslt/en/docs/http/ngx_http_stub_status_module.html
11. Nginx Location 匹配规则
location / {
			# root 关键词,是定义网页根目录的。	html 是以 nginx 安装目录 为相对路径的
            root   html;
            # index 关键词,是定义 nginx 访问首页的名字,默认去找 index.html
            index  index.html index.htm;
            #autoindex  on;
        }
- location 相关语法
location [ = | ~ | ~* | ^~ ] url {
	.......
}
| 匹配符 | 匹配规则 | 优先级 |
|---|---|---|
| = | 精确匹配;用于标准uri前,要求请求字符串和uri严格匹配。如果匹配成功,就停止匹配,立即执行该location里面的请求。 | 1 |
| ^~ | 非正则匹配;用于标准uri前,nginx服务器匹配到前缀最多的uri后就结束,该模式匹配成功后,不会使用正则匹配。 | 2 |
| ~* | 正则匹配;用于正则uri前,表示uri里面包含正则,不区分大小写。 | 3 |
| /blog/ | 直接访问域名或者ip后面加上 blog,例:192.168.169.142:80/blog | 4 |
| / | 通用匹配,不符合其他匹配规则的 | 5 |
# nginx.conf 支持在虚拟朱继忠定义多个 location,进行用户请求 url 的解析

server{

	location = {

	}
	location ^~ {

	}
	....

}
11.1 案例:location 匹配测试
vim mylocation.conf
server {
    listen       83;
    server_name  _;

	# 最低级匹配,不符合其他 location 匹配规则就在这里匹配
    location / {
        return 401;
    }

	# 优先级最高匹配,精确匹配,例如访问:192.168.169.152:83/ (注意这里一定要加上 / 不然不知道访问的是什么)
	location = / {
        return 402;
    }

	# 以 /demo/ 开头的 url 匹配,如果符合其他 location 匹配规则,则其他匹配优先
	location /demo {
        return 403;
    }

	# 匹配任何以 /img/ 开头的请求,不匹配正则,例如:192.168.169.152:83/img
 	location ^~ /img {
        return 404;
    }


	# 匹配任何以 .gif 结尾的请求,支持正则
	location ~* \.(gif|jpg|jpeg) {
        return 500;
    }


}


# 注意:这里如过访问 192.168.169.152:83/img.jpg	按上面配置文件如果是以 jpg 结尾的返回 500 ,但是测试是返回 404 即匹配到了 img 开头的,这是以为 ^~ 比 ~* 优先级高
测试:


12. Nginx url 地址重写功能
Nginx 提供的 rewirte 功能,支持正则表达式,能够实现 url 跳转,实现 url 规范化,根据请求的变量实现 url 跳转等
基于 url 重写功能常见用法如下:
1)对于爬虫功能的封禁,使其跳转到一个错误页面
2)动态 url 伪装成静态 url ,便于搜索引擎抓取
3)新旧域名替换,使用新的域名后,访问旧的域名仍然可以跳转到新的页面上

rewrite 只能在
server {}
location {}
if {}
中,并且默认只能对域名后边的除去传递的参数外的字符串起作用
例如:
http://www.demo.com/abc/asd/index.html?a=1&c=2 只针对 /abc/asd/index.html 重写
12.1 rewirte 语法
rewrite <regex> <replacement> [flag];
例如:
rewrite	^/(.*)	http://192.168.169.152/$1	parmanent;
解释说明:
rewrite		# 是 Nginx 地址重写的关键词指令,开启跳转功能
^/(.*)		# 正则表示匹配所有的请求,匹配成功后跳转到后面指定的 url 地址
$1			# 是取出前面正则表达式分组括号里的内容
parmanent	# 表示 301 重定向的标记

regex			# 表示正则匹配规则
replacement		# 表示跳转后的内容
flag			# 表示rewrite 支持的 flag 标记

flag 标记说明:
last		# 本条规则匹配完成后,继续向下匹配新的 location URL规则,一般用在server和if中
break		# 本条规则匹配完成即终止,不再匹配后面的任何规则。一般用在location中
redirect	# 返回 302 临时重定向,浏览器地址会显示跳转后的 URL 地址,爬虫不会更新 url(因为是临时)。
permanent	# 返回 301 永久重定向,浏览器地址栏会显示跳转后的 URL 地址,爬虫更新 url。
last 和 break 用于实现 url 重写,浏览器的地址栏不会发生变化
redirect 和 permanent 也是用于 url 跳转,浏览器 url 地址栏发生变化,跳转到新的 url 地址栏
12.2 Rewrite 跳转实现
Nginx 是通过 ngx_http_rewrite_module 模块支持 url 重写、支持 if 条件判断,但不支 持 else。

另外该模块需要 PCRE 支持,应在编译 Nginx 时指定 PCRE 支持,默认已经安装。

根据相关变量重定向和选择不同的配置,从一个 location 跳转到另一个 location,不过这样 的循环最多可以执行 10 次,超过后 Nginx 将返回 500 错误。

同时,重写模块包含 set 指令,来创建新的变量并设其值,这在有些情景下非常有用的,如记录条件标识、传递参数到其他location、记录做了什么等等。
12.3 Rewrite 执行顺序
1)执行server块里面的rewrite指令。

2)执行location 匹配

3)执行选定的location中的rewrite指令
12.4 案例
12.4.1 案例:实现一个 301 URL 跳转
试验目标:
	实现当用户访问该虚拟主机时,直接跳转到百度页面
vim /usr/local/nginx/conf/conf_file/learn_rewrite.conf
server {
    listen       84;
    server_name  _;		# 不配置域名(测试使用)

    location / {
    	# ^/(.*) 匹配所有请求之后,跳转到 baidu.com
		rewrite ^/(.*) http://www.baidu.com/$1	permanent;
    }
}

nginx -t
nginx -s reload
12.4.2 案例:基于域名的跳转
vim /usr/local/nginx/conf/conf_file/test1_rewrite.conf
server {
        listen       85;
        server_name  test1.nginx.com;
        charset utf-8;
        location / {
            root   html;
            index  index.html index.htm;
        }

        location /index.html {
            if ($host = 'test1.nginx.com') {
            rewrite ^/(.*)$ test2.nginx.com/$1 permanent;
            }
			root   html/test2;
        }

}
13. Nginx 访问认证
ngx_http_auth_basic_module 模块实现让访问者,只有输入正确的用户密码才允许访问web内容。
web上的一些内容不想被其他人知道,但是又想让部分人看到。nginx的http auth模块以及Apache http auth都是很好的解决方案。

默认情况下nginx已经安装了ngx_http_auth_basic_module模块,如果不需要这个模块,可以加上 --without-http_auth_basic_module
# nginx 提供了认证模式,语法如下
location / {
	auth_basic 'string';	# 开启认证功能,并自定义名称
	auth_basic_user_file conf/htpasswd;		# 配置一个认证密码文件
}
linux 提供了密码生成命令:htpasswd
htpasswd 是 Apache 提供的密码生成工具, nginx 也支持 auth_basic 模块,我们可以利用 htpasswd 命令生成账号密码文件提供给 nginx 使用

# 安装 htpasswd
yum install httpd-tools -y
# 语法
htpasswd -bc .access username password
# 解释:
-b	在命令行中输入账号密码
-c	创建密码文件
username	账号
password	密码

默认 .access 文件使用 md5 加密验证
# 创建密码文件
[root@nginx conf_file]# htpasswd -bc ./htpasswd demo 123
Adding password for user demo
[root@nginx conf_file]# ls -a
.  ..  htpasswd  learn_rewrite.conf  mylocation.conf  port.conf  test1_rewrite.conf
[root@nginx conf_file]# cat htpasswd
demo:$apr1$pYxCrJ0m$6PuPOIoPf856BzfJcsbL0.
- 案例测试
server {
		listen 86;
		server_name _;
		location / {
			root html/learn_auth;
			index	index.html;
			auth_basic "learn nginx auth_basic";	#
			auth_basic_user_file /usr/local/nginx/conf/conf_file/htpasswd;
		}
   }

14. 反向代理

14.1 单端口反向代理
实现效果:
打开浏览器,在浏览器地址栏输入 demo.nginx.com(192.168.169.151) ,跳转到 912.168.169.152 的 tomcat 主页
14.1.1 安装 tomcat
- 将 JDK、Tomcat 安装包上传到服务器中

# 将一下内容添加到 /etc/profile 中
vim /etc/profile

#set java environment
JAVA_HOME=/root/jdk180 #java安装路径
CLASSPATH=.:$JAVA_HOME/lib.tools.jar
PATH=$JAVA_HOME/bin:$PATH
export JAVA_HOME CLASSPATH PATH

# 使文件生效
source /etc/profile
- 启动 tomcat 服务器
 # 进入 tomcat bin 目录,将所有 .sh 文件赋予执行权限
 chmod u+x ./*.sh

 # 启动 tomcat
 ./startup.sh
- 测试机器直接关闭防火墙
systemctl stop firewalld
14.1.2 修改 nginx 配置文件
# 1.修改本机 hosts 文件
192.168.169.151	demo.nginx.com

# 2.增加一个测试文件 proxy.conf
# 因为在 nginx.conf 文件中有 include 参数,里面配置了引用文件的路径
server {
        listen       80;
        server_name  demo.nginx.com;

        location / {
                root   html;
                index  index.html index.htm;
                proxy_pass  http://192.168.169.152:8080;
        }
}

- 访问测试
浏览器访问:demo.nginx.com

14.2 多端口反向代理
14.2.1 实现效果:
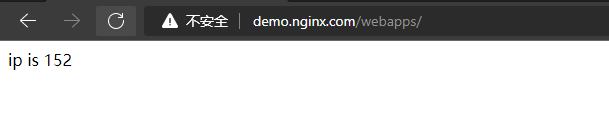
访问 http://demo.nginx.com/webapps/ 直接跳转到 192.168.169.152:8080/webapps/index.html
访问 http://demo.nginx.com/webapps1/ 直接跳转到 192.168.169.152:8081/webapps1/index.html
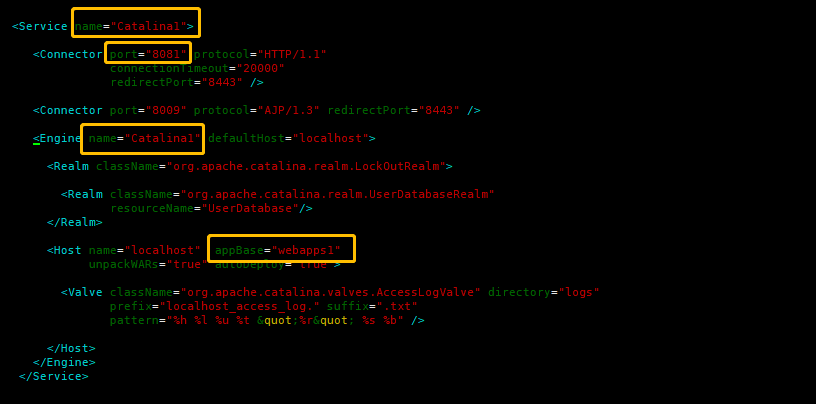
14.2.2 修改 tomcat 配置文件
# 修改 server.xml 文件,增加段新的 service 配置
vim server.xml

<Service name="Catalina1">

    <Connector port="8081" protocol="HTTP/1.1"
               connectionTimeout="20000"
               redirectPort="8443" />

    <Connector port="8009" protocol="AJP/1.3" redirectPort="8443" />

    <Engine name="Catalina1" defaultHost="localhost">

      <Realm className="org.apache.catalina.realm.LockOutRealm">

        <Realm className="org.apache.catalina.realm.UserDatabaseRealm"
               resourceName="UserDatabase"/>
      </Realm>

      <Host name="localhost"  appBase="webapps1"
            unpackWARs="true" autoDeploy="true">

        <Valve className="org.apache.catalina.valves.AccessLogValve" directory="logs"
               prefix="localhost_access_log." suffix=".txt"
               pattern="%h %l %u %t "%r" %s %b" />

      </Host>
    </Engine>
  </Service>
14.2.3 拷贝一个 webapps 并修改为 webapps
cp webapps webapps1

- 准备测试文件
# tomcat 默认访问 webapps/ROOT/*.(html | jsp)
# 或者在浏览器中访问 ROOT 目录下指定目录或者 webapps 目录下指定目录都一样,例如:192.168.169.152:8080/demo/demo.html
# 如果指定目录下是 index.(html | jsp) 则也可以默认访问,例如:192.168.169.152:8080/demo(相当于 192.168.169.152:8080/demo/index.html)
cd /root/apache-tomcat-7.0.69/webapps
mkdir webapps
echo "this is webapps" >> webapps/index.html

cd /root/apache-tomcat-7.0.69/webapps1
mkdir webapps1
echo "this is webapps1" >> webapps1/index.html
14.2.4 修改 nginx配置文件
server {
        listen       80;
        server_name  demo.nginx.com;

        location = /webapps {
                proxy_pass  http://192.168.169.152:8080;	# 匹配后跳转实际访问地址为:http://192.168.169.152:8080/webapps/index.html
        }

        location = /webapps1 {
                proxy_pass  http://192.168.169.152:8081;	# # 匹配后跳转实际访问地址为:http://192.168.169.152:8081/webapps1/index.html
        }
}

# 注:如果匹配目录文件相似,则注意 location 匹配规则,如上面 server 中 webapps 和 webapps1 ,如果使用 ~* 匹配,那么 webapps1 就访问不到

# 注:如果在 location 或者 if 中有 “正则” 那么 proxy_pass 中则不能有 uri
# 例如:proxy_pass  http://192.168.169.152:8081;	  没问题
#	   proxy_pass  http://192.168.169.152:8081/;	会报错

14.2.5 测试
访问:demo.nginx.com/webapps

访问:demo.nginx.com/webapps1

15. 负载均衡

15.1 准备两台 tomcat 服务器
| ip | 端口 |
|---|---|
| 192.168,169.152 | 8080 |
| 192.168,169.150 | 8080 |
15.2 创建测试文件
# 分别在 webapps 目录下创建相应的测试文件
mkdir webapps
echo "ip is 150" >> webapps/index.html

mkdir webapps
echo "ip is 152" >> webapps/index.html
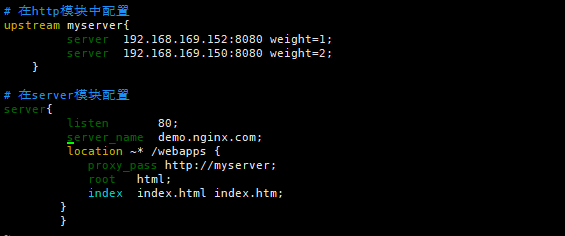
15.3 配置nginx配置文件
# 在http模块中配置
upstream myserver{	# myserver 是自定义名称
         server  192.168.169.152:8080 weight=1;
         server  192.168.169.150:8080 weight=2;
    }

# 在server模块配置
server{
         listen       80;
         server_name  demo.nginx.com;
         location ~* /webapps {
            proxy_pass http://myserver;	# 这里的 myserver 就是上面 upstream 中自定义的

        }
	}
15.4 测试
第一次访问:demo.nginx.com/webapps

第二次访问:demo.nginx.com/webapps
第三次访问:demo.nginx.com/webapps

server  192.168.169.152:8080 weight=1;
server  192.168.169.150:8080 weight=2;

weight 代表权重,默认是1,权重越高被分配的客户端越多。
指定轮询几率,weight和访问比率成正比,用于后端服务器性能不均的情况,所以这里连续访问的时候连接到 150 服务器的几率相比 152 要大
15.4 nginx 提供了几种分配方式(策略)
# 1.轮询(默认)
每个请求按时间顺序逐一分配到不同的后端服务器,如果后端服务器 down 掉,能自动剔除。

# 2.weight
weight 代表权重,默认是1,权重越高被分配的客户端越多。
指定轮询几率,weight和访问比率成正比,用于后端服务器性能不均的情况。例如:

# 在http模块中配置
upstream myserver{	# myserver 是自定义名称
         server  192.168.169.152:8080 weight=1;
         server  192.168.169.150:8080 weight=2;
    }

# 3. ip_hash
每个请求按访问 ip 的 hash 结果分配,这样每个访客固定一个后端服务器,可以解决session的问题。例如:
upstream server_pool{
	ip_hash
	server  192.168.169.152:8080;
    server  192.168.169.150:8080;
}

# 4.fair(第三方,需要安装第三方模块)
按后端服务器的响应时间来分配请求,响应时间短的优先分配。
upstream server_pool{
	server  192.168.169.152:8080 weight=1;
    server  192.168.169.150:8080 weight=2;
	fair;
}
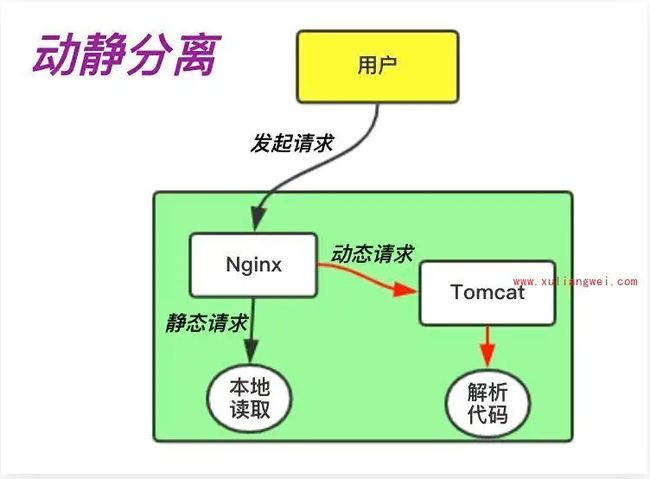
16. 动静分离
16.1 什么是动静分离
动静分离是指在web服务器架构中,将静态页面与动态页面或者静态内容接口和动态内容接口分开不同系统访问的架构设计方法,进而提升整个服务访问性能和可维护性。
nginx 的动静分离,指的是由 nginx 将客户端请求进行分类转发,静态资源请求(如html、css、图片等)由静态资源服务器处理,动态资源请求(如 jsp页面、servlet程序等)由 tomcat 服务器处理,
tomcat 本身是用来处理动态资源的,同时 tomcat 也能处理静态资源,但是 tomcat 本身处理静态资源的效率并不高,而且还会带来额外的资源开销。
利用 nginx 实现动静分离的架构,能够让 tomcat 专注于处理动态资源,静态资源统一由静态资源服务器处理,从而提升整个服务系统的性能
16.2 准备测试资源
在 nginx 服务器中准备一张图片用于测试访问

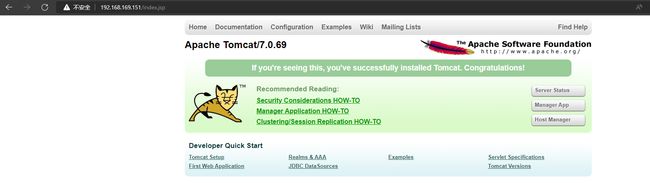
动态资源测试直接访问 tomcat 首页 index.jsp
192.168.169.152:8080
16.3 修改 nginx 配置文件
upstream static {
        server 192.168.169.151:80;
        }
upstream php {
        server 192.168.169.152:8080;
        }

server {
    listen       80;
    server_name  192.168.169.151;

    #静态资源加载
    location ~ .*\.(html|jpg|png|css|js)$ {
            proxy_pass http://static;
                }
    #动态资源加载
    location / {
            proxy_pass http://php;
            }
	}

# 注:本次按以上配置测试时发现在访问 index.jsp 时无法返回 jsp 相关的“样式、图片”,因为在 location 中将这些文件匹配到静态资源中进行加载,所以这里要注意一下

server {
    listen       80;
    server_name  192.168.169.151;

    #静态资源加载
    location ~ .*\.(html|jpg)$ {
            proxy_pass http://static;
                }
    #动态资源加载
    location / {
            proxy_pass http://php;
            }
	}
16.4 测试
访问 http://192.168.169.151/zabbix.jpg

访问 192.168.169.151/index.jsp
17. Nginx 高可用
17.1 Keeplived+Nginx高可用集群(主从模式)

试验场景说明:
	1)在两台服务器上分别安装 nginx 和 keepalived
	2)本次主要配置 nginx 高可用(主从模式),只考虑 nginx 存活及访问问题
	3)实际访问时使用 keepalived 虚拟 IP进行访问
17.1.1 准备测试机器
| 主机 | ip | 环境 |
|---|---|---|
| Nginx01 (maste) | 192.168.169.151 | CentOS Linux release 7.9.2009 (Core) keepalived-1.3.5 nginx/1.8.1 |
| Nginx02 (back) | 192.168.169.152 | CentOS Linux release 7.9.2009 (Core) keepalived-1.3.5 nginx/1.8.1 |
| web | 192.168.169.150 | tomcat |
17.1.2 安装 keepalived
# 分别在两台 nginx 服务器上安装 keepalived
yum -y install keepalived
17.1.3 修改主机(master)配置文件
- 主机配置文件
# 修改 Keepalived 配置文件,将原本的 keepalived.conf 文件备份,新建 keepalived.conf 文件加入如下内容
mv /etc/keepalived/keepalived.conf /etc/keepalived/keepalived.conf.bak
vim /etc/keepalived/keepalived.conf
# 注意:这个是 master(主机) 的配置文件
! Configuration File for keepalived		# 这一行为注释
global_defs {
	router_id nginx01	# router_id 机器标识,通常使用 hostname,相对具有唯一性,和备机区分开,不能使用同一个标识
}


vrrp_script chk_nginx {		# 定义一个检测脚本,在global_defs之外配置
  script "/etc/keepalived/check_nginx.sh"	# 自己写的监测脚本
  interval 2	# 每2s监测一次
  weight 10		# 该参数用于指定当监测失效时,该设备的优先级会减少的值,该值为负表示减少
  fall 2        # 尝试两次都成功才成功
  rise 2        # 尝试两次都失败才失败
}


vrrp_instance VI_1 {		# 定义一个vrrp_install实例,名称为VI_1
	state MASTER			# 表示该实例的角色状态,有MASTER和BACKUP两种主备状态
	interface ens33			# 对外提供服务的网络接口,注意修改为自己的网卡名称,如 ens33,eth0,eth1
	virtual_router_id 51	# 虚拟路由ID标识,主备服务器配置中相同实例的ID必须一致
	priority 150			# priority表示实例优先级,数字越大,优先级越高。master 的优先级必须大于 backup
	advert_int 1			# 设定 master 与 backup 负载均衡器之间同步检查的时间间隔,默认是秒

	authentication {		# 权限认证配置
		auth_type PASS		# 主要有 PASS 和 AH 两种
		auth_pass 1111		# 验证密码,同一个 vrrp_instance 下 MASTER 和 BACKUP 密码必须相同
	}

	virtual_ipaddress {
		192.168.169.200		# 虚拟IP地址;可以配置多个IP,每个IP占一行。注意,这里的IP就是在工作中访问 zabbix server 需要和域名绑定的ip
	}


	track_script {		# 调用自定义的脚本
        chk_nginx
    }

	notify_master /etc/keepalived/to_master.sh		# 指定当切换到 master 时,执行的脚本,即切换到 master 时要将 backup 的 server 关掉


}
- 主机切换脚本
# 指定当切换到 master 时,执行的脚本,即切换到 master 时要将 backup 的 server 关掉
#!/bin/bash

sshpass -p 0 ssh -o StrictHostKeyChecking=no [email protected] "nginx -s stop"

nginx
- Nginx 服务检查脚本
#! /bin/bash
# 当 zabbix server 服务 down 掉之后,通过 keepalived 检查,确认没有服务重新启动 zabbix server
nginx_server=`ps -C nginx --no-header | wc -l`

if [ $nginx_server -gt 0 ];then
    exit 1
else
	nginx
fi
17.1.4 修改备机(backup)配置文件
- 备机配置文件
# 注意:这个是 master(备机) 的配置文件
mv /etc/keepalived/keepalived.conf /etc/keepalived/keepalived.conf.bak

vim /etc/keepalived/keepalived.conf

! Configuration File for keepalived		# 这一行为注释
global_defs {
	router_id nginx02	# router_id 机器标识,通常使用 hostname,相对具有唯一性,和主机区分开,不能使用同一个标识
}

vrrp_script chk_nginx {		# 定义一个检测脚本,在global_defs之外配置
  script "/etc/keepalived/check_nginx.sh"	# 自己写的监测脚本
  interval 2	# 每2s监测一次
  weight 10		# 该参数用于指定当监测失效时,该设备的优先级会减少的值,该值为负表示减少
  fall 2        # 尝试两次都成功才成功
  rise 2        # 尝试两次都失败才失败
}

vrrp_instance VI_1 {		# 定义一个vrrp_install实例,名称为VI_1
	state BACKUP			# 表示该实例的角色状态,有MASTER和BACKUP两种主备状态
	interface ens33			# 对外提供服务的网络接口,注意修改为自己的网卡名称,如 ens33,eth0,eth1
	virtual_router_id 51	# 虚拟路由ID标识,主备服务器配置中相同实例的ID必须一致
	priority 149			# priority表示实例优先级,数字越大,优先级越高。master 的优先级必须大于 backup
	advert_int 1			# 设定 master 与 backup 负载均衡器之间同步检查的时间间隔,默认是秒

	authentication {		# 权限认证配置
		auth_type PASS		# 主要有 PASS 和 AH 两种
		auth_pass 1111		# 验证密码,同一个 vrrp_instance 下 MASTER 和 BACKUP 密码必须相同
	}

	virtual_ipaddress {
		192.168.169.200		# 虚拟IP地址;可以配置多个IP,每个IP占一行。注意,这里的IP就是在工作中访问 zabbix server 需要和域名绑定的ip
	}

	track_script {		# 调用自定义的脚本
        chk_nginx
    }

	notify_master /etc/keepalived/to_backup.sh		# 指定当切换到 backup 时,执行的脚本,切换到 backup 时将 master 的 server 关掉
}
- 备机切换脚本
# 指定当切换到 backup 时,执行的脚本,切换到 backup 时将 master 的 server 关掉
#!/bin/bash

sshpass -p 0 ssh -o StrictHostKeyChecking=no [email protected] "nginx -s stop"

nginx
- Nginx 服务检查脚本
#! /bin/bash
# 当 zabbix server 服务 down 掉之后,通过 keepalived 检查,确认没有服务重新启动 zabbix server
nginx_server=`ps -C nginx --no-header | wc -l`

if [ $nginx_server -gt 0 ];then
    exit 1
else
    nginx
fi
17.1.5 启动 keepalived
# 启动 keepalived
systemctl start keepalived.service
systemctl enable keepalived.service
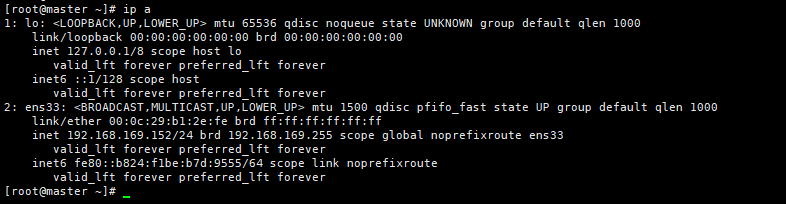
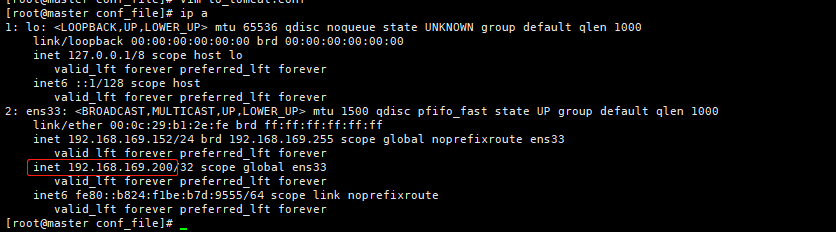
# master 查看虚拟 IP 地址
ip a

# backup 查看虚拟 IP 地址,此时 nginx01 是 master 所以 VIP 在 nginx01上
ip a
17.1.6 修改 nginx 配置文件
- 主备机器都添加如下配置
server {
	listen       80;
	server_name  192.168.169.200;	# 这里是使用虚拟 IP 访问

	location / {
		proxy_pass  http://192.168.169.150:8080;
	}

}
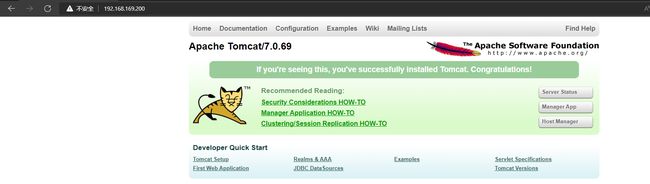
17.1.7 测试
浏览器访问:192.168.169.200
此时虚拟 IP 是在 master 192.168.169.151 上

将 192.168.169.151 关机测试虚拟 IP 跳转到 192.168.169.152 继续提供服务
浏览器访问:192.168.169.200
此时虚拟 IP 是在 backup192.168.169.152 上
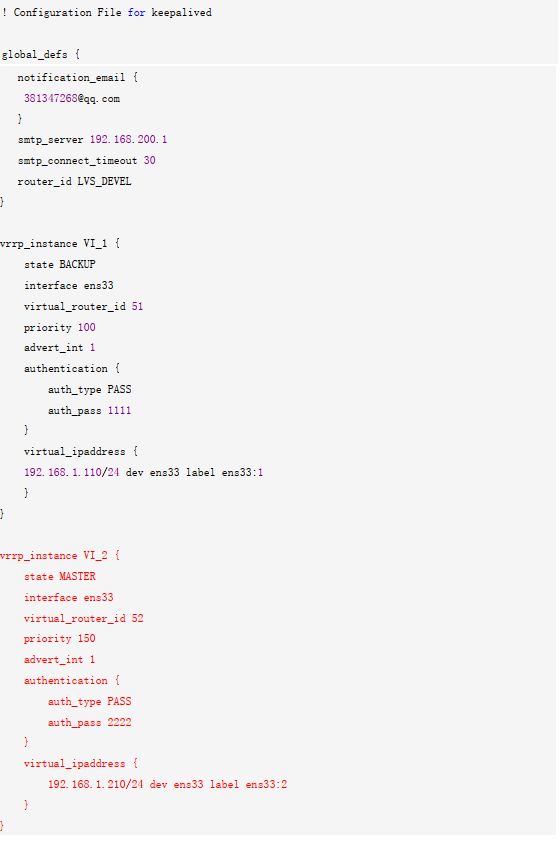
17.2 Keeplived+Nginx 高可用集群(双主模式)
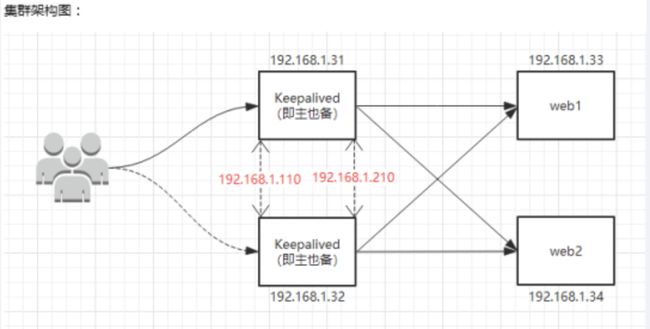
修改配置
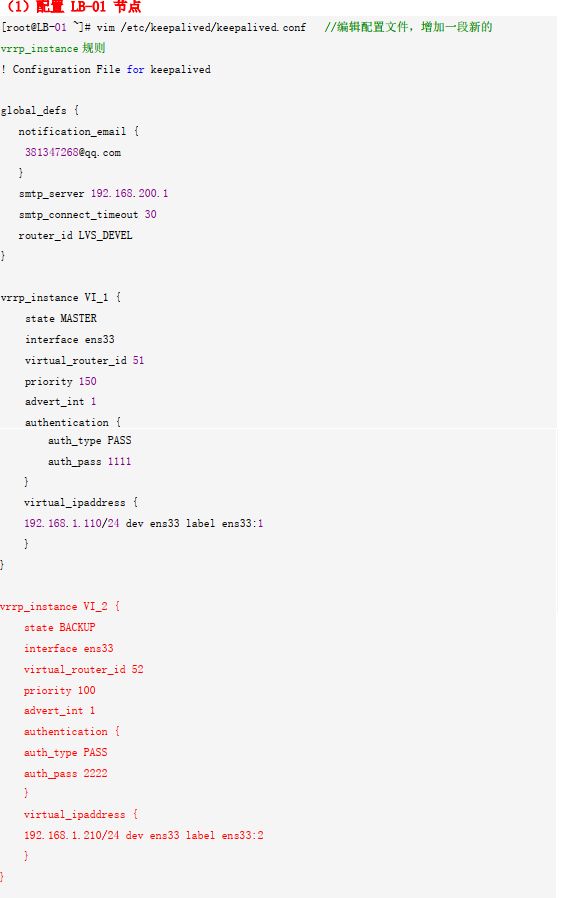
(2) 配置 LB-02 节点