nginx纳入skywalking调用链监控
nginx纳入skywalking调用链监控
- 一、说明
- 二、nginx部署
-
- 2.1 OpenResty介绍
- 2.2 准备SkyWalking Nginx Agent
- 2.3 docker方式部署OpenResty
-
- 2.3.1 修改配置文件
- 2.3.2 启动OpenResty容器
- 2.4 验证
一、说明
服务器中已部署好skywalking,并将tomcat纳入skywalking监控(tomcat接入skywalking的方式可以参考https://blog.csdn.net/qq_44209563/article/details/131420026)。
已有部署信息:
| 组件 | 访问地址 | 备注 |
|---|---|---|
| skywalking | http://132.122.107.9:8082 | 数据采集端口12800 |
| tomcat | http://132.122.107.9:8089 |
现在需要部署nginx,同时也将nginx纳入skywalking监控;测试访问请求从nginx转到tomcat,在skywalking中查到相关的调用链信息。
二、nginx部署
SkyWalking Nginx Agent只为Nginx提供了由Nginx LUA模块驱动的本机跟踪功能。Nginx不自带LUA模块,可以编译安装或者使用OpenResty。
也就是说,nginx需要纳入skywalking监控,需要依赖LUA模块,但是nginx本身没有,所以将nginx改用OpenResty
2.1 OpenResty介绍
官网地址:https://openresty.org/cn/
OpenResty® 是一个基于Nginx 与 Lua 的高性能 Web 平台, 正是我们所需要的。
OpenResty 简单理解成 就相当于封装了nginx,并且集成了LUA脚本, 配置使用同nginx相似。
2.2 准备SkyWalking Nginx Agent
skywalking-nginx-lua是nginx的agent,基本由lua语言编写。
下载:
执行命令wget https://github.com/apache/skywalking-nginx-lua/archive/refs/tags/v0.6.0.tar.gz
解压:
执行命令tar -zxvf skywalking-nginx-lua-0.6.0.tar.gz,解压后有个文件夹:
![]()
文件夹内容如下:

skywalking-nginx-lua-0.6.0文件路径,(以自己的解压路径为准,以下只是我在服务器中的解压路径):
/home/it_ops/test/apps/skywalking-nginx-lua-0.6.0
2.3 docker方式部署OpenResty
OpenResty配置文件信息参考:https://github.com/openresty/docker-openresty/blob/master/README.md#nginx-config-files

拉取镜像:
docker pull openresty/openresty:latest
OpenResty容器内的配置文件位置主要有两个:
1./usr/local/openresty/nginx/conf/nginx.conf, 查看其中内容可以发现包含另一处的配置文件:

2. /etc/nginx/conf.d/目录下的的*.conf,也就是上图提到的位置
2.3.1 修改配置文件
参考文章:
https://blog.csdn.net/m0_60244783/article/details/127716816
github地址:
https://github.com/apache/skywalking-nginx-lua
新建一个配置文件mysit.conf(在/home/it_ops/test/apps/myConfig目录下新建), 将使用挂载的方式挂到容器的/etc/nginx/conf.d/目录下,内容如下:
    ## nginx-agent包的路径, 启动容器时命令添加参数-v /home/it_ops/test/apps/skywalking-nginx-lua-0.6.0:/usr/local/nginx-lua,使用挂载的方式
	lua_package_path "/usr/local/nginx-lua/lib/?.lua;;";

    # Buffer represents the register inform and the queue of the finished segment
    lua_shared_dict tracing_buffer 100m;

    # Init is the timer setter and keeper
    # Setup an infinite loop timer to do register and trace report.
    init_worker_by_lua_block {
        local metadata_buffer = ngx.shared.tracing_buffer

        -- Set service name
		# 服务名
        metadata_buffer:set('serviceName', 'nginx-test-service')
        -- Instance means the number of Nginx deployment, does not mean the worker instances
		# 服务实例
        metadata_buffer:set('serviceInstanceName', 'nginx-instance')
        -- type 'boolean', mark the entrySpan include host/domain
        metadata_buffer:set('includeHostInEntrySpan', false)
        -- set ignoreSuffix, If the operation name(HTTP URI) of the entry span includes suffixes in this set, this segment would be ignored. Multiple values should be separated by a comma(',').
        -- require("skywalking.util").set_ignore_suffix(".jpg,.jpeg,.js,.css,.png,.bmp,.gif,.ico,.mp3,.mp4,.svg")

        -- set random seed
        require("skywalking.util").set_randomseed()
		# skywalking服务的Ip和数据采集端口
        require("skywalking.client"):startBackendTimer("http://132.122.107.9:12800")

        -- If there is a bug of this `tablepool` implementation, we can
        -- disable it in this way
        -- require("skywalking.util").disable_tablepool()

        skywalking_tracer = require("skywalking.tracer")
    }

    server {
	    ## 监听端口
        listen 80;
        ## 路径
        location /tomcat {
            default_type text/html;

            rewrite_by_lua_block {
                ------------------------------------------------------
                -- NOTICE, this should be changed manually
                -- This variable represents the upstream logic address
                -- Please set them as service logic name or DNS name
                --
                -- Currently, we can not have the upstream real network address
                ------------------------------------------------------
                skywalking_tracer:start("openresty-132.122.107.9:8085")
                -- If you want correlation custom data to the downstream service
                -- skywalking_tracer:start("upstream service", {custom = "custom_value"})
            }

            ## 代理地址,设置成tomcat地址,
            ## 注意端口号后边要加上"/", 达到访问ip:80/tomcat -> 转发到http://132.122.107.9:8089的效果
            ## 如果不加"/", 那么访问 ip:80/tomcat -> 则转发到http://132.122.107.9:8089/tomcat
            proxy_pass http://132.122.107.9:8089/;

            body_filter_by_lua_block {
                if ngx.arg[2] then
                    skywalking_tracer:finish()
                end
            }

            log_by_lua_block {
                skywalking_tracer:prepareForReport()
            }
        }
    }
2.3.2 启动OpenResty容器
执行命令:
sudo docker run --rm -p 8085:80 -v /home/it_ops/test/apps/skywalking-nginx-lua-0.6.0:/usr/local/nginx-lua -v /home/it_ops/test/apps/myConfig:/etc/nginx/conf.d/ openresty/openresty:v-test
启动后访问服务IP+端口:http://132.122.107.9:8085,出现以下信息表示部署成功:

参数解释:
-p 8085:80 -> 容器端口80,同配置文件中的监听端口一致

-v /home/it_ops/test/apps/skywalking-nginx-lua-0.6.0:/usr/local/nginx-lua
-> /home/it_ops/test/apps/skywalking-nginx-lua-0.6.0, 服务器解压nginx-agent包的路径, 挂载到容器内的/usr/local/nginx-lua(nginx-lua目录需要自己在容器内新建,再把容器制作成新的镜像openresty/openresty:v-test供后续使用)
-> /usr/local/nginx-lua,容器内的路径,挂载放置着服务器的nginx-agent包

-v /home/it_ops/test/apps/myConfig:/etc/nginx/conf.d
-> 新建mysite.conf文件的目录挂载到容器内的/etc/nginx/conf.d目录
2.4 验证
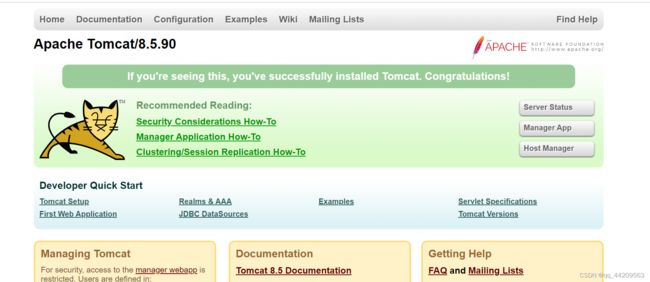
通过访问OpenResty,转到tomcat,访问服务IP:8085/tomcat:
http://132.122.107.9:8085/tomcat

说明请求转发成功。
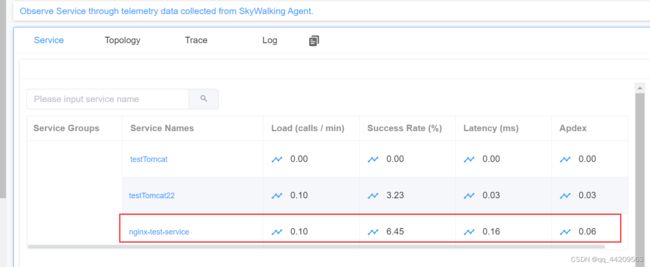
再查看skywalking服务,查看是否有注册的nginx服务名:

说明注册成功。
查看拓扑信息,可以看到调用链的具体情况:

至此表示所有测试完成。