buildAdmin 的api登录代码理解,及自己编写 api接口的login方法
buildAdmin 自有的登录流程
路径在 app/api/controller/user->checkIn方法
这个方法是 集注册的登录为一体的
首先可以看到 class User extends Frontend use控制器是继承了 Frontend 的,并且类中有一个 initialize()的方法
Frontend 的 initialize() 的方法代码如下
 /**
     * 初始化
     * @throws Throwable
     * @throws HttpResponseException
     */
    public function initialize(): void
    {
        parent::initialize();
        $this->auth = Auth::instance();  //Auth是一个单例
        $routePath  = $this->app->request->controllerPath . '/' . $this->request->action(true);
        $token      = $this->request->server('HTTP_BA_USER_TOKEN', $this->request->request('ba-user-token', Cookie::get('ba-user-token') ?: false));
        if (!action_in_arr($this->noNeedLogin)) {
            //如果当前路由的 action 在noNeedLogin数组中(前面的个!号),也就是说当前action 不在noNeedLogin数组中
            $this->auth->init($token);
            //就要使用 token 来初使化 Auth了 (注意Auth是一个单例)
            //如果 Auth loginEd=true 返回true  如果 loginEd是false, 如果token为false, 返回false,如果有token,通过token获取到用户的id
            //通过查找用户,并查看用户的 status是不是enable , 如果通过把 token 给Auth->token, 并且设置登录成功
            if (!$this->auth->isLogin()) {  //如果登录不成功 跳转回登录
                $this->error(__('Please login first'), [
                    'routePath' => '/user/login'
                ], 302);
            }
            if (!action_in_arr($this->noNeedPermission)) {  //这里是查看用户的权限
                if (!$this->auth->check($routePath)) {
                    $this->error(__('You have no permission'), [], 401);
                }
            }
        } elseif ($token) {
            try {
                $this->auth->init($token);  //如果token 不为空
            } catch (HttpResponseException $e) {
            }
        }
        // 会员验权和登录标签位
        Event::trigger('frontendInit', $this->auth);
    }
从上面的代码我们可以看到, 还有一个 Auth 的类,后面再说,因为, 我们从这个代码中, 可以看到, checkIn 的是候是没有 token 的,并且 checkIn 是在 $noNeedLoign 中的

所以, 在 initialize中, 只是在控制器中添加一个 auth属性, 它是一个单例。
回到我们的 app\api\controller\user 控制器中 的chekin方法
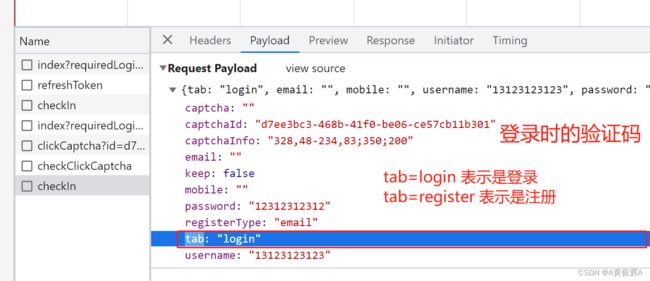
先看一下前端的传参
//这个请求是不需要用户登录的, 所以要 $this->auth中是没有信息的
public function checkIn()
{
$openMemberCenter = Config::get('buildadmin.open_member_center'); //从配置中读取是否开启会员中心
if (!$openMemberCenter) {
$this->error(__('Member center disabled')); //如果配置不开启, 返回错误
}
// 检查登录态 如果用户没有登录, 跳转回 /user
if ($this->auth->isLogin()) { //检测用户是否已登录
$this->success(__('You have already logged in. There is no need to log in again~'), [
'routePath' => '/user'
], 302);
}
if ($this->request->isPost()) {
$params = $this->request->post(['tab', 'email', 'mobile', 'username', 'password', 'keep', 'captcha', 'captchaId', 'captchaInfo', 'registerType']);
if (!in_array($params['tab'], ['login', 'register'])) { //如果tab 参数 不是 login 也不是register 返回错误
$this->error(__('Unknown operation'));
}
$validate = new UserValidate(); //验证信息类
try {
$validate->scene($params['tab'])->check($params);
} catch (Throwable $e) {
$this->error($e->getMessage());
}
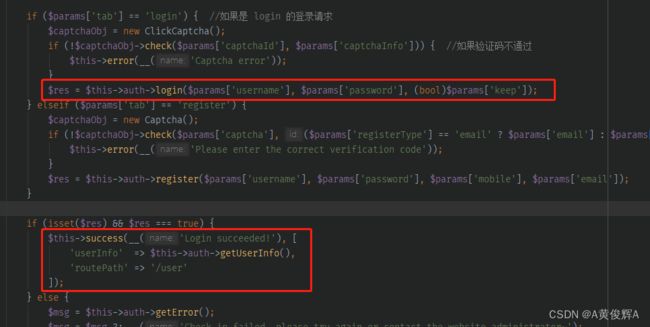
if ($params['tab'] == 'login') { //如果是 login 的登录请求
$captchaObj = new ClickCaptcha();
if (!$captchaObj->check($params['captchaId'], $params['captchaInfo'])) { //如果验证码不通过
$this->error(__('Captcha error'));
} //这里是登录的认证的方法 Auth的 login 方法, 这里才是真正的登录 这里才是真正的登录 这里才是真正的登录
$res = $this->auth->login($params['username'], $params['password'], (bool)$params['keep']);
} elseif ($params['tab'] == 'register') {
$captchaObj = new Captcha();
if (!$captchaObj->check($params['captcha'], ($params['registerType'] == 'email' ? $params['email'] : $params['mobile']) . 'user_register')) {
$this->error(__('Please enter the correct verification code'));
}
$res = $this->auth->register($params['username'], $params['password'], $params['mobile'], $params['email']);
}
//这里是登录成功之后返回给前端的数据, 里面一定是有 token 数据的
if (isset($res) && $res === true) {
$this->success(__('Login succeeded!'), [
'userInfo' => $this->auth->getUserInfo(),
'routePath' => '/user'
]);
} else {
$msg = $this->auth->getError();
$msg = $msg ?: __('Check in failed, please try again or contact the website administrator~');
$this->error($msg);
}
}
$this->success('', [
'accountVerificationType' => get_account_verification_type()
]);
}
从上面的代码中, 我们可以看到, 真正登录的代码是在 $res = t h i s − > a u t h − > l o g i n ( this->auth->login( this−>auth−>login(params[‘username’], p a r a m s [ ′ p a s s w o r d ′ ] , ( b o o l ) params['password'], (bool) params[′password′],(bool)params[‘keep’]);
三个参数, 分别是 用户名, 密码,和前端的一个 “记住我” 的一个标记
进入auth->login 的代码
     * 会员登录
     * @param string $username 用户名
     * @param string $password 密码
     * @param bool   $keep     是否保持登录
     * @return bool
     * @throws Throwable
     */
    public function login(string $username, string $password, bool $keep): bool
    {
        // 判断账户类型
        $accountType = false;
        $validate    = Validate::rule([
            'mobile'   => 'mobile',
            'email'    => 'email',
            'username' => 'regex:^[a-zA-Z][a-zA-Z0-9_]{2,15}$',
        ]);
        if ($validate->check(['mobile' => $username])) $accountType = 'mobile';
        if ($validate->check(['email' => $username])) $accountType = 'email';
        if ($validate->check(['username' => $username])) $accountType = 'username';
        //分别使用不同的 验证来验证username ,也就是说用户可以使用    手机号  邮箱 或都用户名来进行登录
        if (!$accountType) {
            $this->setError('Account not exist');
            return false;
        }
        //这里 Auth类中的model  设置成前端的 user 类的  (注意区分一下,前端的 user 和后端的 admin表)
        $this->model = User::where($accountType, $username)->find();
        if (!$this->model) {
            $this->setError('Account not exist');
            return false;
        }
        if ($this->model->status == 'disable') {
            $this->setError('Account disabled');
            return false;
        }
        //如果不存在这个user 或者说user的status 属性是 disable ; 返回错误
        $userLoginRetry = Config::get('buildadmin.user_login_retry');
        //从配置类中读取用户可以重复登录的次数, 如果超出了登录的次数,就一天内不允许重复登录
        if ($userLoginRetry && $this->model->login_failure >= $userLoginRetry && time() - $this->model->last_login_time < 86400) {
            $this->setError('Please try again after 1 day');
            return false;
        }
        if ($this->model->password != encrypt_password($password, $this->model->salt)) {
            $this->loginFailed();
            $this->setError('Password is incorrect');
            return false;
        }
        //这里是否单点登录, 如果有单点登录的配置,就把 数据库中的token表中的, 当前用户的token 全部删除
        //这样的话, 其它的人用这个帐号登录的时候, 就会因为数据库中没有token 所以就认证失败了
        // Token 类是一个门面类 app\common\library\Token
        // Token 的存储驱动可以是mysql ,也可以是redis ,默认的是 protected string $namespace = '\\app\\common\\library\\token\\driver\\';
        if (Config::get('buildadmin.user_sso')) {
            Token::clear('user', $this->model->id);
            Token::clear('user-refresh', $this->model->id);
        }

        if ($keep) {
            $this->setRefreshToken($this->refreshTokenKeepTime);
        }
        //上面清除了数据库中的所有token ,
        //在这个 loginSuccessful 中会颁发当前用户的新的token
        $this->loginSuccessful();
        return true;
    }
从上面的方法中, 我们可以看到, 代码来到了 loginSuccessful方法中
    /**
     * 登录成功
     * @return bool
     */
    public function loginSuccessful(): bool
    {
        if (!$this->model) {
            return false;
        }
        //开启事务
        $this->model->startTrans();
        try {
            $this->model->login_failure   = 0;
            $this->model->last_login_time = time();
            $this->model->last_login_ip   = request()->ip();
            $this->model->save();
            $this->loginEd = true;     //修改 auth中的登录标记

            //如果this->token为空, 则新建一个token
            if (!$this->token) {
                $this->token = Random::uuid();  //通过 uuid 请建了一个token ,
                //这里要注意,存入数据库的不是这个 uuid
                // $token      = $this->getEncryptedToken($token);
                // 要Token 的  mysql dirver中, 使用了 getEncryptedToken 对 uuid的token 进行了加密
                Token::set($this->token, 'user', $this->model->id, $this->keepTime);
            }
            $this->model->commit();
        } catch (Throwable $e) {
            $this->model->rollback();
            $this->setError($e->getMessage());
            return false;
        }
        return true;
    }
到这里, login方法结束了, 我们回到 chekIn 的代码中
在 $this->success()方法中, 我们看来了, userInfo => $this->auth->getUserInfo();

从上面的步骤中, 我们就可以得到前端用户的 token 和用户信息了