MyBatis项目搭建
1.新建个maven项目
2.导入相关依赖
            org.mybatis
            mybatis
            3.5.7


            mysql
            mysql-connector-java
            8.0.28


            junit
            junit
            4.12
            test
2.编写核心配置文件,可以到mybatis中文网复制模板:mybatis – MyBatis 3 | 入门
mybatis.xml
3.编写实体类和Mapper层以及对应的配置文件
package com.zhou.pojo;

public class User {
    private Integer id;
    private String name;
    private String pwd;
    private String perms;
/*这里省略相关的getset方法和toString方法*/
}
package com.zhou.mapper;
import com.zhou.pojo.User;
import java.util.List;
public interface UserMapper {
List findAll();
}
对应的配置文件
测试
import com.zhou.mapper.UserMapper;
import org.apache.ibatis.io.Resources;
import org.apache.ibatis.session.SqlSession;
import org.apache.ibatis.session.SqlSessionFactory;
import org.apache.ibatis.session.SqlSessionFactoryBuilder;
import org.junit.Test;

import java.io.IOException;
import java.io.InputStream;

public class TestMybatis {

    @Test
    public void test01(){
        InputStream config= null;
        try {
            config = Resources.getResourceAsStream("mybatis.xml");
        } catch (IOException e) {
            e.printStackTrace();
        }
        SqlSessionFactory sqlSessionFactory=new SqlSessionFactoryBuilder().build(config);
        SqlSession sqlSession=sqlSessionFactory.openSession();

        UserMapper userMapper=sqlSession.getMapper(UserMapper.class);

        System.out.println(userMapper.findAll());
    }
}
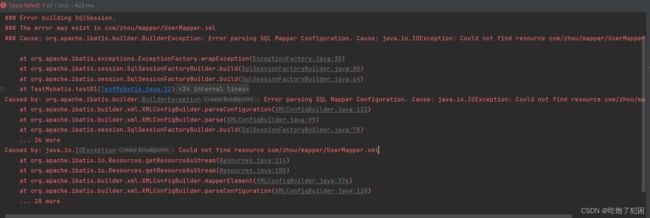
运行之后发现抱错,大概意思就是找不到UserMapper.xml文件
这时候需要在pom.xml文件里把这类文件给过滤掉
                src/main/resources

                    **/*.properties
                    **/*.xml

                true


                src/main/java

                    **/*.properties
                    **/*.xml

                true
再次运行就可以了
与spring进行整合
还是一样的步骤:导jar包,配置文件
导入依赖
            org.mybatis
            mybatis-spring
            2.0.2


            org.springframework
            spring-jdbc
            5.3.21


            com.alibaba
            druid
            1.1.20


            org.springframework
            spring-context
            5.3.21
编写spring 的配置文件applicationContext.xml,并把数据库相关的交给spring管理
mybatis.xml里面就不需要了
写个测试文件
    @Test
    public void test03(){
        ApplicationContext context = new ClassPathXmlApplicationContext( "applicationContext.xml" );
        UserMapper userMapper = context.getBean ( "userMapper",UserMapper.class );//这个getBean里的要小写开头
        for (User user : userMapper.findAll()) {
            System.out.println(user);
        }
    }
成功运行
再整合springmvc
导包
            org.springframework
            spring-webmvc
            5.3.21
再web.xml里配置dispatchservlet
        contextConfigLocation
        classpath:applicationContext.xml


        org.springframework.web.context.ContextLoaderListener


        springmvc
        org.springframework.web.servlet.DispatcherServlet


            contextConfigLocation
            classpath:springmvc-servlet.xml


        1


        springmvc
        /
sprinmvc的配置文件springmvc-servlet.xml
补充service、controller层
package com.zhou.service;

import com.zhou.mapper.UserMapper;
import com.zhou.pojo.User;
import org.springframework.beans.factory.annotation.Autowired;
import org.springframework.stereotype.Service;

import javax.annotation.Resources;
import java.util.List;
@Service
public class UserServiceImpl implements UserService{

    @Autowired
    private UserMapper userMapper;

    @Override
    public List findAll() {
        return userMapper.findAll();
    }
}
package com.zhou.service;

import com.zhou.pojo.User;

import java.util.List;

public interface UserService {
    List findAll();
}
package com.zhou.controller;

import com.zhou.service.UserService;
import org.springframework.beans.factory.annotation.Autowired;
import org.springframework.stereotype.Controller;
import org.springframework.ui.Model;
import org.springframework.web.bind.annotation.RequestMapping;

@Controller
public class UserController {
    @Autowired
    private UserService userService;

    @RequestMapping("/findAll")
    public String findAll(Model model){
        model.addAttribute("userlist",userService.findAll());
        return "user";
    }
}
写一下页面
再WEN-INF下新建一个jsp文件夹,再新建一个页面user.jsp
<%--
  Created by IntelliJ IDEA.
  User: 10729
  Date: 2022/10/28
  Time: 17:32
  To change this template use File | Settings | File Templates.
--%>
<%@ page contentType="text/html;charset=UTF-8" language="java" %>


    Title


用户
${userlist}
在配置一下tomact运行一下,途中遇到一个问题,启动tomact的时候报错了,按照下面的试了一遍就可以了
解决Artifact ssmbuild:war exploded: Error during artifact deployment. See server log for details图解_Escape️的博客-CSDN博客


