基于YOLO V8的车牌识别
赵春江
2023年6月
1、前言
十年前就想实现车牌识别这项任务,虽然当时这项技术就已较成熟(与现在的实现方法不同),但那时的我还具备这个能力。弹指一瞬间,没想到十年间人工智能技术已经发展到一个新的高度,图像识别早已不成问题,以ChapGPT为代表的生成式技术大行其道。写作、作曲、绘画等内容创作,甚至编程都可由计算机自动完成,这在以前只会出现在电影里。
回到主题,正如上文提到的那样,图像识别经过十几年的发展,已经不再触不可及。基于各类预训练模型,通过简单的微调和迁移学习,就可以实现我们想要的各类图像分类、图像识别和图像分割。在这里,我们利用YOLO V8,以车牌识别为研究对象,抛砖引玉地讲解一下图像识别的实现方法(并没有涉及具体的技术细节),以完成我十年前的愿望。
2、实现
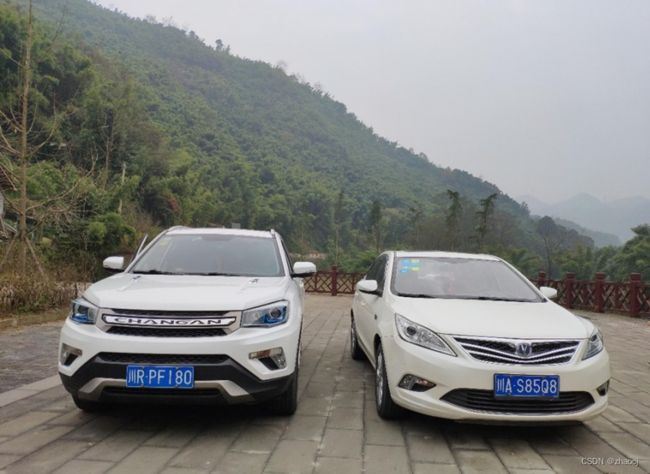
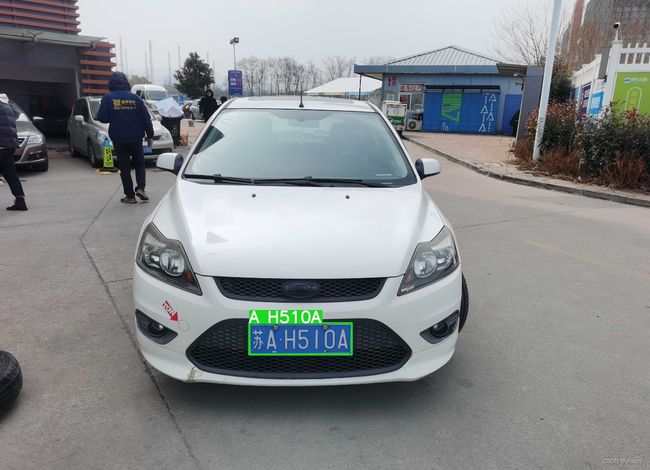
我们识别的车牌为正面水平放置的蓝底白字车牌,如下图所示的位置及车牌。对于其他位置和类型的车牌,本人并不能保证能够正确识别。
2.1、数据准备
数据收集整理和预处理一直都是深度学习最关键的一步。在这里我们使用的图像都来源于网上搜索和本人亲自拍摄。我把车牌识别分为两个步骤:第一步是提取出车牌,第二步是由车牌图像识别出车牌字符。因此需要有两个数据集,一个是含有车牌的图像,另一个是只含有车牌的图像。对于第一个数据集,我们需要标注出车牌的位置;对于第二个数据集,我们不仅需要标注出字符的位置,还需要标注出是哪个字符。这是一项很繁琐的工作,数据集不能太少,标注信息更要准确。
好在我们可以借助https://roboflow.com/这网站,减轻一些标注工作的劳动强度。具体如何标注,在这里就不再赘述。总之我已经标注好了,大家只需下载即可,网址分别为:
含车牌的数据集:
https://universe.roboflow.com/zhao-chunjiang-jztse/chinese-plate-license
只含车牌的数据集:
https://universe.roboflow.com/zhao-chunjiang-jztse/chinese-plate-license-character/dataset/2
这里需要说明的是,由于本人没有能力收集到足够数量的各个省市区的车牌图像,所以识别出的字符并不包括代表省市区的汉字。
2.2、车牌识别
有了数据集,下面就可以开始训练了。我们在google colab内编写程序,这对于那些没有GPU的人来说,再合适不过的了。
首先,利用含有车牌的数据集训练能够识别车牌的模型:
加载谷歌云盘
from google.colab import drive
drive.mount('/content/drive')下载并安装ultralytics
!pip install ultralytics训练模型
from ultralytics import YOLO

model = YOLO("yolov8m.pt")
#train the model
results = model.train(data="/content/drive/MyDrive/Chinese plate license/data.yaml",
                    epochs=120,
                    imgsz=640)
把训练得到的最好模型best.pt保存在谷歌云盘内,供以后使用
import shutil
shutil.copy("/content/runs/detect/train/weights/best.pt","/content/drive/MyDrive/plate.pt")
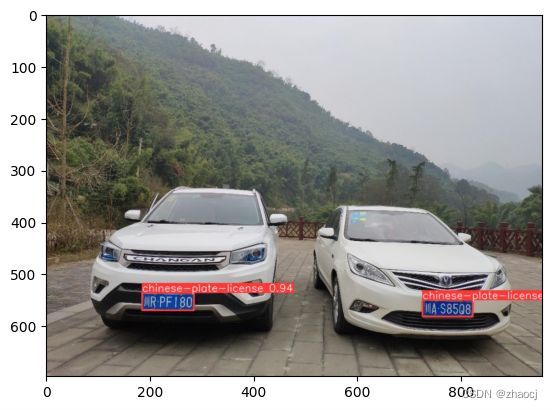
简单的测试一下训练效果,把测试图像上传至colab内,然后调用模型,最后显示结果图像
model = YOLO("/content/drive/MyDrive/plate.pt")
results = model.predict(source="/content/cars.jpg", save=True)

from PIL import Image
import matplotlib.pyplot as plt
image = Image.open("/content/runs/detect/predict/cars.jpg")
plt.imshow(image)
最终结果为:
以上的代码可以在google colab中看到并运行:
https://colab.research.google.com/gist/ZhaoChunjiang/0d8cc1789eb01af28d6176095eb0b024/plate.ipynb
2.3、字符识别
然后,利用只含车牌的数据集训练能够识别字符的模型:
加载谷歌云盘
from google.colab import drive
drive.mount('/content/drive')下载并安装ultralytics
!pip install ultralytics训练模型
from ultralytics import YOLO
model = YOLO("yolov8m.pt")

# train the model
results = model.train(data="/content/drive/MyDrive/Chinese plate license character/data.yaml",
                    epochs=120,
                    imgsz=[448,140])
把训练得到的最好模型best.pt保存在谷歌云盘内,供以后使用
import shutil
shutil.copy("/content/runs/detect/train/weights/best.pt","/content/drive/MyDrive/char.pt")
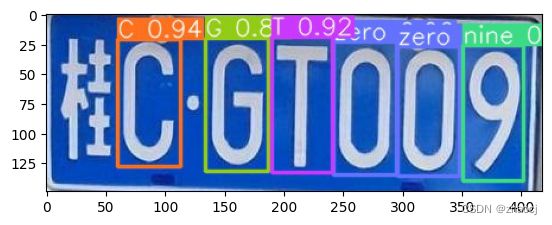
简单的测试一下训练效果,把测试图像上传至colab内,然后调用模型,最后显示结果图像
model = YOLO("/content/drive/MyDrive/char.pt")
results = model.predict(source="/content/plate.jpg", save=True)

from PIL import Image
import matplotlib.pyplot as plt
image = Image.open("/content/runs/detect/predict/plate.jpg")
plt.imshow(image)
最终结果为:
以上的代码可以在google colab中看到并运行:
https://colab.research.google.com/gist/ZhaoChunjiang/8b6ece0dce6fc959dac8b52604997f02/char.ipynb
通过前面两段代码,我们分别得到了识别车牌和字符的网络模型plate.pt和char.pt。为便于大家使用和验证,我把这两个已训练好的网络模型上传至百度云盘,大家也就不用再运行2.2和2.3部分的程序,只要利用这两个pt文件,执行2.4部分的代码,就可以实现车牌识别。
链接:https://pan.baidu.com/s/1cZdg_2pZ5JTTq09l_kN_vQ
提取码:wasd
2.4、车牌字符识别
下面我们就给出车牌识别的完整代码:
加载谷歌云盘
from google.colab import drive
drive.mount('/content/drive')
下载并安装ultralytics
!pip install ultralytics加载已训练好的检测车牌和字符的模型plate.pt和char.pt,这两个模型都已事先上传至谷歌云盘内
from ultralytics import YOLO
modelPlate = YOLO("/content/drive/MyDrive/plate.pt")
modelChar = YOLO("/content/drive/MyDrive/char.pt")
定义待识别的图像(事先已上传至colab内)和字符数组
car = "/content/drive/MyDrive/555.jpg"

charclass = ['A', 'B', 'C', 'D', 'E', 'F', 'G', 'H', 'J', 'K', 'L', 'M', 'N', 'P', 'Q', 'R', 'S', 'T', 'U', 'V', 'W', 'X', 'Y', 'Z', '8', '5', '4', '9', '1', '7', '6', '3', '2', '0']
定义用于在图像中显示字符的函数,它的作用主要是根据图像的大小调整显示字符的大小
import cv2

def box_label(image, box, label='', color=(19, 222, 24), txt_color=(255, 255, 255)):
   #根据图像的大小,选择画笔的粗细
   lw = max(round(sum(image.shape) / 2 * 0.003), 2)
   #得到该矩形的左上角和右下角坐标
   p1, p2 = (int(box[0]), int(box[1])), (int(box[2]), int(box[3]))
   #绘制矩形框
   cv2.rectangle(image, p1, p2, color, thickness=lw, lineType=cv2.LINE_AA)
   #绘制标签
   if label:
      tf = max(lw - 1, 1)  # font thickness
      w, h = cv2.getTextSize(label, 0, fontScale=lw / 3, thickness=tf)[0]  # text width, height
      outside = p1[1] - h >= 3
      p2 = p1[0] + w, p1[1] - h - 3 if outside else p1[1] + h + 3
      cv2.rectangle(image, p1, p2, color, -1, cv2.LINE_AA)  # filled
      cv2.putText(image, label, (p1[0], p1[1] - 2 if outside else p1[1] + h + 2),
                0,
                lw / 3,
                txt_color,  #白色
                thickness=tf,
                lineType=cv2.LINE_AA)
检测车牌
results1 = modelPlate.predict(source=car)
boxes = results1[0].boxes.data.cpu().numpy()[:,:4]
#print(boxes)
识别并显示车牌字符
from PIL import Image
import matplotlib.pyplot as plt
import numpy as np
from google.colab.patches import cv2_imshow

imge = Image.open(car)
img = np.asarray(imge)

for i in range(len(boxes)):
   plate = imge.crop(boxes[i])
   results2 = modelChar.predict(plate)
   chars = results2[0].boxes.data.cpu().numpy()
   inde = np.argsort(chars[:,0])
   char = chars[:,5]
   res = ""
   for j in range(len(chars)):
      res += charclass[int(char[inde[j]])]
      if j==0:
         res += " "

   box_label(img, boxes[i], res)

img = cv2.cvtColor(img, cv2.COLOR_BGR2RGB)
cv2_imshow(img) #在Colab中使用,否则用cv2.imshow
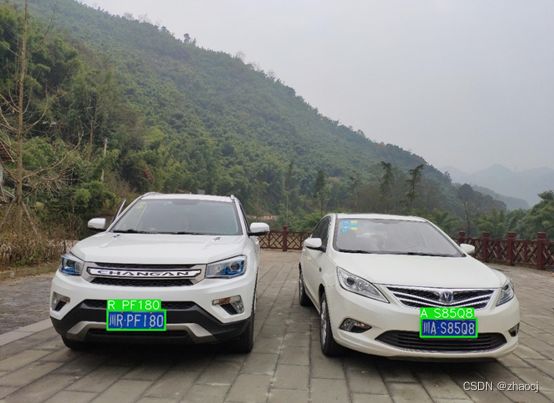
最终的结果为:
我们再看看另一个测试结果:
以上的代码可以在google colab中看到并运行:
https://colab.research.google.com/gist/ZhaoChunjiang/993f9c5936debc79013ea24e19dc8b1e/plate_dection.ipynb
3、小结
经过多次测试可以看出,只要车牌的分辨率足够大,该系统是能够准确识别车牌字符的。唯一的遗憾就是还不能实现对汉字的识别(因数据不够多)。希望大家也用自己的图像测试一下。
