Python的加密
1.加密的分类
- 对称加密
Symmetric Cryptography,消息的发送者和接收者使用相同的key进行加密和解密 - 非对称加密
Asymmetric Cryptography(也叫Public-key Cryptography),消息的加密和解密使用不同的key
2.哈希函数
MD5
import hashlib
password = b"password123"
salt = b"2022"
hash = hashlib.md5 (password + salt).hexdigest()
print (hash)
注意
哈希碰撞: 不同的输入经过同一哈希函数得到相同的输出
SHA
import hashlib
hash_object = hashlib.sha256(b'Hello World')
hex_dig = hash_object.hexdigest()
print(hex_dig)
hash_object = hashlib.sha256(b'Hello World!')
hex_dig = hash_object.hexdigest()
print(hex_dig)
注意
哈希函数具有不可逆性,也就是无法通过哈希值逆向算出原始输入,这点非常重要,否则通过哈希存储的密码就不安全了
3.数字签名
签名过程(签名由私钥持有方发起):
•首先准备一个要发送的明文消息
•通过哈希算法,把这条明文消息转成哈希值
•使用私钥对这个哈希值进行签名
•把明文消息连同签名发送给公钥持有方
验证过程(公钥持有方进行签名验证):
•收到原始明文信息,对其进行哈希,取得哈希值H1
•通过公钥对签名消息进行解密,取得哈希值H2
•比较H1和H2,如果相等,则证明发送信息者,确实为私钥拥有方。
python演示
from Crypto.PublicKey import RSA

key_pair = RSA.generate(bits=1024)
print("Public key:")
print(f' N={hex(key_pair.n)}')
print(f' e={hex(key_pair.e)}')
print("Private key:")
print(f' N={hex(key_pair.n)}')
print(f' d={hex(key_pair.d)}')

# 生成签名
msg = b'A message for signing'
from hashlib import sha512

hash = int.from_bytes(sha512(msg).digest(), byteorder='big')  # 使用了Python内置的pow方法进行乘方和模运算
signature = pow(hash, key_pair.d, key_pair.n)
print("Signature:", hex(signature))

# 签名的验证
msg = b'A message for signing'
hash = int.from_bytes(sha512(msg).digest(), byteorder='big')
hash_from_signature = pow(signature, key_pair.e, key_pair.n)
print("Signature valid:", hash == hash_from_signature)
openssl演示
#生成RSA私钥
openssl genrsa -out private.pem 1024
#生成RSA公钥
openssl rsa -in private.pem -pubout >  public.pem
#对data.txt进行签名
openssl dgst -sha1 -sign private.pem -out sha1.sign data.txt
#对data.txt进行验签名
openssl dgst -sha1 -verify public.pem -signature sha1.sign data.txt
4.消息认证
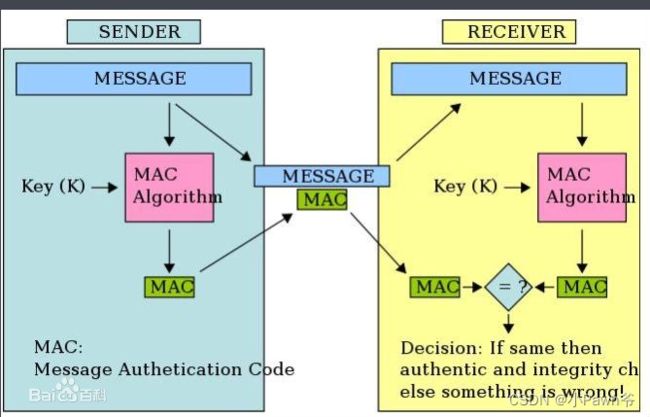
消息认证( Message authentication codes )
•消息认证一般是用在对称加密系统,通信双方共享一个秘钥
•数字签名是用在非对称加密系统,也就是公钥私钥加密
使用Python计算HMAC-SHA256:
import hashlib, hmac, binascii

mac = hmac.new(b'key', b'some msg', hashlib.sha256).digest()
print(binascii.hexlify(mac))
MAC的使用场景
•通信双方共享一个秘钥,并且协商好MAC的算法(比如HMAC-SHA256)
•消息发送方把未加密的消息,连同消息+秘钥计算出的MAC值发送给消息接收方
•接收方通过秘钥和消息计算出MAC值,如果计算的MAC和接收到的MAC值相同,则可以说明消息违背第三方篡改。
5.Fernet方法
Fernet是AES+HMAC的一种应用场景
pip install cryptography
示例
import hashlib
import base64

from cryptography.fernet import Fernet


def create_url_safe_base64_encoded_bytes(secret):
    """convert secret into 32 url-safe base64-encoded bytes for Fernet key"""
    # get 32 bytes SHA256 hash
    m = hashlib.sha256()
    m.update(secret.encode())
    return base64.urlsafe_b64encode(m.digest())


def encrypt(secret, plain_text):
    f = Fernet(create_url_safe_base64_encoded_bytes(secret))
    return f.encrypt(plain_text.encode()).decode()


def decrypt(secret, cipher):
    f = Fernet(create_url_safe_base64_encoded_bytes(secret))
    return f.decrypt(cipher).decode()


def encrypt_file(input_file_name, output_file_name, secret):
    # 一个文件加密的例子,注意读取bytes
    f = Fernet(create_url_safe_base64_encoded_bytes(secret))
    with open(input_file_name, 'rb') as f_in:
        content_raw = f_in.read()
    encrypted = f.encrypt(content_raw)
    with open(output_file_name, 'wb') as f_out:
        f_out.write(encrypted)


if __name__ == "__main__":
    cipher_text = encrypt(secret='password', plain_text="message")
    print(cipher_text)
    plain_text = decrypt(secret='password', cipher=cipher_text)
    print(plain_text)
6.数字证书
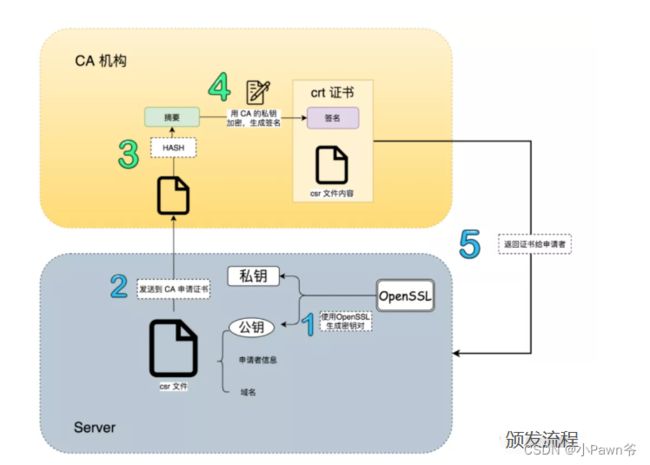
PKI(Public Key Infrastructure ) 简称公钥基础设施 ,它是一个在数字世界里用来认证用户或者设备的技术,由一些受信任的机构签发一个特殊的“文件”来证明一个秘钥属于特定的用户和设备,用户和设备从而可以使用该认证过的秘钥来代表自己的身份,进行消息的传递
6.1证书的内容
•证书拥有者的基本信息,(比如HTTPS证书的话,包括拥有者的域名CNAME,公司或者组织名称,地点等)
•证书颁发者的基本信息
•证书拥有者的公钥
•对公钥和其他信息的签名
6.2OpenSSL生成自签名证书
1.生成 CA的RSA的私钥
openssl genrsa -out ca.key 2048
2.CA公钥生产的签名(根证书)
openssl req -new -x509 -key ca.key -out ca.crt -days 365<<EOF
DN
DN
BJ
BJ
Test
Test
test.com
EOF
3.证书申请者(网站)的RSA公钥私钥
openssl genrsa -out my-website.key 2048
4.证书申请者(网站)公钥 + 网站信息,签名后生成CRS
openssl req -new -key my-website.key -out my-website.csr<<EOF
CN
BJ
BJ
CS
C
my-website.tips
[email protected]
666666
test
EOF
5.查看csr文件信息
openssl req -text -noout -verify -in my-website.csr
6.对csr文件进行签名
openssl x509 -req -in my-website.csr -CA ../ca/ca.crt -CAkey ../ca/ca.key -set_serial 01 -out my-website.crt -days 365
7.查看证书申请者生成的CRT证书
openssl x509 -in my-website.crt -text -noout
8.证书测试
from flask import Flask
app = Flask(__name__)

@app.route("/")
def hello():
    return "Hello World!"

if __name__ == "__main__":
    app.run(ssl_context=('my-website.crt', 'my-website.key'))

