分布式链路追踪之SkyWalking详解和实战
SkyWalking
文章目录
- SkyWalking
-
- 1.SkyWalking概述
- 2.SkyWalking架构设计
- 3.SkyWalking部署
- 4.应用程序接入SkyWalking
- 5.SkyWalking配置应用告警
-
- 5.1.告警规则
- 5.2.Webhook(网络钩子)
- 5.3.邮件告警实践
- 6.项目自动化部署接入SkyWalking
-
- 6.1 整体思路
- 6.2 启动参数修改
- 6.3 上传agent组件到服务器
- 6.4 修改jenkins中的项目配置
1.SkyWalking概述
2015年由个人吴晟(华为开发者)主导开源,作者是华为开发云监控产品经理,主导监控产品的规划、技术路线及相关研发工作,也是OpenTracing分布式追踪标准组织成员 ,该项目 2017年加入Apache孵化器,是一个分布式系统的应用程序性能监控工具(APM),专为微服务、云原生架构和基于容器(Docker、K8s、Mesos)架构而设计。
官方站点:http://skywalking.apache.org/
GitHub项目地址:https://github.com/apache/skywalking
其核心功能要点如下:
- 指标分析:服务,实例,端点指标分析
- 问题分析:在运行时分析代码,找到问题的根本原因
- 服务拓扑:提供服务的拓扑图分析
- 依赖分析:服务实例和端点依赖性分析
- 服务检测:检测慢速的服务和端点
- 性能优化:根据服务监控的结果提供性能优化的思路
- 链路追踪:分布式跟踪和上下文传播
- 数据库监控:数据库访问指标监控统计,检测慢速数据库访问语句(包括SQL语句)
- 服务告警:服务告警功能
名词解释:
- 服务(service):业务资源应用系统
- 端点(endpoint):应用系统对外暴露的功能接口
- 实例(instance):物理机
2.SkyWalking架构设计
SkyWalking的整体架构设计如下图所示:
SkyWalking整体可分为:客户端,服务端
客户端:agent组件
基于探针技术采集服务相关信息(包括跟踪数据和统计数据),然后将采集到的数据上报给Skywalking的数据收集器
服务端:又分为OAP,Storage,WebUI
OAP:observability analysis platform可观测性分析平台,负责接收客户端上报的数据,对数据进行分析,聚合,计算后将数据进行存储,并且还会提供一些查询API进行数据的查询,这个模块其实就是我们所说的链路追踪系统的Collector收集器
Storage:skyWalking的存储介质,默认是采用H2,同时支持许多其他的存储介质,比如:ElastaticSearch,mysql等
WebUI:提供一些图形化界面展示对应的跟踪数据,指标数据等等
SkyWalking采用组件式开发,易于扩展,主要组件作用如下:
- Skywalking Agent:链路数据采集tracing(调用链数据)和metric(指标)信息并上报,上报通过HTTP或者gRPC方式发送数据到Skywalking Collector。
- Skywalking Collector : 链路数据收集器,对agent传过来的tracing和metric数据进行整合分析通过Analysis Core模块处理并落入相关的数据存储中,同时会通过Query Core模块进行二次统计和监控告警。
- Storage: Skywalking的存储,支持以ElasticSearch、Mysql、TiDB、H2等主流存储作为存储介质进行数据存储,H2仅作为临时演示单机用,目前生产测试环境使用的是ES存储。
- SkyWalking UI: Web可视化平台,用来展示落地的数据。
不修改原有项目一行代码就可以进行集成,SkyWalking 以前也将这种说法放在 README 文档中,实际上这种说法是既对又错的。对于最终用户来说是对的,他们不需要修改代码(至少在绝大多数情况下)。 但这种说法也是错的, 因为代码实际上还是被修改了,只是被代理给修改了,这种做法通常叫做“在运行时操作代码”。底层原理就是自动打点代理利用了虚拟机提供的用于修改代码的接口来动态加入打点的代码,也就是说我们没有手动埋点,而是skywalking通过java agent进行了自动埋点,java agent这个机制我理解为一个main函数的拦截器,他提供了premain()方法来修改java类,premain字面理解就是在main函数之前,也就是说skywalking通过java agent的premain方法去执行埋点操作,从而完成自动埋点。
3.SkyWalking部署
参考资料中的docker-compose.yml
(1)安装OAP
docker拉取镜像
docker pull apache/skywalking-oap-server:latest-es6
创建容器
docker run --name skywalking -d -p 1234:1234 -p 11800:11800 -p 12800:12800 --restart always apache/skywalking-oap-server
SkyWalking默认使用H2进行信息存储,但H2一旦重启数据就会丢失,因此采用ES替换H2对SkyWalking中数据信息存储,项目中已经安装了elasticsearch,可以直接使用,需要指定elasticsearch的地址,这里需要注意ES的版本
(2)安装UI
拉取镜像
docker pull apache/skywalking-ui
创建容器
docker run --name skywalking-ui -d -p 8686:8080 --link skywalking:skywalking -e SW_OAP_ADDRESS=skywalking:12800 --restart always apache/skywalking-ui
启动成功后访问skywalking的webui页面:http://192.168.xx.xxx:xxxx/
4.应用程序接入SkyWalking
应用程序接入skywalking非常的简单,只需在应用程序启动时通过-javaagent来指定skyWalking的agent的组件
首先在下载好的skyWalking中找到agent组件:
通过-javaagent来指定skywalking的agent组件的skywalking-agent.jar即可
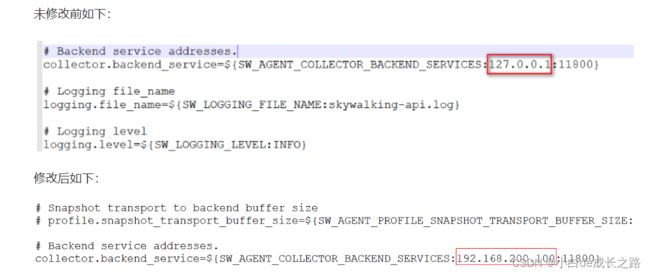
另外:agent负责采集数据然后将数据提交到OAP(collector)中,因此我们需要在agent的配置文件中指定OAP的地址,默认是本地127.0.0.1
进入到config目录,找到:agent.config配置文件
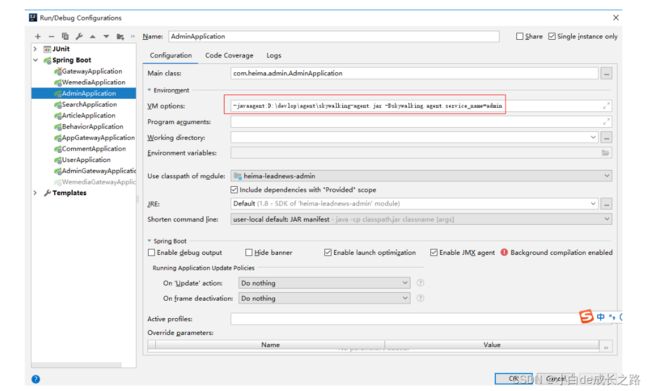
接下来我们依次启动应用程序,以黑马头条第13天的代码的xxx-leadnews-admin中的xxx-leadnews-admin-gateway,xxx-leadnews-user为例来启动,我们只需修改启动参数即可,
我们需要将启动参数修改如下(注意:要指向自己电脑中的agent存放的位置)
-javaagent:D:\develop\agent\skywalking-agent.jar
-Dskywalking.agent.service_name=leadnews-admin
注意:如果一个服务作多节点部署,最好保证服务名称不一样
当然如果一样也可以,只不过是一个服务有多个实例
图示如下:
三个服务都要修改启动参数,然后启动项目
访问:http://192.168.xxx.xxx:xxxx查看skywalking的ui
UI监控视角与指标介绍
我们解读一下比较陌生的一些指标:
用户满意度Apdex Score
Apdex是基于设置的阈值的响应时间的度量。它测量了满意的响应时间与不满意的响应时间之比。从资产请求到完成交付回请求者的响应时间。
管理员,所有者或附加组件管理器定义响应时间阈值T。在T短时间内处理的所有响应都能使用户满意。
例如,如果T为1.2秒,并且响应在0.5秒内完成,则用户会感到满意。所有大于1.2秒的响应都使用户不满意。大于4.8秒的响应使用户感到沮丧。
cpm 每分钟请求数
cpm 全称 call per minutes,是吞吐量(Throughput)指标。
下图是拼接的全局、服务、实例和接口的吞吐量及平均吞吐量。
185cpm=185/60=3.08个请求/秒
SLA 服务等级协议
服务等级协议用来表示提供服务的水平,可以衡量平台的可用性,下面是N个9的计算
1年 = 365天 = 8760小时
99     = 8760 * 1%     => 3.65天----------------》相当于全年有3.65天不可用,2个9就基本不可用了
99.9   = 8760 * 0.1%   => 8.76小时--------------》相当于全年有8.76小时不可用
99.99  = 8760 * 0.01%  => 52.6分钟
99.999 = 8760 * 0.001% => 5.26分钟
因此,全年只要发生一次较大规模宕机事故,4个9肯定没戏,一般平台3个9差不多。
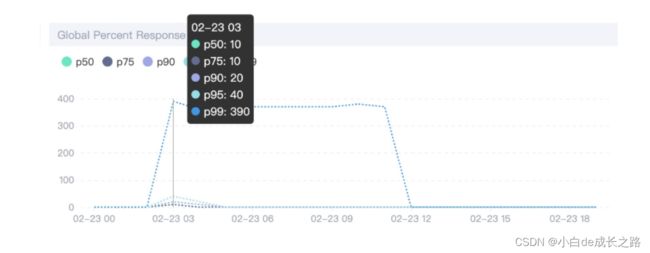
Percent Response 百分位数统计
Skywalking 有 “p50、p75、p90、p95、p99” 一些列值,图中的 “p99:390” 表示 99% 请求的响应时间在390ms以内。
Heatmap 热力图
Heapmap 可译为热力图、热度图都可以,图中颜色越深,表示请求数越多,这和GitHub Contributions很像,commit越多,颜色越深。
纵坐标是响应时间,鼠标放上去,可以看到具体的数量。
通过热力图,一方面可以直观感受平台的整体流量,另一方面也可以感受整体性能。
5.SkyWalking配置应用告警
SkyWalking 告警功能是在6.x版本新增的,其核心由一组规则驱动,这些规则定义在config/alarm-settings.yml文件中。 告警的定义分为两部分:
- 告警规则:它们定义了应该如何触发度量警报,应该考虑什么条件。
- Webhook(网络钩子):定义当警告触发时,哪些服务终端需要被告知
5.1.告警规则
SkyWalking 的发行版都会默认提供config/alarm-settings.yml文件,里面预先定义了一些常用的告警规则。如下:
# Licensed to the Apache Software Foundation (ASF) under one
# or more contributor license agreements.  See the NOTICE file
# distributed with this work for additional information
# regarding copyright ownership.  The ASF licenses this file
# to you under the Apache License, Version 2.0 (the
# "License"); you may not use this file except in compliance
# with the License.  You may obtain a copy of the License at
#
#     http://www.apache.org/licenses/LICENSE-2.0
#
# Unless required by applicable law or agreed to in writing, software
# distributed under the License is distributed on an "AS IS" BASIS,
# WITHOUT WARRANTIES OR CONDITIONS OF ANY KIND, either express or implied.
# See the License for the specific language governing permissions and
# limitations under the License.

# Sample alarm rules.
rules:
  # Rule unique name, must be ended with `_rule`.
  service_resp_time_rule:
    metrics-name: service_resp_time
    op: ">"
    threshold: 1000
    period: 10
    count: 3
    silence-period: 5
    message: Response time of service {name} is more than 1000ms in 3 minutes of last 10 minutes.
  service_sla_rule:
    # Metrics value need to be long, double or int
    metrics-name: service_sla
    op: "<"
    threshold: 8000
    # The length of time to evaluate the metrics
    period: 10
    # How many times after the metrics match the condition, will trigger alarm
    count: 2
    # How many times of checks, the alarm keeps silence after alarm triggered, default as same as period.
    silence-period: 3
    message: Successful rate of service {name} is lower than 80% in 2 minutes of last 10 minutes
  service_resp_time_percentile_rule:
    # Metrics value need to be long, double or int
    metrics-name: service_percentile
    op: ">"
    threshold: 1000,1000,1000,1000,1000
    period: 10
    count: 3
    silence-period: 5
    message: Percentile response time of service {name} alarm in 3 minutes of last 10 minutes, due to more than one condition of p50 > 1000, p75 > 1000, p90 > 1000, p95 > 1000, p99 > 1000
  service_instance_resp_time_rule:
    metrics-name: service_instance_resp_time
    op: ">"
    threshold: 1000
    period: 10
    count: 2
    silence-period: 5
    message: Response time of service instance {name} is more than 1000ms in 2 minutes of last 10 minutes
#  Active endpoint related metrics alarm will cost more memory than service and service instance metrics alarm.
#  Because the number of endpoint is much more than service and instance.
#
#  endpoint_avg_rule:
#    metrics-name: endpoint_avg
#    op: ">"
#    threshold: 1000
#    period: 10
#    count: 2
#    silence-period: 5
#    message: Response time of endpoint {name} is more than 1000ms in 2 minutes of last 10 minutes

webhooks:
#  - http://127.0.0.1/notify/
#  - http://127.0.0.1/go-wechat/
告警规则配置项的说明:
- **Rule name:**规则名称,也是在告警信息中显示的唯一名称。必须以
_rule结尾,前缀可自定义 - **Metrics name:**度量名称,取值为oal脚本中的度量名,目前只支持
long、double和int类型。 - **Include names:**该规则作用于哪些实体名称,比如服务名,终端名(可选,默认为全部)
- **Exclude names:**该规则作不用于哪些实体名称,比如服务名,终端名(可选,默认为空)
- **Threshold:**阈值
- OP: 操作符,目前支持
>、<、= - **Period:**多久告警规则需要被核实一下。这是一个时间窗口,与后端部署环境时间相匹配
- **Count:**在一个Period窗口中,如果values超过Threshold值(按op),达到Count值,需要发送警报
- **Silence period:**在时间N中触发报警后,在TN -> TN + period这个阶段不告警。 默认情况下,它和Period一样,这意味着相同的告警(在同一个Metrics name拥有相同的Id)在同一个Period内只会触发一次
- **message:**告警消息
在配置文件中预先定义的告警规则总结如下:
- 在过去10分钟内服务平均响应时间超过1秒达3次
- 在过去10分钟内服务成功率低于80%达2次
- 在过去10分钟内服务90%响应时间低于1秒达3次
- 在过去10分钟内服务的响应时间超过1秒达2次
- 在过去10分钟内端点的响应时间超过1秒达2次
5.2.Webhook(网络钩子)
Webhook可以简单理解为是一种Web层面的回调机制,通常由一些事件触发,与代码中的事件回调类似,只不过是Web层面的。由于是Web层面的,所以当事件发生时,回调的不再是代码中的方法或函数,而是服务接口。例如,在告警这个场景,告警就是一个事件。当该事件发生时,SkyWalking就会主动去调用一个配置好的接口,该接口就是所谓的Webhook。
5.3.邮件告警实践
根据以上两个小节的介绍,可以得知:SkyWalking是不支持直接向邮箱、短信等服务发送告警信息的,SkyWalking只会在发生告警时将告警信息发送至配置好的Webhook接口。
但我们总不能人工盯着该接口的日志信息来得知服务是否发生了告警,因此我们需要在该接口里来实现发送邮件或短信等功能,从而达到个性化的告警通知。
1:首先需要配置webhook接口,在config/alarm-settings.yml文件配置如下:
注:在192.168.85.143的OAP容器中配置,
进入容器 docker exec -it 容器ID /bin/bash
默认位置为 /skywalking/config
另外:Webhook接口不需要配置到所有服务上,我们只需要找一个服务添加该接口即可,并且找的这个服务尽可能的是那种比较“清闲”的服务。
webhooks:
  - http://192.168.85.143:9010/alarm/mailNotify/
配置完后需要重启容器
3:新建模块:heima-leadnews-alarm
pom文件:
<project xmlns="http://maven.apache.org/POM/4.0.0"
         xmlns:xsi="http://www.w3.org/2001/XMLSchema-instance"
         xsi:schemaLocation="http://maven.apache.org/POM/4.0.0 http://maven.apache.org/xsd/maven-4.0.0.xsd">
    <parent>
        <artifactId>heima-leadnewsartifactId>
        <groupId>com.heimagroupId>
        <version>1.0-SNAPSHOTversion>
    parent>
    <modelVersion>4.0.0modelVersion>

    <artifactId>heima-leadnews-alarmartifactId>

    <dependencies>
        <dependency>
            <groupId>org.springframework.bootgroupId>
            <artifactId>spring-boot-starter-mailartifactId>
        dependency>
    dependencies>
project>
3:创建配置文件:application.yml,添加邮件发送相关需要的账号等信息
server:
  port: 9010
spring:
  mail:
    host: smtp.163.com #发件服务器地址
    username: [email protected] #发件账号
    password: AWUJNNGRDCEKLUTN #对应账号的授权码
    port: 25

  #配置邮件接收人
skywalking:
  alarm:
    from: [email protected] # 发送邮件的地址,和上面username一致
    receiveEmails:
      - [email protected]
使用163邮箱需要开通SMTP服务
同时需要编写一个配置类加载邮件接收人的配置:com.itheima.skywalking.alarm.AlarmEmailProperties
import lombok.Data;
import org.springframework.boot.context.properties.ConfigurationProperties;
import org.springframework.boot.context.properties.EnableConfigurationProperties;
import org.springframework.context.annotation.Configuration;

import java.util.List;


@Data
@Configuration
@EnableConfigurationProperties
@ConfigurationProperties("skywalking.alarm")
public class AlarmEmailProperties {

    private String from;
    private List<String> receiveEmails;

}
4:skyWalking在告警事件发生后需要调用配置好的webhook接口(POST),同时会传递一些参数,是application/json格式的,如下:
[{
    "scopeId": 1,
    "scope": "SERVICE",
    "name": "serviceA",
    "id0": 12,
    "id1": 0,
    "ruleName": "service_resp_time_rule",
    "alarmMessage": "alarmMessage xxxx",
    "startTime": 1560524171000
}, {
    "scopeId": 1,
    "scope": "SERVICE",
    "name": "serviceB",
    "id0": 23,
    "id1": 0,
    "ruleName": "service_resp_time_rule",
    "alarmMessage": "alarmMessage yyy",
    "startTime": 1560524171000
}]
因此我们可以在service1中定义一个DTO来接收数据:com.xxx.skywalking.dto.AlarmDTO
import lombok.Data;

/**
 * Created by 传智播客*黑马程序员.
 */
@Data
public class AlarmDTO {
    private Integer scopeId;
    private String scope;
    private String name;
    private String id0;
    private String id1;
    private String ruleName;
    private String alarmMessage;
    private Long startTime;

}
5:定义一个接口,接收SkyWalking的告警通知,并将数据发送至系统负责人的相关邮箱:com.xxxx.skywalking.controller.AlarmController
package com.xxx.alarm.controller;

import com.xxx.alarm.config.AlarmEamilProperties;
import com.xxx.alarm.model.AlarmDTO;
import lombok.extern.log4j.Log4j2;
import org.springframework.beans.factory.annotation.Autowired;
import org.springframework.mail.SimpleMailMessage;
import org.springframework.mail.javamail.JavaMailSender;
import org.springframework.web.bind.annotation.PostMapping;
import org.springframework.web.bind.annotation.RequestBody;
import org.springframework.web.bind.annotation.RequestMapping;
import org.springframework.web.bind.annotation.RestController;

import java.util.List;

@RestController
@RequestMapping("/alarm")
@Log4j2
public class AlarmController {

    @Autowired
    private JavaMailSender javaMailSender;

    @Autowired
    private AlarmEmailProperties alarmEmailProperties;

    @PostMapping("/mailNotify")
    public void emailAlarm(@RequestBody List<AlarmDTO> alarmDTOList){
        SimpleMailMessage mailMessage = new SimpleMailMessage();
        //从哪个邮箱发出
        mailMessage.setFrom(alarmEmailProperties.getFrom());
        //发送邮件
        mailMessage.setTo(alarmEmailProperties.getReceiveEmails().toArray(new String [] {}));
        //主题
        mailMessage.setSubject("skywalking告警邮件");
        //邮件内容
        mailMessage.setText(alarmDTOList.toString());
        javaMailSender.send(mailMessage);
        log.info("告警邮件已发送");
    }
}
打包部署到服务器,运行服务
6:因为skywalking默认有一个告警规则:10分钟内服务成功率低于80%超过2次,
同时启动
xxxx-leadnews-alarm
xx-leadnews-admin
xx-leadnews-admin-gateway
xx-leadnews-user
xx-leadnews-wemedia
xx-leadnews-article
做一个用户审核,先保证至少一次正常请求,然后可以停掉自媒体微服务,多请求几次,等几分钟可以收到邮件
6.项目自动化部署接入SkyWalking
6.1 整体思路
- 各个微服务启动参数加入agent组件
- 在jenkins启动容器时设置目录挂载,各个微服务都指向一个宿主机中的agent组件
6.2 启动参数修改
在每个微服务中的Dockerfile添加agent启动参数,每个服务名称设置为不同的名称,下面admin微服务的配置
-javaagent:/usr/share/agent/skywalking-agent.jar -Dskywalking.agent.service_name=leadnews-admin
6.3 上传agent组件到服务器
将本地的agent打成压缩包,上传到linux服务器上,移动到目录为:/usr/local/skyWalking下解压,如下效果
注意:目录名称不要写错
6.4 修改jenkins中的项目配置
在每一个项目的配置中修改Execute shell,创建容器时添加目录映射,指向同一个agent
-v /usr/local/skyWalking/agent:/usr/share/agent


