java项目配置双数据源,对两个不同服务器上的数据库中的数据进行CRUD
基于springboot+mybatisPlus,对两个不同服务器上的数据库中的数据进行CRUD,我自己使用的两个都是mysql数据库;db1为我自己的本地库,db2为阿里云服务器上的库,首先我们创建两张表;
在db1库中创建user表,建表语句如下:
CREATE TABLE `user` (
  `id` int(11) NOT NULL AUTO_INCREMENT,
  `name` varchar(64) DEFAULT NULL,
  `age` tinyint(2) DEFAULT NULL,
  `sex` tinyint(1) DEFAULT NULL COMMENT '0:女 1:男',
  PRIMARY KEY (`id`)
) ENGINE=InnoDB DEFAULT CHARSET=utf8mb4
然后在db2库中创建product表,建表语句如下:
CREATE TABLE `product` (
  `id` int(10) NOT NULL,
  `phone` bigint(11) DEFAULT NULL,
  `address` varchar(64) DEFAULT NULL,
  `email` varchar(32) DEFAULT NULL,
  `birth` date DEFAULT NULL,
  PRIMARY KEY (`id`)
) ENGINE=InnoDB DEFAULT CHARSET=utf8mb4
创建完成后,新建一个springboot项目,创建好后导入Mybatis Plus Generator和mysql依赖
            com.baomidou
            mybatis-plus-generator
            3.4.1


            org.apache.velocity
            velocity
            1.7


            mysql
            mysql-connector-java
            8.0.25
除了导入 mybatis-plus-generator依赖外,还需要导入velocity模板,因为MP是按照这个模板来生成代码的。接着新建一个Generator类来生成我们所需要的文件:
public class Generator {

        public static void main(String[] args) {
            //1.创建generator对象
            AutoGenerator autoGenerator = new AutoGenerator();
            //2.配置数据源db1
            DataSourceConfig dataSourceConfig = new DataSourceConfig();
            dataSourceConfig.setDbType(DbType.MYSQL); //数据源类型为mysql
            dataSourceConfig.setUrl("jdbc:mysql://localhost:3306/db1?useSSL=false&useUnicode=true&characterEncoding=utf-8");
            dataSourceConfig.setUsername("root");
            dataSourceConfig.setPassword("密码");
            dataSourceConfig.setDriverName("com.mysql.cj.jdbc.Driver");
            //配置数据源db2 ,
            dataSourceConfig.setDbType(DbType.MYSQL); //数据源类型为mysql
            dataSourceConfig.setUrl("jdbc:mysql://8.142.139.26:3306/db2?useSSL=false&useUnicode=true&characterEncoding=utf-8");
            dataSourceConfig.setUsername("用户名");
            dataSourceConfig.setPassword("你的密码");
            dataSourceConfig.setDriverName("com.mysql.cj.jdbc.Driver");

            autoGenerator.setDataSource(dataSourceConfig);

            //3.全局配置(指明这些类生成的具体位置以及作者....)
            GlobalConfig globalConfig = new GlobalConfig();
            //这里填写要成的位置
            globalConfig.setOutputDir("D:\\javaProject\\sprng2db"+"/src/main/java");
            globalConfig.setOpen(false);//不打开文件
            globalConfig.setAuthor("gaoyj");
            //让service名字前面没有I
            globalConfig.setServiceName("%Service");

            autoGenerator.setGlobalConfig(globalConfig);

            //4.设置包信息(生成的类放在哪个包里面)
            PackageConfig packageConfig = new PackageConfig();
            packageConfig.setParent("com.solongyj");
            packageConfig.setModuleName("generator");
            packageConfig.setController("controller");
            packageConfig.setService("service");
            packageConfig.setServiceImpl("service.impl");
            packageConfig.setEntity("entity");

            autoGenerator.setPackageInfo(packageConfig);

            //5.配置策略
            StrategyConfig strategyConfig = new StrategyConfig();

            //提供lombok
            strategyConfig.setEntityLombokModel(true);
            //支持驼峰
            strategyConfig.setNaming(NamingStrategy.underline_to_camel);
            strategyConfig.setColumnNaming(NamingStrategy.underline_to_camel);
            autoGenerator.setStrategy(strategyConfig);

            //6.执行
            autoGenerator.execute();


    }
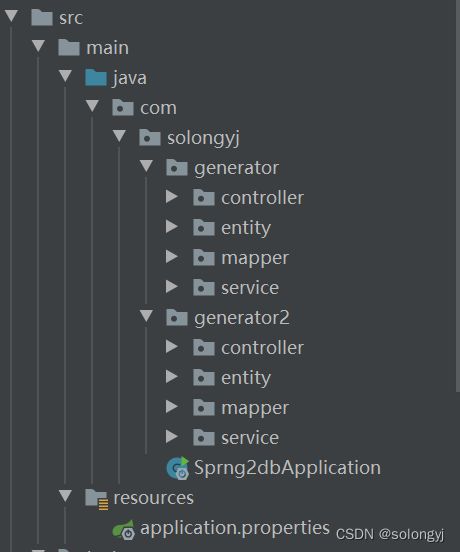
先执行db1,然后把数据库配置修改为db2的内容,再操作一次,执行完毕后结构如下:
然后是两个数据源的配置类,db1的配置类代码如下:
@Configuration
@MapperScan(basePackages = "com.solongyj.demo.mapper.db1", sqlSessionTemplateRef  = "db1SqlSessionTemplate")
public class DataSourceDb1config {

    /**
     * 获取映射文件所在的路径
     */
    @Value("${mybatis.db1.mapper-locations}")
    private String db1tMapperPath;

    /**
     * 数据源加载
     *
     * @return
     */
    @Bean(name = "db1DataSource")
    @ConfigurationProperties(prefix = "spring.datasource.db1.druid")
    public DataSource test1DataSource() {
        return DataSourceBuilder.create().build();
    }

    /**
     * 注入SqlSessionFactory,指定数据源和映射文件路径
     *
     * @param dataSource
     * @return
     * @throws Exception
     */
    @Bean(name = "db1SqlSessionFactory")
    public SqlSessionFactory testSqlSessionFactory(@Qualifier("db1DataSource") DataSource dataSource) throws Exception {
        MybatisSqlSessionFactoryBean bean = new MybatisSqlSessionFactoryBean();
        bean.setDataSource(dataSource);
        Resource[] resources = new PathMatchingResourcePatternResolver().getResources(db1tMapperPath);
        bean.setMapperLocations(resources);
        return bean.getObject();
    }

    /**
     * 注入DataSourceTransactionManager事物管理器
     *
     * @param dataSource
     * @return
     */
    @Bean(name = "db1TransactionManager")
    public DataSourceTransactionManager testTransactionManager(@Qualifier("db1DataSource") DataSource dataSource) {
        return new DataSourceTransactionManager(dataSource);
    }

    /**
     * @param sqlSessionFactory
     * @return
     * @throws Exception
     */
    @Bean(name = "db1SqlSessionTemplate")
    public SqlSessionTemplate testSqlSessionTemplate(@Qualifier("db1SqlSessionFactory") SqlSessionFactory sqlSessionFactory) throws Exception {
        return new SqlSessionTemplate(sqlSessionFactory);
    }
}db2配置类代码:
@Configuration
@MapperScan(basePackages = "com.solongyj.demo.mapper.db2", sqlSessionTemplateRef = "db2SqlSessionTemplate")
public class DataSourceDb2Config {

    /**
     * 获取映射文件所在的路径
     */
    @Value("${mybatis.db2.mapper-locations}")
    private String db2tMapperPath;

    /**
     * 数据源加载
     *
     * @return
     */
    @Bean(name = "db2DataSource")
    @ConfigurationProperties(prefix = "spring.datasource.db2.druid")
    public DataSource test1DataSource() {
        return DataSourceBuilder.create().build();
    }

    /**
     * 注入SqlSessionFactory,指定数据源和映射文件路径
     *
     * @param dataSource
     * @return
     * @throws Exception
     */
    @Bean(name = "db2SqlSessionFactory")
    public SqlSessionFactory testSqlSessionFactory(@Qualifier("db2DataSource") DataSource dataSource) throws Exception {
        MybatisSqlSessionFactoryBean bean = new MybatisSqlSessionFactoryBean();
        bean.setDataSource(dataSource);
        Resource[] resources = new PathMatchingResourcePatternResolver().getResources(db2tMapperPath);
        bean.setMapperLocations(resources);
        return bean.getObject();
    }

    /**
     * 注入DataSourceTransactionManager事物管理器
     *
     * @param dataSource
     * @return
     */
//    @Bean(name = "db2TransactionManager")
    public DataSourceTransactionManager testTransactionManager(@Qualifier("db2DataSource") DataSource dataSource) {
        return new DataSourceTransactionManager(dataSource);
    }

    /**
     * @param sqlSessionFactory
     * @return
     * @throws Exception
     */
    @Bean(name = "db2SqlSessionTemplate")
    public SqlSessionTemplate testSqlSessionTemplate(@Qualifier("db2SqlSessionFactory") SqlSessionFactory sqlSessionFactory) throws Exception {
        return new SqlSessionTemplate(sqlSessionFactory);
    }
application.yml中配置
server:
  port: 8089
#配置数据源,db1&db2
spring:
  datasource:
    db1:
      druid:
        driver-class-name: com.mysql.cj.jdbc.Driver
        jdbc-url: jdbc:mysql://localhost:3306/db1?autoReconnect=true&useUnicode=true&characterEncoding=utf8&useSSL=true
        username: root
        password: root
    db2:
      druid:
        driver-class-name: com.mysql.cj.jdbc.Driver
        jdbc-url: jdbc:mysql://ip:port/db2?autoReconnect=true&useUnicode=true&characterEncoding=utf8&useSSL=true
        username: 你的用户名
        password: 你的密码

# xml文件映射路径
mybatis:
  db1:
    mapper-locations: classpath:mapper/db1/*.xml
  db2:
    mapper-locations: classpath:mapper/db2/*.xml

logging:
  level:
    com.solongyj.demo: debug
配置完成后进行一个简单的测试,在user表数据插入成功后再执行product表数据的插入
@Service
@Slf4j
@Transactional(rollbackFor = Exception.class)
public class UserServiceImpl extends ServiceImpl implements UserService {

    @Autowired
    private UserMapper userMapper;

    @Autowired
    private ProductMapper productMapper;

    @Override
    public void addUser(User user) {
        log.info("db1数据开始插入");
        int userRow = userMapper.insert(user);
        //这里在插入user成功后进行db2中的product的插入,这些数据全都随机生成
        if (userRow != 0) {
            log.info("db1数据插入成功");
            Product product = new Product();
            product.setPhone(RandomUtil.getPhone());
            product.setAddress(RandomUtil.getAddress());
            product.setEmail(RandomUtil.getEmail(6, 9));
            product.setBirth(new Date());
            log.info("db2数据开始插入");
            int prodRow = productMapper.insert(product);
            if (prodRow != 0) {
                log.info("db1和db2数据插入成功");
            }

        }
    }
}
其中user数据我们以json格式传进来,product数据我写了一个随机生成中文姓名,性别,Email,手机号,住址的工具类,其代码如下:
/**
 * 随机生成中文姓名,性别,Email,手机号,住址
 *
 * @author solongyj
 * @date 2022/3/29
 */
public class RandomUtil {
    public static String base = "abcdefghijklmnopqrstuvwxyz0123456789";
    private static String firstName = "赵钱孙李周吴郑王冯陈褚卫蒋沈韩杨朱秦尤许何吕施张孔曹严华金魏陶姜戚谢邹郜喻柏水窦章云苏潘葛奚范彭郎鲁韦昌马苗凤花方俞任袁柳酆鲍史唐费廉岑薛雷贺倪汤滕殷罗毕郝邬安常乐于时傅皮卞齐康伍余元卜顾孟平黄和穆萧尹姚邵湛汪祁毛禹狄米贝明臧计伏成戴谈宋茅庞熊纪舒屈项祝董梁杜阮蓝闵席季麻强贾路娄危江童颜郭梅盛林刁钟徐邱骆高夏蔡田樊胡凌霍虞万支柯咎管卢莫经房裘缪干解应宗宣丁贲邓郁单杭洪包诸左石崔吉钮龚程嵇邢滑裴陆荣翁荀";
    private static String girl = "珍贞莉桂娣叶璧璐娅琦晶妍茜秋珊莎锦黛青倩婷姣婉娴瑾颖露瑶怡婵雁蓓纨仪荷丹蓉眉君琴蕊薇姬舒影荔枝思丽 ";
    private static String boy = "杰彦涛昌强成康星光天达安岩中茂进林有坚和彪博诚先敬震振壮会思群豪心邦承乐绍功松善厚庆磊民友裕河哲江超浩亮政谦亨奇固之轮翰朗伯宏言若鸣朋斌梁栋维启克伦翔旭鹏泽晨辰士以建家致树炎德行时泰盛雄琛钧冠策腾楠榕风航弘";
    private static String[] address = "北京路,南京路,上海路,郑州路,杭州路,福州路,兰州路,哈尔滨路,长春路,沈阳路,成都路,重庆路,济南路,西安路,银川路,太原路,合肥路,南昌路,广州路,海南路,台北路,贵州路,昆明路".split(",");
    private static final String[] email_suffix = "@gmail.com,@qq.com,@163.com,@sina.com,@sohu.com".split(",");

    public static int getNum(int start, int end) {
        return (int) (Math.random() * (end - start + 1) + start);
    }

    /**
     * 返回Email
     *
     * @param lMin 最小长度
     * @param lMax 最大长度
     * @return
     */
    public static String getEmail(int lMin, int lMax) {
        int length = getNum(lMin, lMax);
        StringBuffer sb = new StringBuffer();
        for (int i = 0; i < length; i++) {
            int number = (int) (Math.random() * base.length());
            sb.append(base.charAt(number));
        }
        sb.append(email_suffix[(int) (Math.random() * email_suffix.length)]);
        return sb.toString();
    }

    /**
     * 返回手机号码
     */
    private static String[] telFirst = "135,136,138,139,150,151,152,159,156,133,153".split(",");

    public static Long getPhone() {
        int index = getNum(0, telFirst.length - 1);
        String first = telFirst[index];
        String second = String.valueOf(getNum(1, 888) + 10000).substring(1);
        String third = String.valueOf(getNum(1, 9100) + 10000).substring(1);
        return Long.valueOf(first + second + third);
    }

    /**
     * 返回中文姓名
     */
    private static String name_sex = "";

    public static String getChineseName() {
        int index = getNum(0, firstName.length() - 1);
        String first = firstName.substring(index, index + 1);
        int sex = getNum(0, 1);
        String str = boy;
        int length = boy.length();
        if (sex == 0) {
            str = girl;
            length = girl.length();
            name_sex = "女";
        } else {
            name_sex = "男";
        }
        index = getNum(0, length - 1);
        String second = str.substring(index, index + 1);
        int hasThird = getNum(0, 1);
        String third = "";
        if (hasThird == 1) {
            index = getNum(0, length - 1);
            third = str.substring(index, index + 1);
        }
        return first + second + third;
    }

    /**
     * 返回地址
     *
     * @return
     */
    public static String getAddress() {
        int index = getNum(0, address.length - 1);
        String first = address[index];
        String second = String.valueOf(getNum(11, 150)) + "号";
        String third = "-" + getNum(1, 20) + "-" + getNum(1, 10);
        return first + second + third;
    }


}
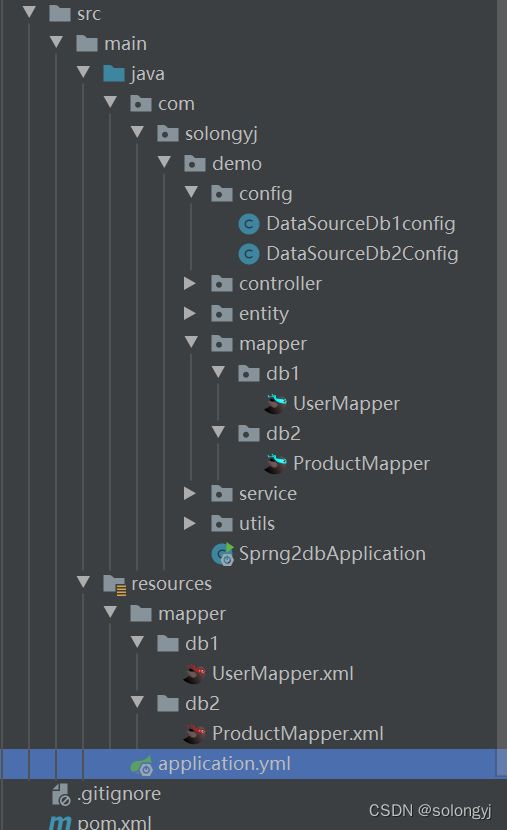
总体结构如下图
在controller层调用UserService的addUser方法,然后启动该项目,因为配置的端口号是8089,所以在测试时地址为http://localhost:8089/addUser
如图

经测试,db1和db2都可以成功插入数据。
以上就是关于java对两个不同服务器上的数据库中的数据进行的简单的数据新增,同理,三个以及多个数据源操作也可按照该方法进行配置;
代码我已上传到gitee,感兴趣的小伙伴可以看一看:https://gitee.com/solongyj/spring2db.git