Linux(Centos7.6)Nginx安装部署并配置SSL证书(简单方便版)
文章目录
-
- 简介
- 安装
-
-
- 1. 安装yum依赖程序
- 2. 手动添加,nginx的yum仓库
- 3. 通过yum安装最新稳定版的nginx
- 4. 启动
- 5. 配置防火墙放行
- 6. 启动后浏览器输入Linux服务器的IP地址或主机名即可访问
- 7. Nginx的文件路径
- 8. 配置SSL证书
-
- 1. 服务器的证书申请
-
- 1.1 腾讯云证书申请
- 2. 查看nginx配置文件
-
简介
Nginx (engine x) 是一个高性能的HTTP和反向代理web服务器,同时也提供了IMAP/POP3/SMTP服务。
Nginx可以托管用户编写的WEB应用程序成为可访问的网页服务,同时也可以作为流量代理服务器,控制流量的中转。
Nginx在WEB开发领域,基本上也是必备组件之一了。
安装
Nginx同样需要配置额外的yum仓库,才可以使用yum安装
安装Nginx的操作需要root身份
1. 安装yum依赖程序
# root执行
yum install -y yum-utils
2. 手动添加,nginx的yum仓库
yum程序使用的仓库配置文件,存放在:/etc/yum.repo.d内。
# root执行
# 创建文件使用vim编辑
vim /etc/yum.repos.d/nginx.repo
# 填入如下内容并保存退出
[nginx-stable]
name=nginx stable repo
baseurl=http://nginx.org/packages/centos/$releasever/$basearch/
gpgcheck=1
enabled=1
gpgkey=https://nginx.org/keys/nginx_signing.key
module_hotfixes=true

[nginx-mainline]
name=nginx mainline repo
baseurl=http://nginx.org/packages/mainline/centos/$releasever/$basearch/
gpgcheck=1
enabled=0
gpgkey=https://nginx.org/keys/nginx_signing.key
module_hotfixes=true
通过如上操作,我们手动添加了nginx的yum仓库
3. 通过yum安装最新稳定版的nginx
# root执行
yum install -y nginx
4. 启动
# nginx自动注册了systemctl系统服务
systemctl start nginx		# 启动
systemctl stop nginx		# 停止
systemctl status nginx		# 运行状态
systemctl enable nginx		# 开机自启
systemctl disable nginx		# 关闭开机自启
5. 配置防火墙放行
nginx默认绑定80端口,需要关闭防火墙或放行80端口
比较推荐第一种方法,不关闭防火墙的话可能导致无法访问
# 方式1(推荐),关闭防火墙
systemctl stop firewalld		# 关闭
systemctl disable firewalld		# 关闭开机自启

# 方式2,放行80端口
firewall-cmd --add-port=80/tcp --permanent		# 放行tcp规则下的80端口,永久生效
firewall-cmd --reload							# 重新加载防火墙规则
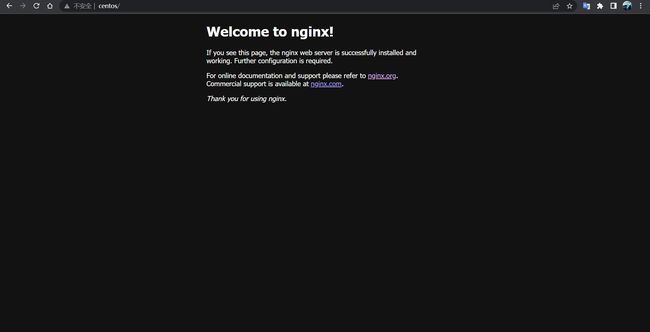
6. 启动后浏览器输入Linux服务器的IP地址或主机名即可访问
http://192.168.119.123 或 http://centos
ps:80端口是访问网站的默认端口,所以后面无需跟随端口号
显示的指定端口也是可以的比如:
- http://192.168.119.123:80
- http://centos:80
至此,Nginx安装配置完成。
7. Nginx的文件路径
1.默认的根目录在: /usr/share/nginx/html
2.配置文件目录在: /etc/nginx/nginx.conf

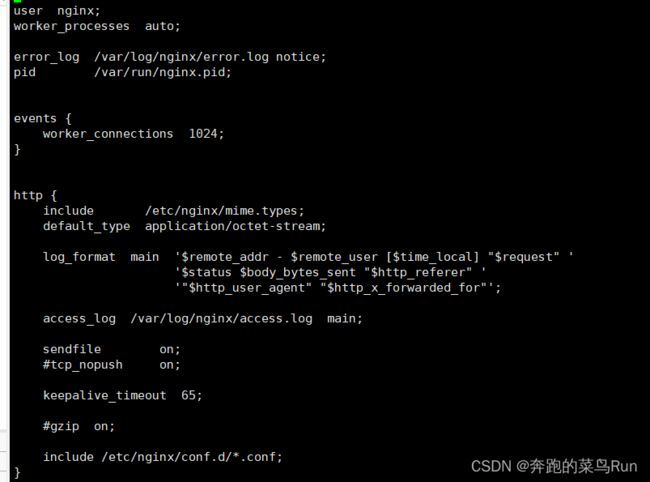
配置文件还include了 /etc/nginx/conf.d/*.conf;意思是引用conf.d目录下的所有以.conf结尾的文件,也就是 default.conf 文件
8. 配置SSL证书
SSL证书的话需要在服务器官网申请,如果只是用于自己测试的虚拟机这种,证书不需要配置。
1. 服务器的证书申请
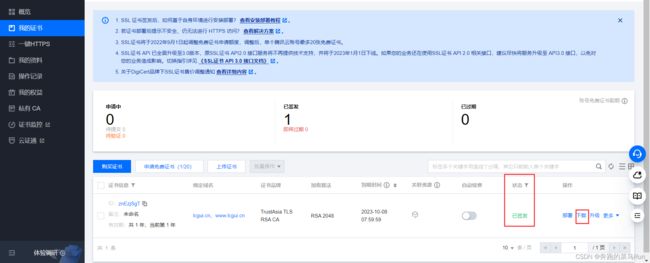
1.1 腾讯云证书申请
-
下载选择nginx下载即可
同时如果是阿里云操作基本一致,申请SSL的免费证书即可
2. 查看nginx配置文件
cat /etc/nginx/nginx.conf
user  nginx;																	#work进程用户(打工者),root是老板
worker_processes  auto;															#work进程数(几个打工者)
error_log  /var/log/nginx/error.log notice;										#错误日志文件路径
pid        /var/run/nginx.pid;
events {
    worker_connections  1024;   												#一个work可以处理1024个进程
}
http {
    include       /etc/nginx/mime.types;   										#加载一个配置文件
    default_type  application/octet-stream;  #									#默认识别文件类型
    log_format  main  '$remote_addr - $remote_user [$time_local] "$request" '   #定义日志格式
                      '$status $body_bytes_sent "$http_referer" '
                      '"$http_user_agent" "$http_x_forwarded_for"';
    access_log  /var/log/nginx/access.log  main; 								#指定日志路径
    sendfile        on;
    #tcp_nopush     on;
    keepalive_timeout  65; 														#超时时间
    #gzip  on;
    include /etc/nginx/conf.d/*.conf;   										#扩展配置(虚拟主机配置文件)
}
拓展的 default.conf配置文件
cat /etc/nginx/conf.d/default.conf
server {
    listen       80;
    server_name  localhost;

    #access_log  /var/log/nginx/host.access.log  main;

    location / {
        root   /usr/share/nginx/html;  #网站根目录
        index  index.html index.htm;
    }

    #error_page  404              /404.html;

    # redirect server error pages to the static page /50x.html
    #
    error_page   500 502 503 504  /50x.html;
    location = /50x.html {
        root   /usr/share/nginx/html;
    }

    # proxy the PHP scripts to Apache listening on 127.0.0.1:80
    #
    #location ~ \.php$ {
    #    proxy_pass   http://127.0.0.1;
    #}

    # pass the PHP scripts to FastCGI server listening on 127.0.0.1:9000
    #
    #location ~ \.php$ {
    #    root           html;
    #    fastcgi_pass   127.0.0.1:9000;
    #    fastcgi_index  index.php;
    #    fastcgi_param  SCRIPT_FILENAME  /scripts$fastcgi_script_name;
    #    include        fastcgi_params;
    #}

    # deny access to .htaccess files, if Apache's document root
    # concurs with nginx's one
    #
    #location ~ /\.ht {
    #    deny  all;
    #}
}
配置SSL证书需要在第一步申请的证书文件,下载的压缩包中有一个 pem文件 和 key 文件需要使用
进行配置,主要更改default.conf文件即可
配置完成后的default.conf,因为原来的配置文件好多已经注释掉的可以去掉影响视线
server {
    listen 80;
    server_name yourdomain; #需要将yourdomain替换成证书绑定的域名。
    rewrite ^(.*)$ https://$host$1; #将所有HTTP请求通过rewrite指令重定向到HTTPS。
    location / {
        root   /usr/share/nginx/html;  #网站根目录
        index  index.html index.htm;
    }
}
#以下属性中,以ssl开头的属性表示与证书配置有关。
server {
    listen 443 ssl;
    #配置HTTPS的默认访问端口为443。
    #如果未在此处配置HTTPS的默认访问端口,可能会造成Nginx无法启动。
    #如果您使用Nginx 1.15.0及以上版本,请使用listen 443 ssl代替listen 443和ssl on。
    server_name yourdomain;
    root html;
    index index.html index.htm;
    ssl_certificate 这里需要填写 SSL 证书的 pem 文件的存储路径;
    ssl_certificate_key 这里需要填写 SSL 证书的 key 文件的存储路径;
    ssl_session_timeout 5m;
    ssl_ciphers ECDHE-RSA-AES128-GCM-SHA256:ECDHE:ECDH:AES:HIGH:!NULL:!aNULL:!MD5:!ADH:!RC4;
    #表示使用的加密套件的类型。
    ssl_protocols TLSv1.1 TLSv1.2 TLSv1.3; #表示使用的TLS协议的类型,您需要自行评估是否配置TLSv1.1协议。
    ssl_prefer_server_ciphers on;
    location / {
        root   /usr/share/nginx/html;  #网站根目录
        index  index.html index.htm;
    }
}
至此,nginx配置完成。


