RabbitMQ
RabbitMQ
- MQ
-
- 1、 什么是消息中间件
-
- (1)MQ是什么
- 为什么使用MQ--面试
- MQ优势
-
- a、应用解耦
- b、异步提速
- c、削峰填谷
- **MQ劣势**
-
-
- (5)什么时候用MQ
-
- AMQP 和 JMS
-
-
- (1)AMQP
- (2)JMS
- (3)AMQP 与 JMS 区别
-
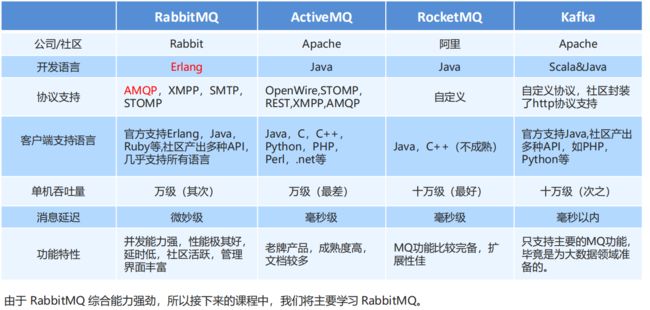
- 消息队列产品
- RabbitMQ**特点**
- 工作模式
- 工作原理
-
- 1、相关概念介绍
- 2、RabbitMQ运转流程
- 3、生产者流转过程说明
- 4、消费者流转过程说明
- 安装
- 入门代码
-
- 生产者
- 消费者
- 工作队列模式
- 订阅发布模式
-
- 生产者
- 消费者1
- 消费者2
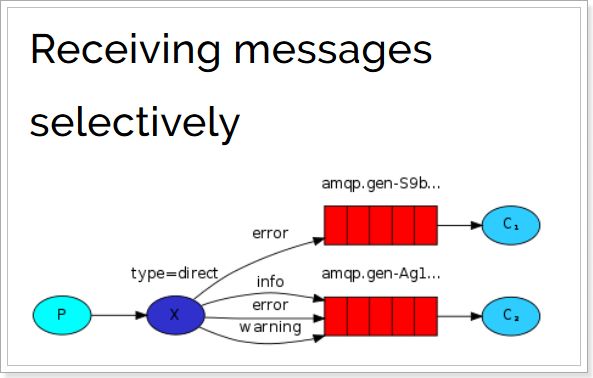
- 路由模式
-
- 生产者
- 消费者1
- 消费者2
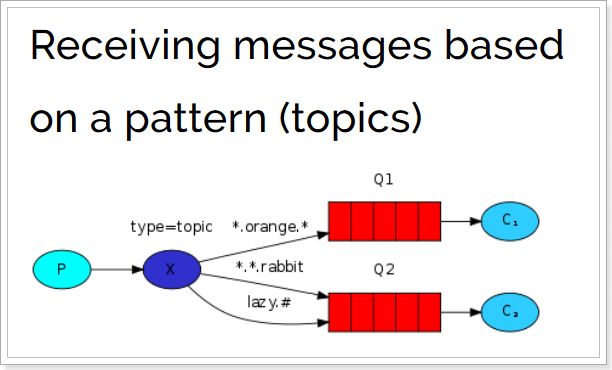
- Topic通配符模式
-
-
- 1) 模式说明
- 2) 代码
-
- 生产者
- 消费者1
- 消费者2
- 6、 模式总结
-
- 简单模式
- 工作队列模式 Work Queue**
- 发布订阅模式 Publish/subscribe**
- 路由模式 Routing**
- 通配符模式 Topic**
-
- Spring整合所有模式
-
- 发布信息
- 消费者
- springboot整合MQ
- 生产者
- 消费者
- RabbitMQ高级
-
- Confirm确认模式
- return退回模式
- 消费者手动ACK
- 面试保证可靠模式投递
- 消费限流
- TTL过期
-
- 设置队列的超时时间
- 设置单个消息超时
- 小结
- 死信队列
- 延迟队列
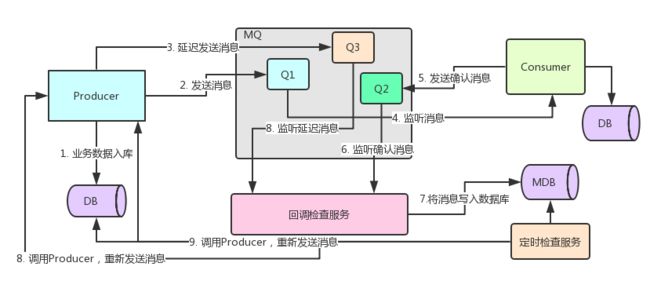
- 消息补充机制
- 幂等性处理
MQ
MQ的优劣
1、 什么是消息中间件
(1)MQ是什么
MQ全称为Message Queue,消息队列是应用程序和应用程序之间的通信方法。
先进先出
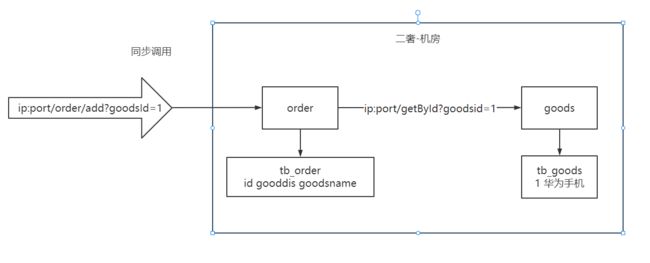
原先:ip:port/order/add?goodsId=1
现在:异步调用
这是添加订单的服务,因为它添加订单,放入队列就算成功了,后面可以然队列慢慢去写。
为什么使用MQ–面试
在项目中,可将一些无需即时返回且耗时的操作提取出来,进行异步处理,而这种异步处理的方式大大的节省了服务器的请求响应时间,从而提高了系统的吞吐量。
现在,应用开发和部署—微服务
MQ优势
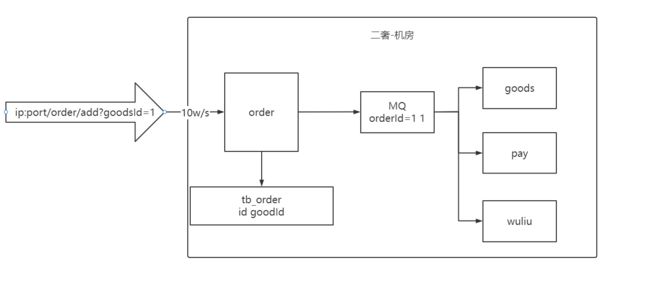
a、应用解耦
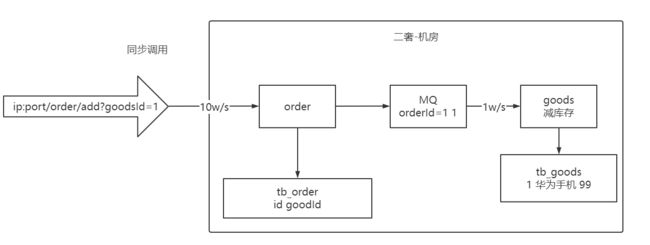
MQ相当于一个中介,生产方通过MQ与消费方交互,它将应用程序进行解耦合。
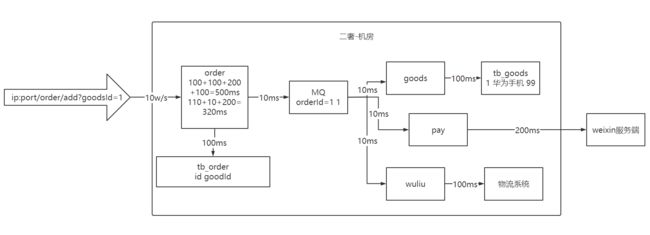
b、异步提速
将不需要同步处理的并且耗时长的操作由消息队列通知消息接收方进行异步处理。提高了应用程序的响应时间。
order_table status 0 已下单 status 1 支付成功 status 2 已通知商家发货 status 3 商家发货 status 4 已经收货
c、削峰填谷
如订单系统,在下单的时候就会往数据库写数据。但是数据库只能支撑每秒1000左右的并发写入,并发量再高就容易宕机。低峰期的时候并发也就100多个,但是在高峰期时候,并发量会突然激增到5000以上,这个时候数据库肯定卡死了。
消息被MQ保存起来了,然后系统就可以按照自己的消费能力来消费,比如每秒1000个数据,这样慢慢写入数据库,这样就不会卡死数据库了。
但是使用了MQ之后,限制消费消息的速度为1000,但是这样一来,高峰期产生的数据势必会被积压在MQ中,高峰就被“削”掉了。但是因为消息积压,在高峰期过后的一段时间内,消费消息的速度还是会维持在1000QPS,直到消费完积压的消息,这就叫做“填谷”
MQ劣势
-
系统可用性降低
需要设置为高可用,一旦宕机还有容错
-
系统复杂度提高
由于异步有以下问题
- 重复消费问题
- 消息丢失
- 消息顺序
-
一致性问题
A 系统处理完业务,通过 MQ 给B、C、D三个系统发消息数据,如果 B 系统、C 系统处理成功,D 系统处理
失败。如何保证消息数据处理的一致性。
最终一致性
(5)什么时候用MQ
-
异步不用返回,直接塞队列
-
容许短暂的不一致性。
-
即解耦、提速、削峰这些方面的收益,超过加入MQ,管理MQ这些成本
AMQP 和 JMS
MQ是消息通信的模型;实现MQ的大致有两种主流方式:AMQP、JMS。
(1)AMQP
MQ协议
(2)JMS
java面向消息的API类似jdbc协议,但是大多使用上面这种协议
(3)AMQP 与 JMS 区别
- JMS是定义了统一的接口,来对消息操作进行统一;AMQP是通过规定协议来统一数据交互的格式
- JMS限定了必须使用Java语言;AMQP只是协议,不规定实现方式,因此是跨语言的。
- JMS规定了两种消息模式;而AMQP的消息模式更加丰富。
消息队列产品
市场上常见的消息队列有如下:
- ActiveMQ:基于JMS
- ZeroMQ:基于C语言开发
- RabbitMQ:基于AMQP协议,erlang语言开发,稳定性好
- RocketMQ:基于JMS,阿里巴巴产品
- Kafka:类似MQ的产品;分布式消息系统,高吞吐量
RabbitMQ特点
- 1、使用简单,功能强大。
- 2、基于AMQP协议。 跨语言 c node.js->mq->java python
- 3、社区活跃,文档完善。
- 4、高并发性能好,这主要得益于Erlang语言。 c 底层语言,性能强。java 好开发。构建一个web。
- 5、Spring Boot默认已集成RabbitMQ
工作模式
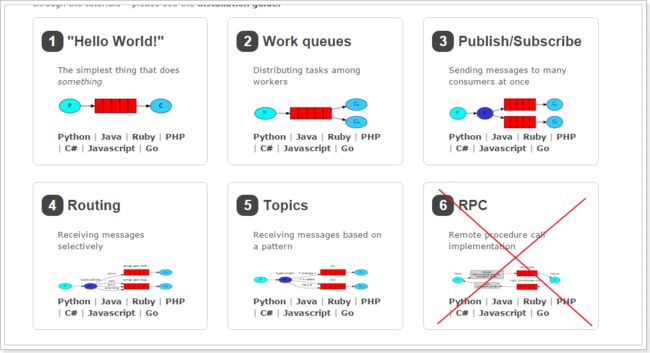
RabbitMQ提供了6种模式:简单模式,work模式,Publish/Subscribe发布与订阅模式,Routing路由模式,Topics主题模式,RPC远程调用模式(远程调用,不太算MQ;暂不作介绍);
官网对应模式介绍:https://www.rabbitmq.com/getstarted.html
- 普通模式
- 一个消费者,一个生产者,一个队列
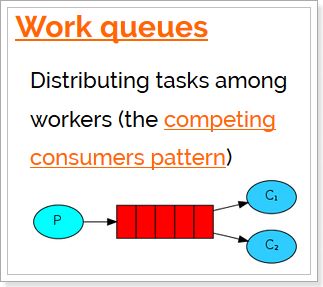
- 工作队列
- 多个消费者,一个生产者,一个队列
- 订阅模式
- 多个消费者,一个生产者,多个队列
- 路由模式
- 主题模式
工作原理
http 三次握手 四次挥手耗费性能 所以使用一个长连接
一个消费者监听“一个”“队列”
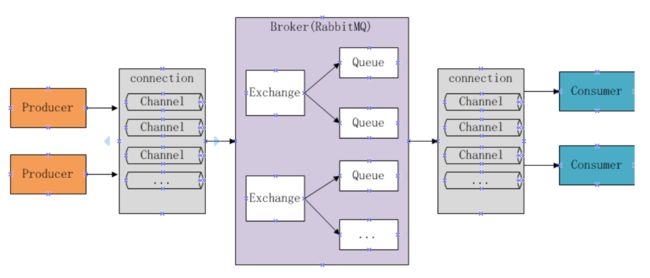
- Broker:消息队列服务进程,此进程包括两个部分:Exchange和Queue。
- Exchange:消息队列交换机,按一定的规则将消息路由转发到某个队列,对消息进行过虑。
- Queue:消息队列,存储消息的队列,消息到达队列并转发给指定的消费方。
- Producer:消息生产者,即生产方客户端,生产方客户端将消息发送到MQ。
- Consumer:监听队列
消息发布接收流程:
-----发送消息-----
1、生产者和Broker建立TCP连接。
2、生产者和Broker建立通道。
3、生产者通过通道消息发送给Broker,由Exchange将消息进行转发。
4、Exchange将消息转发到指定的Queue(队列)
----接收消息-----
1、消费者和Broker建立TCP连接
2、消费者和Broker建立通道
3、消费者监听指定的Queue(队列)
4、当有消息到达Queue时Broker默认将消息推送给消费者。
5、消费者接收到消息。
1、相关概念介绍
AMQP 一个提供统一消息服务的应用层标准高级消息队列协议,是应用层协议的一个开放标准,为面向消息的中间件设计。
AMQP是一个二进制协议,拥有一些现代化特点:多信道、协商式,异步,安全,扩平台,中立,高效。
RabbitMQ是AMQP协议的Erlang的实现。
| 概念 | 说明 |
|---|---|
| 连接Connection | 一个网络连接,比如TCP/IP套接字连接。 |
| 会话Session | 端点之间的命名对话。在一个会话上下文中,保证“恰好传递一次”。 |
| 信道Channel | 多路复用连接中的一条独立的双向数据流通道。为会话提供物理传输介质。 |
| 客户端Client | AMQP连接或者会话的发起者。AMQP是非对称的,客户端生产和消费消息,服务器存储和路由这些消息。 |
| 服务节点Broker | 消息中间件的服务节点;一般情况下可以将一个RabbitMQ Broker看作一台RabbitMQ 服务器。 |
| 端点 | AMQP对话的任意一方。一个AMQP连接包括两个端点(一个是客户端,一个是服务器)。 |
| 消费者Consumer | 一个从消息队列里请求消息的客户端程序。 |
| 生产者Producer | 一个向交换机发布消息的客户端应用程序。 |
2、RabbitMQ运转流程
在入门案例中:
- 生产者发送消息
- 生产者创建连接(Connection),开启一个信道(Channel),连接到RabbitMQ Broker;
- 声明队列并设置属性;如是否排它,是否持久化,是否自动删除;
- 将路由键(空字符串)与队列绑定起来;
- 发送消息至RabbitMQ Broker;
- 关闭信道;
- 关闭连接;
- 消费者接收消息
- 消费者创建连接(Connection),开启一个信道(Channel),连接到RabbitMQ Broker
- 向Broker 请求消费相应队列中的消息,设置相应的回调函数;
- 等待Broker回应闭关投递响应队列中的消息,消费者接收消息;
- 确认(ack,自动确认)接收到的消息;
- RabbitMQ从队列中删除相应已经被确认的消息;
- 关闭信道;
- 关闭连接;
3、生产者流转过程说明
- 客户端与代理服务器Broker建立连接。会调用newConnection() 方法,这个方法会进一步封装Protocol Header 0-9-1 的报文头发送给Broker ,以此通知Broker 本次交互采用的是AMQPO-9-1 协议,紧接着Broker 返回Connection.Start 来建立连接,在连接的过程中涉及Connection.Start/.Start-OK 、Connection.Tune/.Tune-Ok ,Connection.Open/ .Open-Ok 这6 个命令的交互。
- 客户端调用connection.createChannel方法。此方法开启信道,其包装的channel.open命令发送给Broker,等待channel.basicPublish方法,对应的AMQP命令为Basic.Publish,这个命令包含了content Header 和content Body()。content Header 包含了消息体的属性,例如:投递模式,优先级等,content Body 包含了消息体本身。
- 客户端发送完消息需要关闭资源时,涉及到Channel.Close和Channl.Close-Ok 与Connetion.Close和Connection.Close-Ok的命令交互。
4、消费者流转过程说明
- 消费者客户端与代理服务器Broker建立连接。会调用newConnection() 方法,这个方法会进一步封装Protocol Header 0-9-1 的报文头发送给Broker ,以此通知Broker 本次交互采用的是AMQPO-9-1 协议,紧接着Broker 返回Connection.Start 来建立连接,在连接的过程中涉及Connection.Start/.Start-OK 、Connection.Tune/.Tune-Ok ,Connection.Open/ .Open-Ok 这6 个命令的交互。
- 消费者客户端调用connection.createChannel方法。和生产者客户端一样,协议涉及Channel . Open/Open-Ok命令。
- 在真正消费之前,消费者客户端需要向Broker 发送Basic.Consume 命令(即调用channel.basicConsume 方法〉将Channel 置为接收模式,之后Broker 回执Basic . Consume - Ok 以告诉消费者客户端准备好消费消息。
- Broker 向消费者客户端推送(Push) 消息,即Basic.Deliver 命令,这个命令和Basic.Publish 命令一样会携带Content Header 和Content Body。
- 消费者接收到消息并正确消费之后,向Broker 发送确认,即Basic.Ack 命令。
- 客户端发送完消息需要关闭资源时,涉及到Channel.Close和Channl.Close-Ok 与Connetion.Close和Connection.Close-Ok的命令交互。
安装
启动,在sbin目录下
rabbitmq-plugins.bat enable rabbitmq_management
http://localhost:15672
默认用户名密码都是guest
入门代码
生产者
 String queueName = "my_queue";
    public static void main(String[] args) throws IOException, TimeoutException {
        ConnectionFactory factory = new ConnectionFactory();
        //1设置连接信息
        //ip
        factory.setHost("localhost");
        //端口
        factory.setPort(5672);
        //设置虚拟主机
        factory.setVirtualHost("/");
        //设置用户名
        factory.setUsername("root");
        //设置密码
        factory.setPassword("123456");

        //2创建长连接
        Connection connection = factory.newConnection();

        //3创建通道
        Channel channel = connection.createChannel();


        //4声明队列
        //String queue,  队列名
        // boolean durable, 持久化
        // boolean exclusive, 排他的
        // boolean autoDelete, 自动删除
        // Map arguments 属性
        channel.queueDeclare("my_queue",true,false,false,null);

        String msg = "第二条信息";

        //5发消息
        // String exchange,  交换机  ""是默认交换机
        // String routingKey, 路由键
        // AMQP.BasicProperties props, 属性
        // byte[] body 消息      string byte[] char[]如何相互转换的?
        channel.basicPublish("","my_queue",null,msg.getBytes());

        //6关闭连接  资源关闭的顺序,先关后出来的资源,最后关,第一个资源
        channel.close();
        connection.close();
    }
- 设置连接信息
- 建立长连接
- 建立通道
- 声明队列
- 发送消息
- 关闭连接
消费者
public static void main(String[] args) throws IOException, TimeoutException {
    ConnectionFactory factory = new ConnectionFactory();
    //1设置连接信息
    //ip
    factory.setHost("localhost");
    //端口
    factory.setPort(5672);
    //设置虚拟主机
    factory.setVirtualHost("/");
    //设置用户名
    factory.setUsername("root");
    //设置密码
    factory.setPassword("123456");


    //2创建长连接
    Connection connection = factory.newConnection();

    //3创建通道
    Channel channel = connection.createChannel();

    //4声明队列 防止消费者先启动,队列没有声明导致失败
    //String queue,  队列名
    // boolean durable, 持久化
    // boolean exclusive, 排他的
    // boolean autoDelete, 自动删除
    // Map arguments 属性
    channel.queueDeclare("my_queue",true,false,false,null);

    String msg = "adhlashdas";

	//5消息
    DefaultConsumer consumer = new DefaultConsumer(channel){
        //consumerTag 消息者标签,在channel.basicConsume时候可以指定
        //envelope 消息包的内容,可从中获取消息id,消息routingkey,交换机,消息和重传标志(收到消息失败后是否需要重新发送)
        //properties 属性信息
        //body 消息
        @Override
        public void handleDelivery(String consumerTag, Envelope envelope, AMQP.BasicProperties properties, byte[] body) throws IOException {
            //下面是业务逻辑
            super.handleDelivery(consumerTag, envelope, properties, body);
            System.out.println("consumerTag" + consumerTag);
            System.out.println("交换机"+envelope.getExchange());
            System.out.println("路由key"+envelope.getRoutingKey());
            System.out.println("DeliveryTag" + envelope.getDeliveryTag());
        }
    };


    //6监听消息
    // 参数1:队列名称
    // 参数2:是否自动确认,设置为true为表示消息接收到自动向mq回复接收到了,mq接收到回复会删除消息,设置为false则需要手动确认
    // 参数3:消息接收到后回调
    channel.basicConsume("my_queue",true,consumer);

}
- 设置连接信息
- 建立长连接
- 建立通道
- 声明队列
- 声明消费者类,重写其方法
- 监听消息
工作队列模式
一个生产者,一个通道队列,多个消费者
启动多个消费者实例监听同一个通道
和上面的基本一样,只是在消费者的类启动多个实例,两个实例进行抢消息
订阅发布模式
适用场景
- 粉丝关注的博主更新
- 订阅的专栏更新
中间有个交换机,然后由交换机复制多份给各个通道,然后让消费者监听其对应的队列
Exchange类型
- Fanout
- 广播模型
- Direct
- 定向模型
- Topic
- 通配符,把消息交给符合路由模式的队列
生产者
 public static void main(String[] args) throws IOException, TimeoutException {
        ConnectionFactory factory = new ConnectionFactory();
        //1设置连接信息
        //ip
        factory.setHost("localhost");
        //端口
        factory.setPort(5672);
        //设置虚拟主机
        factory.setVirtualHost("/");
        //设置用户名
        factory.setUsername("root");
        //设置密码
        factory.setPassword("123456");

        //2创建长连接
        Connection connection = factory.newConnection();

        //3创建通道
        Channel channel = connection.createChannel();


        // 4声明队列
        // String queue,  队列名
        // boolean durable, 持久化
        // boolean exclusive, 排他的
        // boolean autoDelete, 自动删除
        // Map arguments 属性
        channel.queueDeclare("my_queue1",true,false,false,null);
        channel.queueDeclare("my_queue2",true,false,false,null);

        // 5声明交换机
        // 参数1:交换机名称
        // 参数2:交换机类型,fanout、topic、direct、headers
        // 参数3:是否定义持久化
        // 参数4:是否在不使用的时候自动删除
        // 参数5:属性
        channel.exchangeDeclare("my_exchange",BuiltinExchangeType.FANOUT,true,true,null);

        // 6绑定交换机和队列
        // 参数1 队列
        // 参数2 交换机
        // 参数3 路由箭
        channel.queueBind("my_queue1","my_exchange","");
        channel.queueBind("my_queue2","my_exchange","");

        String msg = "第二条信息";

        // 7发消息
        // String exchange,  交换机  ""是默认交换机
        // String routingKey, 路由键
        // AMQP.BasicProperties props, 属性
        // byte[] body 消息      string byte[] char[]如何相互转换的?
        //这里的路由为"",因为由多个队列,不用指定对应的
        channel.basicPublish("my_exchange","",null,msg.getBytes());
        // 8关闭连接  资源关闭的顺序,先关后出来的资源,最后关,第一个资源
        channel.close();
        connection.close();
    }
消费者1
public static void main(String[] args) throws IOException, TimeoutException {
        ConnectionFactory factory = new ConnectionFactory();
        //1设置连接信息
        //ip
        factory.setHost("localhost");
        //端口
        factory.setPort(5672);
        //设置虚拟主机
        factory.setVirtualHost("/");
        //设置用户名
        factory.setUsername("root");
        //设置密码
        factory.setPassword("123456");


        // 2创建长连接
        Connection connection = factory.newConnection();

        // 3创建通道
        Channel channel = connection.createChannel();

        // 4声明队列 防止消费者先启动,队列没有声明导致失败
        //String queue,  队列名
        // boolean durable, 持久化
        // boolean exclusive, 排他的
        // boolean autoDelete, 自动删除
        // Map arguments 属性
        channel.queueDeclare("my_queue2",true,false,false,null);
//        channel.queueDeclare("my_queue1",true,false,false,null);


        // 5声明交换机
        channel.exchangeDeclare("my_exchange",BuiltinExchangeType.FANOUT,true,true,null);

        // 6绑定交换机和队列
        channel.queueBind("my_queue2","my_exchange","");
//        channel.queueBind("my_queue1","my_exchange","");

        // 7声明消费者逻辑
        DefaultConsumer consumer = new DefaultConsumer(channel){
            //consumerTag 消息者标签,在channel.basicConsume时候可以指定
            //envelope 消息包的内容,可从中获取消息id,消息routingkey,交换机,消息和重传标志(收到消息失败后是否需要重新发送)
            //properties 属性信息
            //body 消息
            @Override
            public void handleDelivery(String consumerTag, Envelope envelope, AMQP.BasicProperties properties, byte[] body) throws IOException {
                //下面是业务逻辑
                super.handleDelivery(consumerTag, envelope, properties, body);
                System.out.println("consumerTag" + consumerTag);
                System.out.println("交换机"+envelope.getExchange());
                System.out.println("路由key"+envelope.getRoutingKey());
                System.out.println("DeliveryTag" + envelope.getDeliveryTag());
            }
        };


        // 8监听消息
        // 参数1:队列名称
        // 参数2:是否自动确认,设置为true为表示消息接收到自动向mq回复接收到了,mq接收到回复会删除消息,设置为false则需要手动确认
        // 参数3:消息接收到后回调
        channel.basicConsume("my_queue2",true,consumer);

    }
消费者2
 public static void main(String[] args) throws IOException, TimeoutException {
        ConnectionFactory factory = new ConnectionFactory();
        //1设置连接信息
        //ip
        factory.setHost("localhost");
        //端口
        factory.setPort(5672);
        //设置虚拟主机
        factory.setVirtualHost("/");
        //设置用户名
        factory.setUsername("root");
        //设置密码
        factory.setPassword("123456");


        // 2创建长连接
        Connection connection = factory.newConnection();

        // 3创建通道
        Channel channel = connection.createChannel();

        // 4声明队列 防止消费者先启动,队列没有声明导致失败
        //String queue,  队列名
        // boolean durable, 持久化
        // boolean exclusive, 排他的
        // boolean autoDelete, 自动删除
        // Map arguments 属性
        channel.queueDeclare("my_queue1",true,false,false,null);
//        channel.queueDeclare("my_queue2",true,false,false,null);

        // 5声明交换机
        channel.exchangeDeclare("my_exchange", BuiltinExchangeType.FANOUT,true,true,null);

        // 6绑定交换机和队列
        channel.queueBind("my_queue1","my_exchange","");
//        channel.queueBind("my_queue2","my_exchange","");


        // 7声明消费者逻辑
        DefaultConsumer consumer = new DefaultConsumer(channel){
            //consumerTag 消息者标签,在channel.basicConsume时候可以指定
            //envelope 消息包的内容,可从中获取消息id,消息routingkey,交换机,消息和重传标志(收到消息失败后是否需要重新发送)
            //properties 属性信息
            //body 消息
            @Override
            public void handleDelivery(String consumerTag, Envelope envelope, AMQP.BasicProperties properties, byte[] body) throws IOException {
                //下面是业务逻辑
                super.handleDelivery(consumerTag, envelope, properties, body);
                System.out.println("consumerTag" + consumerTag);
                System.out.println("交换机"+envelope.getExchange());
                System.out.println("路由key"+envelope.getRoutingKey());
                System.out.println("DeliveryTag" + envelope.getDeliveryTag());
            }
        };


        // 8监听消息
        // 参数1:队列名称
        // 参数2:是否自动确认,设置为true为表示消息接收到自动向mq回复接收到了,mq接收到回复会删除消息,设置为false则需要手动确认
        // 参数3:消息接收到后回调
        channel.basicConsume("my_queue1",true,consumer);

    }
生产者流程
- 设置连接信息
- 创建长连接
- 创建通道
- 声明所有队列
- 声明交换机
- 绑定交换机和队列
- 发布信息,注意路由键为”“,交换机为你使用的交换机
- 关闭连接
消费者流程
- 设置连接信息
- 创建长连接
- 创建通道
- 声明你自己对应队列
- 声明交换机
- 绑定交换机和队列
- 重写默认消费者类的方法
- 发起监听
路由模式
适用:
分布式日志收集系统,可以配合es进行实现
其交换机类型为direct
生产者
 public static void main(String[] args) throws IOException, TimeoutException {
        ConnectionFactory factory = new ConnectionFactory();
        //1设置连接信息
        //ip
        factory.setHost("localhost");
        //端口
        factory.setPort(5672);
        //设置虚拟主机
        factory.setVirtualHost("/");
        //设置用户名
        factory.setUsername("root");
        //设置密码
        factory.setPassword("123456");

        //2创建长连接
        Connection connection = factory.newConnection();

        //3创建通道
        Channel channel = connection.createChannel();


        // 4声明队列
        // String queue,  队列名
        // boolean durable, 持久化
        // boolean exclusive, 排他的
        // boolean autoDelete, 自动删除
        // Map arguments 属性
        channel.queueDeclare("my_queue1",true,false,false,null);
        channel.queueDeclare("my_queue2",true,false,false,null);

        // 5声明交换机
        // 参数1:交换机名称
        // 参数2:交换机类型,fanout、topic、direct、headers
        // 参数3:是否定义持久化
        // 参数4:是否在不使用的时候自动删除
        // 参数5:属性
        channel.exchangeDeclare("my_exchange1", BuiltinExchangeType.DIRECT,true,true,null);

        // 6绑定交换机和队列
        // 参数1 队列
        // 参数2 交换机
        // 参数3 路由箭
        channel.queueBind("my_queue1","my_exchange1","error");
        channel.queueBind("my_queue2","my_exchange1","error");
        channel.queueBind("my_queue2","my_exchange1","info");
        channel.queueBind("my_queue2","my_exchange1","warning");

        String msg = "第二条信息 , routing = error";
        String msg1 = "第二条信息 , routing = info";
        String msg2 = "第二条信息 , routing = warning";


        // 7发消息
        // String exchange,  交换机  ""是默认交换机
        // String routingKey, 路由键
        // AMQP.BasicProperties props, 属性
        // byte[] body 消息      string byte[] char[]如何相互转换的?
        //这里的路由为"",因为由多个队列,不用指定对应的
        channel.basicPublish("my_exchange1","error",null,msg.getBytes());
        channel.basicPublish("my_exchange1","info",null,msg1.getBytes());
        channel.basicPublish("my_exchange1","warning",null,msg2.getBytes());

        // 8关闭连接  资源关闭的顺序,先关后出来的资源,最后关,第一个资源
        channel.close();
        connection.close();
    }
消费者1
public static void main(String[] args) throws IOException, TimeoutException {
        ConnectionFactory factory = new ConnectionFactory();
        //1设置连接信息
        //ip
        factory.setHost("localhost");
        //端口
        factory.setPort(5672);
        //设置虚拟主机
        factory.setVirtualHost("/");
        //设置用户名
        factory.setUsername("root");
        //设置密码
        factory.setPassword("123456");


        // 2创建长连接
        Connection connection = factory.newConnection();

        // 3创建通道
        Channel channel = connection.createChannel();

        // 4声明队列 防止消费者先启动,队列没有声明导致失败
        //String queue,  队列名
        // boolean durable, 持久化
        // boolean exclusive, 排他的
        // boolean autoDelete, 自动删除
        // Map arguments 属性
        channel.queueDeclare("my_queue2",true,false,false,null);


        // 5声明交换机
        channel.exchangeDeclare("my_exchange1", BuiltinExchangeType.DIRECT,true,true,null);

        // 6绑定交换机和队列
        channel.queueBind("my_queue2","my_exchange1","error");
        channel.queueBind("my_queue2","my_exchange1","info");
        channel.queueBind("my_queue2","my_exchange1","warning");

        // 7声明消费者逻辑
        DefaultConsumer consumer = new DefaultConsumer(channel){
            //consumerTag 消息者标签,在channel.basicConsume时候可以指定
            //envelope 消息包的内容,可从中获取消息id,消息routingkey,交换机,消息和重传标志(收到消息失败后是否需要重新发送)
            //properties 属性信息
            //body 消息
            @Override
            public void handleDelivery(String consumerTag, Envelope envelope, AMQP.BasicProperties properties, byte[] body) throws IOException {
                //下面是业务逻辑
                super.handleDelivery(consumerTag, envelope, properties, body);
                System.out.println("consumerTag" + consumerTag);
                System.out.println("交换机"+envelope.getExchange());
                System.out.println("路由key"+envelope.getRoutingKey());
                System.out.println("DeliveryTag" + envelope.getDeliveryTag());
            }
        };


        // 8监听消息
        // 参数1:队列名称
        // 参数2:是否自动确认,设置为true为表示消息接收到自动向mq回复接收到了,mq接收到回复会删除消息,设置为false则需要手动确认
        // 参数3:消息接收到后回调
        channel.basicConsume("my_queue2",true,consumer);

    }
消费者2
public static void main(String[] args) throws IOException, TimeoutException {
    ConnectionFactory factory = new ConnectionFactory();
    //1设置连接信息
    //ip
    factory.setHost("localhost");
    //端口
    factory.setPort(5672);
    //设置虚拟主机
    factory.setVirtualHost("/");
    //设置用户名
    factory.setUsername("root");
    //设置密码
    factory.setPassword("123456");


    // 2创建长连接
    Connection connection = factory.newConnection();

    // 3创建通道
    Channel channel = connection.createChannel();

    // 4声明队列 防止消费者先启动,队列没有声明导致失败
    //String queue,  队列名
    // boolean durable, 持久化
    // boolean exclusive, 排他的
    // boolean autoDelete, 自动删除
    // Map arguments 属性
    channel.queueDeclare("my_queue1",true,false,false,null);


    // 5声明交换机
    channel.exchangeDeclare("my_exchange1", BuiltinExchangeType.DIRECT,true,true,null);

    // 6绑定交换机和队列
    channel.queueBind("my_queue1","my_exchange1","error");


    // 7声明消费者逻辑
    DefaultConsumer consumer = new DefaultConsumer(channel){
        //consumerTag 消息者标签,在channel.basicConsume时候可以指定
        //envelope 消息包的内容,可从中获取消息id,消息routingkey,交换机,消息和重传标志(收到消息失败后是否需要重新发送)
        //properties 属性信息
        //body 消息
        @Override
        public void handleDelivery(String consumerTag, Envelope envelope, AMQP.BasicProperties properties, byte[] body) throws IOException {
            //下面是业务逻辑
            super.handleDelivery(consumerTag, envelope, properties, body);
            System.out.println("consumerTag" + consumerTag);
            System.out.println("交换机"+envelope.getExchange());
            System.out.println("路由key"+envelope.getRoutingKey());
            System.out.println("DeliveryTag" + envelope.getDeliveryTag());
        }
    };


    // 8监听消息
    // 参数1:队列名称
    // 参数2:是否自动确认,设置为true为表示消息接收到自动向mq回复接收到了,mq接收到回复会删除消息,设置为false则需要手动确认
    // 参数3:消息接收到后回调
    channel.basicConsume("my_queue1",true,consumer);

}
路由模式和发布订阅的代码差不多,只是换了个交换机类型Direct和添加了路由键
Topic通配符模式
这种是完善了上面的路由模式,因为有可能有大量的路由key,所以一个个写不现实。
1) 模式说明
ydlclass.taiyuan.caiwubu.info "本月工资大家涨两千!"
ydlclass.taiyuan.renshi.error "李老师携款潜逃!"
ydlclass.beijing.caiwubu.error "因为李老师逃了,全国所有校区降薪两千。不行就毕业!"
ydlclass.lasa.caiwubu.info "lasa校区成立了!"
ydlclass.taiyuan.shitangbu.info "太原校区学生吃饭免费!"
1
2
3
4
5
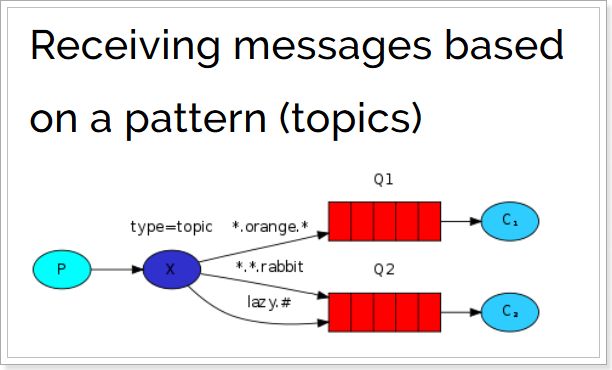
Topic类型与Direct相比,都是可以根据RoutingKey把消息路由到不同的队列。只不过Topic类型Exchange可以让队列在绑定Routing key 的时候使用通配符!
Routingkey` 一般都是有一个或多个单词组成,多个单词之间以”.”分割,例如: `item.insert
通配符规则:
#:匹配一个或多个词
*:匹配不多不少恰好1个词
举例:
我是太原校区校长 ydlclass.taiyuan.*.*
itlils 我是总部财务主管 ydlclass.*.caiwubu.*
1
2
图解:
- 红色Queue:绑定的是
usa.#,因此凡是以usa.开头的routing key都会被匹配到 - 黄色Queue:绑定的是
#.news,因此凡是以.news结尾的routing key都会被匹配
2) 代码
生产者
package com.ydlclass.rabbitmq.topic;

import com.rabbitmq.client.BuiltinExchangeType;
import com.rabbitmq.client.Channel;
import com.rabbitmq.client.Connection;
import com.rabbitmq.client.ConnectionFactory;

/**
 * @Created by IT李老师
 * 公主号 “元动力课堂”
 * 个人微 itlils
 */
public class Producer {

    //交换机名称
    static final String TOPIC_EXCHAGE = "topic_exchange";
    //队列名称
    static final String TOPIC_QUEUE_1 = "topic_queue_1";
    //队列名称
    static final String TOPIC_QUEUE_2 = "topic_queue_2";

    public static void main(String[] args) throws Exception {
        //1创建连接工厂
        ConnectionFactory connectionFactory=new ConnectionFactory();
        //连接的ip
        connectionFactory.setHost("localhost");
        //连接的端口
        connectionFactory.setPort(5672);
        //设置虚拟主机
        connectionFactory.setVirtualHost("/");
        //设置用户名
        connectionFactory.setUsername("itlils");
        //设置密码
        connectionFactory.setPassword("itlils");

        //2创建长连接
        Connection connection = connectionFactory.newConnection();
        //3创建channel
        Channel channel = connection.createChannel();
        //声明队列
        //String queue,  队列名
        // boolean durable, 持久化
        // boolean exclusive, 排他的
        // boolean autoDelete, 自动删除
        // Map arguments 属性
        channel.queueDeclare(TOPIC_QUEUE_1,true,false,false,null);
        channel.queueDeclare(TOPIC_QUEUE_2,true,false,false,null);

        // 声明交换机
        // String exchange,  交换机名称
        // BuiltinExchangeType type, 交换机类型
        // boolean durable,  持久化
        // boolean autoDelete, 自动删除
        // Map arguments 属性
        channel.exchangeDeclare(TOPIC_EXCHAGE, BuiltinExchangeType.TOPIC,true,false,null);

        //队列绑定交换机
        // String queue, 队列名称
        // String exchange, 交换机名称
        // String routingKey 路由键
        channel.queueBind(TOPIC_QUEUE_1,TOPIC_EXCHAGE,"ydlclass.taiyuan.*.*"); //我是太原校区校长的队列
        channel.queueBind(TOPIC_QUEUE_2,TOPIC_EXCHAGE,"ydlclass.*.caiwubu.*");//我是总部财务主管的队列

        //4发消息
        // String exchange,  交换机
        // String routingKey, 路由键
        // AMQP.BasicProperties props, 属性
        // byte[] body 消息      string byte[] char[]如何相互转换的?
        String msg1="hello rabbitmq!topic  本月工资大家涨两千!";
        channel.basicPublish(TOPIC_EXCHAGE,"ydlclass.taiyuan.caiwubu.info",null,msg1.getBytes());

        String msg2="hello rabbitmq!topic 李老师携款潜逃!";
        channel.basicPublish(TOPIC_EXCHAGE,"ydlclass.taiyuan.renshi.error",null,msg2.getBytes());

        String msg3="hello rabbitmq!topic  因为李老师逃了,全国所有校区降薪两千。不行就毕业!";
        channel.basicPublish(TOPIC_EXCHAGE,"ydlclass.beijing.caiwubu.error",null,msg3.getBytes());

        //5关闭连接  资源关闭的顺序,先关后出来的资源,最后关,第一个资源
        channel.close();
        connection.close();
    }
}
消费者1
接收两种类型的消息:更新商品和删除商品
package com.ydlclass.rabbitmq.topic;

import com.rabbitmq.client.*;

import java.io.IOException;

/**
 * @Created by IT李老师
 * 公主号 “元动力课堂”
 * 个人微 itlils
 */
public class Consumer1 {
    //交换机名称
    static final String TOPIC_EXCHAGE = "topic_exchange";
    //队列名称
    static final String TOPIC_QUEUE_1 = "topic_queue_1";
    //队列名称
    static final String TOPIC_QUEUE_2 = "topic_queue_2";

    public static void main(String[] args) throws Exception {
        //1创建连接工厂
        ConnectionFactory connectionFactory=new ConnectionFactory();
        //连接的ip
        connectionFactory.setHost("localhost");
        //连接的端口
        connectionFactory.setPort(5672);
        //设置虚拟主机
        connectionFactory.setVirtualHost("/");
        //设置用户名
        connectionFactory.setUsername("itlils");
        //设置密码
        connectionFactory.setPassword("itlils");

        //2创建长连接
        Connection connection = connectionFactory.newConnection();
        //3创建channel
        Channel channel = connection.createChannel();

        //声明队列
        //String queue,  队列名
        // boolean durable, 持久化
        // boolean exclusive, 排他的
        // boolean autoDelete, 自动删除
        // Map arguments 属性
        channel.queueDeclare(TOPIC_QUEUE_1,true,false,false,null);
        channel.queueDeclare(TOPIC_QUEUE_2,true,false,false,null);

        // 声明交换机
        // String exchange,  交换机名称
        // BuiltinExchangeType type, 交换机类型
        // boolean durable,  持久化
        // boolean autoDelete, 自动删除
        // Map arguments 属性
        channel.exchangeDeclare(TOPIC_EXCHAGE, BuiltinExchangeType.TOPIC,true,false,null);

        //队列绑定交换机
        // String queue, 队列名称
        // String exchange, 交换机名称
        // String routingKey 路由键
        channel.queueBind(TOPIC_QUEUE_1,TOPIC_EXCHAGE,"ydlclass.taiyuan.*.*"); //我是太原校区校长的队列
        channel.queueBind(TOPIC_QUEUE_2,TOPIC_EXCHAGE,"ydlclass.*.caiwubu.*");//我是总部财务主管的队列


        //4监听某个队列
        // String queue, 监听的队列名
        // boolean autoAck, 是否自动应答
        // Consumer callback 回调函数,收到消息,我要干啥
        Consumer consumer=new DefaultConsumer(channel){
            // 回调函数,收到消息,我要干啥
            //  String consumerTag, 消费者标签
            // Envelope envelope, 信封 保存很多信息
            // AMQP.BasicProperties properties, 属性
            // byte[] body  消息字节数组
            @Override
            public void handleDelivery(String consumerTag, Envelope envelope, AMQP.BasicProperties properties, byte[] body) throws IOException {
                //业务逻辑

                //现在的业务逻辑就是打印
//                System.out.println("consumerTag:"+consumerTag);
//                System.out.println("Exchange:"+envelope.getExchange());
//                System.out.println("RoutingKey:"+envelope.getRoutingKey());
//                System.out.println("DeliveryTag:"+envelope.getDeliveryTag()); //消息id

                System.out.println(new String(body));
            }
        };
        channel.basicConsume(TOPIC_QUEUE_1,true,consumer);

        //5 千万别关闭连接,要不然queue有了消息 推不过来了
//        channel.close();
//        connection.close();


    }
}
消费者2
接收所有类型的消息:新增商品,更新商品和删除商品。
package com.ydlclass.rabbitmq.topic;

import com.rabbitmq.client.*;

import java.io.IOException;

/**
 * @Created by IT李老师
 * 公主号 “元动力课堂”
 * 个人微 itlils
 */
public class Consumer2 {
    //交换机名称
    static final String TOPIC_EXCHAGE = "topic_exchange";
    //队列名称
    static final String TOPIC_QUEUE_1 = "topic_queue_1";
    //队列名称
    static final String TOPIC_QUEUE_2 = "topic_queue_2";

    public static void main(String[] args) throws Exception {
        //1创建连接工厂
        ConnectionFactory connectionFactory=new ConnectionFactory();
        //连接的ip
        connectionFactory.setHost("localhost");
        //连接的端口
        connectionFactory.setPort(5672);
        //设置虚拟主机
        connectionFactory.setVirtualHost("/");
        //设置用户名
        connectionFactory.setUsername("itlils");
        //设置密码
        connectionFactory.setPassword("itlils");

        //2创建长连接
        Connection connection = connectionFactory.newConnection();
        //3创建channel
        Channel channel = connection.createChannel();

        //声明队列
        //String queue,  队列名
        // boolean durable, 持久化
        // boolean exclusive, 排他的
        // boolean autoDelete, 自动删除
        // Map arguments 属性
        channel.queueDeclare(TOPIC_QUEUE_1,true,false,false,null);
        channel.queueDeclare(TOPIC_QUEUE_2,true,false,false,null);

        // 声明交换机
        // String exchange,  交换机名称
        // BuiltinExchangeType type, 交换机类型
        // boolean durable,  持久化
        // boolean autoDelete, 自动删除
        // Map arguments 属性
        channel.exchangeDeclare(TOPIC_EXCHAGE, BuiltinExchangeType.TOPIC,true,false,null);

        //队列绑定交换机
        // String queue, 队列名称
        // String exchange, 交换机名称
        // String routingKey 路由键
        channel.queueBind(TOPIC_QUEUE_1,TOPIC_EXCHAGE,"ydlclass.taiyuan.*.*"); //我是太原校区校长的队列
        channel.queueBind(TOPIC_QUEUE_2,TOPIC_EXCHAGE,"ydlclass.*.caiwubu.*");//我是总部财务主管的队列


        //4监听某个队列
        // String queue, 监听的队列名
        // boolean autoAck, 是否自动应答
        // Consumer callback 回调函数,收到消息,我要干啥
        Consumer consumer=new DefaultConsumer(channel){
            // 回调函数,收到消息,我要干啥
            //  String consumerTag, 消费者标签
            // Envelope envelope, 信封 保存很多信息
            // AMQP.BasicProperties properties, 属性
            // byte[] body  消息字节数组
            @Override
            public void handleDelivery(String consumerTag, Envelope envelope, AMQP.BasicProperties properties, byte[] body) throws IOException {
                //业务逻辑

                //现在的业务逻辑就是打印
//                System.out.println("consumerTag:"+consumerTag);
//                System.out.println("Exchange:"+envelope.getExchange());
//                System.out.println("RoutingKey:"+envelope.getRoutingKey());
//                System.out.println("DeliveryTag:"+envelope.getDeliveryTag()); //消息id

                System.out.println(new String(body));
            }
        };
        channel.basicConsume(TOPIC_QUEUE_2,true,consumer);

    }
}
通配符模式和上面的路由模式很像,只是交换机模式为Topic,还有路由键使用了通配符
6、 模式总结
RabbitMQ工作模式:
简单模式
一个生产者、一个消费者,不需要设置交换机(使用默认的交换机)。
工作队列模式 Work Queue**
一个生产者、多个消费者(竞争关系),不需要设置交换机(使用默认的交换机)。
发布订阅模式 Publish/subscribe**
需要设置类型为fanout的交换机,并且交换机和队列进行绑定,当发送消息到交换机后,交换机会将消息发送到绑定的队列。
路由模式 Routing**
需要设置类型为direct的交换机,交换机和队列进行绑定,并且指定routing key,当发送消息到交换机后,交换机会根据routing key将消息发送到对应的队列。
通配符模式 Topic**
需要设置类型为topic的交换机,交换机和队列进行绑定,并且指定通配符方式的routing key,当发送消息到交换机后,交换机会根据routing key将消息发送到对应的队列。
Spring整合所有模式
依赖
        <dependency>
            <groupId>org.springframework.amqpgroupId>
            <artifactId>spring-rabbitartifactId>
            <version>2.2.15.RELEASEversion>
        dependency>
连接信息的配置文件
rabbitmq.host=localhost
rabbitmq.port=5672
rabbitmq.username=root
rabbitmq.password=123456
rabbitmq.virtual-host=/
xml配置文件
<beans xmlns="http://www.springframework.org/schema/beans"
       xmlns:xsi="http://www.w3.org/2001/XMLSchema-instance"
       xmlns:context="http://www.springframework.org/schema/context"
       xmlns:rabbit="http://www.springframework.org/schema/rabbit"
       xsi:schemaLocation="http://www.springframework.org/schema/beans
       http://www.springframework.org/schema/beans/spring-beans.xsd
       http://www.springframework.org/schema/context
       https://www.springframework.org/schema/context/spring-context.xsd
       http://www.springframework.org/schema/rabbit
       http://www.springframework.org/schema/rabbit/spring-rabbit.xsd">


    <context:property-placeholder location="classpath:rabbitmq.properties"/>


    <rabbit:connection-factory id="connectionFactory"
                               host="${rabbitmq.host}"
                               port="${rabbitmq.port}"
                               username="${rabbitmq.username}"
                               password="${rabbitmq.password}"
                               virtual-host="${rabbitmq.virtual-host}"/>

    <rabbit:admin connection-factory="connectionFactory"/>


    <rabbit:queue id="ydlqueue" name="ydlqueue" auto-declare="true"/>


    <rabbit:queue id="spring_fanout_queue_1" name="spring_fanout_queue_1" auto-declare="true" auto-delete="false" durable="true"/>


    <rabbit:queue id="spring_fanout_queue_2" name="spring_fanout_queue_2" auto-declare="true"/>


    <rabbit:fanout-exchange id="spring_fanout_exchange" name="spring_fanout_exchange" auto-declare="true">
        <rabbit:bindings>
            <rabbit:binding queue="spring_fanout_queue_1"/>
            <rabbit:binding queue="spring_fanout_queue_2"/>
        rabbit:bindings>
    rabbit:fanout-exchange>


    <rabbit:queue id="spring_direct_queue_1" name="spring_direct_queue_1" auto-declare="true"/>
    <rabbit:queue id="spring_direct_queue_2" name="spring_direct_queue_2" auto-declare="true"/>


    <rabbit:direct-exchange id="spring_direct_exchange" name="spring_direct_exchange" auto-declare="true">
        <rabbit:bindings>
            <rabbit:binding queue="spring_direct_queue_1" key="error"/>
            <rabbit:binding queue="spring_direct_queue_2" key="info"/>
            <rabbit:binding queue="spring_direct_queue_2" key="error"/>
            <rabbit:binding queue="spring_direct_queue_2" key="warning"/>
        rabbit:bindings>
    rabbit:direct-exchange>


    <rabbit:queue id="spring_topic_queue_1" name="spring_topic_queue_1" auto-declare="true"/>
    <rabbit:queue id="spring_topic_queue_2" name="spring_topic_queue_2" auto-declare="true"/>

    <rabbit:topic-exchange id="spring_topic_exchange" name="spring_topic_exchange">
        <rabbit:bindings>
            <rabbit:binding queue="spring_topic_queue_1" pattern="ydlclass.taiyuan.*.*"/>
            <rabbit:binding queue="spring_topic_queue_2" pattern="ydlclass.*.caiwubu.*"/>
        rabbit:bindings>
    rabbit:topic-exchange>


    <rabbit:template id="rabbitTemplate" connection-factory="connectionFactory"/>
beans>
发布信息
@Autowired
    RabbitTemplate rabbitTemplate;

    //简单模式发送
    @Test
    public void helloTest(){
        // String exchange,  交换机
        // String routingKey,  路由键
        // Object message     Object消息体 User car lunchuan
        String msg="hello rabbitmq!";
        rabbitTemplate.convertAndSend("","ydlqueue",msg);
    }

    //测试发布订阅模式
    @Test
    public void publishTest(){
        String msg="hello rabbitmq! publish";
        rabbitTemplate.convertAndSend("spring_fanout_exchange","",msg);
    }

    //测试routing模式
    @Test
    public void routingTest(){
        String msg="hello rabbitmq!routing error";
        rabbitTemplate.convertAndSend("spring_direct_exchange","error",msg);

        String msg1="hello rabbitmq!routing info";
        rabbitTemplate.convertAndSend("spring_direct_exchange","info",msg1);

        String msg2="hello rabbitmq!routing warning";
        rabbitTemplate.convertAndSend("spring_direct_exchange","warning",msg2);
    }

    //测试topic模式
    @Test
    public void topicTest(){
        String msg1="hello rabbitmq!topic  本月工资大家涨两千!";
        rabbitTemplate.convertAndSend("spring_topic_exchange","ydlclass.taiyuan.caiwubu.info",msg1);

        String msg2="hello rabbitmq!topic 李老师携款潜逃!";
        rabbitTemplate.convertAndSend("spring_topic_exchange","ydlclass.taiyuan.renshi.error",msg2);

        String msg3="hello rabbitmq!topic  因为李老师逃了,全国所有校区降薪两千。不行就毕业!";
        rabbitTemplate.convertAndSend("spring_topic_exchange","ydlclass.beijing.caiwubu.error",msg3);
    }
消费者
1,编写监听方法
//缺啥补啥 干就完事
public class SpringQueueListener implements MessageListener {
    //有了消息 做什么
    @Override
    public void onMessage(Message message) {
        //业务逻辑
        byte[] body = message.getBody();
        System.out.println(new String(body));
    }
}
2,注入监听,并且绑定监听器和队列
<beans xmlns="http://www.springframework.org/schema/beans"
       xmlns:xsi="http://www.w3.org/2001/XMLSchema-instance"
       xmlns:context="http://www.springframework.org/schema/context"
       xmlns:rabbit="http://www.springframework.org/schema/rabbit"
       xsi:schemaLocation="http://www.springframework.org/schema/beans
       http://www.springframework.org/schema/beans/spring-beans.xsd
       http://www.springframework.org/schema/context
       https://www.springframework.org/schema/context/spring-context.xsd
       http://www.springframework.org/schema/rabbit
       http://www.springframework.org/schema/rabbit/spring-rabbit.xsd">

    <context:property-placeholder location="classpath:rabbitmq.properties"/>


    <rabbit:connection-factory id="connectionFactory"
                               host="${rabbitmq.host}"
                               port="${rabbitmq.port}"
                               username="${rabbitmq.username}"
                               password="${rabbitmq.password}"
                               virtual-host="${rabbitmq.virtual-host}"/>

    <rabbit:admin connection-factory="connectionFactory"/>


    <rabbit:queue id="ydlqueue" name="ydlqueue" auto-declare="true"/>


    <rabbit:queue id="spring_fanout_queue_1" name="spring_fanout_queue_1" auto-declare="true" auto-delete="false" durable="true"/>


    <rabbit:queue id="spring_fanout_queue_2" name="spring_fanout_queue_2" auto-declare="true"/>


    <rabbit:fanout-exchange id="spring_fanout_exchange" name="spring_fanout_exchange" auto-declare="true">
        <rabbit:bindings>
            <rabbit:binding queue="spring_fanout_queue_1"/>
            <rabbit:binding queue="spring_fanout_queue_2"/>
        rabbit:bindings>
    rabbit:fanout-exchange>


    <rabbit:queue id="spring_direct_queue_1" name="spring_direct_queue_1" auto-declare="true"/>
    <rabbit:queue id="spring_direct_queue_2" name="spring_direct_queue_2" auto-declare="true"/>


    <rabbit:direct-exchange id="spring_direct_exchange" name="spring_direct_exchange" auto-declare="true">
        <rabbit:bindings>
            <rabbit:binding queue="spring_direct_queue_1" key="error">rabbit:binding>
            <rabbit:binding queue="spring_direct_queue_2" key="info">rabbit:binding>
            <rabbit:binding queue="spring_direct_queue_2" key="error">rabbit:binding>
            <rabbit:binding queue="spring_direct_queue_2" key="warning">rabbit:binding>
        rabbit:bindings>
    rabbit:direct-exchange>


    <rabbit:queue id="spring_topic_queue_1" name="spring_topic_queue_1" auto-declare="true"/>
    <rabbit:queue id="spring_topic_queue_2" name="spring_topic_queue_2" auto-declare="true"/>

    <rabbit:topic-exchange id="spring_topic_exchange" name="spring_topic_exchange">
        <rabbit:bindings>
            <rabbit:binding queue="spring_topic_queue_1" pattern="ydlclass.taiyuan.*.*">rabbit:binding>
            <rabbit:binding queue="spring_topic_queue_2" pattern="ydlclass.*.caiwubu.*">rabbit:binding>
        rabbit:bindings>
    rabbit:topic-exchange>


    <rabbit:template id="rabbitTemplate" connection-factory="connectionFactory"/>


    <bean id="springQueueListener" class="com.example.spring_consumer.listener.SpringQueueListener"/>


    <rabbit:listener-container connection-factory="connectionFactory" auto-declare="true">

        <rabbit:listener ref="springQueueListener" queue-names="ydlqueue"/>


    rabbit:listener-container>
beans>
springboot整合MQ
生产者
上面的都是使用spring模式的,接下来使用springboot
由于spring的xml方式太复杂,所以下面我们用配置类的方式来代替
springboot的MQ依赖
<dependency>
        <groupId>org.springframework.bootgroupId>
        <artifactId>spring-boot-starter-amqpartifactId>
    dependency>
配置类
  //下面是使用配置文件的方式来代替xml
    /**
     * @Created by IT李老师
     * 公主号 “元动力课堂”
     * 个人微 itlils
     */
    @Configuration
    public class RabbitConfig {

        @Bean("boot_hello_queue")
        public Queue queue(){
            //String queue,  队列名
            // boolean durable, 持久化
            // boolean exclusive, 排他的
            // boolean autoDelete, 自动删除
            // Map arguments 属性
            return new Queue("boot_hello_queue",true,false,false,null);
        }

        //发布订阅模式
        //交换机名称
        public static final String FANOUT_EXCHAGE = "boot_fanout_exchange";
        //队列名称
        public static final String FANOUT_QUEUE_1 = "boot_fanout_queue_1";
        //队列名称
        public static final String FANOUT_QUEUE_2 = "boot_fanout_queue_2";

        @Bean(FANOUT_QUEUE_1)
        public Queue FANOUT_QUEUE_1(){
            return new Queue(FANOUT_QUEUE_1,true,false,false,null);
        }
        @Bean(FANOUT_QUEUE_2)
        public Queue FANOUT_QUEUE_2(){
            return new Queue(FANOUT_QUEUE_2,true,false,false,null);
        }
        @Bean(FANOUT_EXCHAGE)
        public Exchange FANOUT_EXCHAGE(){
            return ExchangeBuilder.fanoutExchange(FANOUT_EXCHAGE).durable(true).build();
        }


        @Bean
        public Binding FANOUT_QUEUE_1_FANOUT_EXCHAGE(@Qualifier(FANOUT_QUEUE_1) Queue queue,
                                                     @Qualifier(FANOUT_EXCHAGE) Exchange exchange){
            return BindingBuilder.bind(queue).to(exchange).with("").noargs();
        }
        @Bean
        public Binding FANOUT_QUEUE_2_FANOUT_EXCHAGE(@Qualifier(FANOUT_QUEUE_2) Queue queue,
                                                     @Qualifier(FANOUT_EXCHAGE) Exchange exchange){
            return BindingBuilder.bind(queue).to(exchange).with("").noargs();
        }


        //队列名称和交换机名称
        //交换机名称
        public static final String DIRECT_EXCHAGE = "boot_direct_exchange";
        //队列名称
        public static final String DIRECT_QUEUE_1 = "boot_direct_queue_1";
        //队列名称
        public static final String DIRECT_QUEUE_2 = "boot_direct_queue_2";

        //注入队列
        //注入交换机
        //然后声明队列
        @Bean(DIRECT_QUEUE_1)
        public Queue DIRECT_QUEUE_1(){
            return new Queue(DIRECT_QUEUE_1,true,false,false,null);
        }
        @Bean(DIRECT_QUEUE_2)
        public Queue DIRECT_QUEUE_2(){
            return new Queue(DIRECT_QUEUE_2,true,false,false,null);
        }

        //声明交换机
        @Bean(DIRECT_EXCHAGE)
        public Exchange DIRECT_EXCHAGE(){
            return ExchangeBuilder.directExchange(DIRECT_EXCHAGE).durable(true).build();
        }

        //声明绑定关系
        @Bean
        public Binding DIRECT_QUEUE_1_FANOUT_EXCHAGE(@Qualifier(DIRECT_QUEUE_1) Queue queue,
                                                     @Qualifier(DIRECT_EXCHAGE) Exchange exchange){
            return BindingBuilder.bind(queue).to(exchange).with("").noargs();//要写多个路由模式
        }
        @Bean
        public Binding DIRECT_QUEUE_2_FANOUT_EXCHAGE(@Qualifier(DIRECT_QUEUE_2) Queue queue,
                                                     @Qualifier(DIRECT_EXCHAGE) Exchange exchange){
            return BindingBuilder.bind(queue).to(exchange).with("").noargs();
        }


        //topic模式

}
配置yml
spring:
  rabbitmq:
    host: localhost
    password: 123456
    username: root
    port: 5672
    virtual-host: /
然后直接注入就可以使用了
消费者
以下和生产者一样
-
依赖
-
配置信息
-
配置类
开启监听类
@Component
public class MyLisener {
    //监听那个队列
    @RabbitListener(queues = RabbitConfig.DIRECT_QUEUE_1)
    public void receiveMsg(Message message){
        MessageProperties messageProperties = message.getMessageProperties();//参数
        //数据
        Object targetBean = messageProperties.getTargetBean();
        //还可以去获取你的交换机等等
    }
}
RabbitMQ高级
Confirm确认模式
配置类,就是这个路由键变成confirm
//队列名称和交换机名称
    //交换机名称
    public static final String DIRECT_EXCHAGE = "boot_direct_exchange";
    //队列名称
    public static final String DIRECT_QUEUE_1 = "boot_direct_queue_1";
    //队列名称
    public static final String DIRECT_QUEUE_2 = "boot_direct_queue_2";

    //注入队列
    //注入交换机
    //然后声明队列
    @Bean(DIRECT_QUEUE_1)
    public Queue DIRECT_QUEUE_1(){
        return new Queue(DIRECT_QUEUE_1,true,false,false,null);
    }
    @Bean(DIRECT_QUEUE_2)
    public Queue DIRECT_QUEUE_2(){
        return new Queue(DIRECT_QUEUE_2,true,false,false,null);
    }

    //声明交换机
    @Bean(DIRECT_EXCHAGE)
    public Exchange DIRECT_EXCHAGE(){
        return ExchangeBuilder.directExchange(DIRECT_EXCHAGE).durable(true).build();
    }

    //声明绑定关系
    @Bean
    public Binding DIRECT_QUEUE_1_FANOUT_EXCHAGE(@Qualifier(DIRECT_QUEUE_1) Queue queue,
                                                 @Qualifier(DIRECT_EXCHAGE) Exchange exchange){
        return BindingBuilder.bind(queue).to(exchange).with("confirm").noargs();//要写多个路由模式
    }
    @Bean
    public Binding DIRECT_QUEUE_2_FANOUT_EXCHAGE(@Qualifier(DIRECT_QUEUE_2) Queue queue,
                                                 @Qualifier(DIRECT_EXCHAGE) Exchange exchange){
        return BindingBuilder.bind(queue).to(exchange).with("").noargs();
    }
开启确认模式
使用xml实在配置连接信息的时候设置
    <rabbit:connection-factory id="connectionFactory"
                               host="${rabbitmq.host}"
                               port="${rabbitmq.port}"
                               username="${rabbitmq.username}"
                               password="${rabbitmq.password}"
                               virtual-host="${rabbitmq.virtual-host}"
                               publisher-confirms="true"
    />
springboot配置文件也可以设置
spring:
  rabbitmq:
    username: root
    password: 123456
    virtual-host: /
    host: localhost
    port: 5672
    publisher-confirm-type: correlated
确认模式就是为了不让其出错,也就是在消息发送和接收出错了,的一种换回机制
我们需要在template中重写回调函数
@Autowired
private RabbitTemplate rabbitTemplate;
@Test
void contextLoads() {
    rabbitTemplate.setConfirmCallback(new RabbitTemplate.ConfirmCallback() {
        @Override
        public void confirm(CorrelationData correlationData, boolean ack, String cause) {
            System.out.println("接收到确认信息");

            System.out.println("是否成功" + ack);

            System.out.println("失败原因" + cause);
        }
    });
}
return退回模式
上面是无论成不成功都会调用,而这个只有失败了才会调用
xml中开启退回模式
    <rabbit:connection-factory id="connectionFactory"
                               host="${rabbitmq.host}"
                               port="${rabbitmq.port}"
                               username="${rabbitmq.username}"
                               password="${rabbitmq.password}"
                               virtual-host="${rabbitmq.virtual-host}"
                               publisher-confirms="true"
                               publisher-returns="true"
    />
spring:
  rabbitmq:
    username: root
    password: 123456
    virtual-host: /
    host: localhost
    port: 5672
    publisher-confirm-type: correlated
    publisher-returns: true
设置交换机处理失败消息模式
编写回调
@Test
    void contextLoads2() {
        //设置开启return
        rabbitTemplate.setMandatory(true);

        //2.设置ReturnCallBack
        rabbitTemplate.setReturnCallback(new RabbitTemplate.ReturnCallback() {
            /**
             *
             * @param message   消息对象
             * @param replyCode 错误码
             * @param replyText 错误信息
             * @param exchange  交换机
             * @param routingKey 路由键
             */
            @Override
            public void returnedMessage(Message message, int replyCode, String replyText, String exchange, String routingKey) {
                System.out.println("return 执行了....");

                System.out.println(message);
                System.out.println(replyCode);
                System.out.println(replyText);
                System.out.println(exchange);
                System.out.println(routingKey);

                //处理
            }
        });


        //3. 发送消息
        rabbitTemplate.convertAndSend("test_exchange_confirm", "confirm", "message confirm....");
    }
return相当于Exception
confirm相当于过滤器
消费者手动ACK
有三种确认方式
自动确认:acknowledge=“none”
• 手动确认:acknowledge=“manual”
• 根据异常情况确认:acknowledge=“auto”
1,设置手动ACK
spring:
  rabbitmq:
    username: root
    password: 123456
    virtual-host: /
    host: localhost
    port: 5672
    publisher-confirm-type: correlated
    publisher-returns: true
    listener:
      simple:
        acknowledge-mode: manual
2,编写ACK过滤器
若不成功就要保存。
@Component
public class AckListener implements ChannelAwareMessageListener {

    @Override
    public void onMessage(Message message, Channel channel) throws Exception {
        //接收者ID
        long deliveryTag = message.getMessageProperties().getDeliveryTag();
        //做业务逻辑
        try {
            //做业务逻辑 没问题

            //告诉MQ说接收到消息,也就是可以删除消息了
            channel.basicAck(deliveryTag,true);
        }catch (Exception e){
            //出错了,重回队列 第三个布尔类型,如果是true就重回队列,不然拒绝接收
            channel.basicNack(deliveryTag,true,true);
        }
    }
}
手动ACK好像是全局的。刚刚上面的 @RabbitListener(queues = RabbitConfig.DIRECT_QUEUE_1)是针对监听某个队列,而且无ACK。
上面就是可靠性投递。
面试保证可靠模式投递
-
1,生产者return模式
-
2,消费者手动ACK
-
3,持久化MQ的队列和交换机
-
4,集群部署
-
5, message要持久化
消费限流
MQ可以进行削峰减流
1,首先要是手动ACK模式
spring:
  rabbitmq:
    username: root
    password: 123456
    virtual-host: /
    host: localhost
    port: 5672
    publisher-confirm-type: correlated
    publisher-returns: true
    listener:
      simple:
        acknowledge-mode: manual
过滤器
@Component
public class AckListener implements ChannelAwareMessageListener {

    @Override
    public void onMessage(Message message, Channel channel) throws Exception {
        //接收者ID
        long deliveryTag = message.getMessageProperties().getDeliveryTag();
        //做业务逻辑
        try {
            //做业务逻辑 没问题

            //告诉MQ说接收到消息,也就是可以删除消息了
            channel.basicAck(deliveryTag,true);
        }catch (Exception e){
            //出错了,重回队列
            channel.basicNack(deliveryTag,true,true);
        }
    }
}
2,监听器设定prefetch批处理条数
每次处理100条
spring:
  rabbitmq:
    username: root
    password: 123456
    virtual-host: /
    host: localhost
    port: 5672
    publisher-confirm-type: correlated
    publisher-returns: true
    listener:
      simple:
        acknowledge-mode: manual
      direct:
        prefetch: 100
TTL过期
场景带入,比如我们下单了一样商品,但是在30分钟内没有支付也就自动放弃了。所以,对此我们可以进行对队列里面的消息进行设置实现限制,如果没有
在规定时间内消费,就被剔除。
我们可以从两个方面进行设置时间
- 对队列进行设置时间
- 对消息设置时间
注意:
- 消息时间和队列时间那个小算那个。
- 判断消息是否超时只看队列的首条信息,也就是一条一条看。
设置队列的超时时间
xmlBean
<rabbit:queue name="test_queue_ttl" id="test_queue_ttl">

    <rabbit:queue-arguments>

        <entry key="x-message-ttl" value="10000" value-type="java.lang.Integer"/>
    rabbit:queue-arguments>
rabbit:queue>
springboot注入bean的方式
注入bean的方式是注入一个属性,其实和上面一样,也就是在属性里面插入一个时间,然后拿出来判断而已
我们可以设置以下属性,所以我们就可以添加一个map,带x-message-ttl时间。
如下,这样他的超时时间就是设置的时间,系统自动处理
 	@Bean(DIRECT_QUEUE_1)
    public Queue DIRECT_QUEUE_1(){
        Map<String, Object> map = new HashMap<>();
        map.put("x-message-ttl",100000L);
        return new Queue(DIRECT_QUEUE_1,true,false,false,map);
    }
-
x-message-ttl:队列中消息的存活时间(毫秒),达到TTL的消息可能会被删除。
-
x-expires:队列在多长时间(毫秒)没有被访问以后会被删除。
-
x-max-length:队列中的最大消息数。
-
x-max-length-bytes:队列的最大容量(bytes)。
-
overflow:队列溢出之后的策略。主要可以配置如下参数:reject-publish - 直接丢弃最近发布的消息,如若启用了publisher confirm(发布者确认),发布者将通过发送 basic.nack 消息通知拒绝,如果当前队列绑定有多个消费者,则消息在收到 basic.nack 拒绝通知后,仍然会被发布到其他队列;drop-head - 丢弃队列头部消息(集群模式下只支持这种策略) reject-publish-dlx - 最近发布的消息会进入死信队列。
-
x-dead-letter-exchange:队列的死信交换机。
-
x-dead-letter-routing-key:死信交换机的路由键。
-
x-single-active-consumer:true/false。表示是否最多只允许一个消费者消费,如果有多个消费者同时绑定,则只会激活第一个,除非第一个消费者被取消或者死亡,才会自动转到下一个消费者。
-
x-max-priority:队列中消息的最大优先级, 消息的优先级不能超过它。
-
x-queue-mode:3.6.0 版本引入的,主要是为了实现惰性加载。队列将收到的消息尽可能快的进行持久化操作到磁盘上,然后只有在用户请求的时候才会加载到 RAM 内存。这个参数支持两个值:default 和 lazy。当不进行设置的时候,就是默认为 default,不做任何改变;当设置为 lazy 就会进行懒加载。
-
x-queue-master-locator:为了保证消息的 FIFO,所以在高可用集群模式下需要选择一个节点作为主节点。这个参数主要有三种模式:min-masters- 托管最小数量的绑定主机的节点;client-local- 选择声明的队列已经连接到客户端的节点;random- 随机选择一个节点。
设置单个消息超时
就是实现MessagePostProcessor消息后处理对象,重写postProcessMessage(Message message)方法。
@Test
    public void testTtl2() {

        // 消息后处理对象,设置一些消息的参数信息
        MessagePostProcessor messagePostProcessor = new MessagePostProcessor() {
            @Override
            public Message postProcessMessage(Message message) throws AmqpException {
                //1.设置message的信息
                message.getMessageProperties().setExpiration("5000");//消息的过期时间
                //2.返回该消息
                return message;
            }
        };
小结
- 设置队列过期时间使用参数:x-message-ttl,单位:ms(毫秒),会对整个队列消息统一过期。
- 设置消息过期时间使用参数:expiration。单位:ms(毫秒),当该消息在队列头部时(消费时),会单独判断这一消息是否过期。
- 如果两者都进行了设置,以时间短的为准
死信队列
就是一些过期消息放到死信交换机上面,也就是发送到死信交换机和死信队列,然后发送给运维人员。
死信的3种情况
- 1,队列消息长度达到限制
- 2,消费者拒接信息,并且不把信息重新放入原来队列
- 3,原队列或信息的过期设置,过期未被消费
在ACK我们的catch中也可以放到死信
1,在消息的生产方中,在 spring-rabbitmq-producer.xml 配置文件中,添加如下配置:
-
声明正常的队列(test_queue_dlx)和交换机(test_exchange_dlx)
<rabbit:queue name="test_queue_dlx" id="test_queue_dlx"> rabbit:queue> <rabbit:topic-exchange name="test_exchange_dlx"> <rabbit:bindings> <rabbit:binding pattern="test.dlx.#" queue="test_queue_dlx">rabbit:binding> rabbit:bindings> rabbit:topic-exchange> -
声明死信队列(queue_dlx)和死信交换机(exchange_dlx)
<rabbit:queue name="queue_dlx" id="queue_dlx">rabbit:queue> <rabbit:topic-exchange name="exchange_dlx"> <rabbit:bindings> <rabbit:binding pattern="dlx.#" queue="queue_dlx">rabbit:binding> rabbit:bindings> rabbit:topic-exchange> -
正常队列绑定死信交换机,并设置相关参数信息
<rabbit:queue name="test_queue_dlx" id="test_queue_dlx">

    <rabbit:queue-arguments>

        <entry key="x-dead-letter-exchange" value="exchange_dlx" />


        <entry key="x-dead-letter-routing-key" value="dlx.hehe" />


        <entry key="x-message-ttl" value="10000" value-type="java.lang.Integer" />

        <entry key="x-max-length" value="10" value-type="java.lang.Integer" />
    rabbit:queue-arguments>
rabbit:queue>
<rabbit:topic-exchange name="test_exchange_dlx">
    <rabbit:bindings>
        <rabbit:binding pattern="test.dlx.#" queue="test_queue_dlx">rabbit:binding>
    rabbit:bindings>
rabbit:topic-exchange>
2,编写测试方法
    /**
     * 发送测试死信消息:
     *  1. 过期时间
     *  2. 长度限制
     *  3. 消息拒收
     */
    @Test
    public void testDlx(){
        //1. 测试过期时间,死信消息
        rabbitTemplate.convertAndSend("test_exchange_dlx",
                                      "test.dlx.haha","我是一条消息,我会死吗?");

        //2. 测试长度限制后,消息死信
       for (int i = 0; i < 20; i++) {
            rabbitTemplate.convertAndSend("test_exchange_dlx",
                                          "test.dlx.haha","我是一条消息,我会死吗?");
        }

        //3. 测试消息拒收
        rabbitTemplate.convertAndSend("test_exchange_dlx",
                                      "test.dlx.haha","我是一条消息,我会死吗?");

    }
3,消息拒绝接受消费者增加监听
package com.ydlclass.listener;

/**
 * creste by ydlclass.itcast
 */

import com.rabbitmq.client.Channel;
import org.springframework.amqp.core.Message;
import org.springframework.amqp.rabbit.listener.api.ChannelAwareMessageListener;
import org.springframework.stereotype.Component;

/**
 * Consumer ACK机制:
 *  1. 设置手动签收。acknowledge="manual"
 *  2. 让监听器类实现ChannelAwareMessageListener接口
 *  3. 如果消息成功处理,则调用channel的 basicAck()签收
 *  4. 如果消息处理失败,则调用channel的basicNack()拒绝签收,broker重新发送给consumer
 */
@Component
public class DlxListener implements ChannelAwareMessageListener {

    @Override
    public void onMessage(Message message, Channel channel) throws Exception {
        long deliveryTag = message.getMessageProperties().getDeliveryTag();

        try {
            //1.接收转换消息
            System.out.println(new String(message.getBody()));

            //2. 处理业务逻辑
            System.out.println("处理业务逻辑...");
            int i = 3/0;//出现错误
            //3. 手动签收
            channel.basicAck(deliveryTag,true);
        } catch (Exception e) {
            //e.printStackTrace();
            System.out.println("拒绝接受");
            //4.拒绝签收
            /*
            第三个参数:requeue:重回队列。如果设置为true,则消息重新回到queue,broker会重新发送该消息给消费端
             */
            channel.basicNack(deliveryTag,true,false);
            // 了解
            //channel.basicReject(deliveryTag,true);
        }
    }
}
配置文件
<rabbit:listener ref="dlxListener" queue-names="test_queue_dlx"/>
死信队列的应用
下单秒杀
配置类
//交换机名称
    public static  String ITEM_TOPIC_EXCHANGE="xwl_exchange";
    //队列名称
    public static final String ITEM_QUEUE = "xwl_queue";
    //声明交换机
    @Bean("xwlTopicExchange")
    public Exchange topicExchange(){
        return ExchangeBuilder.topicExchange(ITEM_TOPIC_EXCHANGE).durable(true).build();
    }
    //声明主队列
    @Bean("xwlQueue")
    public Queue itemQueue(){
        Map<String, Object> args = new HashMap<>();
        //声明死信交换器
        args.put("x-dead-letter-exchange", "deal_exchange");
        //声明死信路由键
        args.put("x-dead-letter-routing-key", "DelayKey");
        //声明主队列如果发生堵塞或其它-10秒自动消费消息
        args.put("x-message-ttl",10000);
        return QueueBuilder.durable(ITEM_QUEUE).withArguments(args).build();
    }
    //主队列绑定交换机以及-路由(此处采用TOPC通配符)
    @Bean
    public Binding itemQueueExchange(@Qualifier("xwlQueue") Queue queue,
                                     @Qualifier("xwlTopicExchange") Exchange exchange){
        return BindingBuilder.bind(queue).to(exchange).with("item.#").noargs();
    }


    //声明死信队列
    @Bean("dealQueue")
    public Queue dealQueue(){
        return QueueBuilder.durable("deal_queue").build();
    }
    //声明死信交换机
    @Bean("dealExchange")
    public Exchange dealExchange(){
        return ExchangeBuilder.topicExchange("deal_exchange").durable(true).build();
    }
    //死信队列绑定交换机以及路由key
    @Bean
    public Binding dealQueueExchange(@Qualifier("dealQueue") Queue queue,
                                     @Qualifier("dealExchange") Exchange exchange){
        return BindingBuilder.bind(queue).to(exchange).with("DelayKey").noargs();
    }
配置yml
spring:
  rabbitmq:
    host: localhost #地址
    port: 5672 #端口
    username: xwl #用户名
    password: 258000 #密码
    virtual-host: /xwl #虚拟机地址/权限
    template:
      #exchange: xwl_exchange #交换机
      retry:
        initial-interval: 10000ms #如果没有接收到消费回执,即每隔10秒访问一次
        enabled: true #开启重试机制
        max-interval: 30000ms #最大叠加制不超过30秒
        max-attempts: 2 #每次访问一次间隔后都以2倍叠加再次访问
    listener:
      simple:
        default-requeue-rejected: false #监听器抛出异常而拒绝的消息是否被重新放回队列。默认值为true
        #none无应答确认发送
        #manual意味着监听者必须通过调用Channel.basicAck()来告知所有的消息。
        #auto意味着容器会自动应答,除非MessageListener抛出异常,这是默认配置方式。
        acknowledge-mode: manual
        prefetch: 1
        concurrency: 5 #消费者监听 分发5个队列执行
      type: simple
    publisher-confirms: true
  datasource:
    driver-class-name: com.mysql.jdbc.Driver
    username: root
    password: root
    url: jdbc:mysql://localhost:3306/mythread?characterEncoding=utf-8
eureka:
  client:
    register-with-eureka: false #单体应用测试-不注册eureka
    fetch-registry: false #不发送心跳到注册中心
#配置mybatis-plus打印sql语句于控制台
mybatis-plus:
  configuration:
    #log-impl: org.apache.ibatis.logging.stdout.StdOutImpl
    #开启驼峰命名转换
    map-underscore-to-camel-case: true
下单请求接口
@RequestMapping("skill")
public class SeckKillController {
    private RedisTemplate redisTemplate;
    private ISeckKillService seckKillService;
    /**
    **模拟用户组
    **/
    public List<String> getUsers(){
      return   Arrays.asList("张三","李四","王五","赵六","李珏","郭思","吕布","王月英","嘻哈","田丰");
    }
    /**
     * 模拟抢单-入口
     * @param -用户名
     * @param -商品类型 -此处默认1
     * @return
     */
    @GetMapping("getShopByType")
    public String getShopByType(){
        //为了演示结果需
        redisTemplate.opsForValue().set("stockCount",null);
        getUsers().stream().forEach(name ->{
            seckKillService.getShopByType(name,1);
        });
        return "已经收到您的抢购申请,请稍后留意信息提示结果";
    }
}
@AllArgsConstructor
public class SeckKillServiceImpl implements ISeckKillService {
    //交换机名称
    public static final String ITEM_TOPIC_EXCHANGE = "xwl_exchange";
    //下单队列路由key
    public static final String ITEM_ROUKEY = "item.sendKill";
    //引入消息发送API
    private RabbitTemplate rabbitTemplate;
    @Override
    @SneakyThrows
    public void getShopByType(String userName, Integer shopType) {
        //不做任何操作处理~直接进去队列-
        rabbitTemplate.convertAndSend(ITEM_TOPIC_EXCHANGE,ITEM_ROUKEY,userName);
    }
}
消费监听
@Component
@Configuration
@SuppressWarnings("ALL")
public class SendKillListener {
    //交换机名称
    public static final String ITEM_TOPIC_EXCHANGE = "xwl_exchange";
    //队列名称
    public static final String ITEM_QUEUE = "xwl_queue";
    private RedisTemplate re;
    private StokOrderMapper stokOrderMapper;
    private OrderInfoMapper orderInfoMapper;
    @Autowired
    private RedisTemplate redisTemplate;
    @Autowired
    private StokOrderMapper sr;
    @Autowired
    private OrderInfoMapper oo;
    @PostConstruct
    public void init() {
        this.re = redisTemplate;
        this.orderInfoMapper = oo;
        this.stokOrderMapper = sr;
    }
    /**
     * 监听主队列~
     *
     * @param message
     * @param map
     * @param channel
     * @throws InterruptedException
     * @throws IOException
     */
    @RabbitListener(queues = "xwl_queue")
    public void sendMiss(Message message, @Headers Map<String, Object> map, Channel channel) throws InterruptedException, IOException {
        String msg = new String(message.getBody(), "UTF-8");
        Integer shopCount=0;
        //第一个请求进来获取库存-先去缓存redis找对应key值如果没有发送一个连接查询后续无需再次获取库存
        if (StringUtils.isEmpty(re.opsForValue().get("stockCount"))) {
            re.opsForValue().set("stockCount", stokOrderMapper.findCountByShopType(1), 60, TimeUnit.MINUTES);
            shopCount = ((Integer) re.opsForValue().get("stockCount"));
        }else {
            //自减缓存内库存量- 每次减-
             shopCount = ((Integer) re.opsForValue().get("stockCount"))-1;
        }
        //如果库存量小于等于0即已经抢完
        if (shopCount<= 0) {
            //即放入死信队列-推送后续队列内消息即为抢单失败-
            channel.basicNack(message.getMessageProperties().getDeliveryTag(), false, false);
            //返回 不做后续处理
            return;
        }
        //如果库存数不为0即没有抢完
        //数据库存储订单
        orderInfoMapper.insert(new OrderInfo(msg, UUID.randomUUID().toString(), 1));
        //设置缓存库存量key过期时间-redis自行删除(赋值减值)
        re.opsForValue().set("stockCount", shopCount, 60, TimeUnit.MINUTES);
        //手动设置ACK接收确认当前消息消费完毕
        ;
        channel.basicAck(message.getMessageProperties().getDeliveryTag(), false);
        System.out.println(msg + "抢购成功,恭喜!");
    }
    /**
     * 监听死信队列-即推送抢单失败
     *
     * @param message
     * @param map
     * @param channel
     * @throws InterruptedException
     * @throws IOException
     */
    @RabbitListener(queues = "deal_queue")
    public static void sendMiss2(Message message, @Headers Map<String, Object> map, Channel channel) throws InterruptedException, IOException {
        String msg = new String(message.getBody(), "UTF-8");
        channel.basicAck(message.getMessageProperties().getDeliveryTag(), false);
        System.out.println(msg + "商品已被抢空~下次再来");
    }
}
延迟队列
- 下单30分钟后未支付,回滚库存
- 新用户7天短信问候
实现方法
- 定时器
- 延迟队列
注意:在RabbitMQ中并未提供延迟队列功能。
但是可以使用:TTL+死信队列 组合实现延迟队列的效果
消息补充机制
幂等性处理
乐观锁机制
