SpringBoot详解(1)
微服务阶段
javase:oop
mysql:持久化
html+css+js+jquery+框架:视图(框架不熟练)
javaweb:独立开发mvc三层架构网站(较为原始)
ssm:简化了我们的配置流程。(但是随着项目迭代,配置文件臃肿复杂,依赖管理混乱影响项目部署上线速度)
上边的技术框架项目都是打war包部署到tomcat中(而springboot打jar包,且内置tomcat)
于是就有了接下来的spring再简化,于是诞生了——>springboot微服务架构。
服务越来越多——>便有了SpringCloud
为什么要学Springboot
传统Spring的痛点:
-
复杂的配置
项目各种配置其实是开发时的损耗, 因为在思考 Spring 特性配置和解决业务问题之间需要进行思维切换,所以写配置挤占了写应用程序逻辑的时间。
回顾一下传统Spring MVC 应用的开发流程:- 新建Web工程,将spring-framework的jar包复制到工程中
- 添加web.xml文件,配置DispatcherServlet
<web-app>
    <listener>
        <listener-class>org.springframework.web.context.ContextLoaderListenerlistener-class>
    listener>
    <context-param>
        <param-name>contextConfigLocationparam-name>
        <param-value>/WEB-INF/app-context.xmlparam-value>
    context-param>
    <servlet>
        <servlet-name>appservlet-name>
        <servlet-class>org.springframework.web.servlet.DispatcherServletservlet-class>
        <init-param>
            <param-name>contextConfigLocationparam-name>
            <param-value>param-value>
        init-param>
        <load-on-startup>1load-on-startup>
    servlet>
    <servlet-mapping>
        <servlet-name>appservlet-name>
        <url-pattern>/app/*url-pattern>
    servlet-mapping>
web-app>
- 配置Spring MVC,配置包扫描、注解处理映射器、注解处理适配器、拦截器、视图解析器、控制器等等
<mvc:annotation-driven conversion-service="conversionService"/>

    <bean id="conversionService" class="org.springframework.format.support.FormattingConversionServiceFactoryBean">
        <property name="converters">
            <set>
                <bean class="org.example.MyConverter"/>
            set>
        property>
        <property name="formatters">
            <set>
                <bean class="org.example.MyFormatter"/>
                <bean class="org.example.MyAnnotationFormatterFactory"/>
            set>
        property>
        <property name="formatterRegistrars">
            <set>
                <bean class="org.example.MyFormatterRegistrar"/>
            set>
        property>
    bean>

    <mvc:interceptors>
    <bean class="org.springframework.web.servlet.i18n.LocaleChangeInterceptor"/>
    <mvc:interceptor>
        <mvc:mapping path="/**"/>
        <mvc:exclude-mapping path="/admin/**"/>
        <bean class="org.springframework.web.servlet.theme.ThemeChangeInterceptor"/>
    mvc:interceptor>
    <mvc:interceptor>
        <mvc:mapping path="/secure/*"/>
        <bean class="org.example.SecurityInterceptor"/>
    mvc:interceptor>
mvc:interceptors>
beans>
- 编写业务代码,业务中用到的Bean也需要配置在XML文件中,久而久之,配置文件变得既复杂又臃肿,严重影响问题排查和项目部署上线的速度。
- 混乱的依赖管理
项目的依赖管理也是件吃力不讨好的事情。决定项目里要用哪些库就已经够让人头痛的了,你还要知道这些库的哪个版本和其他库不会有冲突,这难题实在太棘手。并且,依赖管理也是一种损耗,添加依赖不是写应用程序代码。一旦选错了依赖的版本,随之而来的不兼容问题毫无疑问会是生产力杀手。
基于这些缺点于是就有了SpringBoot。
微服务架构
在讲springboot之前先要了解什么是微服务架构。 什么是微服务架构?所谓微服务架构就是打破之前all in one的架构方式,把每个功能元素独立出来。把独立出来的功能元素动态组合, 需要的功能元素才拿来组合,需要一些时可以整合多个功能元素。所以微服务架构是对功能元素进行复制,而没有对整个应用进行复制。
这样做的好处:
1).节省了资源调用
2).每个功能元素的服务都是一个可替换的,可独立升级软件代码。
SpringBoot
Spring Boot 是在Spring框架基础上创建的一个全新框架。(它出生名门之后,是对spring的整合优化,不是代替spring。)
Spring官网
SpringBoot是Spring项目中的一个子工程,与我们所熟知的Spring-framework 同属于Spring的产品:

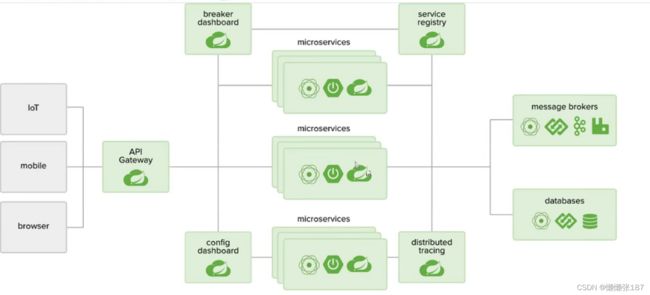
人们把Spring Boot 称为搭建程序的脚手架 。其最主要作用就是帮我们快速的构建庞大的Spring项目,并且尽可能的减少一切xml配置,做到开箱即用,迅速上手,让我们关注与业务而非配置。(核心思想:约定大于配置)。
SpringBoot特点
Spring Boot 设计的目的是简化Spring 应用的搭建和开发过程,它不但具有Spring的所有优秀特性,而且具有如下显著的特点:
- 为Spring 开发提供更加简单的使用和快速开发的技巧
- 具有开箱即用的默认配置功能,能根据项目依赖自动配置
- 具有功能更加强大的服务体系,包括嵌入式服务、安全、性能指标,健康检查等
- 绝对没有代码生成,没有冗余的 XML 配置,即可让应用更加轻巧和灵活
Spring Boot 对于一些第三方技术的使用,提供了非常完美的整合,使用简单。
快速入门
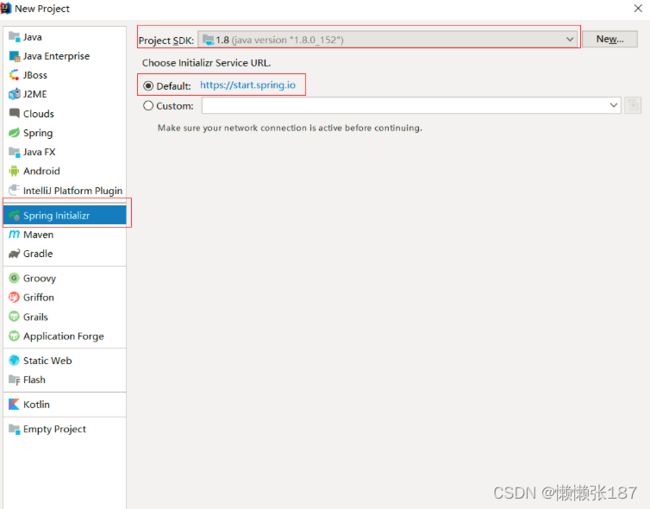
1.使用Spring Initializr 创建项目
1.新建项目

2.选择类型,需要连接到 Spring Initializr下载模板,可以使用阿里的加速网站https://start.aliyun.com/
3.添加项目信息

4.选择版本和组件

5.输入项目名称

6.开启自动导入

7.加载完成

完整的pom.xml
	<parent>
        <groupId>org.springframework.bootgroupId>
        <artifactId>spring-boot-starter-parentartifactId>
        <version>2.2.6.RELEASEversion>
        <relativePath/>
    parent>
    <groupId>com.itgroupId>
    <artifactId>spring-boot-demoartifactId>
    <version>0.0.1-SNAPSHOTversion>
    <name>spring-boot-demoname>
    <description>Demo project for Spring Bootdescription>

    <properties>
        <java.version>1.8java.version>
    properties>

    <dependencies>
        <dependency>
            <groupId>org.springframework.bootgroupId>
            <artifactId>spring-boot-starter-webartifactId>
        dependency>

        <dependency>
            <groupId>org.springframework.bootgroupId>
            <artifactId>spring-boot-starter-testartifactId>
            <scope>testscope>
            <exclusions>
                <exclusion>
                    <groupId>org.junit.vintagegroupId>
                    <artifactId>junit-vintage-engineartifactId>
                exclusion>
            exclusions>
        dependency>
    dependencies>

    <build>
        <plugins>
            <plugin>
                <groupId>org.springframework.bootgroupId>
                <artifactId>spring-boot-maven-pluginartifactId>
            plugin>
        plugins>
    build>
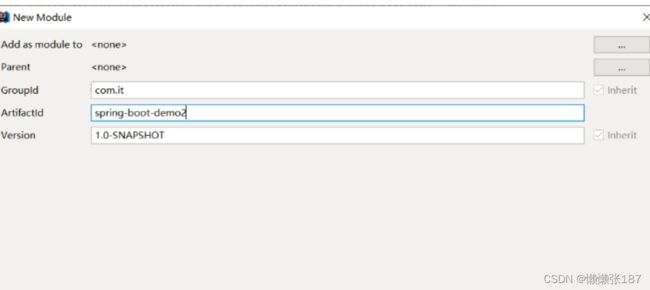
2.使用Maven创建项目
1.选择类型

2.输入Groupid和Artifactid
3.指定项目名称和存放路径
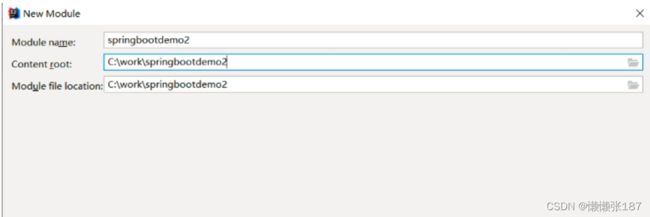
4.配置完成
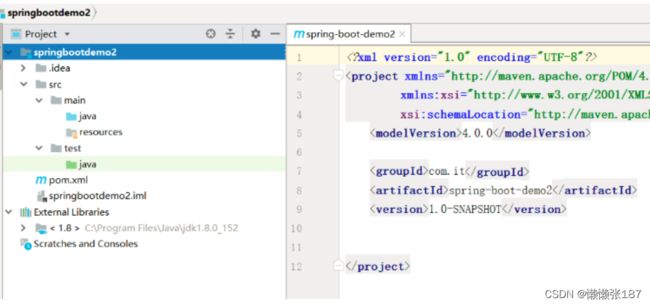
6.添加依赖
Spring Boot提供了一个名为spring-boot-starter-parent的工程,里面已经对各种常用依赖(并非全部)的版本进行了管理,我们的项目需要以这个项目为父工程,这样我们就不用操心依赖的版本问题了,需要什么依赖,直接引入即可!
6.1添加父工程坐标
	<parent>
        <groupId>org.springframework.bootgroupId>
        <artifactId>spring-boot-starter-parentartifactId>
        <version>2.2.6.RELEASEversion>
        <relativePath/>
    parent>
6.2设置JDK版本
	<properties>
        <java.version>1.8java.version>
    properties>
6.3添加web启动器
&emsp:为了让Spring Boot帮我们完成各种自动配置,我们必须引入Spring Boot提供的自动配置依赖模块,这些“开箱即用”的依赖模块都约定以spring-boot-starter-作为命名的前缀,我们称这些模块为 启动器 。
如果是web项目,这里引入web启动器:
 <dependency>
       <groupId>org.springframework.bootgroupId>
       <artifactId>spring-boot-starter-webartifactId>
 dependency>
添加完成后可以看到项目中出现了大量的依赖:

这些依赖的版本号在哪定义呢?


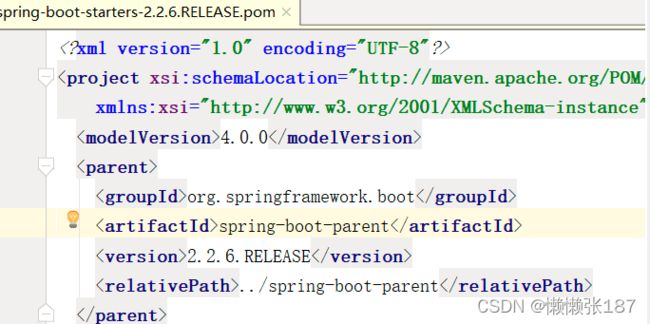
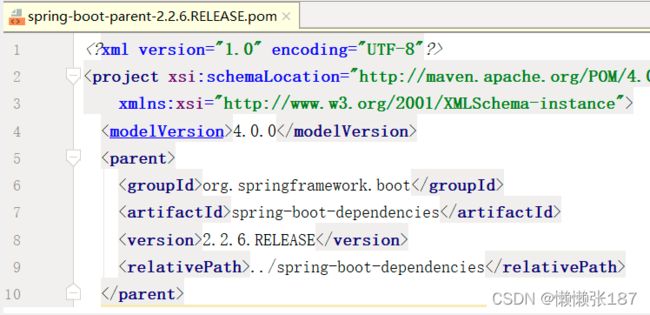


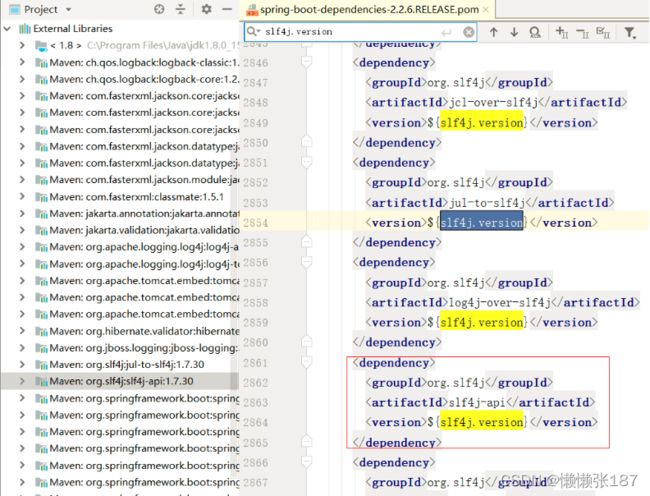
7.添加启动类
Spring Boot项目通过main函数即可启动,我们需要创建一个启动类:

@SpringBootApplication
public class DemoApplication {
    public static void main(String[] args) {
        SpringApplication.run(DemoApplication.class,args);
    }
}
8.添加Controller类实现业务功能
@RestController
public class HelloController {
    @GetMapping("/hello") //restful风格
    public String hello(){
        return "Hello Spring";
    }
}
1. 新建工程
2. 添加依赖
3. 添加启动类
4. 编写业务代码 一般使用@RestController给前端返回数据
java加载配置
在Spring3.0开始, Spring官方就已经开始推荐使用Java注解配置来代替传统的xml配置了。
Spring纯注解基本知识
Java配置主要靠Java类和一些注解,比较常用的注解有:
- @Configuration:声明一个类作为配置类,代替xml文件
- @Bean: 声明在方法上,将方法的返回值加入Bean容器,代替
- @Value:属性注入
- @PropertySource:指定外部属性文件
需求:定义一个简单的User类,定义配置文件, User对象中的属性值从配置文件中获取
User类如下:
public class User {
    private String username;
    private String password;
    private Integer age;
    //get/set…
}
a.@Value方式
1.在resources下创建一个user.properties文件,里面的内容如下:
user.username=zhangsan
user.password=123456
user.age=18
2.创建一个配置类,并使用@Configuration声明是一个配置类,在配置类中创建User对象
@Configuration  // 声明这个类是一个配置类
@PropertySource(value = "classpath:user.properties") //加载配置文件
public class UserConfig {
    @Value("${user.username}") //使用@Value注解获取值
    private String username;
    @Value("${user.password}")
    private String password;
    @Value("${user.age}")
    private Integer age;

    @Bean   //创建User对象,交给Spring容器 User对象中的值从配置文件中获取
    public User getUser(){
        User user = new User();
        user.setUsername(username);
        user.setPassword(password);
        user.setAge(age);
        return user;
    }
}
3.测试
@RestController
public class HelloController {

    @Autowired
    private User user;

    @GetMapping("/user")
    public User getUser(){
        return user;
    }
}
b.Environment获取数据方式
Spring中的Environment用来表示整个应用运行时的环境,可以使用Environment获取整个运行环境中的配置信息:方法是: environment.getProperty(配置文件中的key) ,返回的一律都是字符串,可以根据需要转换。
@Configuration  // 声明这个类是一个配置类
@PropertySource(value = "classpath:user.properties") //加载配置文件
public class UserConfig {
    @Autowired
    private Environment environment;
    @Bean   //创建User对象,交给spring容器 User对象中的值从配置文件中获取
    public User getUser() {
        User user = new User();
        user.setUsername(environment.getProperty("user.username"));
        user.setPassword(environment.getProperty("user.password"));
        user.setAge(Integer.parseInt(environment.getProperty("user.age")));
        return user;
    }
}
c.@ConfigurationProperties方式
Spring约定的、非常简洁的配置方式
首先约定,配置信息需要写在一个application.properties的文件中
1.在resources中创建一个application.properties文件(和user.properties中的内容一样)
2.修改配置类
@Configuration  // 声明这个类是一个配置类
public class UserConfig {

    @Bean   //创建User对象,交给spring容器 User对象中的值从配置文件中获取
    @ConfigurationProperties(prefix = "user")   //前缀
    public User getUser() {
        User user = new User();
        return user;
    }
}
SpringBoot支持的配置文件(重点)
配置文件除了可以使用application.properties类型,还可以使用后缀名为: .yml或者.yaml的类型,也就是: application.yml或者application.yaml
yml和yaml基本格式是一样的:
user:
  username: zhangsan
  password: 123456
  age: 20

可以在配置文件中定义一个数组或集合
在User类中添加3个属性:
public class User {
    private String username;
    private String password;
    private Integer age;

    private List<String> girlNames; //字符串集合
    private String[] boyNames;  //数组
    private List<User> userList;    // 对象集合

    getter\sertter...
}
在application.yml或application.yaml中添加如下配置
user:
  username: tom
  password: 1234567
  age: 20
  girlNames[0]: xiaoli
  girlNames[1]: xiaomei
  boyNames[0]: xiaoming
  boyNames[1]: xiaolei
  userList[0]:
    username: tom
    password: 123
    age: 18
  userList[1]:
    username: jerry
    password: 1234
    age: 19
也可以这样定义
user:
  username: jerry
  password: 123456
  age: 19
  girlNames:
    - xiaomei
    - xiaoli
  boyNames:
    - zhangsan
    - lisi
  userList:
    - username: tom
      password: 123
      age: 18
    - username: lisi
      password: 1234
      age: 22
如果出现乱码问题,需要设置IDEA
File -> Settings -> Editor -> File Encodings
将Properties Files (*.properties)下的Default encoding for properties files设置为UTF-8,将Transparent native-to-ascii conversion前的勾选上

配置完成后,一定要 重新重新重新 新建一个application.properties
优先级:
在项目中其实只出现一种配置文件就可以了,但是如果真的有properties、 yaml、 yml三种配置文件时,那它们被加载的优先级是:
properties > yml > yaml 优先级高的配置生效
推荐使用yml
SpringBoot加载配置
在应用启动的时候会调用SpringApplication.run方法
public static ConfigurableApplicationContext run(Class<?>[] primarySources, String[] args) {
	return new SpringApplication(primarySources).run(args);
}
首先创建一个SpringApplication,首先会加载工厂实例

跟进代码

这里会加载一个配置文件

文件位置如下
public static final String FACTORIES_RESOURCE_LOCATION = “META-INF/spring.factories”;
这里面定义了很多会使用到的类。
接下来在构造方法中注册ApplicationListener监听器

这些监听器在 spring.factories中配置

其中有一个ConfigFileApplicationListener监听器

这个监听器实现了SmartApplicationListener接口,这个接口继承自ApplicationListener接口,当应用中有ApplicationEvent事件发布后,这个监听器就会收到事件并进入onApplicationEvent方法处理事件

那事件在哪发出呢?还是在SpringApplication.run方法中。

继续跟进事件处理代码

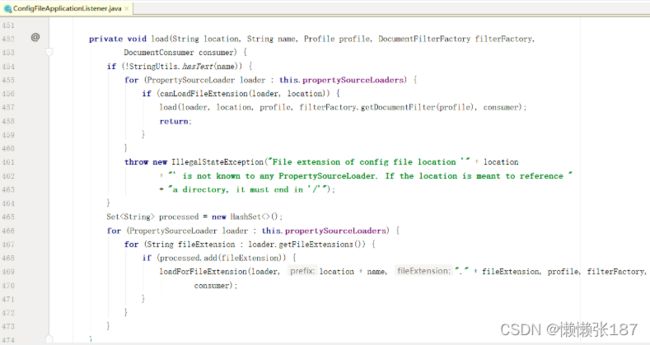
在这里调用了内部类的load()方法

在这个方法里会去加载配置文件
 PropertySourceLoader
同样在spring.factories`中配置,从这里就可以看到支持两种配置文件

Spring Boot 默认配置
元数据配置:

总结:
1. SpringApplication初始化时会加载并注册多个监听器,其中有一个监听器为ConfigFileApplicationListener
2. 在SpringApplication的run方法执行时,会在准备环境的时候发布事件
3. 当ConfigFileApplicationListener收到事件后进入到事件处理方法,通过查找资源目录中的application.properties或者application.yml来读取配置
4. SpringBoot默认有很多的配置,在配置文件中读取的配置会覆盖默认的配置
SpringBoot整合ssm框架
1.准备数据库
2.新建项目
搭建Spring Boot 应用常规步骤:
1. 新建工程,添加依赖
2. 添加启动类
3. 添加配置文件
<parent>
    <groupId>org.springframework.bootgroupId>
    <artifactId>spring-boot-starter-parentartifactId>
    <version>2.2.6.RELEASEversion>
    <relativePath/>
parent>
<properties>
    <java.version>1.8java.version>
properties>
<dependencies>
    <dependency>
        <groupId>org.springframework.bootgroupId>
        <artifactId>spring-boot-starter-webartifactId>
    dependency>
    <dependency>
        <groupId>org.projectlombokgroupId>
        <artifactId>lombokartifactId>
        <optional>trueoptional>
    dependency>
dependencies>
添加配置文件application.yml
server:
  port: 8080
spring:
  application:
    name: user-service
添加启动类
@SpringBootApplication
public class DemoApplication {
    public static void main(String[] args) {
        SpringApplication.run(DemoApplication.class,args);
    }
}
3.集成Mybatis Plus
1. 在pom中添加mybatisplus的依赖
2. 配置文件中添加数据库地址
3. 编写实体类
4. 编写mapper
5. 编写service
6. 编写serviceimpl
7. 配置包扫描
8. 添加Controller编写业务代码
在pom.xml文件中引入相关依赖
<dependency>
      <groupId>org.projectlombokgroupId>
      <artifactId>lombokartifactId>
      <optional>trueoptional>
    dependency>
<dependency>
    <groupId>mysqlgroupId>
    <artifactId>mysql-connector-javaartifactId>
    <version>5.1.47version>
dependency>
<dependency>
    <groupId>com.baomidougroupId>
    <artifactId>mybatis-plus-boot-starterartifactId>
    <version>3.3.0version>
dependency>
在yml文件中添加数据库配置
server:
  port: 8080
spring:
  application:
    name: user-service #指定服务名
  datasource:
    driver-class-name: com.mysql.jdbc.Driver
    url: jdbc:mysql://192.168.85.135:3306/spring?characterEncoding=utf-8&useUnicode=true&useSSL=false
    username: root
    password: root
  jackson:
    date-format: yyyy-MM-dd HH:mm:ss
    time-zone: GMT+8
在yml文件中添加mybatis plus 自定义配置
mybatis-plus:
  global-config:
    db-config:
      # 数据库ID自增
      id-type: auto
      # 表名前缀
      table-prefix: t_
  configuration:
    # 打印sql
    log-impl: org.apache.ibatis.logging.stdout.StdOutImpl
    # 开启自动驼峰命名规则(camel case)映射,即从经典数据库列名 A_COLUMN(下划线命名) 到经典 Java 属性名 aColumn(驼峰命名) 的类似映射
    map-underscore-to-camel-case: true
@Data
@TableName("t_user")
public class User {
    @TableId
    private int id;
    private String username;
    private String password;
    private int age;
    @TableField(value = "update_time")
    private Date updateTime;
}
public interface UserMapper extends BaseMapper<User> {
}
添加service包,创建IArticleService 接口

public interface IUserService extends IService<User> {
}
在service 包下添加impl 包,创建ArticleServiceImpl 类

@Service
public class UserServiceImpl extends ServiceImpl<UserMapper, User> implements IUserService {
}
@Configuration
@MapperScan("com.it.spring.mapper")
public class MyBatisConfig {
}
添加Controller实现业务功能
@RestController
@RequestMapping("/user")
public class UserController {
    // 注入IUserService
    @Autowired
    private IUserService userService;

    @GetMapping("/{id}")
    public User getById(@PathVariable int id){
        User user = userService.getById(id);
        return user;
    }

    @PostMapping
    public Integer save(@RequestBody User user){
        user.setUpdateTime(new Date());
        // 保存
        userService.save(user);
        // 返回保存的数据库ID
        return user.getId();
    }

    @PutMapping("/{id}")
    public boolean updateById(@PathVariable int id,@RequestBody User user){
        user.setUpdateTime(new Date());
        user.setId(id);
        boolean update = userService.updateById(user);
        return update;
    }

    @DeleteMapping("/{id}")
    public boolean deleteById(@PathVariable int id){
        boolean remove = userService.removeById(id);
        return remove;
    }
}


