Nginx+keepalived负载均衡及高可用
说明:node1,node2作为负载服务器,安装nginx (实现负载均衡), keepalived(实现高可用),node3,node4作为后端真实服务器(real server),node5作为客户端进行测试。
node1:192.168.129.131 node2:192.168.129.132
node3:192.168.129.133 node4:192.168.129.134 node5:192.168.129.135
1.使用rpm包方式安装安装Nginx: (node1,node2)
1.将httpd服务停止(都是web服务器,端口都是80)
[root@localhost ~]# systemctl stop httpd2.配置扩展源:
[root@localhost ~]# wget -O /etc/yum.repos.d/epel.repo http://mirrors.aliyun.com/repo/epel-7.repo3.使用yum方式安装,启动:
[root@localhost ~]# yum install nginx -y
[root@localhost ~]# systemctl start nginx
rpm包安装,网页默认放在此文件:
[root@localhost ~]# ls /usr/share/nginx/html/
404.html  50x.html  en-US  icons  img  index.html  nginx-logo.png  poweredby.png
关闭防火墙,可在网页直接访问默认页面
[root@localhost ~]# systemctl stop firewalld
2.node3,node4提供两个测试的静态页面:(使用的apache服务)
[root@localhost ~]# yum install httpd -y
[root@localhost ~]# systemctl start httpd
[root@localhost ~]# cd /var/www/html/
[root@localhost ~]# echo "web test page, ip `hostname -I`." > /var/www/html/index.html
[root@localhost ~]# systemctl stop firewalld        #关闭防火墙
[root@localhost ~]# systemctl restart httpd        #重启服务
3.nginx负载均衡配置 :
[root@node1 ~]# cd /etc/nginx/conf.d/
[root@node1 conf.d]# vim www.conf

upstream websrvs {
	server 192.168.129.133:80 weight=1;        #node1地址,端口,轮询算法1:1
	server 192.168.129.134:80 weight=1;        #node2地址,端口,轮询算法1:1
}
server{
	location / {
		proxy_pass http://websrvs;
		index index.html;
	}
}
查看是否有语法错误,重启:
[root@node1 conf.d]# nginx -t
nginx: the configuration file /etc/nginx/nginx.conf syntax is ok
nginx: configuration file /etc/nginx/nginx.conf test is successful
[root@node1 conf.d]# systemctl restart nginx.service
测试负责均衡是否配置成功:
[root@node5 ~]# for ((i=1;i<=8;i++))
> do
> curl 192.168.129.131
> done
web test page, ip 192.168.129.133 .
web test page, ip 192.168.129.134 .
web test page, ip 192.168.129.133 .
web test page, ip 192.168.129.134 .
web test page, ip 192.168.129.133 .
web test page, ip 192.168.129.133 .
web test page, ip 192.168.129.134 .
web test page, ip 192.168.129.134 .
将node1中的www.conf 文件拷贝到node2:
[root@node1 conf.d]# scp www.conf 192.168.129.132:/etc/nginx/conf.d/重启:
[root@node2 conf.d]# systemctl restart nginx.service测试:
[root@node5 ~]# for ((i=1;i<=8;i++)); do curl 192.168.129.132; done
web test page, ip 192.168.129.133 .
web test page, ip 192.168.129.133 .
web test page, ip 192.168.129.134 .
web test page, ip 192.168.129.134 .
web test page, ip 192.168.129.133 .
web test page, ip 192.168.129.134 .
web test page, ip 192.168.129.133 .
web test page, ip 192.168.129.134 .
4.使用rpm包方式安装keepalived:
1.安装:
[root@localhost ~]# yum install keepalived -y配置文件:/etc/keepalived/keepalived.conf
5.调度服务器node3 (主) ,node4(从):
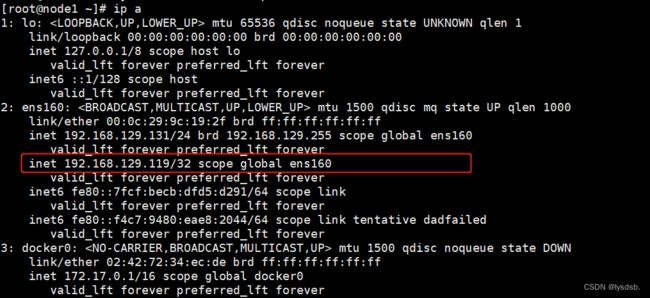
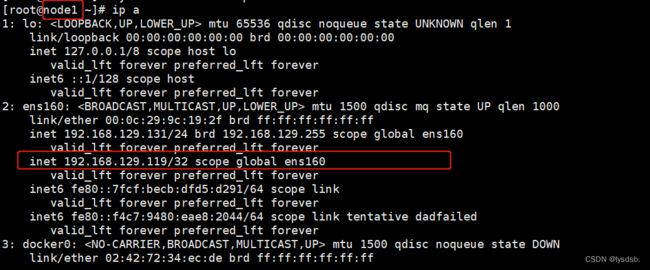
1.配置keepalived,node1为主,node2为从:(vip为192.168.129.119)
[root@node1 ~]# vim /etc/keepalived/keepalived.conf! Configuration File for keepalived global_defs { notification_email { [email protected] [email protected] [email protected] } notification_email_from [email protected] smtp_server 192.168.200.1 smtp_connect_timeout 30 router_id LVS_MASTER #名字 } vrrp_instance VI_1 { state MASTER #状态为MASTER interface ens160 #网卡名称 virtual_router_id 51 priority 100 #优先级为100 advert_int 1 authentication { auth_type PASS auth_pass 1111 } virtual_ipaddress { 192.168.129.119 #vip(虚拟ip) } }node2中配置:
global_defs {
   notification_email {
     [email protected]
     [email protected]
     [email protected]
   }
   notification_email_from [email protected]
   smtp_server 192.168.200.1
   smtp_connect_timeout 30
   router_id LVS_BACKUP                        #名字
}

vrrp_instance VI_1 {
    state BACKUP                                #状态为BACKUP
    interface ens160
    virtual_router_id 51
    priority 80                                #优先级设为80
    advert_int 1
    authentication {
        auth_type PASS
        auth_pass 1111
    }
    virtual_ipaddress {
        192.168.129.119
    }
}
重启验证:
[root@node1 ~]# systemctl restart keepalived
6.通过vrrp_script实现对集群资源的监控:(node1,node2)
(1)通过killall命令探测服务运行状态:
1.安装killall命令对应的包:
[root@node1 ~]# yum whatprovides killall        #查询命令killall所属的软件包
[root@node1 ~]# yum install psmisc -y
[root@node1 ~]# killall -l                      #提供一些信号
HUP INT QUIT ILL TRAP ABRT IOT BUS FPE KILL USR1 SEGV USR2 PIPE ALRM TERM
STKFLT CHLD CONT STOP TSTP TTIN TTOU URG XCPU XFSZ VTALRM PROF WINCH IO PWR SYS
UNUSED
[root@node1 ~]# kill -l                        #用数字表示
 1) SIGHUP	 2) SIGINT	 3) SIGQUIT	 4) SIGILL	 5) SIGTRAP
 6) SIGABRT	 7) SIGBUS	 8) SIGFPE	 9) SIGKILL	10) SIGUSR1
11) SIGSEGV	12) SIGUSR2	13) SIGPIPE	14) SIGALRM	15) SIGTERM
16) SIGSTKFLT	17) SIGCHLD	18) SIGCONT	19) SIGSTOP	20) SIGTSTP
21) SIGTTIN	22) SIGTTOU	23) SIGURG	24) SIGXCPU	25) SIGXFSZ
26) SIGVTALRM	27) SIGPROF	28) SIGWINCH	29) SIGIO	30) SIGPWR
31) SIGSYS	34) SIGRTMIN	35) SIGRTMIN+1	36) SIGRTMIN+2	37) SIGRTMIN+3
38) SIGRTMIN+4	39) SIGRTMIN+5	40) SIGRTMIN+6	41) SIGRTMIN+7	42) SIGRTMIN+8
43) SIGRTMIN+9	44) SIGRTMIN+10	45) SIGRTMIN+11	46) SIGRTMIN+12	47) SIGRTMIN+13
48) SIGRTMIN+14	49) SIGRTMIN+15	50) SIGRTMAX-14	51) SIGRTMAX-13	52) SIGRTMAX-12
53) SIGRTMAX-11	54) SIGRTMAX-10	55) SIGRTMAX-9	56) SIGRTMAX-8	57) SIGRTMAX-7
58) SIGRTMAX-6	59) SIGRTMAX-5	60) SIGRTMAX-4	61) SIGRTMAX-3	62) SIGRTMAX-2
63) SIGRTMAX-1	64) SIGRTMAX
2.配置:
! Configuration File for keepalived

global_defs {
   notification_email {
     [email protected]
     [email protected]
     [email protected]
   }
   notification_email_from [email protected]
   smtp_server 192.168.200.1
   smtp_connect_timeout 30
   router_id LVS_MASTER
}
vrrp_script check_nginx {               #定义一个检测脚本,在global_defs之外配置,脚本名称
        script "killall -0 nginx"       #对nginx服务进行监控
        interval 2                      #间隔时间,单位为秒,默认1秒
}

vrrp_instance VI_1 {
    state MASTER
    interface ens160
    virtual_router_id 51
    priority 100
    advert_int 1
    authentication {
        auth_type PASS
        auth_pass 1111
    }
    track_script {                            #引用脚本
         check_nginx                          #脚本名称
    }
    virtual_ipaddress {
        192.168.129.119
    }
}
可以正常通过vip来访问:
[root@node5 ~]# for ((i=1;i<=8;i++)); do curl 192.168.129.119;done
web test page, ip 192.168.129.133 .
web test page, ip 192.168.129.133 .
web test page, ip 192.168.129.134 .
web test page, ip 192.168.129.134 .
web test page, ip 192.168.129.133 .
web test page, ip 192.168.129.133 .
web test page, ip 192.168.129.134 .
web test page, ip 192.168.129.134 .
7.模拟故障进行检测:
1.node1关闭keepalived:
[root@node1 ~]# systemctl stop keepalived.servicevip会漂移到node2:
客户端可以正常访问:
node1再次启动,vip又会重新到node1:
客户端正常访问:
2.模拟nginx出现故障:
[root@node1 ~]# systemctl stop nginxvip漂移到node2:
3.模拟real server出现故障:
[root@node3 html]# systemctl stop httpd客户端正常访问:
[root@node3 html]# systemctl start httpd客户端正常访问:


