【MQTT接收数据写入数据库】
MQTT接收数据写入数据库
1.搭建MQTT服务器
参考上一篇文章
2.安装数据库mysql
sudo apt update
sudo apt install mysql-server
创建一个数据库和数据表存储mqtt消息
首先,登录到MySQL服务器:
mysql -u root -p
输入你的root用户密码。默认root
3.创建mqtt数据表
- 创建数据库:
CREATE DATABASE mqtt_data;
- 选择创建的数据库:
USE mqtt_data;
- 创建数据表:
这里我们假设你从MQTT接收到的数据是一个简单的字符串。我们将创建一个包含两个字段的表,一个字段是自增的ID,另一个字段用于存储字符串数据。
CREATE TABLE mqtt_messages (
    id INT AUTO_INCREMENT PRIMARY KEY,
    message_data VARCHAR(255) NOT NULL,
    received_at TIMESTAMP DEFAULT CURRENT_TIMESTAMP
);
完成以上步骤后,你现在有一个名为mqtt_data的数据库和一个名为mqtt_messages的数据表。
4.编写python脚本来从MQTT接收数据并保存到数据库
模板文件
import paho.mqtt.client as mqtt
import mysql.connector

# MySQL数据库配置
db_config = {
    'host': 'localhost',
    'user': 'root',
    'password': 'your_root_password',  # 替换为你的root密码
    'database': 'mqtt_data'
}

# 连接到数据库
conn = mysql.connector.connect(**db_config)
cursor = conn.cursor()

# MQTT配置
MQTT_BROKER = 'localhost'  # 或其他MQTT服务器地址
MQTT_PORT = 1883
MQTT_TOPIC = 'your_topic'  # 更改为你的MQTT主题

# 当接收到MQTT消息时的回调函数
def on_message(client, userdata, message):
    data = message.payload.decode('utf-8')
    print("Received message:", data)

    # 插入数据到数据库
    try:
        cursor.execute("INSERT INTO mqtt_messages (message_data) VALUES (%s)", (data,))
        conn.commit()
    except Exception as e:
        print("Error saving data to database:", e)

client = mqtt.Client()
client.connect(MQTT_BROKER, MQTT_PORT)
client.subscribe(MQTT_TOPIC)
client.on_message = on_message
client.loop_forever()
MQTT_BROKER = ‘localhost’ # 或其他MQTT服务器地址代表本地的服务器
运行上述Python脚本后,每当有新的消息发布到你所订阅的MQTT主题时,on_message回调函数就会被调用,消息数据会被保存到你在MySQL中创建的mqtt_messages表中。
注意:别忘了替换your_root_password为你MySQL的root用户的实际密码,以及更改your_topic为你希望从MQTT broker订阅的实际主题。
更改后我的文件如下
import paho.mqtt.client as mqtt
import mysql.connector

# MySQL数据库配置
db_config = {
    'host': 'localhost',
    'user': 'root',
    'password': 'root',  # 替换为你的root密码
    'database': 'mqtt_data'
}

# 连接到数据库
conn = mysql.connector.connect(**db_config)
cursor = conn.cursor()

# MQTT配置
MQTT_BROKER = 'localhost'  # 或其他MQTT服务器地址
MQTT_PORT = 1883
MQTT_TOPIC = 'hdjhdj/newbie'  # 更改为你的MQTT主题

# 当接收到MQTT消息时的回调函数
def on_message(client, userdata, message):
    data = message.payload.decode('utf-8')
    print("Received message:", data)

    # 插入数据到数据库
    try:
        cursor.execute("INSERT INTO mqtt_messages (message_data) VALUES (%s)", (data,))
        conn.commit()
    except Exception as e:
        print("Error saving data to database:", e)

client = mqtt.Client()
client.connect(MQTT_BROKER, MQTT_PORT)
client.subscribe(MQTT_TOPIC)
client.on_message = on_message
client.loop_forever()
5.运行py脚本
出现如下错误
解决办法如下
错误信息是:
mysql.connector.errors.ProgrammingError: 1698 (28000): Access denied for user 'root'@'localhost'
这意味着Python脚本在尝试连接到MySQL数据库时遇到了权限问题。具体来说,root用户在localhost上没有登录MySQL的权限。这可能是由于以下原因:
- 密码错误:确保
db_config中的密码与你为MySQLroot用户设置的密码匹配。 - 权限问题:在默认的MySQL安装中,
root用户可能没有通过密码从本地登录的权限。这意味着,即使密码是正确的,你仍然可能会收到“Access denied”错误。
解决错误如下:
使用其他用户 :考虑创建一个新的MySQL用户,并给予其适当的权限,然后在Python脚本中使用这个用户进行连接。
例如,为了创建一个名为mqttuser,密码为mqttpassword的用户,并给予其对mqtt_data数据库的所有权限,你可以执行以下SQL命令:
CREATE USER 'mqttuser'@'localhost' IDENTIFIED BY 'mqttpassword';
GRANT ALL PRIVILEGES ON mqtt_data.* TO 'mqttuser'@'localhost';
FLUSH PRIVILEGES;
然后,在使用新的用户名和密码。
打开mysql执行以上命令
更改py脚本中用户名和密码
import paho.mqtt.client as mqtt
import mysql.connector

# MySQL数据库配置
db_config = {
    'host': 'localhost',
    'user': 'mqttuser',
    'password': 'mqttpassword',  # 替换为你的root密码
    'database': 'mqtt_data'
}

# 连接到数据库
conn = mysql.connector.connect(**db_config)
cursor = conn.cursor()

# MQTT配置
MQTT_BROKER = 'localhost'  # 或其他MQTT服务器地址
MQTT_PORT = 1883
MQTT_TOPIC = 'hdjhdj/newbie'  # 更改为你的MQTT主题

# 当接收到MQTT消息时的回调函数
def on_message(client, userdata, message):
    data = message.payload.decode('utf-8')
    print("Received message:", data)

    # 插入数据到数据库
    try:
        cursor.execute("INSERT INTO mqtt_messages (message_data) VALUES (%s)", (data,))
        conn.commit()
    except Exception as e:
        print("Error saving data to database:", e)

client = mqtt.Client()
client.connect(MQTT_BROKER, MQTT_PORT)
client.subscribe(MQTT_TOPIC)
client.on_message = on_message
client.loop_forever()
再次执行该脚本
python3 mqtt_to_db.py
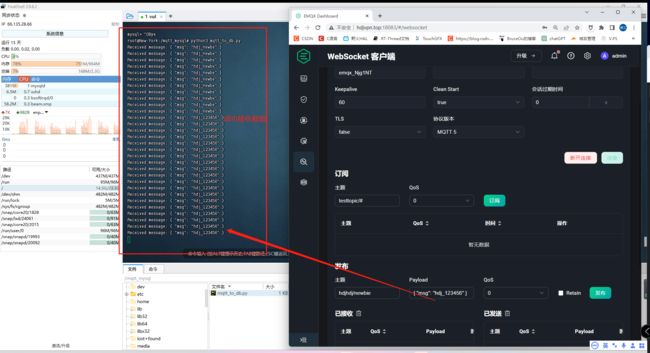
这里没有任何数据出现 则代表订阅主题成功,连接数据库成功
6.验证MQTT
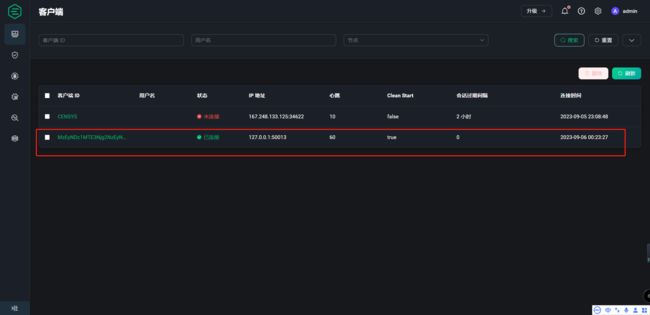
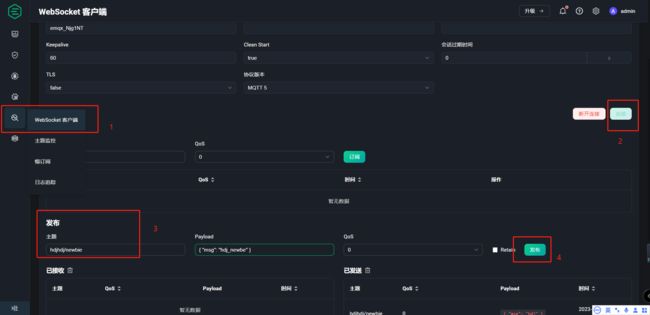
这里我的主题是 hdjhdj/newbie
使用服务器对该主题发布消息验证是否成功,我们可以看到一个客户端已经连接
发布消息
7.查询数据库存储消息
手动检查数据库内容:
登录到MySQL:
mysql -u mqttuser -p
输入你的密码,然后选择数据库并查看mqtt_messages表的内容:
USE mqtt_data;
SELECT * FROM mqtt_messages;
这将显示表中的所有行。应该能看到你通过MQTT发送的消息。
至此完成


