【MQTT服务器】(二)SpringBoot+Mysql数据库存储MQTT消息
系列文章目录
【MQTT服务器】(一)EMQX平台搭建
【MQTT服务器】(二)SpringBoot+Mysql数据库存储MQTT消息
【MQTT服务器】(三)MQTT终端设备
【MQTT服务器】(四)搭建网页
目录
系列文章目录
【MQTT服务器】(一)EMQX平台搭建
【MQTT服务器】(二)SpringBoot+Mysql数据库存储MQTT消息
【MQTT服务器】(三)MQTT终端设备
【MQTT服务器】(四)搭建网页
一、安装数据库MySQL
二、新建SpringBoot项目
(1) 配置maven
(2) Spring Assistant创建项目
(3)修改配置文件
(4)打包jar文件
(5)运行jar包
(6) 效果验证
前言
第一篇文章讲述了如何搭建一个EMQX平台的MQTT服务器,这个服务器是作为所有终端的MQTT消息中转服务器,也就是一个可以处理大量MQTT消息的转发服务器,但是这个开源的服务器没有记录、处理加工MQTT信息以及回复MQTT消息的功能,企业版貌似有这个功能,如果只是简单的记录消息到数据库,可以使用SpringBoot写一个服务器订阅主题,再将数据记录到数据库。
本文是基于阿里云服务器搭建的环境,阿里云对于新用户优惠力度还是很大的,一定要去云小站领取新人优惠券,我之前通过领取这个链接的优惠券,购买1年的共享型S6才花了不到200块大洋。腾讯云最近同样在搞新春、618各种特惠活动,现在比阿里云便宜很多,也可以去领取--腾讯云新人优惠券,白给的羊毛为啥不薅。
一、安装数据库MySQL
宝塔面板安装数据库还是比较简单的,一键式安装,这个项目使用的是5.6.50版本。
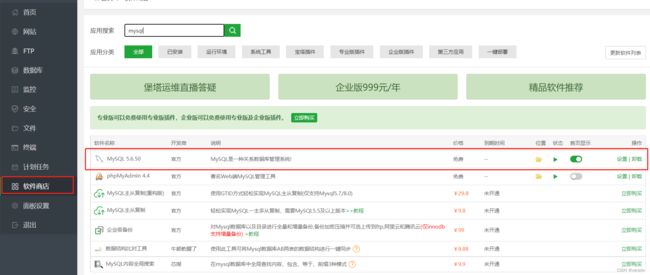
MySQL安装完毕后,需要创建一个数据库。可以先修改数据库root密码然后再添加数据库。

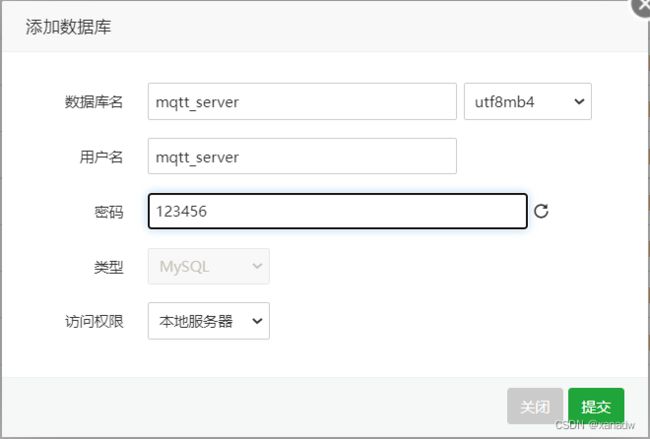
添加数据库, 先确定数据库名称(这个数据库名称后面在Java项目里面的配置项需要使用),格式选择utf8mb4,不要选择uft-8,uft-8格式存在问题,mysql中utf-8只支持每个字符最多三个字节,而真正的UTF-8是每个字符最多四个字节。
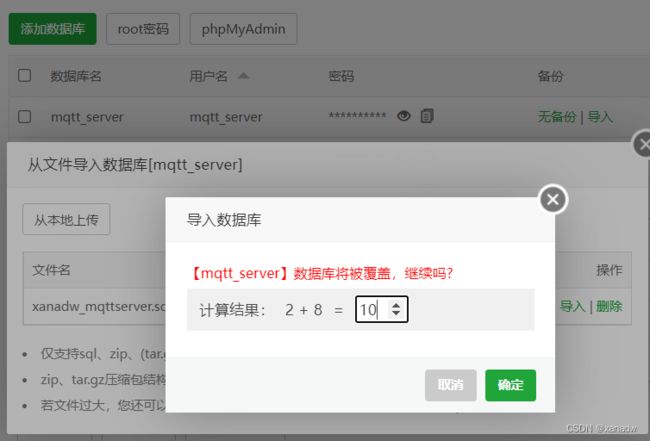
到这,基本上数据库就创建完毕了,如果有表结构的话可以点击导入上传。

下面是一个我写的比较简单的图书借阅管理系统的sql文件。
/*
Navicat MySQL Data Transfer

Source Server         : 127.0.0.1
Source Server Version : 50704
Source Host           : 127.0.0.1:3306
Source Database       : xanadw_mqttserver

Target Server Type    : MYSQL
Target Server Version : 50704
File Encoding         : 65001

Date: 2021-07-28 01:03:33
*/

SET FOREIGN_KEY_CHECKS=0;

-- ----------------------------
-- Table structure for xanadw_book
-- ----------------------------
DROP TABLE IF EXISTS `xanadw_book`;
CREATE TABLE `xanadw_book` (
  `id` varchar(30) NOT NULL COMMENT '图书RFID编号',
  `name` varchar(50) DEFAULT NULL COMMENT '图书名称',
  `location` varchar(50) DEFAULT NULL COMMENT '图书位置',
  `borrow_count` bigint(20) DEFAULT NULL COMMENT '借阅次数',
  `depot_number` bigint(20) DEFAULT NULL COMMENT '库存数量',
  PRIMARY KEY (`id`)
) ENGINE=InnoDB DEFAULT CHARSET=utf8mb4 COMMENT='图书信息';

INSERT INTO `xanadw_book` VALUES ('300833b2ddd9014000000001', '物理世界探秘', '第一组', 0, 0);
INSERT INTO `xanadw_book` VALUES ('300833b2ddd9014000000002', '小足迹大中国', '第二组', 0, 0);
INSERT INTO `xanadw_book` VALUES ('300833b2ddd9014000000003', '精美的雕塑'  , '第三组', 0, 0);
INSERT INTO `xanadw_book` VALUES ('300833b2ddd9014000000004', '<<尚书>>史话', '第四组', 0, 0);


-- ----------------------------
-- Table structure for xanadw_borrowmsg
-- ----------------------------
DROP TABLE IF EXISTS `xanadw_borrowmsg`;
CREATE TABLE `xanadw_borrowmsg` (
  `id` varchar(2000) NOT NULL COMMENT '图书RFID编号',
  `borrow_id` varchar(50) NOT NULL COMMENT '借阅人编号',
  `borrow_time` datetime NOT NULL COMMENT '借阅日期',
  `topic` varchar(50) DEFAULT NULL COMMENT '会话名称',
  `client_name` varchar(50) DEFAULT NULL COMMENT '客户端名称',
  `book_name` varchar(50) DEFAULT NULL COMMENT '图书名称',
  `location` varchar(50) DEFAULT NULL COMMENT '图书位置',
  PRIMARY KEY (`borrow_id`, `borrow_time`)
) ENGINE=InnoDB DEFAULT CHARSET=utf8mb4 COMMENT='图书借阅信息';

INSERT INTO `xanadw_borrowmsg` VALUES ('300833b2ddd9014000000001,300833b2ddd9014000000002,300833b2ddd9014000000003,300833b2ddd9014000000004', '', '20210823194553', 'SixLab/Rfid', '001', '<<尚书>>史话', '第一组');


-- ----------------------------
-- Table structure for xanadw_depotbook
-- ----------------------------
DROP TABLE IF EXISTS `xanadw_depotbook`;
CREATE TABLE `xanadw_depotbook` (
  `name` varchar(50) NOT NULL COMMENT '图书名称',
  `id_str` varchar(2000) NOT NULL COMMENT '图书ID字符串',
  `location` varchar(2000) DEFAULT NULL COMMENT '图书位置',
  `depot_number` bigint(20) DEFAULT NULL COMMENT '库存数量',
  PRIMARY KEY (`name`)
) ENGINE=InnoDB DEFAULT CHARSET=utf8mb4 COMMENT='图书信息';

INSERT INTO `xanadw_depotbook` VALUES ('<<尚书>>史话', '300833b2ddd9014000000004,300833b2ddd9014000000008,300833b2ddd9014000000012,300833b2ddd90140000000016,300833b2ddd9014000000020,300833b2ddd9014000000024,300833b2ddd9014000000028', '第一组,第二组,第三组,第四组,第五组,第六组,第七组', 1000);
上传SQL文件,并导入到数据库里面。

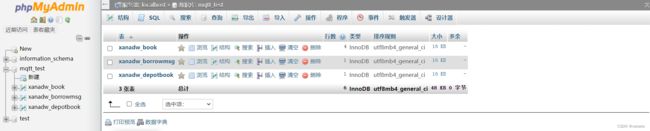
数据库安装完毕,怎么查看表是否存在,或者查看表的数据呢?可以使用另外一个插件,phpMyadmin这个工具,可以通过宝塔直接跳转到数据库表。不用后台登录Mysql查看。

直接点击管理,就可以进入数据库里面查看,可以看到导入的三张表,book、borrowmsg、depotbook,点击对应的表可以查看对应的数据,具体使用自己可以摸索看看,搜索、更新表、导入、导出等等。

二、新建SpringBoot项目
(1) 配置maven
创建项目前,可以去设置里面,优先配置maven,如果不想你的C盘爆满的话,推荐修改下面的settings.xml红色配置项路径,配置过的可以跳过此步。
D:\workspace\maven\repository
(2) Spring Assistant创建项目
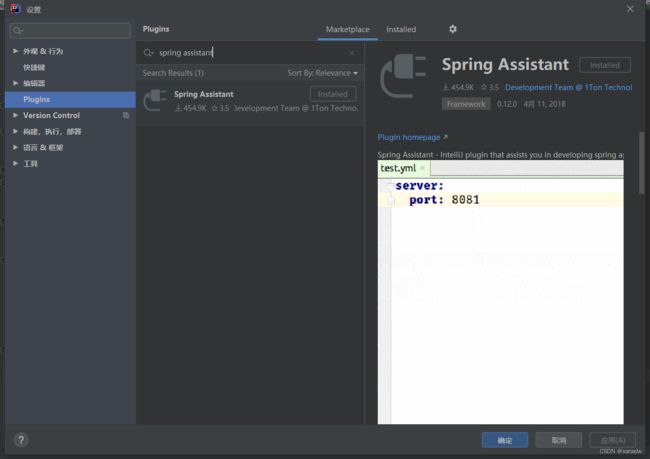
如果没有安装spring assistant,可以去插件里面直接安装。
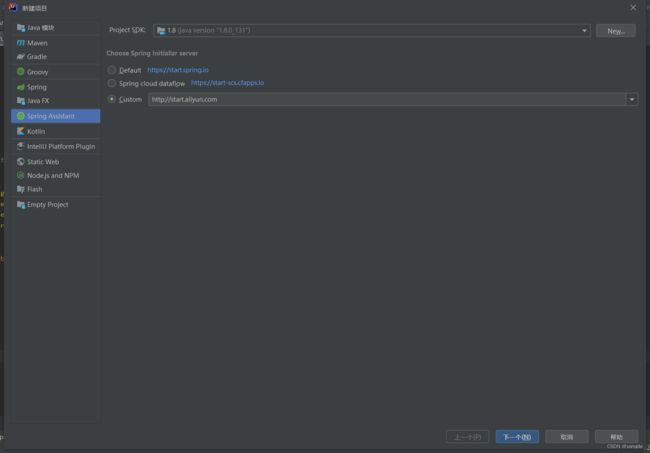
第一步,按照spring assisant创建项目,因为默认的源在国外,所以这里选择下面国内的阿里源。
http://start.aliyun.com
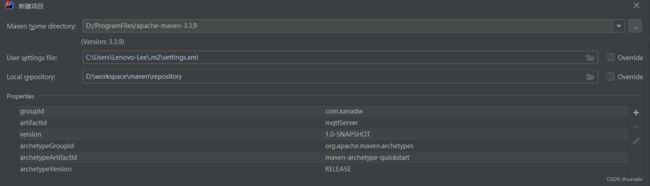
修改项目的创建机构和名称,其它的如语言以及版本默认就行,当然这里还是用的java 1.8。
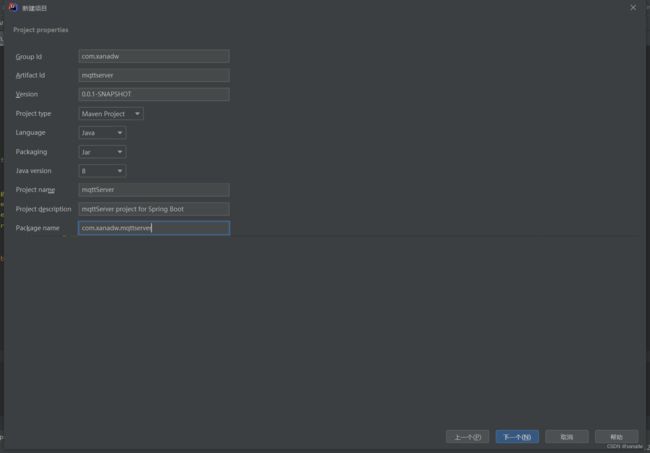
每一项都点一下,相信你们都可以找到右侧的那几个组件的(其实没找到也没啥关系,只是后面需要修改pom.xml文件)。
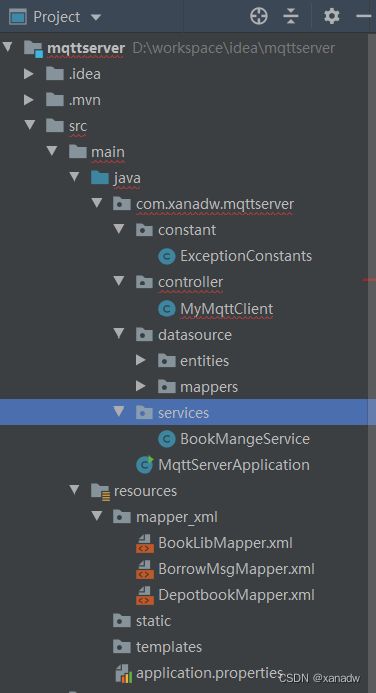
创建完毕后,应该会出现下面的目录结构。
第二步,修改pom.xml文件,dependencies增加下面这些依赖。
      org.eclipse.paho
      org.eclipse.paho.client.mqttv3
      1.2.0
            com.gitee.starblues
            springboot-plugin-framework-extension-mybatis
            2.2.1-RELEASE


            com.baomidou
            mybatis-plus-boot-starter
            3.0.7.1


            mysql
            mysql-connector-java
            5.1.30
plugins增加mybatis-generator插件,自动生成数据库表实体类和dao的mapper插件
                org.mybatis.generator
                mybatis-generator-maven-plugin
                1.4.0

                    ${basedir}/src/test/resources/generatorConfig.xml
                    true
                    true
第三步,maven根据generatorConfig.xml生成相应的数据库表实体类和mapper类。
由于篇幅的问题,这里就不详细讲解如何通过Mybatis自动生成这些类,具体看这篇文章--【Mybatis】自动生成mapper文件。
最终的项目目录结构如下。
第四步,增加一个常用的异常类,constant.ExceptionConstants
package com.xanadw.mqttserver.constant;

import com.alibaba.fastjson.JSONObject;

public class ExceptionConstants {
    /**
     * code 格式 type+五位数字,例如3500000
     * ResourceInfo(value = "inOutItem", type = 35)
     *
     * */

    public static final String GLOBAL_RETURNS_CODE = "code";
    public static final String GLOBAL_RETURNS_MESSAGE = "msg";
    public static final String GLOBAL_RETURNS_DATA = "data";

    /**
     * 正常返回/操作成功
     **/
    public static final int SERVICE_SUCCESS_CODE = 200;
    public static final String SERVICE_SUCCESS_MSG = "操作成功";
    /**
     * 数据查询异常
     */
    public static final int DATA_READ_FAIL_CODE = 300;
    public static final String DATA_READ_FAIL_MSG = "数据查询异常";
    /**
     * 数据写入异常
     */
    public static final int DATA_WRITE_FAIL_CODE = 301;
    public static final String DATA_WRITE_FAIL_MSG = "数据写入异常";

    /**
     * 系统运行时未知错误
     **/
    public static final int SERVICE_SYSTEM_ERROR_CODE = 500;
    public static final String SERVICE_SYSTEM_ERROR_MSG = "未知异常";


    //用户录入数量超出限制
    public static final int USER_OVER_LIMIT_FAILED_CODE = 500004;
    public static final String USER_OVER_LIMIT_FAILED_MSG = "用户录入数量超出限制,请联系管理员";

    /**
     * 标准正常返回/操作成功返回
     * @return
     */
    public static JSONObject standardSuccess () {
        JSONObject success = new JSONObject();
        success.put(GLOBAL_RETURNS_CODE, SERVICE_SUCCESS_CODE);
        success.put(GLOBAL_RETURNS_MESSAGE, SERVICE_SUCCESS_MSG);
        return success;
    }

    public static JSONObject standardErrorUserOver () {
        JSONObject success = new JSONObject();
        success.put(GLOBAL_RETURNS_CODE, USER_OVER_LIMIT_FAILED_CODE);
        success.put(GLOBAL_RETURNS_MESSAGE, USER_OVER_LIMIT_FAILED_MSG);
        return success;
    }
}
第五步,增加数据库的服务类,services.BookMangeService。
package com.xanadw.mqttserver.services;

import com.xanadw.mqttserver.constant.ExceptionConstants;
import com.xanadw.mqttserver.datasource.entities.BookLib;
import com.xanadw.mqttserver.datasource.entities.BookLibExample;
import com.xanadw.mqttserver.datasource.entities.BorrowMsg;
import com.xanadw.mqttserver.datasource.mappers.BookLibMapper;
import com.xanadw.mqttserver.datasource.mappers.BorrowMsgMapper;
import org.slf4j.Logger;
import org.slf4j.LoggerFactory;
import org.springframework.stereotype.Service;
import org.springframework.transaction.annotation.Transactional;

import javax.annotation.Resource;
import java.text.SimpleDateFormat;
import java.util.ArrayList;
import java.util.Date;
import java.util.List;

@Service
public class BookMangeService {
    private Logger logger = LoggerFactory.getLogger(BookMangeService.class);

    @Resource
    private BorrowMsgMapper borrowMsgMapper;

    /**************
    * borrowMsgMapper
    * 盘点信息处理
     * *************/
    @Transactional(value = "transactionManager", rollbackFor = Exception.class)
    public void addBorrowMsg(String rfid, String borrowid, String topic, String clientName, BookLib bookInfo) throws Exception {
        BorrowMsg borrowMsg = null;

        try {
            Date date = new Date();
            borrowMsg = borrowMsgMapper.selectByPrimaryKey(borrowid, date);
            if (borrowMsg == null) {
                BorrowMsg borrowMsgIn = new BorrowMsg();
                if (bookInfo != null) {
                    borrowMsgIn.setId(rfid);
                    borrowMsgIn.setBorrowId(borrowid);
                    borrowMsgIn.setBorrowTime(date);
                    borrowMsgIn.setTopic(topic);
                    borrowMsgIn.setClientName(clientName);
                    borrowMsgIn.setBookName(bookInfo.getName());
                    borrowMsgIn.setLocation(bookInfo.getLocation());
                } else {
                    borrowMsgIn.setId(rfid);
                    borrowMsgIn.setBorrowId(borrowid);
                    borrowMsgIn.setBorrowTime(date);
                    borrowMsgIn.setTopic(topic);
                    borrowMsgIn.setClientName(clientName);
                    borrowMsgIn.setBookName("");
                    borrowMsgIn.setLocation("");
                }
                borrowMsgMapper.insert(borrowMsgIn);
            }
        } catch (Exception e) {
            System.out.println(e.toString());
            logger.error("异常码[{}],异常提示[{}],异常[{}]",
                    ExceptionConstants.DATA_READ_FAIL_CODE, ExceptionConstants.DATA_READ_FAIL_MSG, e);
        }
    }
}
第六步,增加controller.MyMqttClient业务类。
下面代码中这一行需要修改成上一节emqx平台的端口。
mqttClient = new MqttClient("tcp://127.0.0.1:1883", clientId,memoryPersistence);
package com.xanadw.mqttserver.controller;

import com.xanadw.mqttserver.datasource.entities.BookLib;
import com.xanadw.mqttserver.services.BookMangeService;
import org.eclipse.paho.client.mqttv3.*;
import org.eclipse.paho.client.mqttv3.persist.MemoryPersistence;
import org.springframework.stereotype.Component;

import javax.annotation.Resource;
import java.text.MessageFormat;
import java.util.Arrays;
import java.util.List;

@Component
public class MyMqttClient {

    public  MqttClient mqttClient = null;
    private  MemoryPersistence memoryPersistence = null;
    private  MqttConnectOptions mqttConnectOptions = null;
    @Resource
    private BookMangeService bookMangeService;

    public  void init(String clientId) {
        //初始化连接设置对象
        mqttConnectOptions = new MqttConnectOptions();
        //初始化MqttClient
        if(null != mqttConnectOptions) {
            //true可以安全地使用内存持久性作为客户端断开连接时清除的所有状态
            mqttConnectOptions.setCleanSession(true);
            //设置连接超时
            mqttConnectOptions.setConnectionTimeout(30);
			//设置持久化方式
            memoryPersistence = new MemoryPersistence();
            if(null != memoryPersistence && null != clientId) {
                try {
                    mqttClient = new MqttClient("tcp://127.0.0.1:1883", clientId,memoryPersistence);
                } catch (MqttException e) {
                    // TODO Auto-generated catch block
                    e.printStackTrace();
                }
            }else {

            }
        }else {
            System.out.println("mqttConnectOptions对象为空");
        }

        System.out.println(mqttClient.isConnected());
        //设置连接和回调
        if(null != mqttClient) {
            if(!mqttClient.isConnected()) {

                //创建回调函数对象
                //MqttReceriveCallback mqttReceriveCallback = new MqttReceriveCallback();
                //客户端添加回调函数
                MqttCallback mqttCallback = new MqttCallback() {
                    @Override
                    public void connectionLost(Throwable throwable) {

                    }

                    @Override
                    public void messageArrived(String s, MqttMessage mqttMessage) throws Exception {
                        String rfid = new String(mqttMessage.getPayload());
                        String theMsg = MessageFormat.format("id:{0} is arrived for topic {1}.", rfid, s);
                        System.out.println(theMsg);

                        bookMangeService.addBorrowMsg(rfid, "", s, "", null);
                    }

                    @Override
                    public void deliveryComplete(IMqttDeliveryToken iMqttDeliveryToken) {

                    }
                };

                mqttClient.setCallback(mqttCallback);
                //mqttClient.setCallback(mqttReceriveCallback);
                //创建连接
                try {
                    System.out.println("create connection.");
                    mqttClient.connect(mqttConnectOptions);
                } catch (MqttException e) {
                    // TODO Auto-generated catch block
                    e.printStackTrace();
                }
            }
        }else {
            System.out.println("mqttClient is empty.");
        }
        System.out.println(mqttClient.isConnected());
    }

    //	发布消息
    public void publishMessage(String pubTopic, String message, int qos) {
        if(null != mqttClient&& mqttClient.isConnected()) {
            System.out.println("Publish the message "+mqttClient.isConnected());
            System.out.println("id:"+mqttClient.getClientId());
            MqttMessage mqttMessage = new MqttMessage();
            mqttMessage.setQos(qos);
            mqttMessage.setPayload(message.getBytes());

            MqttTopic topic = mqttClient.getTopic(pubTopic);

            if(null != topic) {
                try {
                    MqttDeliveryToken publish = topic.publish(mqttMessage);
                    if(!publish.isComplete()) {
                        System.out.println("The message publish success!");
                    }
                } catch (MqttException e) {
                    // TODO Auto-generated catch block
                    e.printStackTrace();
                }
            }

        }else {
            reConnect();
        }

    }

    //	关闭连接
    public void closeConnect() {
        //关闭存储方式
        if(null != memoryPersistence) {
            try {
                memoryPersistence.close();
            } catch (MqttPersistenceException e) {
                // TODO Auto-generated catch block
                e.printStackTrace();
            }
        }else {
            System.out.println("memoryPersistence is null");
        }

		//关闭连接
        if(null != mqttClient) {
            if(mqttClient.isConnected()) {
                try {
                    mqttClient.disconnect();
                    mqttClient.close();
                } catch (MqttException e) {
                    // TODO Auto-generated catch block
                    e.printStackTrace();
                }
            }else {
                System.out.println("mqttClient is not connect");
            }
        }else {
            System.out.println("mqttClient is null");
        }
    }

    //	重新连接
    public void reConnect() {
        if(null != mqttClient) {
            if(!mqttClient.isConnected()) {
                if(null != mqttConnectOptions) {
                    try {
                        mqttClient.connect(mqttConnectOptions);
                    } catch (MqttException e) {
                        // TODO Auto-generated catch block
                        e.printStackTrace();
                    }
                }else {
                    System.out.println("mqttConnectOptions is null");
                }
            }else {
                System.out.println("mqttClient is null or connect");
            }
        }else {
            init("123");
        }

    }
    //	订阅主题
    public void subTopic(String topic) {
        if(null != mqttClient&& mqttClient.isConnected()) {
            try {
                mqttClient.subscribe(topic, 1);
            } catch (MqttException e) {
                // TODO Auto-generated catch block
                e.printStackTrace();
            }
        }else {
            System.out.println("mqttClient is error");
        }
    }


    //	清空主题
    public void cleanTopic(String topic) {
        if(null != mqttClient&& !mqttClient.isConnected()) {
            try {
                mqttClient.unsubscribe(topic);
            } catch (MqttException e) {
                // TODO Auto-generated catch block
                e.printStackTrace();
            }
        }else {
            System.out.println("mqttClient is error");
        }
    }

}
第七步,修改MqttServerApplication主类
package com.xanadw.mqttserver;

import com.xanadw.mqttserver.controller.MyMqttClient;
import org.mybatis.spring.annotation.MapperScan;
import org.springframework.boot.SpringApplication;
import org.springframework.boot.autoconfigure.SpringBootApplication;
import org.springframework.boot.web.servlet.ServletComponentScan;
import org.springframework.context.ConfigurableApplicationContext;
import org.springframework.scheduling.annotation.EnableScheduling;

@SpringBootApplication
@ServletComponentScan
@EnableScheduling
@MapperScan("com.xanadw.mqttserver.datasource.mappers")
public class MqttServerApplication {

    public static void main(String[] args) {
        ConfigurableApplicationContext context = SpringApplication.run(MqttServerApplication.class, args);
        MyMqttClient mqttClient= context.getBean(MyMqttClient.class);
        mqttClient.init("server");
        mqttClient.subTopic("Xanadw/Rfid");
    }

}
(3)修改配置文件
1)application.properties
#登录超时-秒
server.servlet.session.timeout=36000
#mybatis-plus配置
mybatis-plus.mapper-locations=classpath:./mapper_xml/*.xml
因为我的8080端口被占用了,所以需要修改,我的改成了18080
# 应用服务 WEB 访问端口
server.port=18080
阿里云服务器上的数据库配置,非本地生成mapper文件的数据库,用户名和密码就是通过宝塔面板创建的数据库用户和密码。
#数据库连接
spring.datasource.url=jdbc:mysql://127.0.0.1:3306/mqtt_server?useUnicode=true&characterEncoding=utf8&useCursorFetch=true&defaultFetchSize=500&allowMultiQueries=true&rewriteBatchedStatements=true&useSSL=false
spring.datasource.driverClassName=com.mysql.jdbc.Driver
spring.datasource.username=mqtt_server
spring.datasource.password=123456
(4)打包jar文件
窗口编辑配置
![]()
选中maven,输入生成jar包的install命令,也可以添加clean命令清除之前的编译。
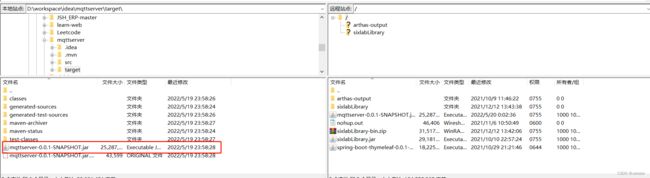
成功生成了,去下面文件夹获取Jar包上传到云服务器上。

通过filezilla这个ftp工具上传,需要在宝塔ftp里面创建这个连接。

(5)运行jar包

java -jar mqttserver-0.0.1-SNAPSHOT.jar
执行上面的命令,出现下面的界面就说明成功了,
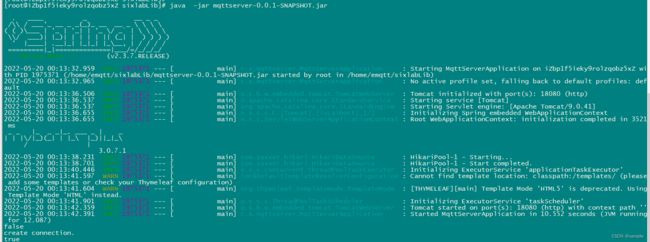
不过,这种运行方式存在一个问题,页面不能再次输入,并且不能ctrl+c,而且不能关闭ssh的会话。可以采用下面这种nohup的方式以及后台运行的方法。
nohup java -jar mqttserver-0.0.1-SNAPSHOT.jar &
终止程序的运行会麻烦一点,先查找线程pid,
ps -ef|grep mqtt
查看对应的pid是1976991
![]() 终止命令则是
终止命令则是
kill -9 1976991
(6) 效果验证
1.成功连接了emqx平台。

2.订阅的是Xanadw/Rfid主题,使用MQTT.fx发送一条信息

EMQX平台的监控主题。

通过phpMyadmin查看数据库的信息

最后,附上完整的项目地址--【MQTT服务器】SpringBoot+Mysql存储MQTT消息
总结
创建一个SpringBoot+Mysql保存MQTT消息服务器,这个终端和服务器不是直连的形式,而是通过emqx服务器进行转发mqtt消息的,也就是说可以实现多个MQTT终端设备一个服务器的需求,而保存数据和处理MQTT消息只需要这一个服务器就够了。这一节只介绍了如何收到MQTT消息,并将消息保存到数据库。但是通过数据库查看消息还是有一点点麻烦,而且一开始说的网页模板thymeleaf并没有用上,下一节实现一个静态页面,网页实时查看MQTT消息。