Ribbon的介绍和使用(一)
1.关于Ribbon
Netflix开源的客户端侧负载均衡器,也可以理解成是一个用于选择微服务的小组件。
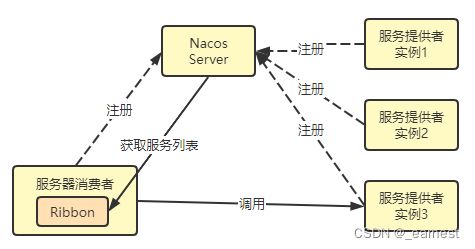
2.架构的演进
3.三板斧整合Ribbon实现负载均衡
3.1加依赖
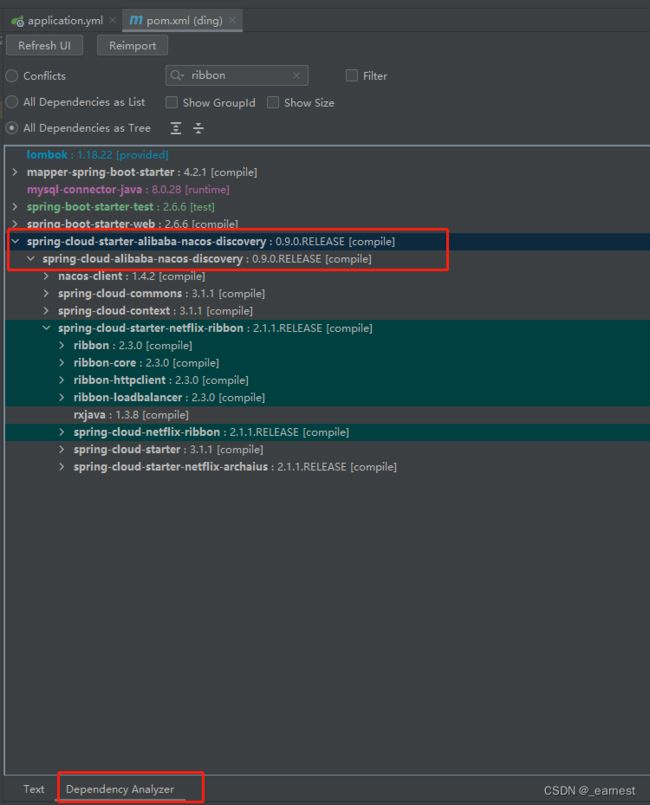
不需要加,nacos-discover包含了netflix-ribbon,如图:

3.2写注解
为restTemplate整合Ribbon
package com.ding.contentcenter;

import org.mybatis.spring.annotation.MapperScan;
import org.springframework.boot.SpringApplication;
import org.springframework.boot.autoconfigure.SpringBootApplication;
import org.springframework.cloud.client.loadbalancer.LoadBalanced;
import org.springframework.context.annotation.Bean;
import org.springframework.web.client.RestTemplate;

// 扫描mybatis哪些包里面的接口
@MapperScan("com.ding")
@SpringBootApplication
public class ContentCenterApplication {

    public static void main(String[] args) {
        SpringApplication.run(ContentCenterApplication.class, args);
    }

    @Bean
    @LoadBalanced
    public RestTemplate restTemplate(){
        return new RestTemplate();
    }
}
3.3 写配置
Ribbon整合无需写配置
4.内容中心请求用户中心
提示:这里需要准备一个内容中心微服务,和2个用户中心微服务,实现方法可以参考:【Nacos的介绍和使用】
4.1 请求用户中心,代码:
package com.ding.contentcenter.service.content;

import com.ding.contentcenter.dao.share.ShareMapper;
import com.ding.contentcenter.domain.dto.content.ShareDTO;
import com.ding.contentcenter.domain.dto.user.UserDTO;
import com.ding.contentcenter.domain.entity.share.Share;
import lombok.RequiredArgsConstructor;
import lombok.extern.slf4j.Slf4j;
import org.springframework.beans.BeanUtils;
import org.springframework.beans.factory.annotation.Autowired;
import org.springframework.cloud.client.ServiceInstance;
import org.springframework.cloud.client.discovery.DiscoveryClient;
import org.springframework.stereotype.Service;
import org.springframework.web.client.RestTemplate;
import java.util.List;

@Slf4j
@Service
@RequiredArgsConstructor(onConstructor = @__(@Autowired))
public class ShareService {
    private final ShareMapper shareMapper;
    private final RestTemplate restTemplate;
    private final DiscoveryClient discoveryClient;
    public ShareDTO findById(Integer id){
        Share share = this.shareMapper.selectByPrimaryKey(id);
        Integer userId = share.getUserId();
        List<ServiceInstance> instances = discoveryClient.getInstances("user-center");


        UserDTO userDTO = this.restTemplate.getForObject(
                "http://user-center/users/{id}",
                UserDTO.class,userId
        );

        // 消息的装配
        ShareDTO shareDTO = new ShareDTO();
        BeanUtils.copyProperties(share,shareDTO);
        shareDTO.setWxNickname(userDTO.getWxNickname());

        return shareDTO;
    }
}
4.2 请求用户中心接口:
curl --location --request GET 'http://localhost:8082/shares/1'
4.3 响应结果:
{
    "id": 1,
    "userId": 1,
    "title": "xxx",
    "createTime": "2022-04-17T16:28:34.000+00:00",
    "updateTime": "2022-04-17T16:28:34.000+00:00",
    "isOriginal": false,
    "author": "earnest",
    "cover": "xxx",
    "summary": "",
    "price": 0,
    "downloadUrl": "",
    "buyCount": 1,
    "showFlag": false,
    "auditStatus": "0",
    "reason": "",
    "wxNickname": "212aa"
}
到这里就完成了Ribbon实现负载均衡 。
5.Ribbon接口的类型
| 接口 | 作用 | 默认值 |
|---|---|---|
| IClientConfig | 读取配置 | DefaultClientConfigImpl |
| IRule | 负载均衡规则,选择实例 | ZoneAvoidanceRule |
| IPing | 筛选掉ping不通的实例 | DummyPing |
| ServerList |
交给Ribbon的实例列表 | Ribbon:ConfigurationBasedServerList Spring Cloud Alibaba:NacosServerList |
| ILoadBalancer | Ribbon的入口 | ZoneAwareLoadBalancer |
| ServerListUpdater | 更新交给Ribbon的List的策略 | PollingServerListUpdater |
以上是常用的一些接口,也可以可以对这些接口自定义,ctrl+alt 选择对应的接口,如下:

6.细粒度配置自定义
6.1 什么是细粒度配置自定义
用户中心调用微服务A和微服务B,调用服务A使用随机的负载规则,调用服务2使用默认的负载规则,即调用不同的微服务选用不同的负载规则。
6.2 Java代码实现细粒度自定义
6.2.1 创建UserCenterRibbonConfiguration类
package com.ding.contentcenter.configuration;

import org.springframework.cloud.netflix.ribbon.RibbonClient;
import org.springframework.context.annotation.Configuration;
import ribbonconfiguration.RibbonConfiguration;

@Configuration
@RibbonClient(name = "user-center",configuration = RibbonConfiguration.class)
public class UserCenterRibbonConfiguration {
}
注:name = "user-center"表明当前的类用来为用户中心服务的,configuration = RibbonConfiguration.class指定配置的类,读取其中的配置信息。
6.2.2 创建RibbonConfiguration类
package ribbonconfiguration;

import com.netflix.loadbalancer.IRule;
import com.netflix.loadbalancer.RandomRule;
import org.springframework.context.annotation.Bean;
import org.springframework.context.annotation.Configuration;

@Configuration
public class RibbonConfiguration {
    @Bean
    public IRule ribbonRule(){
        return new RandomRule();
    }
}
注:返回一个随机的服务实例
6.2.3 请求用户中心接口
curl --location --request GET 'http://localhost:8082/shares/1'
6.2.4 响应结果


注:实例1和实例2分别被请求了3次和1次,说明通过java的方式实现了实例的随机调用。
6.2.5 关于父子上下文的问题
RibbonConfiguration类和UserCenterRibbonConfiguration类分别是放在2个包下的,RibbonConfiguration的注解@Configuration包含了@Component的注解,而启动类UserCenterRibbonConfiguration的@SpringBootApplication注解包含了@ComponentScan注解,这个注解会扫描当前启动类所在包下的所有Component。如果两个类放在同一个包下,@Configuration扫描的上下文和@SpringBootApplication扫描的上下文将会重叠引起不可预见的异常。
6.3 配置属性方式实现细粒度自定义
user-center:
  ribbon:
    NFLoadBalancerRuleClassName: com.netflix.loadbalancer.RandomRule
注:同一个微服务尽量保持单一性,不用两种方式一起使用,会增加代码复杂性。
6.4 代码配置vs属性配置
| 配置方式 | 优点 | 缺点 |
|---|---|---|
| 代码配置 | 基于代码,更加灵活 | 小坑(父子上下文) 线上修改需重新打包、发布 |
| 属性配置 | 1.简单 2.配置直观 3.线上修改无需重新打包、发布 4.优先级高 |
极端情况没有代码配置灵活 |
7.全局配置
package com.ding.contentcenter.configuration;

import org.springframework.cloud.netflix.ribbon.RibbonClients;
import org.springframework.context.annotation.Configuration;
import ribbonconfiguration.RibbonConfiguration;

@Configuration
@RibbonClients(defaultConfiguration = RibbonConfiguration.class)
public class UserCenterRibbonConfiguration {
}
8.支持的配置项
8.1 java 自定义配置项
package ribbonconfiguration;

import com.netflix.loadbalancer.IPing;
import com.netflix.loadbalancer.IRule;
import com.netflix.loadbalancer.PingUrl;
import com.netflix.loadbalancer.RandomRule;
import org.springframework.context.annotation.Bean;
import org.springframework.context.annotation.Configuration;

@Configuration
public class RibbonConfiguration {
    @Bean
    public IRule ribbonRule(){
        return new RandomRule();
    }

    @Bean
    public IPing ping(){
        return new PingUrl();
    }
}
经测试:ping()和ribbonRule()方法可自定义
8.2 配置属性方式
user-center:
  ribbon:
    NFLoadBalancerRuleClassName: com.netflix.loadbalancer.RandomRule
9.饥饿加载
在每次编译完项目运行时速度都会非常慢,我们可以通过饥饿加载的方式解决这个问题
ribbon:
  eager-load:
    clients: user-center
    enabled: true
(此文完)
