vue3+ts+element plus简单使用
初始化项目
脚手架用的是vue-cli,vite还不太稳定,很多第三方库也存在兼容问题,为了能正常在实际项目中使用,还是选择了vue-cli。
如果不是最新的脚手架,就需要重新安装一下了:
npm install -g @vue/cli
# OR
yarn global add @vue/cli
创建项目:
vue create vue3-ts-template

// 选择Manually select features

composition-api ([Vue 2] router, vuex, less, babel, eslint)
Default ([Vue 2] babel, eslint)
Default (Vue 3 Preview) ([Vue 3] babel, eslint)
✅ Manually select features - [x] Choose Vue version
- [x] Babel
- [x] TypeScript
- [ ] Progressive Web App (PWA) Support
- [x] Router
- [x] Vuex
- [x] CSS Pre-processors
- [x] Linter / Formatter
- [ ] Unit Testing
- [ ] E2E Testing
然后 Vue 选 3.0, css预处理器,看个人习惯,sass,less,stylus都可以。
创建完项目,把那些不需要的页面例如:helloword删了就行了,有一个shims-vue.d.ts 得留着。
安装 ElementPlus
yarn add element-plus

// main.ts

import ElementPlus from 'element-plus';
import 'element-plus/lib/theme-chalk/index.css';

const app = createApp(App);
app.use(ElementPlus);
app.mount('#app');
登录页面
页面内容没什么好说的,想怎么画就怎么画。
登陆
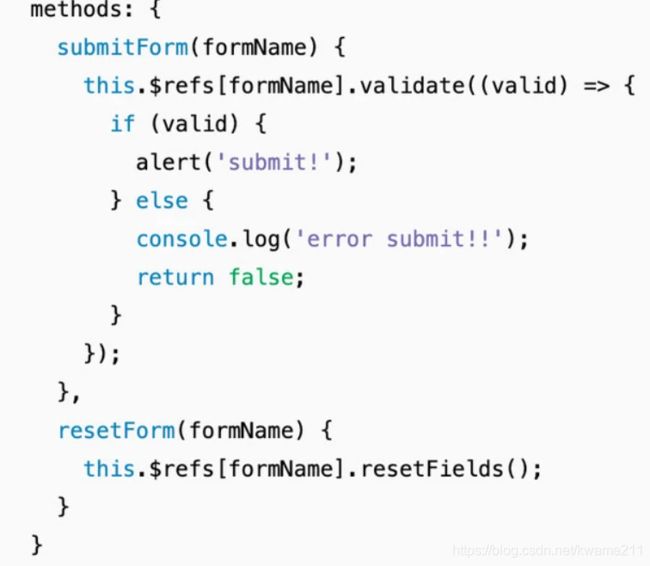
说说验证吧!ElementPlus 官方文档里面,还是按照Vue2.x的方式optionsApi写的:
但是我们既然采用了vue3,还是要紧跟时代步伐:
import { defineComponent, toRefs, reactive, ref } from 'vue';
import { useRouter } from 'vue-router';

interface UserForm {
    email: string;
    pass: string | number;
}

export default defineComponent({
    setup () {
        const router = useRouter();
        const state = reactive({
            form: {
                email: 'admin',
                pass: 'admin123'
            } as UserForm,
            ruleForm: ref(null)
        });
        const onSubmit = () => {
            // ruleForm.value.validate
            state.ruleForm.validate().then((valid: boolean) => {
                if (valid) {
                    if (state.form.email === 'admin') {
                        router.push({ path: '/' });
                    }
                }
            });
        };

        return {
            ...toRefs(state),
            onSubmit
        };
    }
}); ruleForm: ref声明(null) ruleForm,并返回state.ruleForm.validate()而不是state.ruleForm.value.validate()
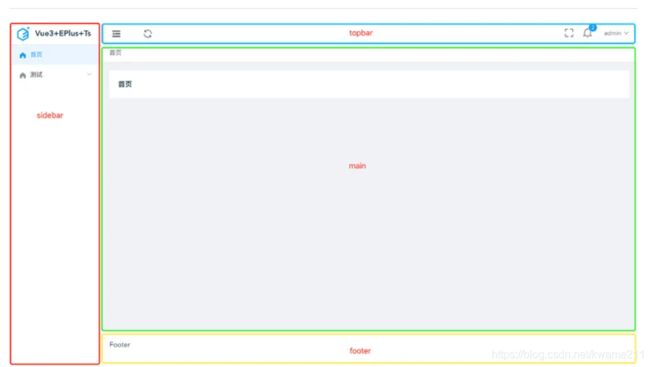
布局
Footer
刷新页面
布局全凭自己喜欢,我这里采用最简单,最常见的布局。这里做了一个刷新主要内容的功能。
setup() {
  const isRouterAlive = ref(true);
  const handleReload = () => {
    isRouterAlive.value = false;
    nextTick(() => {
        isRouterAlive.value = true;
    });
  };
  return {handleReload}
}
网页全屏
yarn add screenfullimport screenfull, { Screenfull } from 'screenfull';
setup() {
const change = () => {
fullscreen.value = (screenfull as Screenfull).isFullscreen;
};
// 全屏事件
const handleFullScreen = () => {
if (!screenfull.isEnabled) {
// 如果不允许进入全屏,发出不允许提示
ElMessage({
message: '暂不不支持全屏',
type: 'warning'
});
return false;
}
screenfull.toggle();
};
if (screenfull.isEnabled) {
screenfull.on('change', change);
}
}
要引入 Screenfull 这个接口,并做一下类型断言 (screenfull as Screenfull),不这样ts编译通不过。
引入axios
yarn add axiosimport axios, { AxiosResponse, AxiosRequestConfig } from 'axios';
import { ElMessage } from 'element-plus';
const instance = axios.create({
baseURL: process.env.VUE_APP_API_BASE_URL || '',
timeout: 120 * 1000,
withCredentials: true
});
const err = (error) => {
if (error.message.includes('timeout')) {
// console.log('error---->',error.config)
ElMessage({
message: '请求超时,请刷新网页重试',
type: 'error'
});
}
if (error.response) {
const data = error.response.data;
const token = '';
if (error.response.status === 403) {
ElMessage({
message: 'Forbidden',
type: 'error'
});
}
if (error.response.status === 401 && !(data.result && data.result.isLogin)) {
ElMessage({
message: 'Unauthorized',
type: 'error'
});
if (token) {
// store.dispatch('Logout').then(() => {
// setTimeout(() => {
// window.location.reload();
// }, 1500);
// });
}
}
}
return Promise.reject(error);
};
instance.interceptors.request.use((config: AxiosRequestConfig) => {
return config;
}, err);
instance.interceptors.response.use((response: AxiosResponse) => {
console.log(response);
const config: AxiosRequestConfig = response.config || '';
const code = Number(response.data.status);
if (code === 200) {
if (config && config.successNotice) {
ElMessage({
message: response.data.msg,
type: 'success'
});
}
return response.data;
} else {
let errCode = [402, 403];
if (errCode.includes(response.data.code)) {
ElMessage({
message: response.data.msg || '没有权限',
type: 'warning'
});
setTimeout(() => {
window.location.reload();
}, 500);
}
}
}, err);
export default instance;这个axios二次封装就见仁见智了,看你们的业务和习惯,我只提供一个示例。
挂载到全局:
import axios from '@/utils/request';

app.config.globalProperties.$http = axios;

// 使用

import { getCurrentInstance } from 'vue';
const { ctx } = getCurrentInstance() as any;

ctx.$http(...).then(...)
这里需要说明一点的是,如果引入AxiosResponse, AxiosRequestConfig这两个接口来做类型判断。要是在config中定义了一些额外的参数,又要使用就需要定义一个声明文件了。
我在config中定义了successNotice和errorNotice分别来判断请求成功和失败是否需要提示信息,并且它们都是非必填。
// shims.axios.d.ts
import { AxiosRequestConfig } from 'axios';

declare module 'axios' {
  export interface AxiosRequestConfig {
    successNotice? : boolean,
    errorNotice? : boolean
  }
}
二次封装组件
为了更方便快捷的写业务,可以二次封装一些组件,简化操作。
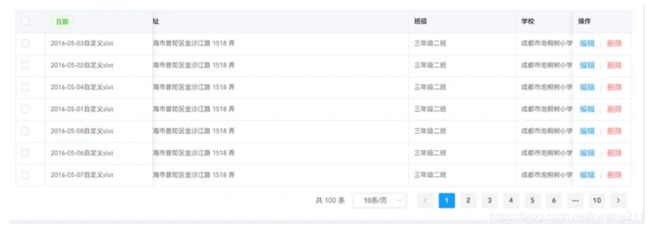
Table 表格
{{item.label || '自定义header'}}
{{scope.row[item.prop] || '需要自定义' }}
在一些常见的业务场景下,用起来就比较方便了:
日期
{{scope.data.date}}自定义slot
编辑
Form 表单
{{op[item.selectLabel]}}
{{op[item.selectLabel]}}
提交


steup() {
const formJson = [
    {
        require: true,
        type: 'input',
        label: '姓名',
        placeholder: '请输入姓名',
        val: 'name',
        other: { style: 'width:220px' }
    },
    {
        require: true,
        type: 'select',
        label: '年级',
        placeholder: '请选择年级',
        val: 'grade',
        selectLabel: 'label',
        selectVal: 'val',
        options: [{ val: 1, label: '一年级' }, { val: 2, label: '二年级' }]
    },
    ....
]
}这里需要提的一点是,自定义组件的v-model实现。
vue2的实现方式:
vue3的实现方式:
更多具体介绍可前往官网。
DatePicker 时间选择器
DatePicker 为啥要封装一下?因为官方把value-format这个功能取消了(可以看看这个issues),所以每次都要自己去转化一次时间格式,太麻烦。
elemment-plus已经把moment换成了dayjs,我们不需要再安装就可以直接使用。
二次封装呀,我觉得有一点很重要,我们不可能把原来组件的所有props都穷举一遍,所以加上v-bind="$attrs"可以省很多事。


