搭建vue3项目+ts
vue3+ts
-
- 一、环境
- 二、安装
- 三、创建项目
-
- 1、vue-cli创建项目
- 2、图形化创建项目
- 3、部分目录介绍
- 四、安装sass
- 五、ts集成和使用
-
- 1、集成
- 2、使用
- 六、路由
-
- 1、安装
- 2、使用
- 七、vuex
-
- 1、安装
- 2、引入注册
- 3、mapState、mapGetters、mapMutations、mapActions
- 4、使用
- 八、vue.config.js配置
- 九、vue3的一些写法
-
- 1、mixin
- 2、teleport
- 3、composition-api
- 4、生命周期函数
- 5、props
- 6、Provider Inject 父子传值
- 7、Suspense 异步加载组件
- 十、好用插件
-
- 1、安装`style-resources-loader`自动化导入
vue3的优点
1、vue3采用渐进式开发,向下兼容
2、性能的提升:打包大小减少41%,初次渲染快55%,更新快133%,内存使用减少54%
3、Composition API集合,解决vue2组件开发问题
4、新得api加入:Teleprot瞬移组件,Suspense解决异步加载组件问题
5、更好TypeScript支持
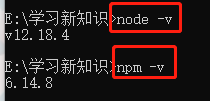
一、环境
Vue CLI 3需要 nodeJs ≥ 8.9 (官方推荐 8.11.0+,你可以使用 nvm 或 nvm-windows在同一台电脑中管理多个 Node 版本)
1、下载安装node
下载地址:https://nodejs.org/en/
2、检查是否安装成功
二、安装
1、全局安装过旧版本的 vue-cli(1.x 或 2.x)要先卸载它,否则跳过此步:
npm uninstall vue-cli -g //或者 yarn global remove vue-cli
2、安装@vue/cli(Vue CLI 3的包名称由 vue-cli 改成了 @vue/cli)
1 cnpm install -g @vue/cli //yarn global add @vue/cli
3、vue -V 检查vue版本号
三、创建项目
1、vue-cli创建项目
1、安装vue-cli
npm install -g @vue/cli
或者
yarn global add @vue/cli

查看版本
vue --version
2、npm创建项目
vue create 项目名

如:
//我这里设置了以下淘宝源
vue create vue-next-libs --registry=https://registry.npm.taobao.org
选择最后一个
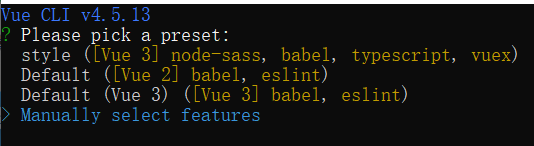
勾选如下
 选择3.x
选择3.x

下面的选择根据自己的需求来

2、图形化创建项目
vue ui
会默认开启一个服务

3、部分目录介绍
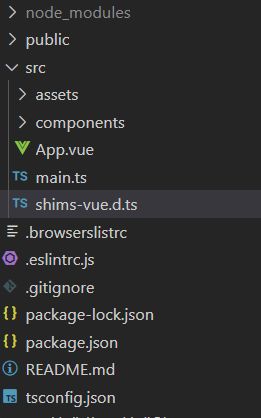
- shims-vue.d.ts 类文件/定义文件,让ts认识vue
- .browserslistrc 在不同工具间共有浏览器和node版本进行配置兼容
- .eslintrc.js .eslintrc配置文件
- .gitignore 不需要上传到库的文件的配置文件
- tsconfig.json ts的配置文件
四、安装sass
删除之前安装失败的包(第一次安装请跳过此步)
npm uninstall node-sass
安装
npm install -D sass-loader node-sass
安装style-resources-loader样式自动引入(公用样式里面的变量不用没页引入,就可以直接用了)
vue add style-resources-loader
在vue.config.js中使用
const path = require('path');
module.exports = {
    pluginOptions: {
        'style-resources-loader': {
            preProcessor: 'less',
            patterns: [
                // 这个是加上自己的路径,不能使用(如下:alias)中配置的别名路径
                path.resolve(__dirname, './src/style/params.less')
            ]
        }
    },
    ......
}
五、ts集成和使用
1、集成
进入到项目,执行下面的命令
vue add typescript
这里选择n,生成的组件就会和文档给的一样;y则组件是class类型

上面的程序运行完,typescript也就集成好啦!
2、使用

<template>
  <div class="red">
    {{ name }}
    <home />
  </div>
</template>

<script lang="ts">
import { defineComponent, reactive, toRefs } from "vue";
import home from "./components/home.vue";
// data数据的接口
interface User {
  name: string;
  age: number;
  get(): string;
}

export default defineComponent({
  name: "App",
  components: {
    home,
  },
  setup() {
    // ref只能用第二种写法

    // 实现接口的第一种方法 属性可增不可减
    // let data: User = reactive({
    //   name: "张三",
    //   age: 12,
    //   get() {
    //     return this.name;
    //   },
    // set(){}
    // });

    // 实现接口的第二种方法 属性不可增减
    // let data = reactive({
    //   name: "张三",
    //   age: 12,
    //   get() {
    //     return this.name;
    //   },
    // });

    // 实现接口的第三种方法  属性可增不可减
    let data = reactive({
      name: "张三",
      age: 12,
      get() {
        return this.name;
      },
      set() {},
    }) as User;
    return {
      ...toRefs(data),
    };
  },
});
</script>

<style lang="scss">
</style>
六、路由
1、安装
npm install vue-router@next --save
2、使用
在src目录下面建一个路由文件routes.ts
import { createRouter, createWebHistory } from 'vue-router'
// 引入组件
import Home from "./components/home.vue"
import Location from "./components/location.vue"

const routes = [{
    path: '', redirect: '/home' //路由重定向
}, {
    //alias路由别名,user访问的也是home页面,也可以配置多个
    // 如:alias:["/c","/n"]
    path: '/home', alias: "/user", component: Home
}, {
    path: '/location', component: Location
}]
// 配置路由
const router = createRouter({
    // history: createWebHashHistory(),//哈希模式
    history: createWebHistory(),//h5 History 模式   这种方式上线需要服务器配置伪静态
    routes
})
// 暴露路由实例对象
export default router
在main.ts中挂载路由
import { createApp } from 'vue'
import App from './App.vue'
import routes from "./routes"
const app = createApp(App)
// 挂载路由
app.use(routes)
app.mount('#app')
在App.vue中通过router-view渲染组件
<template>
哎呀
  <router-link to="/">首页</router-link>
  <router-link to="/location">本地</router-link>
  <router-view></router-view>
</template>

<script lang="ts">
import { defineComponent } from "vue";

export default defineComponent({
  name: "App",
  setup() {},
});
</script>

<style lang="scss">
</style>
七、vuex
更多详情请查看https://vuex.vuejs.org/zh/installation.html
1、安装
npm install vuex@next --save
2、引入注册
store.ts
import { createStore } from 'vuex'
const store = createStore({
    state: { num: 0 }
    ...
})
export default store
main.ts
import { createApp } from 'vue'
import App from './App.vue'
import routes from "./routes"
import store from "./store"
const app = createApp(App)
// 挂载路由
app.use(routes)
app.use(store)
app.mount('#app')
3、mapState、mapGetters、mapMutations、mapActions
先引入
import { mapState,mapGetters,mapMutations,mapActions} from 'vuex'
- mapState
nickname(){return this.$store.state.nickname}
age(){return this.$store.state.age}
gender(){return this.$store.state.gender}

//一句代替上面三句
 computed: mapState(['nickname','age','gender'])//映射哪些字段就填入哪些字段
当还有自定义计算属性时
computed: {   //computed是不能传参数的
  value(){
   return this.val/7
},
  ...mapState(['nickname','age','gender'])
}
- mapGetters
computed: {  //computed是不能传参数的
 valued(){
   return this.value/7
 },
 ...mapGetters(['realname','money_us'])
}
- mapMutations
methods:{
 ...mapMutations(['addAge'])
 //就相当于
 addAge(payLoad){
  this.$store.commit('addAge',payLoad)
}
}
- mapActions
methods:{ ...mapActions([‘getUserInfo’])}
总结一下:
① 依赖state得到新的数据,用getters(跟computed一样,只读)
② 修改state的属性值,就用mutations(同步操作)
③异步就用actions
4、使用
store.ts
import { createStore, Store } from 'vuex'
import { ComponentCustomProperties } from 'vue';
declare module '@vue/runtime-core' {
  interface State {
    num: number,
    str: string,
    arr: string[]
  }
  interface ComponentCustomProperties {
    $store: Store<State>
  }
}

const store = createStore({
  state() {
    return {
      num: 12,
      str: 'tom',
      arr: [1, 2, 4],
    }
  },
  mutations: {
    numMutation(state: any, data: number) {
      state.num = data;
    },
    strMutation(state: any, data: string) {
      state.str = data;
    },
    arrMutation(state: any, data: string[]) {
      state.arr = data;
    },
  },
  actions: {
    numAction({ commit }, args) {
      commit('numMutation', args)
    }
  },
  modules: {
  }
})
export default store
home.vue
<template>
  <div class="home">我是子组件home</div>
  -------------{{ num }}
  <button @click="numAction(10)">change</button>
</template>


<script  lang="ts" >
import { toRef, toRefs, defineComponent } from "vue";
import { useStore } from "vuex";
export default defineComponent({
  name: "home",
  setup() {
    const store: any = useStore();
    //mapState
    const { str, arr, obj } = toRefs(store.state);
    const num = toRef(store.state, "num");
    //mapGetters
    const { getNum } = toRefs(store.getters);
    //mapMutations
    const {
      strMutation: [strMutation],
    } = store._mutations;
    //mapActions
    const {
      numAction: [numAction],
    } = store._actions;
    return {
      str,
      num,
      arr,
      obj,
      getNum,
      strMutation,
      numAction,
    };
  },
  methods: {},
});
</script>

<style scoped>
</style>
八、vue.config.js配置
vue-cli升级到3之后,减少了很多的配置文件,将所有的配置项都浓缩到了vue.config.js这个文件中。
在根目录 新建一个 vue.config.js 同名文件
① 基本路径
baseUrl从 Vue CLI 3.3 起已弃用使用publicPath来替代。
在开发环境下,如果想把开发服务器架设在根路径,可以使用一个条件式的值
module.exports = {
 publicPath: process.env.NODE_ENV === 'production' ? '/production-sub-path/' : '/'
}
② 构建输出目录(打包位置)outputDir
module.exports = {
 outputDir: 'dist',
}
③ 静态资源目录 assetsDir
放置生成的静态资源 (js、css、img、fonts) 的目录
module.exports = {
 assetsDir: 'assets',
}
④ eslint代码检测 有效值:ture | false | ‘error’
设置为 true 时, eslint-loader 会将 lint 错误输出为编译警告。默认情况下,警告仅仅会被输出到命令行,且不会使得编译失败
希望让 lint 错误在开发时直接显示在浏览器中,可以使用 lintOnSave: ‘error’ 。这会强制 eslint-loader 将 lint 错误输出为编译错误
module.exports = {
  lintOnSave:false,//这里禁止使用eslint-loader

}
⑤ webpack-dev-server 相关配置
devServer: {
  open: true,//设置自动打开
  port: 1880,//设置端口
  proxy: {
   //设置代理
      '/axios': {
        target: 'http://101.15.22.98',
        changeOrigin: true,
        secure: false, //如果是http接口,需要配置该参数
        pathRewrite: {
          '^/axios': ''
          }
        }
   }
  }
 }
module.exports = {
// 部署应用时的基本 URL
publicPath: process.env.NODE_ENV === 'production' ? '192.168.60.110:8080' : '192.168.60.110:8080',
// build时构建文件的目录 构建时传入 --no-clean 可关闭该行为
outputDir: 'dist',
// build时放置生成的静态资源 (js、css、img、fonts) 的 (相对于 outputDir 的) 目录
assetsDir: '',
// 指定生成的 index.html 的输出路径 (相对于 outputDir)。也可以是一个绝对路径。
indexPath: 'index.html',
// 默认在生成的静态资源文件名中包含hash以控制缓存
filenameHashing: true,
// 构建多页面应用,页面的配置
pages: {
index: {
// page 的入口
entry: 'src/index/main.js',
// 模板来源
template: 'public/index.html',
// 在 dist/index.html 的输出
filename: 'index.html',
// 当使用 title 选项时,
// template 中的 title 标签需要是 <%= htmlWebpackPlugin.options.title %>
title: 'Index Page',
// 在这个页面中包含的块,默认情况下会包含
// 提取出来的通用 chunk 和 vendor chunk。
chunks: ['chunk-vendors', 'chunk-common', 'index']
},
// 当使用只有入口的字符串格式时,
// 模板会被推导为 `public/subpage.html`
// 并且如果找不到的话,就回退到 `public/index.html`。
// 输出文件名会被推导为 `subpage.html`。
subpage: 'src/subpage/main.js'
},
// 是否在开发环境下通过 eslint-loader 在每次保存时 lint 代码 (在生产构建时禁用 eslint-loader)
lintOnSave: process.env.NODE_ENV !== 'production',
// 是否使用包含运行时编译器的 Vue 构建版本
runtimeCompiler: false,
// Babel 显式转译列表
transpileDependencies: [],
// 如果你不需要生产环境的 source map,可以将其设置为 false 以加速生产环境构建
productionSourceMap: true,
// 设置生成的 HTML 中 和