Web项目之基于nginx负载均衡的双vip+prometheus高可用web集群
文章目录
- 项目名称:基于nginx的高可用web集群项目
- 项目拓扑图
- 项目描述
- 项目环境
- 项目步骤
-
- 配置ssh免密通道、安装配置ansible、编写playbook批量安装软件
- 编写一键安装nginx脚本
- 配置RS的nginx模块
- 配置NFS
- 配置LB实现https以及反向代理和负载均衡
- 配置LB的双vip架构
- 配置DNS服务器实现dns轮询双vip
- 配置prometheus监控以及grafana出图
- 使用测试机进行压力测试
- 一些内核以及nginx参数优化
- 项目心得
项目名称:基于nginx的高可用web集群项目
项目拓扑图

项目描述
本项目目的是构建一个基于nginx以及keepalived双vip并通过ansible快速搭建的实现7层负载均衡高可用高并发的Web集群。采用NFS保证数据一致性,dns实现双vip轮询,prometheus+grafana实现高可读性监控界面
项目环境
VMware Workstation15.5.0、CentOS 7.9.2009(10台 1核2G)、nginx 1.23.3、ansible 2.9.27、keepalived v1.3.5、prometheus-2.43.0、grafana-9.4.7
项目步骤
0.画好项目拓扑图,进行ip规划
1.准备10台全新的centOS7.9的linux系统机,配置好ip地址,修改主机名
2.配置ansible服务器后在其上生成密钥对,给web集群、负载均衡器、dns、nfs、prom建立免密通道
3.编写一键安装nginx的脚本
4.编写ansible主机清单,编写playbook实现批量编译安装部署nginx、安装dns、nfs和keepalived、exporter等
5.配置RS的nginx模块实现状态统计以及身份认证等功能
6.配置nfs保证数据一致性,并进行测试
7.配置LB的nginx模块实现https以及反向代理和负载均衡
8.配置LB的双vip架构实现高可用,并进行测试
9.配置dns服务器实现dns轮询双vip,并进行测试
10.使用prometheus对web集群以及LB进行监控以及用grafana出图,并进行测试
11.使用测试机用ab命令对Web集群进行压力测试
12.内核以及nginx参数优化
配置ssh免密通道、安装配置ansible、编写playbook批量安装软件
[root@ansible ~]# ssh-keygen		# 生成密钥
[root@ansible ~]# cd /root/.ssh/
[root@ansible .ssh]# ls		# 公钥私钥文件
id_rsa  id_rsa.pub
[root@ansible .ssh]# ssh-copy-id -i id_rsa.pub [email protected]		# 分发公钥
# 同样分发到所有需要ansible管理的服务器上

[root@ansible ~]# yum install epel-release -y
[root@ansible ~]# yum install ansible -y	# 安装ansible

[root@ansible .ssh]#  vim /etc/ansible/hosts	# 编写主机清单
[web_servers]
192.168.31.200 #web1
192.168.31.201 #web2
192.168.31.202 #web3
[dns_server]
192.168.31.153 #dns
[lb_servers]
192.168.31.110 #lb1
192.168.31.120 #lb2
[nfs_server]
192.168.31.250 #NFS_server

[root@ansible ansible]# mkdir playbooks
[root@ansible ansible]# cd playbooks/
[root@ansible playbooks]# vim software_install.yaml		# 编写playbook
- hosts: web_servers #web集群
  remote_user: root
  tasks:
  #web主机组中编译安装部署nginx集群
  - name: install nginx
    script:  /etc/ansible/nginx/one_key_install_nginx.sh #调用本地一键安装部署nginx脚本,在远程主机上编译安装
    #web主机组中安装nfs,访问nfs服务器,实现数据同源
  - name: install nfs
    yum: name=nfs-utils state=installed
- hosts: dns_server #dns服务器
  remote_user: root
  tasks:
  - name: install dns
    yum: name=bind.* state=installed
- hosts: lb_servers #负载均衡服务器
  remote_user: root
  tasks:
    #lb主机组中编译安装nginx
  - name: install nginx
    script:  /etc/ansible/nginx/one_key_install_nginx.sh
    #lb主机组中安装keepalived,实现高可用
  - name: install keepalived
    yum: name=keepalived state=installed
- hosts: nfs_server #NFS服务器
  remote_user: root
  tasks:
  - name: install nfs
    yum: name=nfs-utils state=installed
#调用本地onekey_install_node_exporter脚本,批量安装部署node_exporter,为prometheus采集数据
- hosts: web_servers lb_servers
  remote_user: root
  tasks:
  - name: install node_exporters
    script: /etc/ansible/node_exporter/onekey_install_node_exporter.sh
    tags: install_exporter
  - name: start node_exporters #后台运行node_exporters
    shell: nohup node_exporter --web.listen-address 0.0.0.0:8090 &
    tags: start_exporters #打标签,方便后面直接跳转到此处批量启动node_exporters
以上通过playbook可以批量编译安装nginx、exporter(并启动),同时在LB上安装了keepalived,此外还有安装nfs、dns。
编写一键安装nginx脚本
[root@ansible ansible]# mkdir nginx
[root@ansible ansible]# cd nginx
[root@ansible ansible]# vim one_key_install_nginx.sh
mkdir -p /my_nginx
cd /my_nginx

# 下载nginx压缩包
curl -O http://nginx.org/download/nginx-1.23.3.tar.gz
# 或者用wget
#wget http://nginx.org/download/nginx-1.23.3.tar.gz
# 解压
tar xf nginx-1.23.3.tar.gz
# 进入文件夹
cd nginx-1.23.3

# 新建用户,用于启动nginx进程,名字自拟
useradd -s /sbin/nologin mynginx99

# 安装依赖包
# ssh相关、gcc为编译需要、pcre正则相关、make编译相关
yum install -y openssl openssl-devel gcc pcre pcre-devel automake make net-tools vim

# configure是一个配置的脚本文件,会根据指定的配置生成一个Makefile文件,这个文件会影响后面make命令的编译,相当于图纸
# configure可配置参数可以参考官方文档:http://nginx.org/en/docs/configure.html
# 常用选项:
# --with-*:开启某个功能,默认不安装	--without-*:禁用某个功能,默认安装
# --prefix=path:指定路径			--conf-path=path:指定配置文件路径,不指定会放到prefix路径下
# --user=name:指定启动nginx worker进程的用户
# --with-http_ssl_moudle 开启https的功能,下载ssl来进行公钥和私钥的认证
# --without-http——memcached_moudle 禁用http_memcached
# --with-http_realip_module 启用realip功能,让后端知道通过代理访问的用户的ip
# --with-http_v2_module:对http2.0版本的支持
# --with-threads:开启线程池功能		--with-http_stub_status_moudle:开启nginx状态统计功能,可以知道多少访问
# --with-stream 支持tcp/udp反向代理,即4层负载均衡
./configure --prefix=/usr/local/mynginx99 --user=mynginx99 --with-http_ssl_module --with-http_realip_module --with-http_v2_module --with-threads --with-http_stub_status_module --with-stream

# 编译
# make是按照Makefile的配置去编译程序为二进制文件,二进制文件就是执行可以运行的程序
# -j:指定编译进程数,多点速度快些,可以使用top后按1查看虚拟机配有几个核心
make -j2
# 将编译好的二进制文件复制到指定安装路径目录下
make install

# 启动nginx
/usr/local/mynginx99/sbin/nginx

# 修改PATH变量,其中临时修改的PATH变量在使用source执行本脚本时才会生效,
PATH=$PATH:/usr/local/mynginx99/sbin
echo "PATH=$PATH" >>/root/.bashrc

# 设置nginx的开机启动,rc.local是指向rc.d/rc.local的链接,后者需要拥有执行权限才能开机自启
echo "/usr/local/mynginx99/sbin/nginx" >>/etc/rc.local
chmod +x /etc/rc.d/rc.local

# selinux和firewalld防火墙都关闭
# selinux临时和永久关闭
setenforce 0
sed -i '/^SELINUX=/ s/enforcing/disabled/' /etc/selinux/config

# 防火墙临时和永久关闭
service firewalld stop
systemctl disable firewalld
执行playbook
[root@ansible playbooks]# ansible-playbook --syntax-check software_install.yaml # 语法检测

playbook: epel_install.yaml		# 说明语法没有问题

[root@ansible playbooks]# ansible-playbook software_install.yaml
配置RS的nginx模块
[root@rs1 mynginx99]# cat conf/nginx.conf
worker_processes  2;

events {
    worker_connections  2048;
}

http {
    include       mime.types;
    default_type  application/octet-stream;

    log_format  main  '$remote_addr - $http_x_real_ip - $remote_user [$time_local] "$request" '
                      '$status $body_bytes_sent "$http_referer" '
                      '"$http_user_agent" "$http_x_forwarded_for"';

    access_log  logs/access.log  main;

    sendfile        on;

    keepalive_timeout  65;

    #隐藏服务器版本
    server_tokens off;

    server {
        listen       80;
        server_name  localhost;

        location / {
            root   html;
            index  index.html index.htm;
        }

	location = /info {
	    # 开启状态统计
	    stub_status on;
	    # 查看状态的访问不计入日志
	    access_log off;
	    # 启用身份认证
	    auth_basic "my_website";
	    # 指定密码文件,默认在conf目录下查找
	    auth_basic_user_file htpasswd;
	}

        error_page   500 502 503 504  /50x.html;
        location = /50x.html {
            root   html;
        }
    }
}
配置NFS
[root@nfs ~]# service nfs start
[root@nfs ~]# vim /etc/exports
/web    192.168.31.0/255.255.255.0(ro,all_squash,async)

[root@nfs ~]# cd /web
[root@nfs web]# ls
404.html  50x.html  index.html

[root@nfs web]# service nfs restart
[root@nfs web]# exportfs -rv
[root@nfs web]# service firewalld stop	# 临时关闭防火墙
[root@nfs web]# systemctl disable firewalld	# 永久关闭防火墙
[root@nfs web]# echo "service nfs start">>/etc/rc.local 	# 开启自动启动nfs服务

[root@rs1 ~]# mount 192.168.10.142:/web /usr/local/zh54/html	# mount 源路径文件(远程机器上)	挂载点(本机上),其他两天RS同样如此挂载
[root@rs1 mynginx99]# df
文件系统                  1K-块    已用    可用 已用% 挂载点
/dev/mapper/centos-root 8374272 1465524 6908748   18% /
devtmpfs                 920404       0  920404    0% /dev
tmpfs                    932640       0  932640    0% /dev/shm
tmpfs                    932640    9848  922792    2% /run
tmpfs                    932640       0  932640    0% /sys/fs/cgroup
/dev/sda1               1038336  145116  893220   14% /boot
tmpfs                    186528       0  186528    0% /run/user/0
192.168.31.250:/web     8374272 2105088 6269184   26% /usr/local/mynginx99/html

[root@rs1 etc]# vim /etc/fstab 	# 实现开机自动挂载
192.168.31.250:/web /usr/local/mynginx/html        nfs     defaults        0 0
配置LB实现https以及反向代理和负载均衡
[root@lb1 mynginx99]# cat conf/nginx.conf

worker_processes  2;

events {
    worker_connections  2048;
}


http {
    include       mime.types;
    default_type  application/octet-stream;

    sendfile        on;

    server_tokens off;

    keepalive_timeout  65;

    upstream my_lb {		# 定义转发组
	server 192.168.31.200; #web1
	server 192.168.31.201; #web2
	server 192.168.31.202; #web3
 }
    server {
        listen       80;
        server_name  localhost;
		return 301 https://www.chenlb666.top;
        }
    }
     #HTTPS server

    server {
        listen       443 ssl;
        server_name  www.chenlb666.top;	# 写自己申请的域名

        ssl_certificate      9560502_chenlb666.top.pem;	# 域名的证书
        ssl_certificate_key  9560502_chenlb666.top.key;

        ssl_session_cache    shared:SSL:1m;
        ssl_session_timeout  5m;

        ssl_ciphers  HIGH:!aNULL:!MD5;
        ssl_prefer_server_ciphers  on;

        location / {
		proxy_pass http://my_lb;	# 转发到my_lb组
		proxy_set_header X-Real-IP $remote_addr;	# 在转发报文的头部插入远程主机的ip字段
        }
    }
}
配置LB的双vip架构
[root@lb1 mynginx99]# cat /etc/keepalived/keepalived.conf
! Configuration File for keepalived

global_defs {
   notification_email {
     [email protected]
     [email protected]
     [email protected]
   }
   notification_email_from [email protected]
   smtp_server 192.168.200.1
   smtp_connect_timeout 30
   router_id LVS_DEVEL
   vrrp_skip_check_adv_addr
   #vrrp_strict
   vrrp_garp_interval 0
   vrrp_gna_interval 0
}

#定义监控脚本chk_nginx
vrrp_script chk_nginx {
        #判断nginx是否在运行,若服务已挂,则返回值为1,执行下面的命令,使其priority值减80,小于backup的priority的值,使其成为backup状态
        script "/etc/keepalived/check_nginx.sh"
	interval 1
	weight -80
}

vrrp_instance VI_1 {
    state MASTER
    interface ens33
    virtual_router_id 88
    priority 150
    advert_int 1
    authentication {
        auth_type PASS
        auth_pass 1111
    }
    virtual_ipaddress {
        192.168.31.188
    }
#调用监控脚本
track_script {
	chk_nginx
}
#定义notify_backup,如果本机负载均衡器lb1的nginx挂了,就关闭keepalived
notify_backup "/etc/keepalived/stop_keepalived"
}

vrrp_instance VI_2 {
    state BACKUP
    interface ens33
    virtual_router_id 99
    priority 100
    advert_int 1
    authentication {
        auth_type PASS
        auth_pass 1111
    }
    virtual_ipaddress {
        192.168.31.199
    }
}

# 下面时LB2的配置

[root@lb2 ~]# cat /etc/keepalived/keepalived.conf
! Configuration File for keepalived

global_defs {
   notification_email {
     [email protected]
     [email protected]
     [email protected]
   }
   notification_email_from [email protected]
   smtp_server 192.168.200.1
   smtp_connect_timeout 30
   router_id LVS_DEVEL
   vrrp_skip_check_adv_addr
   #vrrp_strict
   vrrp_garp_interval 0
   vrrp_gna_interval 0
}
#定义监控脚本chk_nginx
vrrp_script chk_nginx {
	#判断nginx是否在运行,若服务已挂,则返回值为1,执行下面的命令,使其priority值减80,小于backup的priority的值,使其成为backup状态
	script "/etc/keepalived/check_nginx.sh"
	interval 1
        weight -80

}
vrrp_instance VI_1 {
    state BACKUP
    interface ens33
    virtual_router_id 88
    priority 100
    advert_int 1
    authentication {
        auth_type PASS
        auth_pass 1111
    }
    virtual_ipaddress {
        192.168.31.188
    }
}

vrrp_instance VI_2 {
    state MASTER
    interface ens33
    virtual_router_id 99
    priority 150
    advert_int 1
    authentication {
        auth_type PASS
        auth_pass 1111
    }
    virtual_ipaddress {
        192.168.31.199
    }
#调用监控脚本
track_script {
	chk_nginx
}
#定义notify_backup,如果本机负载均衡器lb2的nginx挂了,就关闭keepalived
notify_backup "/etc/keepalived/stop_keepalived"
}
通过以上配置使两台LB服务器互为主备,当中健康检测使用了一个检测nginx进程是否挂了的脚本和一个notify_backup时执行关闭keepalived的脚本:
[root@lb2 ~]# cd /etc/keepalived/
[root@lb2 keepalived]# ls
check_nginx.sh  keepalived.conf  stop_keepalived
[root@lb2 keepalived]# cat check_nginx.sh
#!/bin/bash
if /usr/sbin/pidof nginx &>/dev/null;then
	exit 0
else
	exit 1
fi
[root@lb2 keepalived]# cat stop_keepalived
#!/bin/bash
service keepalived stop
配置DNS服务器实现dns轮询双vip
一.启动服务并配置为缓存服务器
# 一.启动服务并配置为缓存服务器
[root@dns ~]# systemctl enable named
[root@dns ~]# ps aux |grep named
named       965  0.0 23.8 240336 114520 ?       Ssl  02:29   0:04 /usr/sbin/named -u named -c /etc/named.conf
root       1365  0.0  0.2 112824   980 pts/1    S+   03:53   0:00 grep --color=auto named
[root@dns ~]# vim /etc/resolv.conf
# Generated by NetworkManager
nameserver 127.0.0.1
[root@dns ~]# nslookup qq.com		# 尝试解析qq.com
Server:		127.0.0.1
Address:	127.0.0.1#53

Non-authoritative answer:
Name:	qq.com
Address: 183.3.226.35
Name:	qq.com
Address: 61.129.7.47
Name:	qq.com
Address: 123.151.137.18

[root@dns ~]# vim /etc/named.conf		# 修改配置文件
options {
	listen-on port 53 { any; };		# 将127.0.0.1改为any
	listen-on-v6 port 53 { any; };
	directory 	"/var/named";
	dump-file 	"/var/named/data/cache_dump.db";
	statistics-file "/var/named/data/named_stats.txt";
	memstatistics-file "/var/named/data/named_mem_stats.txt";
	recursing-file  "/var/named/data/named.recursing";
	secroots-file   "/var/named/data/named.secroots";
	allow-query     { any; };		# 将localhost改为any

[root@dns ~]# service named restart			# 重启服务
二.修改区域配置文件,告诉named为chenlb666.top提供域名解析
# 二.修改区域配置文件,告诉named为sc.com提供域名解析
[root@dns etc]# vim named.rfc1912.zones 	# 插入新的zone,如下配置,建议插在localhost后面
zone "chenlb666.top" IN {
	type master;
	file "chenlb666.top.zone";
	allow-update { none; };
};
三.在数据配置文件目录创建chenlb666.top.zone数据文件
# 三.在数据配置文件目录创建chenlb666.top.zone数据文件
[root@dns named]# pwd
/var/named
[root@dns named]# cp -a named.localhost chenlb666.top.zone
# 注意cp时加-a,保留原来文件的属性,不然属组是root,named是看不了的
四.配置chenlb666.top.zone数据文件
# 四.配置chenlb666.top.zone数据文件
[root@dns named]# cat chenlb666.top.zone
$TTL 1D
@	IN SOA	@ rname.invalid. (
					0	; serial
					1D	; refresh
					1H	; retry
					1W	; expire
					3H )	; minimum
	NS	@
	A	192.168.31.153
www IN  A	192.168.31.188
www IN  A	192.168.31.199
五.使用命令检验配置文件
[root@dns named]# named-checkconf /etc/named.rfc1912.zones 	# 区域配置文件检验
[root@dns named]# named-checkzone chenlb666.top /var/named/chenlb666.top.zone 	# 单个区域配置文件检验
zone chenlb666.top/IN: loaded serial 0
OK
六.客户机测试
[root@ab ~]# cat /etc/resolv.conf
# Generated by NetworkManager
nameserver 192.168.31.153
[root@ab ~]# ping www.chenlb666.top
PING www.chenlb666.top (192.168.31.199) 56(84) bytes of data.
64 bytes from 192.168.31.199 (192.168.31.199): icmp_seq=1 ttl=64 time=12.2 ms
64 bytes from 192.168.31.199 (192.168.31.199): icmp_seq=2 ttl=64 time=5.85 ms
64 bytes from 192.168.31.199 (192.168.31.199): icmp_seq=3 ttl=64 time=7.11 ms
64 bytes from 192.168.31.199 (192.168.31.199): icmp_seq=4 ttl=64 time=6.93 ms
^C
--- www.chenlb666.top ping statistics ---
4 packets transmitted, 4 received, 0% packet loss, time 3012ms
rtt min/avg/max/mdev = 5.850/8.034/12.236/2.473 ms
[root@ab ~]# ping www.baidu.com
PING www.a.shifen.com (14.119.104.254) 56(84) bytes of data.
64 bytes from 14.119.104.254 (14.119.104.254): icmp_seq=1 ttl=54 time=16.0 ms
64 bytes from 14.119.104.254 (14.119.104.254): icmp_seq=2 ttl=54 time=17.8 ms
^C
--- www.a.shifen.com ping statistics ---
2 packets transmitted, 2 received, 0% packet loss, time 1003ms
rtt min/avg/max/mdev = 16.098/16.949/17.800/0.851 ms
[root@ab ~]# ping www.jd.com
PING wwwv6.jcloudimg.com (175.6.49.131) 56(84) bytes of data.
64 bytes from 175.6.49.131 (175.6.49.131): icmp_seq=1 ttl=55 time=5.08 ms
64 bytes from 175.6.49.131 (175.6.49.131): icmp_seq=2 ttl=55 time=3.36 ms
64 bytes from 175.6.49.131 (175.6.49.131): icmp_seq=3 ttl=55 time=4.30 ms
^C
--- wwwv6.jcloudimg.com ping statistics ---
3 packets transmitted, 3 received, 0% packet loss, time 4242ms
rtt min/avg/max/mdev = 3.367/4.251/5.080/0.702 ms
配置prometheus监控以及grafana出图
Prometheus 安装配置
安装Prom
[root@prom /]# mkdir /prom
[root@prom /]# cd prom
# 传入软件包
[root@prom prom]# ls
prometheus-2.43.0.linux-amd64.tar.gz
[root@prom prom]# tar xf prometheus-2.43.0.linux-amd64.tar.gz
[root@prom prom]# ls
prometheus-2.43.0.linux-amd64  prometheus-2.43.0.linux-amd64.tar.gz
[root@prom prom]# mv prometheus-2.43.0.linux-amd64 prometheus-2.43.0	# 名字改短一点
[root@prom prom]# cd prometheus-2.43.0
[root@prom prometheus-2.43.0]# ls
console_libraries  consoles  LICENSE  NOTICE  prometheus  prometheus.yml  promtool
[root@prom prometheus-2.43.0]# PATH=$PATH:/prom/prometheus-2.43.0	# 临时加入到PATH
[root@prom prometheus-2.43.0]# vim /root/.bashrc 	# 永久加入到PATH,或者用下面命令
[root@prom prometheus-2.43.0]# echo "PATH=$PATH:/prom/prometheus-2.43.0" >>/root/.bashrc
配置Prom为服务
[root@prom prometheus-2.43.0]# vim /usr/lib/systemd/system/prometheus.service	# 在该目录下添加文件即注册服务
[Unit]
Description=prometheus
[Service]
ExecStart=/prom/prometheus-2.43.0/prometheus --config.file=/prom/prometheus-2.43.0/prometheus.yml
ExecReload=/bin/kill -HUP $MAINPID
KillMode=process
Restart=on-failure
[Install]
WantedBy=multi-user.target
[root@prom prometheus-2.43.0]# systemctl daemon-reload		# 刷新服务
[root@prom prometheus-2.43.0]# service prometheus start		# 使用service方式启动
Redirecting to /bin/systemctl start prometheus.service
[root@prom prometheus-2.43.0]# ps aux |grep prom
root       1778  2.3  2.0 798956 38572 ?        Ssl  20:48   0:00 /prom/prometheus-2.43.0/prometheus --confifile=/prom/prometheus-2.43.0/prometheus.yml
root       1786  0.0  0.0 112824   988 pts/0    S+   20:48   0:00 grep --color=auto prom
[root@prom prometheus-2.43.0]# service prometheus stop		# 使用service方式停止服务
Redirecting to /bin/systemctl stop prometheus.service
[root@prom prometheus-2.43.0]# ps aux |grep prom
root       1805  0.0  0.0 112824   984 pts/0    S+   20:48   0:00 grep --color=auto prom
配置Prom去获取exporter的数据
[root@prom prometheus-2.43.0]# vim prometheus.yml	#编写配置文件
  # 添加exporter
  - job_name: "LB1"
    static_configs:
        - targets: ["192.168.31.110:8090"]
  - job_name: "LB2"
    static_configs:
        - targets: ["192.168.31.120:8090"]
  - job_name: "Web1"
    static_configs:
        - targets: ["192.168.31.200:8090"]
  - job_name: "Web2"
    static_configs:
        - targets: ["192.168.31.201:8090"]
  - job_name: "Web3"
    static_configs:
        - targets: ["192.168.31.202:8090"]
[root@prom prometheus-2.43.0]# service prometheus restart
进入Prom自带的web界面看效果
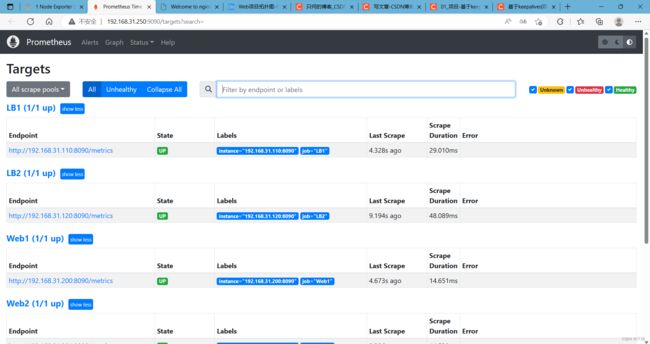
Grafana安装配置
安装在Prom服务器上
[root@prom graf]# ls	# 直接从windows传的软件包
grafana-enterprise-9.4.7-1.x86_64.rpm
[root@prom graf]# yum install grafana-enterprise-9.4.7-1.x86_64.rpm -y
启动
[root@prom graf]# service grafana-server start		# 启动graf服务
Starting grafana-server (via systemctl):                   [  确定  ]
[root@prom graf]# ps aux |grep graf
grafana    1896 22.1  5.3 1233956 100668 ?      Ssl  13:36   0:02 /usr/share/grafana/bin/grafana server --config=/etc/grafana/grafana.ini --pidfile=/var/run/grafana/grafana-server.pid --packaging=rpm cfg:default.paths.logs=/var/log/grafana cfg:default.paths.data=/var/lib/grafana cfg:default.paths.plugins=/var/lib/grafana/plugins cfg:default.paths.provisioning=/etc/grafana/provisioning
root       1905  0.0  0.0 112824   988 pts/0    S+   13:36   0:00 grep --color=auto graf
[root@prom graf]# netstat -anplut |grep graf
tcp        0      0 192.168.10.138:44680    34.120.177.193:443      ESTABLISHED 1896/grafana
tcp6       0      0 :::3000                 :::*                    LISTEN      1896/grafana
设置开机启动
systemctl enable grafana-server
访问服务
在Windows上访问3000服务器ip的端口,输入用户名:admin,密码:admin之后设置新密码就可以进入服务页面了
设置数据源

点击Data source,选择Prometheus

在URL处填入Prom的ip地址:端口
滑倒最下面点击save & test,出现如下图标即可

设置Dashboards仪表盘

左边的四方格就是Dashboards仓库,可以点击导入模板,导入json文件或者输入模板ID号进行导入

监控数据效果展示:

使用测试机进行压力测试
[root@ab ~]# ab -c 1200 -n 10000 http://www.chenlb666.top/
This is ApacheBench, Version 2.3 <$Revision: 1430300 $>
Copyright 1996 Adam Twiss, Zeus Technology Ltd, http://www.zeustech.net/
Licensed to The Apache Software Foundation, http://www.apache.org/

Benchmarking www.chenlb666.top (be patient)
Completed 1000 requests
Completed 2000 requests
Completed 3000 requests
Completed 4000 requests
Completed 5000 requests
Completed 6000 requests
Completed 7000 requests
Completed 8000 requests
Completed 9000 requests
Completed 10000 requests
Finished 10000 requests


Server Software:        nginx
Server Hostname:        www.chenlb666.top
Server Port:            80

Document Path:          /
Document Length:        162 bytes

Concurrency Level:      1200
Time taken for tests:   5.441 seconds
Complete requests:      10000
Failed requests:        0
Write errors:           0
Non-2xx responses:      10000
Total transferred:      3500000 bytes
HTML transferred:       1620000 bytes
Requests per second:    1837.92 [#/sec] (mean)
Time per request:       652.911 [ms] (mean)
Time per request:       0.544 [ms] (mean, across all concurrent requests)
Transfer rate:          628.20 [Kbytes/sec] received

Connection Times (ms)
              min  mean[+/-sd] median   max
Connect:       12  233 345.2    130    3165
Processing:    65  272 353.7    147    4284
Waiting:        8  266 351.1    144    4284
Total:        113  506 492.3    278    4427

Percentage of the requests served within a certain time (ms)
  50%    278
  66%    309
  75%    598
  80%    693
  90%   1269
  95%   1324
  98%   2042
  99%   2435
 100%   4427 (longest request)
经过多次测试,该web集群最高能处理2500+的并发数,笔记本资源有限,在实际应用场景中或许才能体验出一些效果。
一些内核以及nginx参数优化
[root@rs1 mynginx99]# ulimit -a
core file size          (blocks, -c) 0
data seg size           (kbytes, -d) unlimited
scheduling priority             (-e) 0
file size               (blocks, -f) unlimited
pending signals                 (-i) 7190
max locked memory       (kbytes, -l) 64
max memory size         (kbytes, -m) unlimited
open files                      (-n) 65535
pipe size            (512 bytes, -p) 8
POSIX message queues     (bytes, -q) 819200
real-time priority              (-r) 0
stack size              (kbytes, -s) 8192
cpu time               (seconds, -t) unlimited
max user processes              (-u) 7190
virtual memory          (kbytes, -v) unlimited
file locks                      (-x) unlimited

[root@rs1 mynginx99]# cat /proc/sys/vm/swappiness
0

[root@rs1 mynginx99]# head /usr/local/mynginx99/conf/nginx.conf

#user  nobody;
worker_processes  2;

#pid        logs/nginx.pid;

events {
    worker_connections  2048;
}
项目心得
1.提前规划好整个集群的架构,可以提高项目开展时效率;
2.nginx前期编译时没加入realip模块,可以考虑热升级;
3.一键安装nginx脚本中修改PATH变量时,修改的是子进程中的环境变量,即使export PATH变量也只是让子进程以及子进程的子进程可以使用,无法影响到父进程的环境变量,导致安装完nginx后无法在PATH变量中找到nginx命令,简单的解决办法有二个:一是重启,二是在ansibleplaybook中不使用script模块,而是先cp脚本过去后通过shell模块用source执行;
4.对本地hosts文件进行双vip域名解析记录,效果并不明显,可以考虑在前面加一个负载均衡器,实现论询效果;
5.对基于Nginx的集群和高可用有了深入的理解,同时对脑裂现象也有了更加深刻的体会和分析;
6.锻炼了自己细心和用专业角度解决问题的能力;