不惑JAVA之JAVA基础 - NIO (一)
JAVA中最可以大书特书的我觉得至少有两个:一个是NIO,另外一个就是JVM了。这也就是为什么一直我没有去写这两个知识点的原因,因为我一直找不出来一个可以在一篇博文中全部覆盖这个知识点的总结。
这两天翻了一下了JAVA中的圣经《think in java》和《Java核心技术》,虽然写的很好,但感觉写的也不是太符合我想一篇博文覆盖NIO知识点的要求。由于NIO本来就是技术难点,并且java对IO的设计和使用也较为复杂难懂。我也是能力有限如有说明不到位或错误的地方请大家指出。
本文参考并引用了大量优秀博文,均在下面参考中显示,感谢这些优秀博主。
NIO 和 IO 的区别
在开始介绍NIO前,先来看一个常见的问题,NIO和IO的区别:
| IO | NIO |
|---|---|
| 面向流 | 面向缓冲 |
| 阻塞IO | 非阻塞IO |
| 无 | 选择器 |
这些先有个概念后面会慢慢介绍。
Java 的 I/O 类库的基本架构
ava 的 I/O 操作类在包 java.io 下,大概有将近 80 个类,但是这些类大概可以分成四组,分别是:
- 基于字节操作的 I/O 接口:InputStream 和 OutputStream (1个字节是8位)
- 基于字符操作的 I/O 接口:Writer 和 Reader (1个字符是2个字节,16位)
- 基于磁盘操作的 I/O 接口:File
- 基于网络操作的 I/O 接口:Socket
下面将主要围绕这四类接口开始讲解。
基于字节的 I/O 操作接口
InputStream
基于字节的 I/O 操作接口输入和输出分别是:InputStream 和 OutputStream,InputStream 输入流的类继承层次如下图所示:

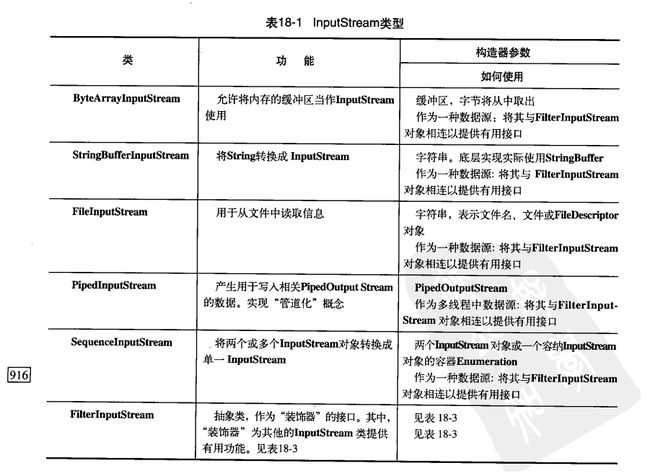
InputStream是用来表示从不同的数据源产生输入类,如:
- 字节数组;
- String对象;
- 文件;
- 管道;
- 等其他作用
每一种数据源都有相应的InputStream子类。下面是InputStream类的概述(来自《Think in java》)

涉及到的方法(JDK API):
| 方法名 | 说明 |
|---|---|
| int read( ) | 从输入流中读取数据的下一个字节,返回0到255范围内的int字节值。如果因为已经到达流末尾而没有可用的字节,则返回-1。在输入数据可用、检测到流末尾或者抛出异常前,此方法一直阻塞。 |
| int read( byte b[ ] ) | 读取多个字节,放置到字节数组b中,通常读取的字节数量为b的长度,返回值为实际读取的字节的数量 |
| int read( byte b[ ], int off, int len ) | 读取len个字节,放置到以下标off开始字节数组b中,返回值为实际读取的字节的数量 |
| int available( ); | 返回值为流中尚未读取的字节的数量 |
| long skip( long n ); | //读指针跳过n个字节不读,返回值为实际跳过的字节数量 |
简单介绍一下read的使用方法
read无参方法:
 public static void main(String args[]){
        try {
            InputStream inputStream = new FileInputStream("C:\\script.txt");
            int i = 0;
            try {
                // read无参方法的使用
                while((i=inputStream.read())!=-1){
                    System.out.print((char)i);
                }
            } catch (IOException e) {
                e.printStackTrace();
            }
        } catch (FileNotFoundException e) {
            e.printStackTrace();
        }
    }
这个代码是有点问题的,就是如果有中文是会有乱码。
read含有数组参数方法:
 public static void main(String args[]){
        try {
            InputStream inputStream = new FileInputStream("C:\\script.txt");
            byte[] b = new byte[16];
            int i = 0;
            try {
                // read数组参数方法的使用
                while((i=inputStream.read(b))!=-1){
                    // 注意String的参数i是b数组中有长度,String会从0到i读取。如果使用new String(b)会出现就相当于String(b,0,16),就有空能出现多读取的问题
                    String str = new String(b,0,i);
                    System.out.print(str);
                }
                inputStream.close();
            } catch (IOException e) {
                e.printStackTrace();
            }
        } catch (FileNotFoundException e) {
            e.printStackTrace();
        }
    }
OutputStream
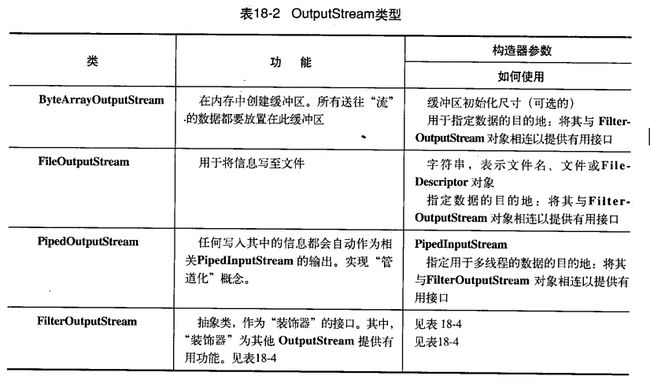
OutputStream实现类介绍(借鉴Think in java):

涉及到的方法(JDK API):
| 方法名 | 说明 |
|---|---|
| void write( int b ); | 往流中写一个字节b |
| void write( byte b[ ] ); | 往流中写一个字节数组b |
| void write( byte b[ ], int off, int len ); | //把字节数组b中从下标off开始,长度为len的字节写入流中 |
| flush( ) | 刷空输出流,并输出所有被缓存的字节由于某些流支持缓存功能,该方法将把缓存中所有内容强制输出到流中 |
简单介绍一下write的使用方法
单一字节流写入:
    //创建要操作的文件路径和名称
    //其中,File.separator表示系统相关的分隔符,Linux下为:/  Windows下为:\\
    String path = File.separator + "home" + File.separator + "siu" + File.separator + "work" + File.separator + "demo.txt";

    //由于IO操作会抛出异常,因此在try语句块的外部定义FileWriter的引用
     FileWriter w = null;
    //以path为路径创建一个新的FileWriter对象
     //如果需要追加数据,而不是覆盖,则使用FileWriter(path,true)构造方法
     w = new FileWriter(path);

     //将字符串写入到流中,\r\n表示换行想有好的
     w.write("Nerxious is a good boy\r\n");
     //如果想马上看到写入效果,则需要调用w.flush()方法
     w.flush();
再来看一个“二进制文件的复制”代码就能大概了解write方法的应用了:
import java.io.File;
import java.io.FileInputStream;
import java.io.FileOutputStream;
import java.io.IOException;

public class Demo {
    public static void main(String[] args ) {

        String bin = File.separator + "home" + File.separator + "siu" +
                      File.separator + "work" + File.separator + "一个人生活.mp3";

        String copy = File.separator + "home" + File.separator + "siu" +
                      File.separator + "life" + File.separator + "一个人生活.mp3";

        FileInputStream i = null;
        FileOutputStream o = null;

        try {
            i = new FileInputStream(bin);
            o = new FileOutputStream(copy);

            //循环的方式读入写出文件,从而完成复制
            byte[] buf = new byte[1024];
            int temp = 0;
            while((temp = i.read(buf)) != -1) {
                // 字节写入
                o.write(buf, 0, temp);
            }

        } catch (IOException e) {
            e.printStackTrace();
        } finally {
            if(i != null) {
                try {
                    i.close();
                } catch (IOException e) {
                    e.printStackTrace();
                }
            }
            if(o != null) {
                try {
                    o.close();
                } catch (IOException e) {
                    e.printStackTrace();
                }
            }
        }
    }
}
基于字符的 I/O 操作接口
不管是磁盘还是网络传输,最小的存储单元都是字节,而不是字符,所以 I/O 操作的都是字节而不是字符,但是为啥有操作字符的 I/O 接口呢?这是因为我们的程序中通常操作的数据都是以字符形式,为了操作方便当然要提供一个直接写字符的 I/O 接口,如此而已。
Reader 和 Writer
Writer 相关类层次结构
| 类名 | 解释 |
|---|---|
| OutputStreamWriter | 提供了字符流到字节流的转换 |
| BufferedWriter | 提供了向字符输出流写入数据的功能,写一个字符输出流的文本,缓冲各个字符,从而提供单个字符,数组和字符串的高效写入。 |
Reader 相关类层次结构
| 类名 | 解释 |
|---|---|
| InputStreamReader | 提供了字符流到字节流的转换 |
| BufferedReader | 提供了从字符输入流读取一行文本的功能 |
字节与字符的转化接口
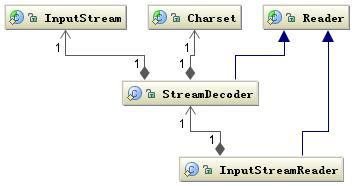
另外数据持久化或网络传输都是以字节进行的,所以必须要有字符到字节或字节到字符的转化。字符到字节需要转化,其中读的转化过程如下图所示:
字符解码相关类结构
已InputStreamReader为例:

InputStreamReader 类是字节到字符的转化桥梁,InputStream 到 Reader 的过程要指定编码字符集,否则将采用操作系统默认字符集,很可能会出现乱码问题。StreamDecoder 正是完成字节到字符的解码的实现类。
参考一篇博文,StreamDecoder的源码大概是这样的:
public class InputStreamReader extends Reader {
    private final StreamDecoder sd;//由上图已知在InputStreamReader中一定有一个StreamDecoder对象
    public InputStreamReader(InputStream in) {//InputStreamReader有多个构造方法,我假设它用的就是这个
        super(in);
        try {
              // 创建一个StreamDecoder对象
            sd = StreamDecoder.forInputStreamReader(in, this, (String)null); // 用系统默认编码
        } catch (UnsupportedEncodingException e) {
            // The default encoding should always be available
            throw new Error(e);
        }
    }
    public int read() throws IOException {
        // 看猫腻来了,竟然实际上是StreamDecoder在read
        return sd.read();
    }
/**其他的方法我们不管,看有关的就行**/
}
好,再来看看JDK7中的StreamDecoder(IDE中显示不出,我也不知道为什么,我在这个网址看的源码点一下)是怎么实现的:
public class StreamDecoder extends Reader{
    private static final int MIN_BYTE_BUFFER_SIZE = 32;
    private static final int DEFAULT_BYTE_BUFFER_SIZE = 8192;
    private Charset cs;
    private CharsetDecoder decoder;
    private ByteBuffer bb;

    // 由上述的 forInputStreamReader方法的参数可知用的是下面这个方法
    public static StreamDecoder forInputStreamReader(InputStream in,Object lock,String charsetName) throws UnsupportedEncodingException {
        String csn = charsetName;
       if (csn == null) // 由于用的是默认编码,会执行这句
       csn = Charset.defaultCharset().name();
       try {
        if (Charset.isSupported(csn))   // 检测JVM是否支持该编码集

              return new StreamDecoder(in, lock, Charset.forName(csn));
       } catch (IllegalCharsetNameException x) { }
              throw new UnsupportedEncodingException (csn);
    }

    StreamDecoder(InputStream in, Object lock, Charset cs) {
        this(in, lock, cs.newDecoder().onMalformedInput(CodingErrorAction
                        .REPLACE).onUnmappableCharacter(CodingErrorAction.REPLACE));
        // 额,说明它是在用Charset对象产生CharsetDecoder对象,目的是为了执行另一个构造函数
    }

    StreamDecoder(InputStream in, Object lock, CharsetDecoder dec) {
        //  CharsetDecoder:是一个引擎,可以将一个字节序列按照特定的字符集转换成一个16位的Unicode序列
             super(lock);
             this.cs = dec.charset();
             this.decoder = dec;
        // 下面的代码先不用管,我们这里用不上
        // This path disabled until direct buffers are faster
             if (false && in instanceof FileInputStream) {
                    ch = getChannel((FileInputStream)in);
                    if (ch != null)
                        bb = ByteBuffer.allocateDirect(DEFAULT_BYTE_BUFFER_SIZE);
                }
                if (ch == null) {
                    this.in = in;
                    this.ch = null;
                    bb = ByteBuffer.allocate(DEFAULT_BYTE_BUFFER_SIZE);
                }
                bb.flip();    // So that bb is initially empty
    }
    // 调用的就是这个函数吧
    public int read() throws IOException {
        return read0(); //额,又是假的;继续看
    }
    private int read0() throws IOException {
        synchronized (lock) {
            // Return the leftover char, if there is one
            if (haveLeftoverChar) {
                haveLeftoverChar = false;
                return leftoverChar;
            }
            // Convert more bytessz
            char cb[] = new char[2];    //一次读两个字节
            int n = read(cb, 0, 2);
            switch (n) {
                case -1:
                    return -1;
                case 2:
                    leftoverChar = cb[1];
                    haveLeftoverChar = true;
                // FALL THROUGH
                case 1:
                    return cb[0];
                default:
                    assert false : n;
                    return -1;
            }// end of catch
        }// end of  synchronized
    }
}
实际使用例子
将键盘输入控制台的字符输出到文本文件
import java.io.*;

public class Demo {
    public static void main(String[] args) {
        readAndWriteCmd();
    }

    public static void readAndWriteCmd() {
        BufferedReader bufr = new BufferedReader(new InputStreamReader(System.in));
        // BufferedWriter bufw= new BufferedWriter(new OutputStreamWriter(new
        // FileOutputStream("c:\\out.txt")));
        BufferedWriter bufw = null;
        try {
            bufw = new BufferedWriter(new FileWriter("c:\\out.txt"));
            String lineStr = null;
            while (true) {
                lineStr = bufr.readLine(); // 读取我们从键盘输入到控制台的内容
                if (lineStr != null) {
                    if (lineStr.equals("over")) // 输入over时结束
                    {
                        break;
                    } else {
                        bufw.write(lineStr);
                        bufw.newLine(); // 输出换行符,在windows里也可直接输出"\r\n"
                        bufw.flush(); // 清空缓冲区,否则下一次输出时会重复输出
                    }
                } else {
                    break;
                }
            }
        } catch (IOException e) {
            e.printStackTrace();
        }finally {
            try {
                bufr.close();
                bufw.close();
            } catch (IOException e) {
                e.printStackTrace();
            }
        }
    }
}
处理类
在了解处理流之前,我们重新来回顾一下字符和字节流。Java所有的流类位于java.io包中,都分别继承字以下四种抽象流类型。
| 字节流 | 字符流 |
|---|---|
| 输入流 | InputStream |
| 输出流 | OutputStream |
继承自InputStream/OutputStream的流都是用于向程序中输入/输出数据,且数据的单位都是字节(byte=8bit),如图,深色的为节点流,浅色的为处理流。
继承自Reader/Writer的流都是用于向程序中输入/输出数据,且数据的单位都是字符(2byte=16bit),如图,深色的为节点流,浅色的为处理流。
那什么是节点流和处理流呢?
他们主要是通过功能区分的。
节点流:节点流从一个特定的数据源读写数据。即节点流是直接操作文件,网络等的流,例如FileInputStream和FileOutputStream,他们直接从文件中读取或往文件中写入字节流。

处理流:“连接”在已存在的流(节点流或处理流)之上通过对数据的处理为程序提供更为强大的读写功能(这就是我们常说的修饰模式)。过滤流是使用一个已经存在的输入流或输出流连接创建的,过滤流就是对节点流进行一系列的包装。例如BufferedInputStream和BufferedOutputStream,使用已经存在的节点流来构造,提供带缓冲的读写,提高了读写的效率,以及DataInputStream和DataOutputStream,使用已经存在的节点流来构造,提供了读写Java中的基本数据类型的功能。他们都属于过滤流。

举个一篇博文的例子:
public static void main(String[] args) throws IOException {
        // 节点流FileOutputStream直接以A.txt作为数据源操作
        FileOutputStream fileOutputStream = new FileOutputStream("A.txt");
        // 过滤流BufferedOutputStream进一步装饰节点流,提供缓冲写
        BufferedOutputStream bufferedOutputStream = new BufferedOutputStream(fileOutputStream);
        // 过滤流DataOutputStream进一步装饰过滤流,使其提供基本数据类型的写
        DataOutputStream out = new DataOutputStream(bufferedOutputStream);
        out.writeInt(3);
        out.writeBoolean(true);
        out.flush();
        out.close();
        // 此处输入节点流,过滤流正好跟上边输出对应,读者可举一反三
        DataInputStream in = new DataInputStream(new BufferedInputStream(
                new FileInputStream("A.txt")));
        System.out.println(in.readInt());
        System.out.println(in.readBoolean());
        in.close();
}
File的使用
File主要是对文件的操作,如对文件的读写,复制移动删除及目录创建查询等功能。
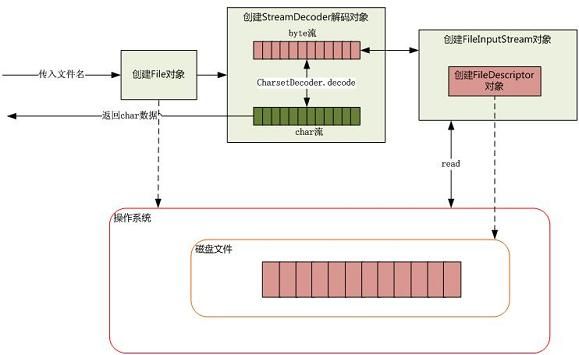
从磁盘读取文件
对学习File前,我们先来了解一下如何从磁盘读取一段文本字符。

当传入一个文件路径,将会根据这个路径创建一个 File 对象来标识这个文件,然后将会根据这个 File 对象创建真正读取文件的操作对象,这时将会真正创建一个关联真实存在的磁盘文件的文件描述符 FileDescriptor,通过这个对象可以直接控制这个磁盘文件。由于我们需要读取的是字符格式,所以需要 StreamDecoder 类将 byte 解码为 char 格式,至于如何从磁盘驱动器上读取一段数据,由操作系统帮我们完成。
对应方法解析
文件或目录的生成
| 方法名 | 解释 |
|---|---|
| public File(String path); | /如果path是实际存在的路径,则该File对象,表示的是目录,如果path是文件名,则该File对象表示的是文件。/ |
| public File(String path,String name); | //path是路径名,name是文件名 |
| public File(File dir,String name); | //dir是路径名,name是文件名 |
文件名的处理
| 方法名 | 解释 |
|---|---|
| String getName( ); | //得到一个文件的名称(不包括路径) |
| String getPath( ); | //得到一个文件的路径名 |
| String getAbsolutePath( ); | //得到一个文件的绝对路径名 |
| String getParent( ); | //得到一个文件的上一级目录名 |
| String renameTo(File newName); | //将当前文件名更名为给定文件的完整路径 |
文件属性测试
| 方法名 | 解释 |
|---|---|
| boolean exists( ); | //测试当前File对象所指示的文件是否存在 |
| boolean canWrite( ); | //测试当前文件是否可写 |
| boolean canRead( ); | //测试当前文件是否可读 |
| boolean isFile( ); | //测试当前文件是否是文件(不是目录) |
| boolean isDirectory( ); | //测试当前文件是否是目录 |
普通文件信息和工具
| 方法名 | 解释 |
|---|---|
| long lastModified( ); | //得到文件最近一次修改的时间 |
| long length( ); | //得到文件的长度,以字节为单位 |
| boolean delete( ); | //删除当前文件 |
目录操作
| 方法名 | 解释 |
|---|---|
| boolean mkdir( ); | //根据当前对象生成一个由该对象指定的路径 |
| String list( ); | //列出当前目录下的文件 |
File应用实例
由于篇幅原因,可以参考java中的IO操作总结(二)博文给出的实例,写的非常不错。
下篇预报
不惑JAVA之JAVA基础 - NIO (二)将会对NIO原理如Buffer、Channel、selecter等,NIO优化及相关应用进行讲解。ConcurrentHahsmap后期会补上。
参考:
深入分析 Java I/O 的工作机制
《Think in java》
java中的IO操作总结(一)
Java字节流和字符流的转换器:StreamDecoder
java学习笔记:关于IO转换流InputStreamReader和OutputStreamWriter
深入理解 Java中的 流 (Stream)


