Swift的几种传值方式
传值方式
在进行页面跳转过程中无法避免需要进行值的传递,那么值的传递可以分为正向传值和反向传值,例如在SourceViewController跳转至DestinationViewController的过程中需把前者的属性值传递给后者称为正向传值;在DestinationViewController进行销毁页面操作时SourceViewController接受到了值并进行UI的改变称为反向传值,以下是能实现传值的几种传值方式。
使用Segue传值
可以使用Segue将数据从一个视图控制器传递到另一个视图控制器。在源视图控制器中,您可以覆盖prepare(for:sender:)方法,并使用destinationViewController属性来获取目标视图控制器。然后,您可以在目标视图控制器中使用自定义属性来获取传递的数据。(这种传值方式是基于storyboard创建的ViewController
以下是一个示例:
假设您有两个视图控制器:
ViewController和DestinationViewController,您想要在这两个视图控制器之间传递一些数据。首先,在Storyboard中,您需要创建一个Segue,将
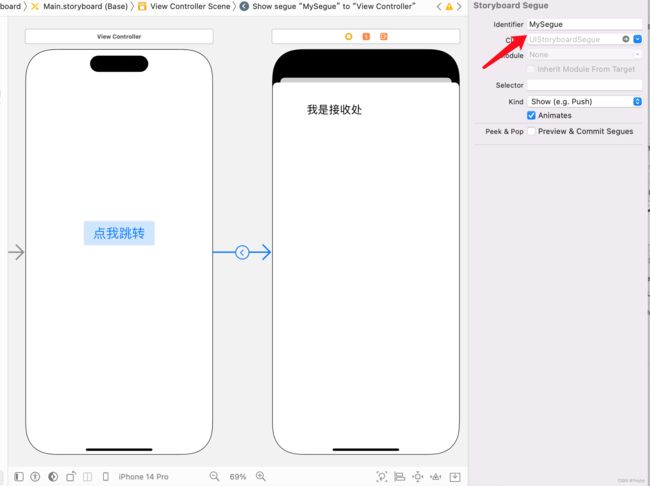
ViewController与DestinationViewController连接起来。并设置Segue的标识符为MySegue,如下图所示:然后,在ViewController 中,您需要实现prepare(for:sender:) 方法,该方法会在Segue将要发生时被调用。您可以在这个方法中获取DestinationViewController ,并将需要传递的数据设置到DestinationViewController 的属性中,如下所示:
class ViewController: UIViewController {

    let message: String = "我是一个数据"
    override func viewDidLoad() {
        super.viewDidLoad()
    }

    override func prepare(for segue: UIStoryboardSegue, sender: Any?) {
        if segue.identifier == "MySegue"{
						// 获取目标视图控制器
            let destinationVC = segue.destination as! DestinationViewController
            // 设置目标视图控制器的属性
						destinationVC.labelText = message
        }
    }

}
在DestinationViewController中,您可以定义一个属性来接收传递的数据。在这个例子中,我们定义了一个labelText属性来接收从ViewController传递过来的数据,如下所示:
class DestinationViewController: UIViewController {

    @IBOutlet weak var dataLabel: UILabel!
    var labelText: String = ""
    override func viewDidLoad() {
        super.viewDidLoad()
        dataLabel.text = labelText
        // Do any additional setup after loading the view.
    }
}
使用属性传值
在源视图控制器中,您可以创建一个属性来存储需要传递的数据。然后,您可以将该属性分配给目标视图控制器的相应属性。
以下是一个示例:
假设您有两个视图控制器:
SourceViewController和DestinationViewController,您想要在这两个视图控制器之间传递一些数据。在
SourceViewController中,您可以定义需要传递的数据,并将其设置到DestinationViewController的属性中。// SourceViewController class SourceViewController: UIViewController { // 定义需要传递的数据 var message: String = "Hello, World!" override func viewDidLoad() { super.viewDidLoad() // 创建DestinationViewController实例 let destinationVC = DestinationViewController() // 将数据设置到DestinationViewController的属性中 destinationVC.message = message // 显示DestinationViewController present(destinationVC, animated: true, completion: nil) } }在DestinationViewController中,您可以定义一个属性来接收传递的数据。在这个例子中,我们定义了一个message属性来接收从SourceViewController 传递过来的数据,如下所示:
// DestinationViewController
class DestinationViewController: UIViewController {
    // 定义用于接收数据的属性
    var message: String = ""

    override func viewDidLoad() {
        super.viewDidLoad()

        // 在界面上显示接收到的数据
        let label = UILabel(frame: CGRect(x: 0, y: 0, width: 200, height: 30))
        label.center = view.center
        label.textAlignment = .center
        label.text = message
        view.addSubview(label)
    }
}
使用代理传值
可以创建一个代理协议并在源视图控制器中实现该协议。在目标视图控制器中,您可以设置代理并调用代理方法来传递数据。
以下是一个示例:
假设您有两个视图控制器:
SourceViewController和DestinationViewController,您想要在这两个视图控制器之间传递一些数据。首先,您需要定义一个代理协议,该协议定义了一个用于传递数据的方法。示例代码如下:
// 定义代理协议
protocol DestinationViewControllerDelegate: AnyObject {
    func destinationViewController(_ controller: DestinationViewController, didPassMessage message: String)
}
然后,在DestinationViewController中,您需要声明一个代理属性,并在需要传递数据的地方调用代理方法。示例代码如下:
// DestinationViewController
class DestinationViewController: UIViewController {
    // 定义代理属性
    weak var delegate: DestinationViewControllerDelegate?

    // 在需要传递数据的地方调用代理方法
    @IBAction func passMessage(_ sender: UIButton) {
        delegate?.destinationViewController(self, didPassMessage: "Hello, World!")
    }
}
在SourceViewController中,您需要实现代理协议,并将SourceViewController设置为DestinationViewController的代理。示例代码如下:
// SourceViewController
class SourceViewController: UIViewController, DestinationViewControllerDelegate {
    override func viewDidLoad() {
        super.viewDidLoad()

        // 创建DestinationViewController实例
        let destinationVC = DestinationViewController()

        // 将SourceViewController设置为DestinationViewController的代理
        destinationVC.delegate = self

        // 显示DestinationViewController
        present(destinationVC, animated: true, completion: nil)
    }

    // 实现代理方法
    func destinationViewController(_ controller: DestinationViewController, didPassMessage message: String) {
        print("Received message: \(message)")
    }
}
这样,在DestinationViewController中调用代理方法时,会触发SourceViewController中实现的代理方法,并将数据传递给SourceViewController。在SourceViewController中,您可以使用传递过来的数据进行后续的处理,例如打印出来。
使用闭包传值
在目标视图控制器中,您可以定义一个闭包来处理传递的数据。然后,在源视图控制器中,您可以将闭包分配给目标视图控制器的相应属性。
以下是一个示例:
假设您有两个视图控制器:
SourceViewController和DestinationViewController,您想要在这两个视图控制器之间传递一些数据。在
DestinationViewController中,您需要定义一个闭包变量,该闭包变量将用于传递数据。示例代码如下:// DestinationViewController class DestinationViewController: UIViewController { // 定义闭包变量 var messageHandler: ((String) -> Void)? // 在需要传递数据的地方调用闭包 @IBAction func passMessage(_ sender: UIButton) { messageHandler?("Hello, World!") dismiss(animated: true, completion: nil) } }在SourceViewController中,您可以在创建DestinationViewController实例时,将一个闭包作为参数传递进去,并在闭包中处理从DestinationViewController传递过来的数据。示例代码如下:
// SourceViewController
class SourceViewController: UIViewController {
    override func viewDidLoad() {
        super.viewDidLoad()

        // 创建DestinationViewController实例
        let destinationVC = DestinationViewController()

        // 将闭包传递给DestinationViewController
        destinationVC.messageHandler = { message in
            print("Received message: \(message)")
        }

        // 显示DestinationViewController
        present(destinationVC, animated: true, completion: nil)
    }
}
这样,在DestinationViewController 中调用闭包时,会触发在SourceViewController 中定义的闭包处理函数,并将数据传递给它。在SourceViewController 中,您可以使用传递过来的数据进行后续的处理,例如打印出来。
使用通知传值
您可以使用通知中心在视图控制器之间传递数据。在源视图控制器中,您可以发布通知,并在目标视图控制器中使用通知中心接收该通知。
首先,在发送方视图控制器中,您可以在某个事件触发后,通过NotificationCenter发送一个自定义的通知,携带需要传递的数据。示例代码如下:
// 发送方视图控制器
// 发送自定义通知,并携带数据
let notificationData = ["message": "Hello, World!"]
NotificationCenter.default.post(name: Notification.Name("CustomNotification"), object: nil, userInfo: notificationData)
在接收方视图控制器中,您需要在视图加载时,注册对该通知的监听,以便在通知被发送时,能够接收并处理数据。示例代码如下:
// 接收方视图控制器
// 注册对自定义通知的监听
NotificationCenter.default.addObserver(self, selector: #selector(handleCustomNotification(_:)), name: Notification.Name("CustomNotification"), object: nil)

// 实现处理通知的方法
@objc func handleCustomNotification(_ notification: Notification) {
    if let data = notification.userInfo as? [String: Any], let message = data["message"] as? String {
        print("接收到的消息:\(message)")
    }
}
在接收方视图控制器中,需要在适当的时候,通过NotificationCenter.removeObserver()方法,取消对该通知的监听。这样可以避免出现重复监听的问题,同时也有助于释放内存。
